Right-click the Start button (or press Win + X) and select Disk Management to open it on Windows 11 or Windows 10.
Below are five ways to open it, what the window shows, how to initialize a disk, create a volume, change a drive letter, extend or shrink a volume, and what to do when it will not open.
1. Open Disk Management from the Power User Menu
Microsoft lists this as the recommended route. The same menu opens from the keyboard, because Win + X does exactly what a right-click on Start does.
- Right-click the Start button, or long-press it on a touch screen.
- Or press Win + X to open the same Quick Link menu from the keyboard.
- Select Disk Management in the menu.
- Wait a few seconds while it scans your drives, then work in the window that opens.
The menu is identical on Windows 10 and Windows 11, and Disk Management itself looks and works the same on both versions.
Quick Comparison: Which Method Should You Use?
| Your situation | Use this | Why |
|---|---|---|
| You want it open right now | Method 1: Win + X > Disk Management | Two clicks, no typing |
| You prefer the keyboard or a command window | Method 2: Win + R > diskmgmt.msc |
Same command works in the Run box and at a command prompt |
| You need administrator permissions for a task | Method 3: search diskmgmt.msc, right-click, Run as administrator |
Microsoft's own fix when Disk Management will not open normally |
| Right-clicking Start does nothing or Disk Management fails | Method 4: Computer Management as administrator > Storage > Disk Management | The route Microsoft's troubleshooting guide uses |
| You already work in Control Panel | Method 5: Windows Tools or Administrative Tools | Mouse-only path through the admin tools folder |
2. Open Disk Management with the Run Command
The console file behind Disk Management is diskmgmt.msc. Type it into the Run box, or into any Command Prompt, PowerShell or Windows Terminal window.
- Press Win + R to open the Run dialog.
- Type
diskmgmt.mscin the Open box. - Select OK or press Enter.
- To use a terminal instead, open Command Prompt, PowerShell or Windows Terminal.
- Type
diskmgmt.mscand press Enter. Disk Management opens in its own window.
Microsoft documents that a console command works the same in the Run box, in any command-prompt window, in a shortcut or in a batch file. To get administrator rights this way, start the terminal itself with Run as administrator first.
3. Open Disk Management from Windows Search
Searching for Disk Management does not return a result with that name. Windows lists it as Create and format hard disk partitions on both Windows 11 and Windows 10.
- Select Search on the taskbar, or open Start and start typing.
- Type
Disk ManagementorCreate and format hard disk partitions. - Select Create and format hard disk partitions in the results.
- For administrator permissions, right-click the result and select Run as administrator, then select Yes.
- If that result does not appear, type
diskmgmt.mscinstead, right-click it and select Run as administrator.
Search terms that reliably find it: disk management, create and format, partitions and diskmgmt.msc.
4. Open Disk Management Through Computer Management
Computer Management is a larger console that holds Disk Management, Device Manager, Event Viewer and Services in one window. Microsoft's own troubleshooting guide opens Disk Management this way.
- Type
Computer Managementin the search box on the taskbar. - Right-click Computer Management and select Run as administrator, then select Yes.
- In the left pane, expand Storage.
- Select Disk Management. It loads in the center pane.
Computer Management also opens from the Win + X menu, or by typing compmgmt.msc in the Run box.
5. Open Disk Management from Control Panel or Windows Tools
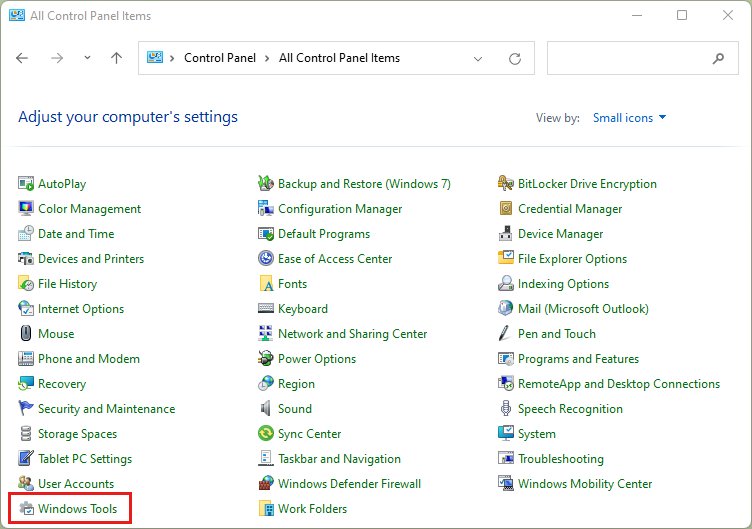
Control Panel keeps the admin consoles in one folder. It is called Windows Tools on Windows 11 and Administrative Tools on Windows 10, and it contains Computer Management.
- Press Win + R, type
controland press Enter to open Control Panel. - Set View by to Large icons if the folder list is grouped into categories.
- Open Windows Tools on Windows 11, or Administrative Tools on Windows 10.
- Double-click Computer Management.
- Expand Storage and select Disk Management.
Microsoft notes that the tools in this folder vary by Windows edition, so the list may look slightly different on your PC.
What You Should See When Disk Management Opens
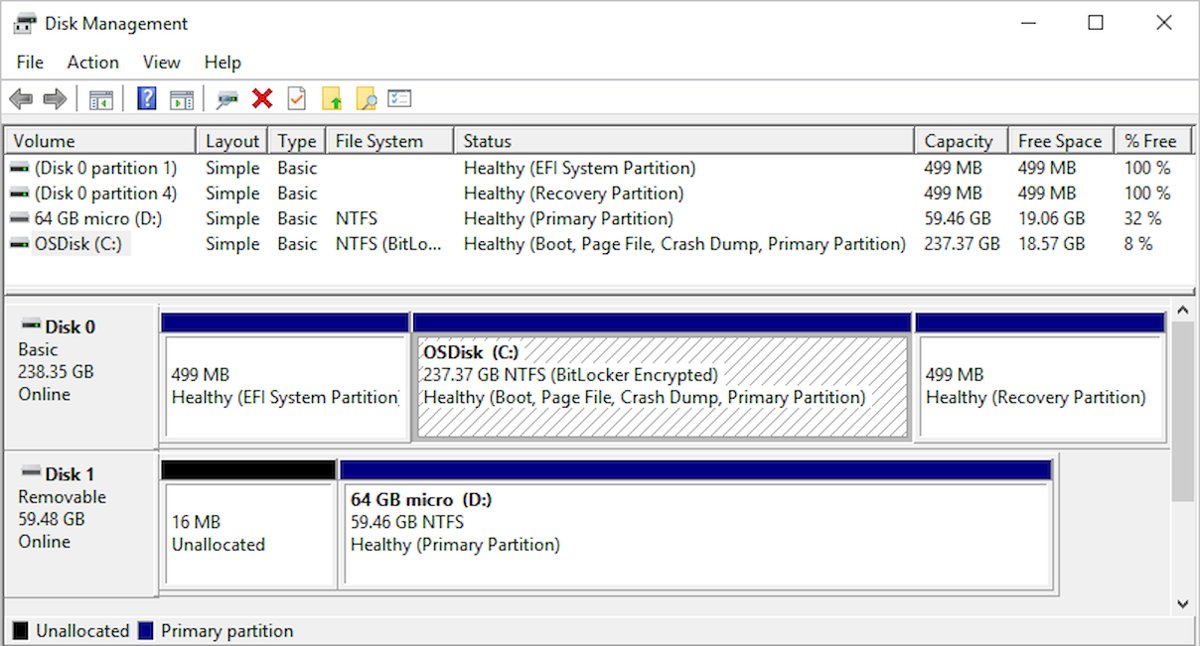
Disk Management lists every drive and every partition on it, with size, file system, status and free space. A typical Windows PC shows three partitions on Disk 0.
- Find Disk 0, your main drive, in the lower pane.
- Check for Local Disk (C:), the partition that holds Windows and most apps.
- Check for an EFI System partition, which starts the PC, and a Recovery partition, which holds repair tools.
- Look at the status of each partition. Healthy on an Online disk is what you want.
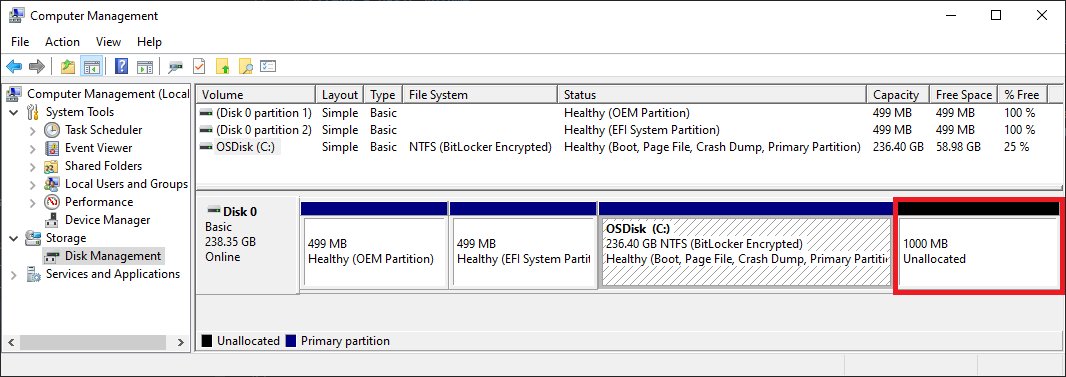
- Look for any black bar labelled Unallocated. That is empty space with no volume on it.
- If you added a new disk, confirm it appears, even if its status reads Not Initialized or Offline.
Disk Management may report the EFI System and Recovery partitions as 100 percent free. They are not; they store files the PC needs to boot and recover, so leave them alone.
Before You Start: What Disk Management Is For
Disk Management is the built-in Windows tool for managing disks and volumes. It does not free up space or defragment; other Windows tools handle those jobs.
| Job | Disk Management? | Use instead |
|---|---|---|
| Set up a brand-new drive (initialize it) | Yes | – |
| Create and format a volume in unallocated space | Yes | – |
| Change or add a drive letter | Yes | – |
| Extend a volume into free space after it | Yes | – |
| Shrink a volume to make room for a new partition | Yes | – |
| Free up drive space | No | The tools in Microsoft's Free up drive space guide |
| Defragment or optimize a drive | No | The Windows defragment and optimize tool |
| Pool several drives like a RAID | No | Storage Spaces |
Most tasks require an account in the Administrators or Backup Operators group.
How to Use Disk Management in Windows 11 and 10
Every task starts the same way: right-click a disk or a volume in the Disk Management window and pick an action. Open Disk Management with administrator permissions first.
Initialize a new disk
A new internal drive stays invisible in File Explorer until it is initialized. Initializing erases the disk, so only do this on an empty drive.
- Find the new disk. If it reads Offline, right-click it and select Online.
- Right-click the disk and select Initialize Disk.
- Confirm the correct disk is ticked in the Initialize Disk dialog.
- Keep the default GPT partition style unless you need MBR for older hardware, then select OK.
- Wait for the status to change from Initializing to Online.
Create a new simple volume
This turns unallocated space into a formatted drive with a letter.
- Right-click the Unallocated space and select New Simple Volume.
- Select Next in the New Simple Volume Wizard.
- Accept the maximum size, or enter a smaller size in MB, and select Next.
- Accept the suggested drive letter or pick another, then select Next.
- Keep the default format settings (usually NTFS) and select Next.
- Review the summary and select Finish.
Change or assign a drive letter
Do not change the letter of the drive that holds Windows or installed apps; they may stop finding their files.
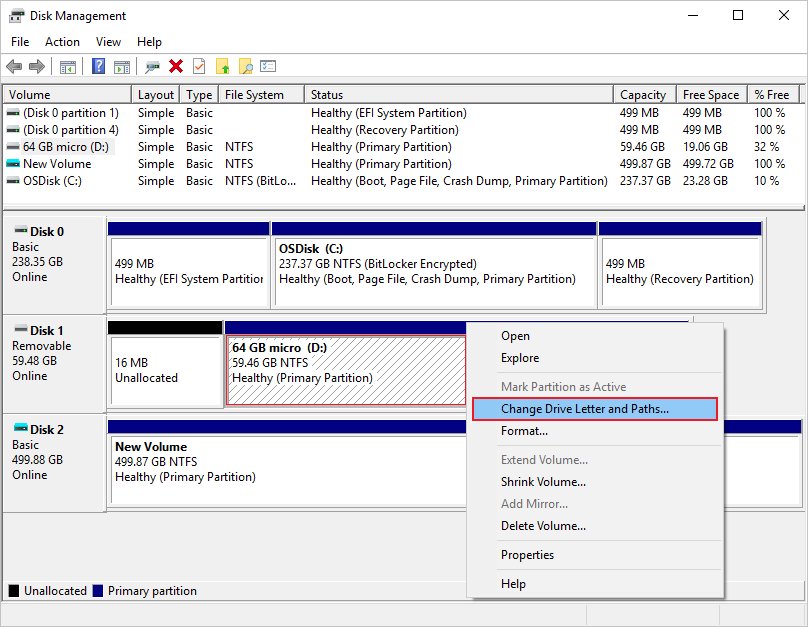
- Right-click the volume and select Change Drive Letter and Paths.
- Select Change to replace the current letter, or Add if the volume has none.
- Select Assign the following drive letter and pick a letter from the list.
- Select OK, then select Yes in the confirmation dialog.
Extend a volume
The unallocated space must sit immediately to the right of the volume, on the same disk, and the volume must use NTFS or ReFS.
- Right-click the volume and select Extend Volume.
- Select Next in the Extend Volume Wizard.
- Under Select Disks, keep Maximum available or enter a smaller amount.
- Select Next, then Finish.
Shrink a volume
Shrinking moves ordinary files automatically and creates unallocated space at the end of the volume, with no reformat needed.
- Right-click the volume and select Shrink Volume.
- Follow the on-screen prompt to enter how much space to free, in MB.
- Confirm, then wait for the new Unallocated block to appear after the volume.
Format a volume
Formatting destroys everything on the volume, and Windows will not let you format the partition it is running from.
- Back up anything on the volume you want to keep.
- Right-click the volume and select Format.
- Keep the default settings and select OK, then OK again.
On a basic disk, the first three partitions you create are primary partitions. From the fourth on, Windows creates logical drives inside an extended partition.
Useful Disk Management Shortcuts to Remember
| Shortcut or command | What it opens or does | Where to use it |
|---|---|---|
| Win + X, then Disk Management | Disk Management from the Quick Link menu | Anywhere in Windows |
Win + R, then diskmgmt.msc |
Disk Management | Run box |
diskmgmt.msc |
Disk Management | Command Prompt, PowerShell, Terminal or taskbar search |
Create and format hard disk partitions |
Disk Management's name in search results | Taskbar search |
Win + R, then compmgmt.msc |
Computer Management, which contains Disk Management | Run box |
| Action > Rescan Disks | Makes Disk Management look for newly attached drives | Disk Management menu bar |
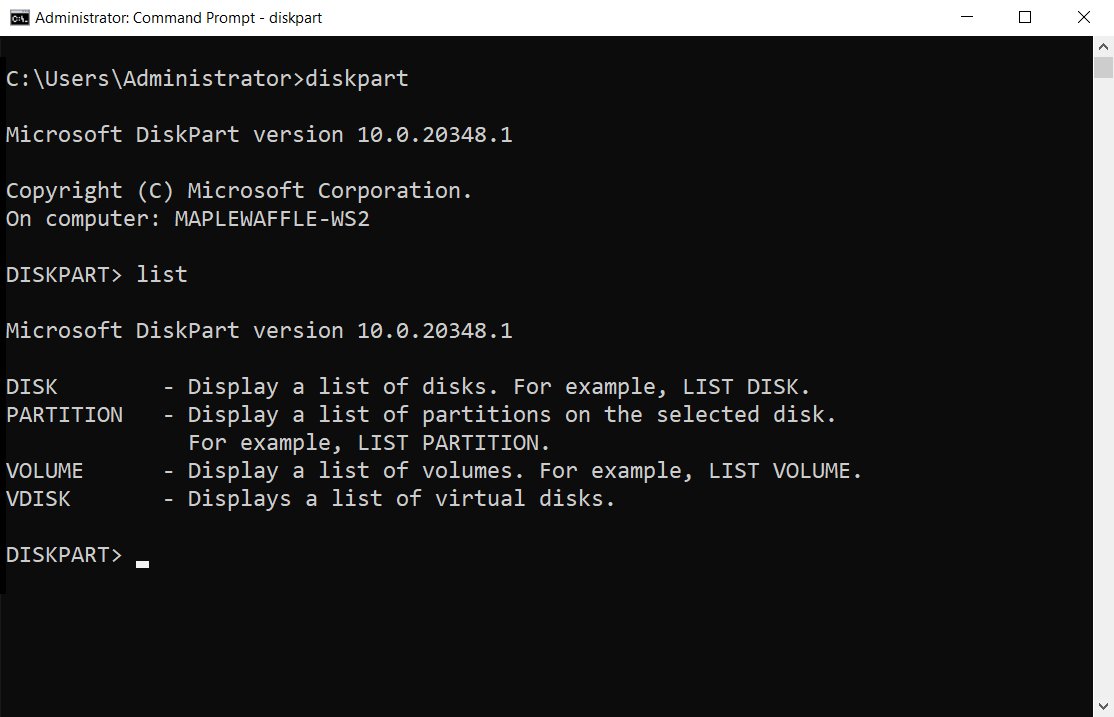
diskpart |
The command-line disk tool | Command Prompt run as administrator |
Disk Management vs. DiskPart: Which One Do You Need?
Both tools manage the same disks, partitions and volumes. Disk Management is the graphical version; DiskPart is a command interpreter where you select an object first and then act on it.
| Question | Disk Management | DiskPart |
|---|---|---|
| How you use it | Right-click a disk or volume and pick an action | Type list volume, select volume <number>, then a command |
| Permissions | Administrators or Backup Operators for most tasks | Must be in the local Administrators group |
| Best for | Seeing the whole layout and one-off changes | Scripts, and systems where the graphical tool is unavailable |
| Shrink a volume | Shrink Volume | shrink desired=<MB> |
| Risk of mistakes | Lower, because you see the target volume | Higher, because the command acts on whatever has focus |
To start DiskPart, open Command Prompt as administrator and type diskpart. Run list volume and read the numbers carefully before you select anything.
Common Problems When Opening Disk Management
Disk Management will not open, or an action says you lack permission
Disk Management was started without administrator permissions.
- Type
Computer Managementin the taskbar search box. - Right-click Computer Management and select Run as administrator, then Yes.
- Go to Storage > Disk Management.
- If the Start menu or taskbar is frozen, open Task Manager with Ctrl + Shift + Esc and restart from there.
You do not see the Disk Management option
Search lists it as Create and format hard disk partitions, not by its own name.
- Press Win + X and look for Disk Management in the menu.
- If it is not there, press Win + R, type
diskmgmt.mscand press Enter. - Or open Computer Management and select Storage > Disk Management.
Disk Management takes a long time to load or shows a disk as Unreadable
Disks can show Unreadable while they spin up or while Disk Management rescans every drive.
- Wait until the scan finishes.
- Select Action > Rescan Disks.
- Restart the PC if the status does not change.
- If the same disk stays Unreadable, back up what you can and check its cable and port.
A drive appears in Disk Management but not File Explorer
The volume has no drive letter, has no file system (RAW), or the disk is not initialized.
- If the partition has a file system but no letter, right-click it and select Change Drive Letter and Paths > Add.
- If the disk reads Offline, right-click it and select Online.
- If the disk reads Not Initialized and is new and empty, right-click it and select Initialize Disk.
- If the partition is RAW and holds files you need, do not format it; stop and recover the data first.
A new or external disk does not show up at all
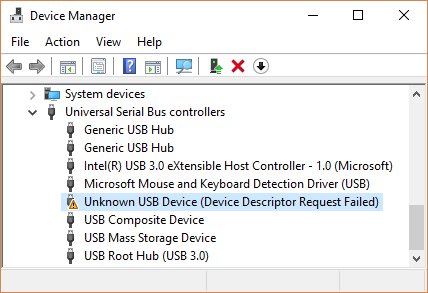
A loose cable, a weak USB port or hub, or a failing disk.
- Unplug the disk, plug it back in, and select Action > Rescan Disks.
- Connect it to a USB port directly on the PC instead of a hub.
- Try a different cable.
- Right-click Start, open Device Manager and look for a warning icon on the drive.
- Test the disk on another PC to rule out the drive itself.
Extend Volume or Change Drive Letter and Paths is greyed out
The space is not directly after the volume, the file system is not NTFS or ReFS, or the volume is an EFI System or Recovery partition.
- Confirm Disk Management is running as administrator.
- Check that the Unallocated block sits immediately to the right of the volume.
- Check the file system column reads NTFS or ReFS.
- On a disk over 2 TB, confirm it uses GPT.
- If another volume is in the way, create a new simple volume in the free space instead.
Safety Tips Before Changing Partitions
| Before you | Know this | Safer habit |
|---|---|---|
| Initialize a disk | Initialization erases every file on the disk | Only initialize a new, empty disk; copy files off an old one first |
| Format or delete a volume | Both destroy the data on the volume | Back up first, and double-check the drive letter and size |
| Touch EFI System or Recovery partitions | They hold files the PC needs to start and recover | Leave them alone, even if they show as empty |
| Change the Windows drive letter | Windows and apps may stop finding their files | Only change letters on data drives |
| Shrink a RAW partition | Shrinking a raw partition that holds data, such as a database, can destroy it | Only shrink NTFS volumes or empty raw partitions |
| Start any partition change | Microsoft notes some Disk Management tasks need your BitLocker recovery key or an existing restore point | Find the recovery key, create a restore point and back up your files first |
Frequently Asked Questions
How do I open Disk Management in Windows 10?
Right-click the Start button, or press Win + X, and select Disk Management. You can also press Win + R, type diskmgmt.msc and select OK. Disk Management looks and works the same in Windows 10 and Windows 11.
How do I open Disk Management in Windows 11?
Press Win + X or right-click Start, then select Disk Management. Searching for Disk Management also works, but the result is named Create and format hard disk partitions. Select that result to open the tool.
How do I open Disk Management in Windows 11 from CMD?
Open Command Prompt, type diskmgmt.msc and press Enter. For administrator permissions, open Command Prompt with Run as administrator first. The same command also works in PowerShell, Windows Terminal and the Run box.
How do I open Disk Management as administrator?
Type diskmgmt.msc in the taskbar search box, right-click the result and select Run as administrator, then select Yes. Alternatively, run Computer Management as administrator and go to Storage > Disk Management.
What is the Run command for Disk Management?
The Run command for Disk Management is diskmgmt.msc. Press Win + R, type diskmgmt.msc and press Enter or select OK. For Computer Management, which contains Disk Management, the command is compmgmt.msc.
How do I use Disk Management in Windows 10?
Open Disk Management, then right-click a disk or volume and choose an action. Initialize Disk sets up a new drive, New Simple Volume creates a partition, Change Drive Letter and Paths edits letters, and Extend Volume or Shrink Volume resizes a partition.
Why can't I open Disk Management in Windows 10?
It usually needs administrator permissions. Run Computer Management as administrator and select Storage > Disk Management. If the Win + X menu does not respond, press Win + R and type diskmgmt.msc instead.
Why does my drive show in Disk Management but not in File Explorer?
The volume most likely has no drive letter, is RAW, or sits on a disk that is Offline or Not Initialized. Right-click the volume and use Change Drive Letter and Paths > Add, or bring the disk Online first.
Is Disk Management different in Windows 11 and Windows 10?
No. Microsoft states that Disk Management looks and works the same in Windows 10 and Windows 11, with no feature differences. Only the Control Panel folder name changes: Windows Tools on Windows 11 and Administrative Tools on Windows 10.
What is the difference between Disk Management and DiskPart?
Disk Management is the graphical tool where you right-click a disk or volume. DiskPart is a command-line interpreter that needs local administrator rights and acts on whichever object you select, which suits scripts but makes mistakes easier.


![Allow apps to access your microphone Windows 11 [tutorial]](https://techdows.com/wp-content/uploads/2026/10/Windows-10-Privacy-Microphone-page-with-the-apps-access-switch-on.jpg)
Accessing the C Drive on Windows 11: Step-by-Step Guide - Techdows
[…] for Disk Management from Start and open it with administrator […]
How to Add or Your C, D, E or F Drive in Navigation Pane (Home or Quick Access) of File Explorer - Techdows
[…] the volume in Disk Management; an unallocated disk must be initialized […]
How to open Computer Management console (compmgmt.msc) on Windows 10/11 (2026) - Techdows
[…] error in Event Viewer. For one task only, the standalone console opens faster; you can also open Disk Management or manage Windows services with services.msc on their […]