Windows 10 Disk Management is the built-in tool for setting up drives: right-click Start, select Disk Management, then right-click a disk or volume to initialize, partition, format, shrink, extend or re-letter it.
This guide covers each of those jobs step by step, the same jobs in DiskPart and PowerShell, how to read the disk map, and fixes for unallocated, RAW and offline drives.
How to open Disk Management
The quickest route is the Start button's right-click menu, and it works the same way in Windows 10 and Windows 11. If that menu is blocked, there are other ways to open Disk Management on Windows 10 or 11, including the Run box and Computer Management.
- Right-click (or press and hold) the Start button, or press Windows + X.
- Select Disk Management from the menu.
- Wait for the disk list to load. The window shows every connected disk and its partitions.
Two fallbacks cover most cases: press Windows + R, type diskmgmt.msc and select OK, or open Computer Management and select Storage > Disk Management.
What is Disk Management in Windows 10?
Disk Management is a Microsoft Management Console (MMC) snap-in that ships with Windows, so there is nothing to download or install. Microsoft states it looks and works the same in Windows 10 and Windows 11, with no feature differences.
| Disk Management can | Disk Management cannot |
|---|---|
| Initialize a new disk as GPT or MBR | Merge two partitions in one step |
| Create a new simple volume in unallocated space | Move a partition to put free space next to another one |
| Format a volume as NTFS, FAT32 or exFAT | Free up space or delete files (use Storage settings or Disk Cleanup) |
| Shrink an NTFS volume to free unallocated space | Defragment or optimize a drive (use Optimize Drives) |
| Extend an NTFS or ReFS volume into adjacent free space | Pool drives into a RAID-style set (use Storage Spaces) |
| Change or add a drive letter or folder mount path | Recover deleted files from a volume |
| Bring an Offline disk Online, rescan disks, convert GPT/MBR on an empty disk | Shrink a volume past unmovable files such as the page file |
Windows 10 reached end of support on October 14, 2025. The tool still works on Windows 10 PCs, and every step below applies unchanged on Windows 11.
Disk Management interface explained
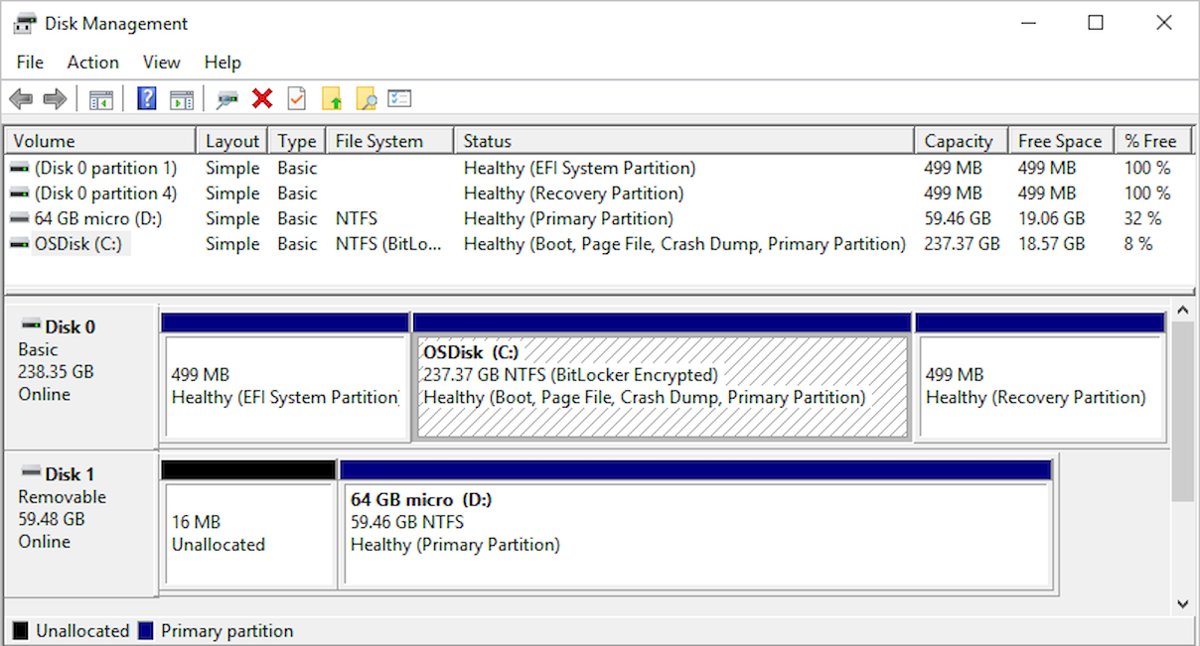
The window lists each volume with its file system, status and space figures, and draws each physical disk as a horizontal bar split into partitions. A typical system disk (Disk 0) holds three partitions: the Windows volume, the EFI System partition and the Recovery partition.
| What you see | What it means | What to do |
|---|---|---|
| Local Disk (C:) | The Windows installation and most apps and files | Shrink or extend it; never format or delete it |
| EFI System Partition | Boot files for UEFI PCs; may show as 100 percent free | Leave it alone |
| Recovery Partition | Windows recovery tools; may show as 100 percent free | Leave it alone |
| Black bar labelled Unallocated | Space that belongs to no partition | Create a new simple volume or extend the volume to its left |
| Disk status Not Initialized | The disk has no valid disk signature | Initialize it (erases the disk) |
| Disk status Offline | Windows has taken the disk offline | Right-click the disk and select Online |
| Disk status Unreadable | Hardware failure, corruption or I/O errors, or the disk is still spinning up | Select Action > Rescan Disks or restart |
| Disk status Foreign (dynamic disks) | A dynamic disk moved from another PC | Right-click it and select Import Foreign Disks |
| File system RAW | The partition has no recognized file system | Recover files first; format only if the partition is empty |
| Volume status Healthy | The volume is working normally | No action needed |
| Volume status Failed or Unknown | The disk is damaged, the file system is corrupt or the boot sector is unreadable | Check cables and power, then see the troubleshooting section |
Disk Management vs DiskPart vs PowerShell: which to use
| Your situation | Use this | Why |
|---|---|---|
| Setting up one new drive, or resizing C: | Disk Management | Wizards show every disk visually, so picking the wrong one is harder |
| Disk Management will not load, or you are in Windows Recovery | DiskPart | Text-only command interpreter that runs from any elevated Command Prompt |
| Repeating the same setup on several disks or PCs | PowerShell Storage cmdlets | Commands chain in a pipeline and run from a script |
| Converting a disk that already holds partitions | Back up, delete volumes, then Disk Management | Disk Management converts only an empty disk |
| Moving a partition so free space sits next to C: | A partitioning app from a vendor you trust | No built-in Windows tool moves partitions |
Managing disks with Disk Management MMC
Every Disk Management task starts with a right-click on either the disk label (Disk 0, Disk 1) on the left of the bar, or a volume inside the bar. This reference shows which one and which menu item.
| Task | Right-click | Menu item | Keeps data? |
|---|---|---|---|
| Set up a brand-new disk | Disk label | Initialize Disk | No |
| Create a partition | Unallocated space | New Simple Volume | Yes (uses empty space only) |
| Format a partition | Volume | Format | No |
| Change or add a drive letter | Volume | Change Drive Letter and Paths | Yes |
| Make a volume smaller | Volume | Shrink Volume | Yes |
| Make a volume larger | Volume | Extend Volume | Yes |
| Remove a partition | Volume | Delete Volume | No |
| Change partition style | Disk label (empty disk only) | Convert to GPT Disk or Convert to MBR Disk | No (volumes must be deleted first) |
| Bring a disk back | Disk label | Online or Reactivate Disk | Yes |
You need to be signed in as an administrator, or a member of the Backup Operators group, for these tasks.
Step-by-step tutorial: mastering Disk Management on Windows 10 with a new drive
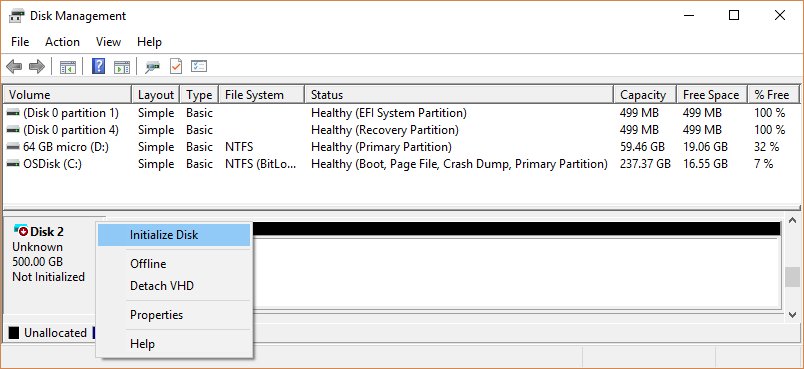
A newly installed internal drive usually shows as Not Initialized and does not appear in File Explorer. Initializing writes a partition style and erases anything already on the disk, so confirm the disk number first.
- Open Disk Management. If the new disk shows Offline, right-click its label and select Online.
- Right-click the disk label and select Initialize Disk.
- Check that only the correct disk is ticked, choose GPT (GUID Partition Table) for a UEFI PC or a drive larger than 2 TB, or MBR for older BIOS-only hardware, then select OK.
- Wait for the status to change from Initializing to Online.
- Right-click the black Unallocated bar and select New Simple Volume, then select Next.
- Enter a size in MB or keep the maximum, select Next, accept or pick a drive letter, and select Next.
- On the Format Partition page, select Next to format with the default settings, then review your choices and select Finish.
Some USB disks cannot be initialized. Those are only formatted and given a drive letter. On a basic MBR disk, the first three new partitions are primary partitions, and the fourth onward become logical drives inside an extended partition.
How to partition a drive in Windows 10 Disk Management
To add a partition to a disk that is already in use, you need unallocated space. If there is none, shrink an existing volume first (next section) and then come back here.
- Right-click the Unallocated region on the disk and select New Simple Volume.
- Select Next on the first page of the New Simple Volume Wizard.
- Enter the volume size in megabytes (1 GB is 1,024 MB) and select Next.
- Accept the default drive letter or choose a different one, and select Next.
- On the Format Partition page, select Next to format with the default settings, or select Do not format this volume and then Next.
- Review the summary and select Finish.
How to shrink a volume in Windows 10 Disk Management
Shrinking frees space at the end of an NTFS volume without reformatting it. Windows moves ordinary files out of the way automatically, but it stops at unmovable files such as the page file or shadow copy storage.
- Back up important files on the volume.
- Right-click the volume (for example C:) and select Shrink Volume.
- Wait while Windows queries the volume for the space it can release.
- Enter how much space to release, in MB. Windows cannot release more than the amount it calculated.
- Confirm the shrink. The released space appears as Unallocated to the right of the volume.
Disk Management shrinks only NTFS volumes or partitions with no file system. Shrinking a raw partition that holds data, such as a database file, can destroy that data.
How to extend the C drive in Windows 10 Disk Management
Extend Volume works only when unallocated space sits directly to the right of the volume on the same disk, and the volume uses NTFS or ReFS. On an MBR disk, nothing beyond 2 TB can be used.
- Open Disk Management as an administrator and find the black Unallocated bar.
- Confirm the unallocated space is immediately to the right of C: with no other partition between them.
- Right-click C: and select Extend Volume.
- Select Next in the Extend Volume Wizard.
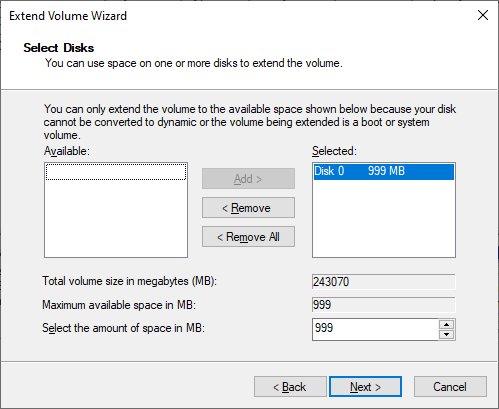
- Under Select Disks, keep Maximum available or enter a smaller amount in MB, then select Next.
- Select Finish. C: grows into the free space.
On most PCs the Recovery partition sits between C: and any new free space, which greys out Extend Volume. Do not delete the Recovery partition to get around this; create a new volume in the free space instead, or use a partitioning app that can move partitions.
How to format a drive in Windows 10 Disk Management
Formatting erases everything on the volume. You cannot format the volume Windows is running from, or any volume currently in use.
- Copy any files you want to keep to another drive.
- Right-click the volume and select Format.
- Type a volume label and choose a file system: NTFS for computer drives and most external drives, or exFAT or FAT32 for SD cards and small USB drives.
- Leave Perform a quick format ticked for a working drive, or clear it to overwrite the whole volume.
- Select OK, then select OK again to confirm that all data on the volume will be erased.
A quick format builds a new file table without overwriting the data, so it finishes in seconds. A full format overwrites the volume and takes much longer on large drives.
How to change a drive letter in Disk Management
Change letters only on data drives, external drives and optical drives. Changing the letter of a drive that holds Windows or installed apps can stop those apps from finding their files.
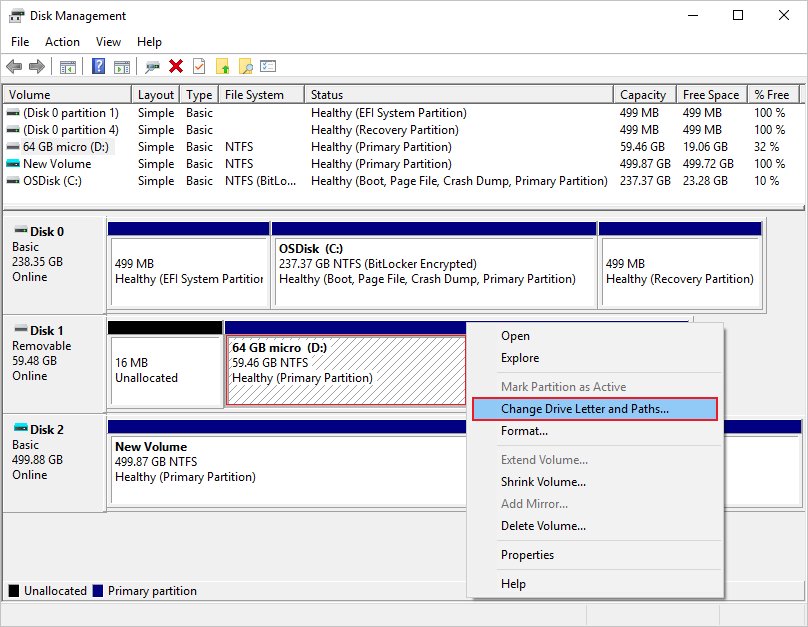
- Right-click the volume and select Change Drive Letter and Paths.
- Select Change to replace the current letter, or Add if the volume has no letter.
- Select Assign the following drive letter and pick a letter from the list.
- Select OK.
- Select Yes in the confirmation dialog.
Instead of a letter, a drive can also be mounted in an empty folder so it appears as a folder.
Windows 10 Disk Management: delete a volume or partition
Deleting a volume turns it into unallocated space and destroys its data. Use it to remove an unwanted partition, to empty a disk before converting it, or to free space next to a volume you want to extend.
- Back up or move every file you need from the volume.
- Right-click the volume and select Delete Volume.
- Select Yes to confirm. The space turns into a black Unallocated bar.
- To merge it into the volume on its left, right-click that volume and select Extend Volume.
- To reuse it as a separate drive, right-click the unallocated space and select New Simple Volume.
Disk Management has no merge command. Deleting the right-hand partition and extending the left-hand one is the built-in way to combine two partitions, after the right-hand one is backed up.
Convert a disk to GPT or MBR in Disk Management
MBR supports up to four primary partitions and disks up to 2 TB. GPT supports more partitions and larger disks, and is the style UEFI PCs boot from. Disk Management can convert a disk only after every volume on it is deleted.
- Back up all data on the disk and close programs that use it.
- Right-click each volume on that disk, select Delete Volume, and select Yes.
- Right-click the disk label and select Convert to GPT Disk or Convert to MBR Disk.
- Right-click the disk label, select Properties, open the Volumes tab, and confirm the Partition style line.
To convert a Windows system disk from MBR to GPT without deleting data, Microsoft provides the separate MBR2GPT tool.
Managing disks with DISKPART command
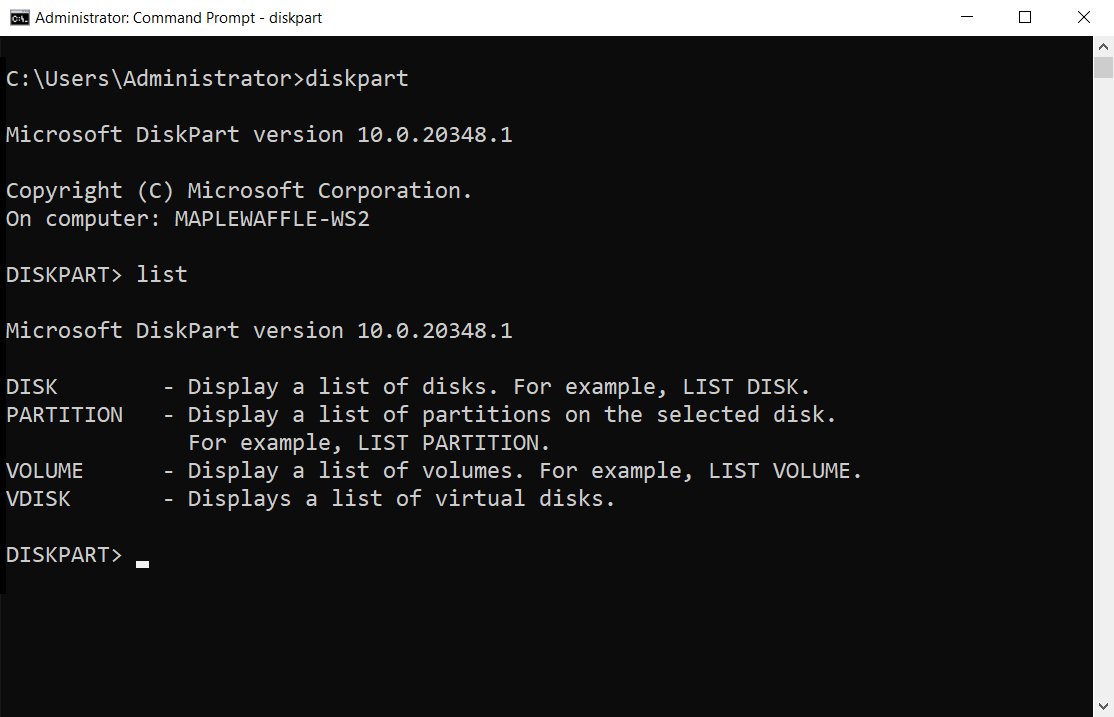
The DiskPart command-line tool does the same jobs from a command prompt. It works on whichever disk, partition or volume has focus, so always run a list command and then select the right number before changing anything. You must be a member of the local Administrators group.
- Open Command Prompt as an administrator, type
diskpart, and press Enter. - Type
list diskand note the number of the disk you want, matching it by size. - Type
select disk 1(replace 1 with your disk number). - Type
create partition primaryto use all free space, or addsize=with a value in MB. - Type
format fs=ntfs label=Backup quickto format the new partition. - Type
assign letter=Eto give it a drive letter, then typeexit.
To shrink instead, type list volume, then select volume 2, then shrink desired=10240 to release 10,240 MB. To extend, select the volume and type extend. The clean command wipes every partition on the selected disk, so check the selection twice.
Managing disks with PowerShell
The Storage module in Windows PowerShell covers the same tasks and suits scripts. Open PowerShell as administrator: search for Windows PowerShell, right-click it, and select Run as administrator.
- Run
Get-Diskto list disks with their number, size and partition style. - Run
Get-Disk | Where-Object PartitionStyle -Eq "RAW" | Initialize-Disk -PassThru | New-Partition -AssignDriveLetter -UseMaximumSize | Format-Volumeto initialize, partition and format every uninitialized disk in one line. - Run
New-Partition -DiskNumber 1 -UseMaximumSize -DriveLetter Tto create a partition on disk 1 that uses all free space and takes the letter T. - Run
Format-Volume -DriveLetter T -FileSystem NTFSto format that volume. - Run
$size = (Get-PartitionSupportedSize -DriveLetter C)and thenResize-Partition -DriveLetter C -Size $size.SizeMaxto extend C: to its maximum size. - Run
Get-Volumeto confirm the file system, health status and size of every volume.
The pipeline in step 2 touches every RAW disk it finds. Run Get-Disk first and disconnect any blank disk you do not want formatted.
How to check a Disk Management change worked
- In Disk Management, confirm the disk status reads Online and the volume reads Healthy with the file system you chose.
- Check the size on the volume bar matches what you entered, and that any space you released shows as Unallocated.
- Open File Explorer > This PC and confirm the drive appears with its new letter and label.
- For a partition-style change, right-click the disk label, select Properties > Volumes, and read Partition style.
- In PowerShell, run
Get-Volumeand check HealthStatus shows Healthy.
Disk Management problems in Windows 10 and fixes
Disk shows as Not Initialized or does not appear in File Explorer
The disk has no valid signature: it is new, its formatting is corrupted, or it is failing.
- If the disk is new and empty, right-click it and select Initialize Disk.
- If it holds files you need, do not initialize it. Unplug it, reconnect it, and select Action > Rescan Disks.
- Connect an external disk to a USB port directly on the PC, not a hub, and try a different cable.
- Right-click Start, select Device Manager, and look for a device with a warning icon.
- Try the disk in another PC. If it fails there too, the disk itself is faulty.
Windows 10 Disk Management shows the drive as unallocated
The space has no partition, either because it is new or because a partition was deleted or lost.
- If you know the space is empty, right-click it and select New Simple Volume.
- If the space used to hold files, do not create a volume yet. Recover the files first (see the recovery section below).
- To add the space to the volume on its left instead, right-click that volume and select Extend Volume.
Partition shows as RAW
Windows does not recognize the file system, usually because it is corrupted.
- If the partition holds files you need, copy them off with a recovery tool before anything else.
- If the partition is empty or already recovered, right-click it and select Format.
- Choose NTFS for an internal drive, or exFAT for a removable drive, and select OK.
Extend Volume is greyed out
The free space is not directly to the right of the volume, the volume is not NTFS or ReFS, or Disk Management is not elevated.
- Close Disk Management and reopen it as an administrator.
- Check that no partition (often the Recovery partition) sits between the volume and the unallocated space.
- Check the file system column. FAT32 and exFAT volumes cannot be extended without backing up and reformatting as NTFS.
- For a disk over 2 TB, confirm it uses GPT; MBR cannot address the extra space.
Shrink Volume fails or releases less space than the drive has free
Unmovable files such as the page file or shadow copies sit near the end of the volume.
- Open Event Viewer and check the Application log for event ID 259, which names the blocking file.
- Move the page file to another drive temporarily from the virtual memory settings in Control Panel.
- Delete old shadow copies if you no longer need them, then shrink again.
- Move the page file back after the shrink completes.
Disk shows Offline, Missing or Unreadable
The disk was taken offline, lost power or connection, or has I/O errors.
- For an Offline disk, right-click the disk label and select Online (basic) or Reactivate Disk (dynamic).
- Check that the disk is powered, plugged in and its cable is seated.
- Select Action > Rescan Disks, or restart the PC.
- If the status stays Unreadable, back up whatever is readable and replace the disk.
Recover deleted files in Windows 10 with software and without
Disk Management cannot undo a format or a deleted volume. Stop writing to the affected drive at once, because new files can overwrite the space that still holds the old data.
- Without software: if File History was on, open File Explorer, right-click the folder (or drive) that held the files, select Restore previous versions, pick a version and select Restore.
- Check the Recycle Bin for files deleted normally; it does not hold files lost to a format or a deleted partition.
- With software: install Windows File Recovery from the Microsoft Store, then search for it and select Yes at the prompt.
- Plug in a second drive for the recovered files. The source and destination drives must be different.
- For a formatted, corrupted or RAW NTFS drive, or any FAT or exFAT drive, use extensive mode, for example
winfr E: C: /extensive /n *.docx. - Type Y to start. The recovered files land in a Recovery_<date and time> folder on the destination drive.
Windows File Recovery works on internal, external and USB drives, not on cloud storage or network shares. Regular mode is for recently deleted files on a healthy NTFS drive.
Tips for mastering Disk Management on Windows 10
| Tip | Why it matters |
|---|---|
| Match a disk by its size and model before you right-click | Initialize, Format and Delete Volume act instantly on whatever you selected |
| Back up before you initialize, format, convert or delete | Those four actions erase data, and a backup is the only undo |
| Have your BitLocker recovery key and a restore point ready | Microsoft notes some Disk Management tasks need them |
| Leave the EFI System and Recovery partitions alone | They show as nearly empty but hold the files Windows needs to start and repair itself |
| Do not change the letter of C: or a drive with installed apps | Apps store full paths and can stop working |
| Pick GPT for any new disk over 2 TB | MBR cannot use space past 2 TB |
| Use Optimize Drives, Storage settings and Storage Spaces for their jobs | Disk Management does not defragment, free space or pool drives |
Windows 10 Disk Management FAQ
What is Disk Management in Windows 10?
Disk Management is a built-in Windows 10 tool for managing drives. It lets you initialize new disks, create and format partitions, shrink and extend volumes, change drive letters, and see the status and free space of every disk connected to the PC.
How do I manage disks in Windows 10?
Right-click the Start button and select Disk Management. Then right-click a disk label to initialize or convert it, or right-click a volume to format, shrink, extend, delete it or change its drive letter. DiskPart and PowerShell do the same jobs from the command line.
Do I need to download Disk Management for Windows 10?
No. Disk Management is part of Windows 10 and Windows 11, and opens from the Start button's right-click menu or by running diskmgmt.msc. Any site offering a Disk Management download is offering something else, often a third-party partition tool.
How do I extend the C drive in Windows 10 Disk Management?
Right-click C: and select Extend Volume, then follow the wizard. The option works only when unallocated space sits directly to the right of C: on the same disk. If the Recovery partition is in between, Extend Volume stays greyed out.
How do I merge partitions in Windows 10 Disk Management?
Disk Management has no merge command. Back up the partition on the right, delete it with Delete Volume so it becomes unallocated, then right-click the partition on its left and select Extend Volume to absorb the space.
How do I delete a partition in Windows 10 Disk Management?
Right-click the partition, select Delete Volume, and select Yes. The space becomes unallocated and all data on that partition is lost, so back it up first. Never delete the Windows, EFI System or Recovery partitions.
Why is my drive unallocated in Disk Management?
Unallocated space has no partition on it. A new disk starts that way, and space also turns unallocated after a shrink or a deleted partition. If the space is empty, create a New Simple Volume; if it held files, recover them first.
How do I fix a RAW drive in Windows 10 Disk Management?
A RAW partition has a file system Windows cannot read. Recover any files you need with a tool such as Windows File Recovery in extensive mode, then right-click the partition in Disk Management, select Format, and choose NTFS or exFAT.
Does formatting in Disk Management erase everything?
Yes. Formatting removes all files on the volume. A quick format only writes a new file table, so recovery tools can sometimes restore data afterwards; a full format overwrites the volume and makes recovery far less likely.
Should I choose GPT or MBR when initializing a disk?
Choose GPT for a modern UEFI PC, any disk over 2 TB, or a disk that needs more than four partitions. Choose MBR only for older BIOS-based hardware or operating systems that do not support UEFI.