To add your C, D, E or F drive to the navigation pane, right-click the drive under This PC and select Pin to Quick access; it then appears under Quick access on Home (Windows 11) or Quick access (Windows 10).
This guide covers pinning on Windows 11 and Windows 10, the alternatives when pinning is not what you want, how to remove a pinned drive, and how to fix drive shortcuts that break.
The Easiest Method: Pin a Drive to Quick Access
Pinning puts the drive in two places at once: the Quick access list in the left navigation pane and the Quick access area of the start page. It uses the same Pin to Quick access command Microsoft documents for folders.
Steps for Windows 11
From version 22H2, This PC lists only drives and network locations, so the drive is easy to find there.
- Press Windows logo key + E to open File Explorer.
- Select This PC in the navigation pane.
- Right-click (or press and hold) the drive, for example Local Disk (D:).
- Select Pin to Quick access. If it is not on the short menu, select Show more options first.
- Check the navigation pane: the drive now sits under Quick access, and it shows on Home too.
Steps for Windows 10
Windows 10 lists drives under This PC below the known folders.
- Press Windows logo key + E to open File Explorer.
- Select This PC in the navigation pane.
- Right-click the drive you want to add.
- Select Pin to Quick access.
- Look under Quick access at the top of the navigation pane to find the drive.
How to Pin Multiple Drives
Each drive is pinned on its own; there is no multi-drive pin command.
- Repeat the right-click and Pin to Quick access for C, D, E and F in turn.
- Check that each drive shows under Quick access before you pin the next.
What “Home” and “Quick access” Mean in File Explorer
Home and Quick access are not two separate places in Windows 11. Quick access was renamed File Explorer Home in version 22H2, and Quick access survives as the pinned list inside it.
| Item | Windows 11 | Windows 10 |
|---|---|---|
| Start page name | Home (renamed from Quick access in version 22H2) | Quick access |
| Where pinned drives appear | Quick access on Home and in the navigation pane | Quick access at the top of the navigation pane and on the start page |
| What This PC shows | Drives and network locations only; the known folders moved to Quick access | Known folders plus your drives |
| Default pins | Desktop, Documents, Downloads, Pictures, Music, Videos | None until you pin a folder; frequent folders are added automatically |
| Unpin command | Unpin from Quick access | Unpin from Quick access (Remove from Quick access for automatic entries) |
Which Method Should You Use?
| Your situation | Use this | Why |
|---|---|---|
| You want D: or E: one click away in the left pane | Pin a drive to Quick Access | One right-click, and it shows on Home too |
| You only ever open one folder on that drive | Pin a folder inside the drive | Skips a level of browsing every time |
| You want every drive visible when File Explorer opens | Change the opening location to This PC | This PC lists all drives on launch |
| The drive is a shared folder on another PC or NAS | Map it as a network drive | It gets its own letter under This PC and reconnects at sign-in |
| You start from the desktop, not File Explorer | Desktop shortcut to the drive | Double-click opens the drive in File Explorer |
| A USB drive keeps switching letters and breaking pins | Assign a stable drive letter | The pin keeps pointing at the right letter |
Add a Drive Shortcut to the Navigation Pane by Pinning a Folder Inside the Drive
If you work in one folder on a drive, such as D:\Projects, pin that folder instead of the whole drive. Microsoft documents this route for any folder on Windows 11 and Windows 10.
- Open File Explorer and select This PC.
- Double-click the drive, for example E:, to open it.
- Right-click (or press and hold) the folder you use most.
- Select Pin to Quick access.
- Confirm the folder now appears under Quick access in the navigation pane, with a pin icon on Home.
Pinned folders from Quick access cannot be cut and pasted directly. Right-click the entry and select Open first, then move files as usual.
Add a Drive to the Start Page by Changing File Explorer’s Opening Location
Home lists only the drives you pin, but This PC lists them all. Setting File Explorer to open to This PC puts C, D, E and F in front of you every time. Turning Home or Quick Access off has the full walk-through.
Windows 11: Open File Explorer to This PC
The setting sits behind the See more menu on the command bar.
- Open File Explorer and select See more (the three dots) on the command bar.
- Select Options.
- In Open File Explorer to, select This PC.
- Select Apply, then OK.
Windows 10: Open File Explorer to This PC
The setting sits on the View tab of the ribbon.
- Open File Explorer and select the View tab.
- Select Options.
- In the Open File Explorer to list, select This PC.
- Select Apply, then OK.
Show or Hide This PC in the Navigation Pane
Microsoft documents no setting that hides This PC on its own. What it does document is showing or hiding the whole navigation pane, which is the usual reason This PC and its drives seem to vanish.
| Goal | Windows 11 | Windows 10 |
|---|---|---|
| Show the navigation pane again | View > Show > Navigation Pane | View tab > Navigation pane |
| Add libraries to the left pane | Not documented for Windows 11 | View tab > Navigation pane > Show libraries |
| Reach This PC with the keyboard | Press F6 until the navigation pane has focus, then use the arrow keys | Press F6 until the tree view has focus, then use the arrow keys |
| Get This PC on the desktop | Settings > Personalization > Themes > Desktop icon settings | Same path |
Add a Drive as a Network Location or Mapped Drive
Mapping gives a shared folder on another computer or NAS its own drive letter under This PC. It does not apply to local drives, which already have letters.
- Press Windows logo key + E to open File Explorer.
- Select This PC in the navigation pane.
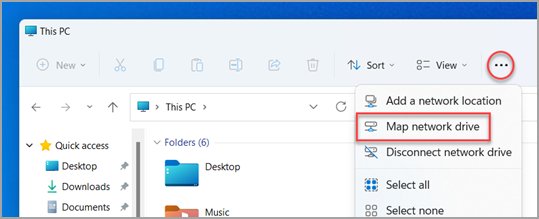
- On Windows 11, select More on the command bar and choose Map network drive. If it is missing, right-click This PC in the navigation pane instead.
- In the Drive list, select any free letter.
- In the Folder box, type the network path or select Browse.
- Select Reconnect at sign-in so the drive returns each time you sign in.
- Select Finish. Pin the new drive to Quick access if you want it at the top of the pane too.
If the drive will not connect, the other computer may be off or your account may lack permission to the share.
How to Add a Drive Shortcut to the Desktop and Then Use It from File Explorer
- Open File Explorer and select This PC.
- Right-click the drive you want, for example F:.
- Select Show more options > Send to > Desktop (create shortcut). On some PCs Send to appears directly.
- Double-click the new shortcut on the desktop to open the drive in File Explorer.
- From that window, pin the drive with Pin to Quick access if you also want it in the navigation pane.
To get every drive from the desktop, turn on the This PC icon under Settings > Personalization > Themes > Desktop icon settings.
How to Keep External Drive Letters from Changing
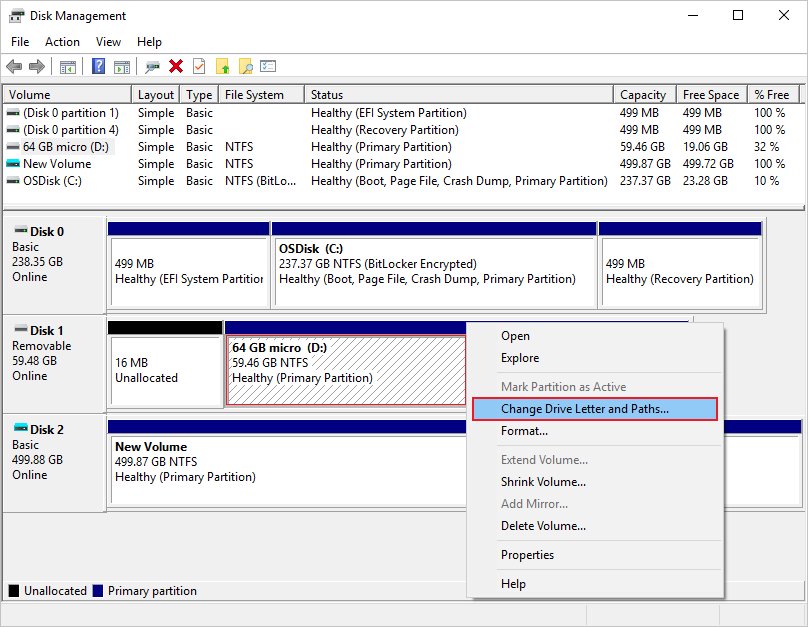
A pin points at a letter. If a USB drive comes back as G: instead of E:, the pin breaks. Giving the drive a fixed letter in Disk Management stops that. You need an administrator account.
- Right-click the Start button and select Disk Management.
- Right-click the external drive's volume and select Change Drive Letter and Paths.
- Select Change.
- Select Assign the following drive letter, pick an unused letter, and select OK.
- Select Yes in the confirmation dialog.
- Unpin the old Quick access entry and pin the drive again under its new letter.
Do not change the letter of C: or any drive that holds installed apps. Microsoft warns that apps may fail to run or find the drive afterwards.
Remove a Drive from Quick Access or Home
Unpinning removes only the shortcut. The drive and every file on it stay exactly where they are.
- Open File Explorer.
- Find the pinned drive under Quick access in the navigation pane or on Home.
- Right-click (or press and hold) it.
- Select Unpin from Quick access.
- On Windows 10, an entry that Windows added automatically shows Remove from Quick access instead; select that.
Show Only Pinned Items in Quick Access
Pinned drives are easier to spot when recent files and frequent folders stop crowding the list. Clearing the history itself is covered in the Quick Access guide.
Windows 11
One Settings toggle controls recent items in Start, Jump Lists and File Explorer.
- Select Start > Settings.
- Select Personalization > Start.
- Turn off Show recently opened items in Start, Jump Lists, and File Explorer.
Windows 10
The Privacy section of Folder Options controls what Quick access records.
- Open File Explorer and select the View tab.
- Select Options.
- In the Privacy section, clear the check boxes and select Apply.
Can You Add a Drive as Its Own Top-Level Item in the Navigation Pane?
No supported setting does this. Microsoft documents no option or registry value that places C, D, E or F at the top level beside Home, Gallery and This PC. These are the supported routes that come closest.
| Supported route | Where the drive ends up | Catch |
|---|---|---|
| Pin to Quick access | Under Quick access, one level down | None; this is the standard route |
| Open File Explorer to This PC | All drives listed on the start page | Changes the start page for everything |
| Map a network drive | Under This PC with its own letter | Network shares only |
| Mount the drive in an empty NTFS folder, then pin that folder | Inside a folder you choose, pinnable like any folder | Needs Disk Management, administrator rights and an NTFS or ReFS volume |
Best Practices for Organizing Drives in File Explorer
| Practice | How | What it prevents |
|---|---|---|
| Pin drives, not deep folders you rarely use | Pin the drive plus one or two working folders | A Quick access list too long to scan |
| Fix letters on external drives | Assign a letter in Disk Management | Broken pins after reconnecting |
| Hide recent items | Show only pinned items (see above) | Pinned drives buried under recent files |
| Leave C: on its original letter | Never change the system drive letter | Apps that fail to start |
How to check the drive is really in the navigation pane
- Close every File Explorer window, then press Windows logo key + E.
- Look under Quick access in the left pane: the drive name and letter, such as Data (D:), appear with a pin.
- Select the entry. The content pane should show the root of that drive, not a folder inside it.
- Right-click the entry and confirm the menu offers Unpin from Quick access, which proves it is pinned rather than a recent item.
If “Pin to Quick access” Is Missing or Does Not Work
The command is not on the right-click menu
Windows 11 shows a short menu first; some commands sit in the full menu.
- Right-click the drive under This PC.
- Select Show more options to open the full menu.
- Select Pin to Quick access there.
The menu shows Unpin from Quick access instead
The drive is already pinned.
- Look under Quick access in the navigation pane; the drive is already listed.
- If you cannot see it, expand Quick access or scroll the pane.
Pinning works but the drive does not show up
The navigation pane is hidden, or the window has not refreshed.
- On Windows 11, select View > Show > Navigation Pane.
- Close all File Explorer windows and open a new one with Windows logo key + E.
- As a fallback, pin a folder inside the drive instead.
Fix Broken or Duplicate Drive Shortcuts
A pinned drive gives an error when selected
The drive is unplugged, or it came back under a different letter.
- Reconnect the drive and check its letter under This PC.
- If the letter changed, right-click the old entry and select Unpin from Quick access.
- Pin the drive again, then give it a fixed letter in Disk Management so it stays put.
The same drive appears twice in Quick access
Usually one entry is pinned and one is a frequent folder, or two letters pointed at the same drive over time.
- Right-click each entry; keep the one showing Unpin from Quick access.
- Select Remove from Quick access (Windows 10) or Unpin from Quick access on the duplicate.
- Turn off recent items so the list does not refill.
Troubleshooting Common Problems
Desktop, Documents and other folders vanished from This PC
Windows 11 version 22H2 moved them to Quick access by design.
- Select Home in the navigation pane.
- Select the Up arrow to the left of the address bar to see all six known folders.
- Right-click any missing folder and select Pin to Quick access.
Map network drive is not on the More menu
The command bar layout hides it on some windows.
- Right-click This PC in the navigation pane.
- Select Map network drive from that menu.
Change Drive Letter and Paths is greyed out
The volume is not ready for a letter: it is unallocated, or it is an EFI System or Recovery partition.
- Check the volume in Disk Management; an unallocated disk must be initialized first.
- Leave EFI System and Recovery partitions alone; they are not meant to have letters.
Frequently Asked Questions
Can I pin a drive like D: to Quick access?
Yes. Open This PC in File Explorer, right-click the drive and select Pin to Quick access. On Windows 11 the command may sit under Show more options. The drive then appears under Quick access in the navigation pane and on Home.
Is Home the same as Quick access in Windows 11?
Almost. Windows 11 version 22H2 renamed the Quick access start page to Home. Quick access still exists as the pinned list inside Home and in the navigation pane, and that is where pinned drives appear.
Does unpinning a drive from Quick access delete anything?
No. Unpin from Quick access removes only the shortcut. The drive, its folders and its files stay untouched, and you can pin the drive again at any time from This PC.
How do I make File Explorer open showing all my drives?
Set it to open to This PC. On Windows 11 select See more > Options; on Windows 10 select View > Options. Choose This PC in Open File Explorer to, then select Apply.
Why did my pinned USB drive stop working?
The drive is either disconnected or came back under a different letter. Reconnect it, unpin the old entry, pin it again, and assign a fixed letter in Disk Management so the pin keeps working.
Can I add a drive as its own top-level item in the navigation pane?
Not with a supported setting. Microsoft documents no option that places a drive beside Home and This PC. Pinning it to Quick access is the supported way to get it one click from the top of the pane.
Why are Desktop and Documents missing from This PC?
Starting with Windows 11 version 22H2, the known folders are pinned to Quick access by default and no longer listed under This PC, which now focuses on drives and network locations.
How do I get a network share to show as a drive?
Map it. Select This PC, choose More > Map network drive (or right-click This PC), pick a letter, enter the folder path, select Reconnect at sign-in and select Finish. It then appears under This PC.

8 tips to organize files efficiently on your Windows PC - Techdows
[…] access sits at the top of the File Explorer navigation pane. On Windows 11, pinned folders also appear on the Home […]