To unhide the D drive in Windows 11, open Disk Management, right-click the volume that has no letter, select Change Drive Letter and Paths, and add the letter D.
That fixes most cases, because a volume without a letter never appears in File Explorer. The rest of this guide covers offline disks, DiskPart's hidden flag, File Explorer options, the Group Policy and Registry setting that hides drives, BitLocker, RAW volumes and network drives that take the D: letter.
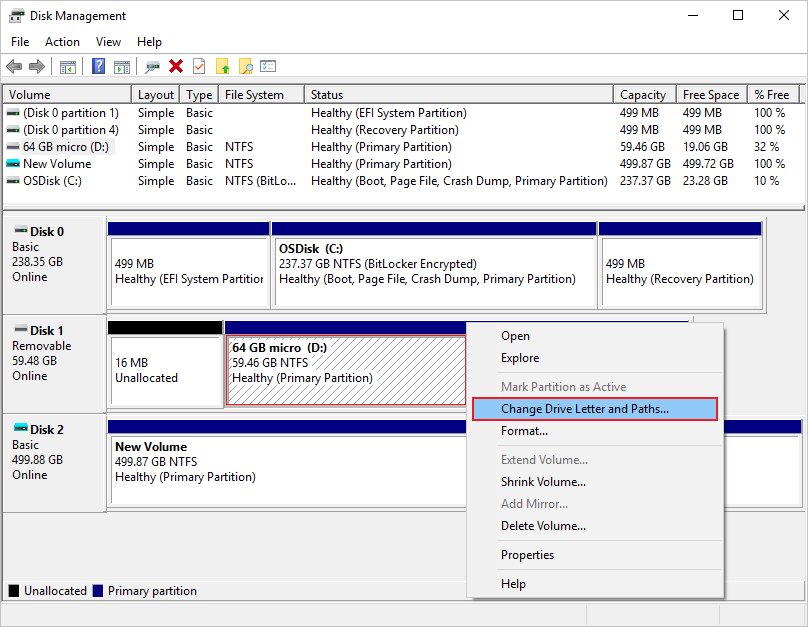
Best quick fix for most people
A missing D drive usually still exists; it has simply lost its drive letter. Disk Management shows every volume, with or without a letter, and can give the letter back in under a minute. You need an administrator account.
- Right-click the Start button and select Disk Management.
- Find the volume that has a file system such as NTFS but no letter next to its name.
- Right-click that volume and select Change Drive Letter and Paths.
- Select Add, then Assign the following drive letter.
- Pick D from the list and select OK.
- Select Yes if Windows asks you to confirm, then open File Explorer and select This PC.
If D is not in the list, another device already holds it. Method 2 below shows how to free it. If the volume does not appear in Disk Management at all, start with Method 3.
Before you start: confirm what “hidden” means
"Hidden" can mean several different things, and each has its own fix. Open Disk Management first and match what you see to a row.
| What you see | What it means | Go to |
|---|---|---|
| Volume is Healthy and has a file system, but no letter | The drive letter was removed or never assigned | Method 2 or Method 5 |
| Volume has a letter in Disk Management, but not in File Explorer | A policy, the Registry or a File Explorer option is hiding it | Methods 7, 8 and 9 |
| The whole disk is marked Offline | Windows sees the disk but is not mounting it | Method 3 |
| The volume shows as RAW or the space is Unallocated | No readable file system on that space | Method 11 |
| The disk is not listed at all | Windows cannot detect the hardware | Method 12 |
| D: is used by a mapped network drive or DVD drive | The letter is taken, so your disk cannot use it | Method 2 and Method 13 |
If the drive shows in File Explorer but its folders look empty, the drive is not hidden. Individual files are hidden instead; see the FAQ at the end.
Method 1: Restart Windows and check File Explorer
A restart remounts every volume and reapplies policies. Do it once before changing anything, because it costs nothing.
- Save your work and select Start > Power > Restart.
- Sign in and press Windows logo key + E to open File Explorer.
- Select This PC in the left pane and look under Devices and drives.
- If the left pane is missing, select View > Show > Navigation pane, then select This PC.
- For an external D drive, unplug it, plug it into a port directly on the PC, and check again.
File Explorer opens to Home by default, which lists folders, not drives. To open on This PC every time, select See more > Options and set Open File Explorer to to This PC.
Method 2: Assign the D drive letter in Disk Management
This is the full version of the quick fix, including what to do when D: is taken or the option is greyed out. Microsoft advises against changing the letter of a drive that holds Windows or installed apps, because apps may fail to find it.
- Press Windows logo key + R, type
diskmgmt.mscand select OK. - Find the D volume. Ignore EFI System Partition and Recovery Partition entries; those must stay hidden.
- If D is in use by a DVD drive or card reader, right-click that device first, select Change Drive Letter and Paths > Change, and give it a spare letter such as E.
- Right-click your data volume and select Change Drive Letter and Paths.
- Select Add (or Change if it already has another letter).
- Select Assign the following drive letter, choose D and select OK.
- Select Yes in the confirmation dialog.
If Change Drive Letter and Paths is missing or greyed out, Microsoft lists three causes: the disk is unallocated and needs initializing, the partition is a protected type such as EFI or Recovery, or your account lacks administrator rights.
Method 3: Bring the disk online
An Offline disk keeps all its volumes out of File Explorer. Bringing it online mounts them again; for a basic disk, every volume on it comes back at once.
- Open Disk Management from the Start button's right-click menu.
- Find the disk marked Offline.
- Right-click the disk label (for example Disk 1), not the volume, and select Online.
- If the disk shows Offline and Missing, check that it is powered, plugged in and attached, then right-click it and select Reactivate Disk.
- Once the disk is online, check whether the volume has a letter. If not, follow Method 2.
To do the same from DiskPart, run list disk, then select disk=1 (use your disk number), then online disk. Microsoft notes that online disk fails on a read-only disk.
Method 4: Use Windows Settings to check disks and volumes
Settings has its own view of every internal and external disk. It is a quick way to confirm Windows can see the drive, its capacity and its health, without opening an admin tool.
- Open Settings > System > Storage.
- Select Advanced storage settings, then Disks & volumes.
- Find the disk that should hold D: and check that its volume is listed with a file system and size.
- Select Properties for the disk to see its details and any health warning.
- If the volume has no letter here, go back to Method 2 and assign one in Disk Management.
Microsoft uses the same page for storage health alerts. A critical warning under Properties means the disk may be failing, so back up whatever you can reach before changing anything else.
Method 5: Unhide the D drive using DiskPart
DiskPart does the same job as Disk Management from a command line. It acts immediately and has no undo, so back up any data you can reach first and check the volume number twice before each command.
DiskPart needs membership in the local Administrators group. It cannot assign a letter to system, boot, OEM or non-data GPT partitions.
- Select Start, type
cmd, right-click Command Prompt, select Run as administrator and approve the prompt. - Type
diskpartand press Enter. - Type
list volumeand press Enter. Find your data volume by its size, label and file system; the Ltr column is blank. - Type
select volume=3, replacing 3 with your volume number, and press Enter. - Type
assign letter=dand press Enter. - Type
list volumeagain. The volume now shows D in the Ltr column and an asterisk marks it as selected. - Type
exitto close DiskPart.
If DiskPart reports an error on assign, the letter D is already in use. Free it first by selecting the volume that holds D, running assign letter=e, then selecting your data volume and running assign letter=d.
Method 6: Remove the hidden attribute from a volume
DiskPart can flag a volume as hidden or nodefaultdriveletter. Either flag can keep D: out of File Explorer, even after a letter is added, and the second stops Windows giving it a letter automatically.
On a basic MBR disk these flags apply to every volume on the disk, not just the one you select. On GPT disks they apply only to the selected volume. Back up first.
- Open Command Prompt as administrator, type
diskpartand press Enter. - Type
list volumeand note your data volume's number. - Type
select volume=3with your number and press Enter. - Type
attributes volumeand press Enter to show the volume's current attributes. - If the hidden attribute is set, type
attributes volume clear hiddenand press Enter. - If the no-default-drive-letter attribute is set, type
attributes volume clear nodefaultdriveletterand press Enter. - Type
assign letter=dif the volume still has no letter, thenexit.
Leave the flags alone on recovery or EFI partitions. Those are hidden on purpose, and the PC needs them to start and to recover.
Method 7: Check whether File Explorer is hiding drives
File Explorer can hide drives that have no media inserted, such as an empty card reader or DVD drive that holds D:. The same dialog controls whether hidden items show at all.
- Open File Explorer with Windows logo key + E.
- Select See more (the three dots) on the command bar, then Options.
- Open the View tab.
- Under Advanced settings, clear Hide empty drives.
- Select Show hidden files, folders, and drives.
- Select Apply, then OK, and check This PC again.
A D: that only appears after clearing Hide empty drives is a removable or optical device with nothing inserted, not your data disk. Give it another letter in Disk Management if you want D: for a hard drive.
Method 8: Unhide D: using Local Group Policy Editor
The policy Hide these specified drives in My Computer removes chosen drive icons from File Explorer and from the Open dialog in apps. One of its preset options is Restrict D drive only. It hides the icon only, so Disk Management still shows the drive with its letter.
Microsoft lists this policy for Windows 11 Pro, Enterprise and Education. On Home, use Method 9.
- Press Windows logo key + R, type
gpedit.mscand select OK. - Go to User Configuration > Administrative Templates > Windows Components > File Explorer.
- Double-click Hide these specified drives in My Computer.
- Select Not Configured or Disabled. Alternatively, keep Enabled and choose Do not restrict drives.
- Select Apply, then OK.
- Check Prevent access to drives from My Computer in the same folder and set it to Not Configured too.
- Restart the PC and open This PC.
On a work or school PC, a domain policy can override your local change. If D: disappears again after a restart, ask your IT administrator.
Method 9: Unhide D: using the Registry
The Group Policy setting writes a value named NoDrives under HKCU\Software\Microsoft\Windows\CurrentVersion\Policies\Explorer. Each bit stands for one letter; a value of 8 hides only D, and 67108863 hides every drive. Deleting the value shows all drives again.
- Select Start, type
cmdand open Command Prompt. The key sits under your own user, so admin rights are not required. - Back up the Registry key first: run
reg export HKCU\Software\Microsoft\Windows\CurrentVersion\Policies\Explorer "%USERPROFILE%\Desktop\explorer-policies.reg". - Confirm the backup file appears on your desktop.
- Run
reg delete HKCU\Software\Microsoft\Windows\CurrentVersion\Policies\Explorer /v NoDrives /f. The/fswitch deletes the value without a confirmation prompt. - If the command reports an error because the value does not exist, this policy is not what hides D:.
- Restart the PC and open This PC in File Explorer.
Delete only the NoDrives value, never the whole Explorer key, because other policies live there. To undo, double-click the exported .reg file on your desktop.
Method 10: Unlock a BitLocker-protected D drive
A locked BitLocker drive keeps its letter but shows a padlock and will not open. You need its password or its 48-digit recovery key. Microsoft Support cannot retrieve a lost key.
- Find the recovery key: from another device, open
https://aka.ms/myrecoverykeyand sign in with the Microsoft account that turned BitLocker on. - Match the key by the first 8 digits of the key ID that the drive shows.
- For a work or school PC, use
https://aka.ms/aadrecoverykeyor ask your IT department. - Open Command Prompt as administrator: select Start, type
cmd, right-click it and select Run as administrator. - To use the drive password, run
manage-bde -unlock D: -passwordand enter it when prompted. - To use the recovery key, run
manage-bde -unlock D: -recoverypasswordfollowed by the 48-digit key, dashes included.
Microsoft lists BitLocker Drive Encryption, and the Manage BitLocker tool, only on Windows Pro, Enterprise and Education editions.
Method 11: Fix a D drive that appears as RAW or unallocated
RAW means Windows cannot read a file system on the volume. Unallocated means there is no volume at all. Both fixes below erase data, so use them only on a drive you know is empty or already backed up.
| What Disk Management shows | If the drive holds files you need | If you know the drive is empty |
|---|---|---|
| RAW instead of NTFS, ReFS, FAT32 or exFAT | Do not format. Recover the files first with data recovery tools or a recovery lab | Right-click the partition, select Format, then select OK twice to accept the defaults |
| Unallocated space | Do not create a volume. Recover first | Right-click it, select New Simple Volume, and choose D at the drive letter step |
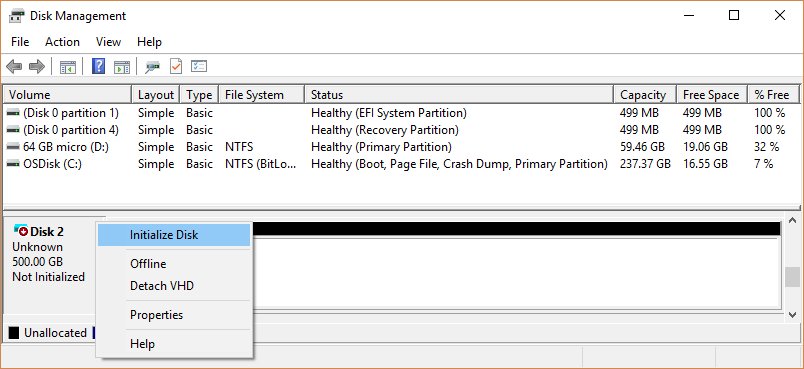
| Not Initialized disk | Initializing can erase the partition table. Recover first | Right-click the disk, select Initialize Disk, choose GPT on a modern UEFI PC |
| Unknown volume or Unreadable disk | Rescan with Action > Rescan Disks, restart, then check cables | Initialize the disk, then create a new volume |
Microsoft notes that a disk that keeps showing these states is often failing. Update your backups as soon as the drive is readable.
Method 12: Check Device Manager if the disk is not detected
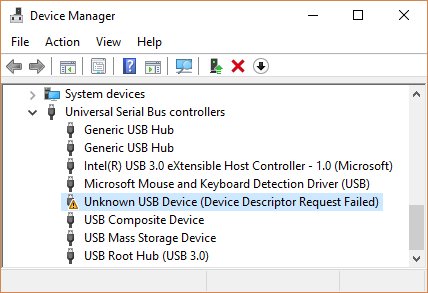
If the disk is missing from Disk Management and Settings, Windows is not seeing the hardware. Device Manager shows whether the drive or its controller has an error.
- Right-click the Start button and select Device Manager.
- Look for any device with an exclamation point beside it, especially your disk or its controller.
- Select that device and read its status.
- Right-click a device with an error and select Uninstall device.
- Select Action > Scan for hardware changes to reinstall it.
- For an external drive, try another cable and a USB port directly on the PC, not a hub.
- If the disk still does not appear, test it on another PC to tell a disk fault from a PC fault.
Method 13: Check for a network drive using D:
A mapped network drive can hold the D: letter, which leaves no room for your local disk. The net use command lists every mapped letter.
- Select Start, type
cmdand open Command Prompt. - Type
net useand press Enter to list network connections and their letters. - If D: is in the list, run
net use D: /deleteto disconnect it. - Assign D to your local volume with Method 2.
- Remap the network share to a spare letter: in File Explorer select This PC, then More > Map network drive, choose a letter such as Z, enter the folder path and select Finish.
Method 14: Run a file system check after the drive returns
A drive that vanished often has file system errors. Once D: has its letter back, run chkdsk from Command Prompt opened with Run as administrator. Close any files open on D: first, because /f must lock the drive.
chkdsk D: /fD: is the volume to check. /f fixes the errors it finds. Use /r instead to also locate bad sectors and recover readable data; it takes much longer. chkdsk D: /scan runs an online scan on an NTFS volume.
You should see: The report ends with no errors found, or lists the fixes made. If it says the volume is in use, close open files or answer Y to check it at the next restart.
Common reasons the D drive disappears in Windows 11
| Cause | Typical sign | Fix |
|---|---|---|
| The volume lost its drive letter | Healthy volume in Disk Management with no letter | Method 2 or Method 5 |
| Another device took D: | A DVD drive, card reader or network share shows as D: | Methods 2, 7 and 13 |
| The disk went offline | Disk labelled Offline in Disk Management | Method 3 |
| DiskPart hidden or no-default-letter flag | Letter never sticks, or the volume stays out of File Explorer | Method 6 |
| A drive-hiding policy is set | D: exists in Disk Management but not in This PC | Methods 8 and 9 |
| BitLocker has locked the drive | Padlock icon; the drive will not open | Method 10 |
| Corrupted or erased partition | RAW, Unallocated or Not Initialized | Method 11 |
| Hardware or connection fault | Disk missing everywhere, or an error in Device Manager | Method 12 |
How to check the D drive is back
- Open File Explorer, select This PC, and confirm (D:) is listed under Devices and drives with its usual label and size.
- Double-click it and confirm your folders open.
- Press Windows logo key + R, type
D:\and press Enter; File Explorer should open at the drive root. - In Disk Management, the volume shows D: and a Healthy status.
- Restart once more and check that D: is still there. If it vanishes again, a policy or DiskPart flag is still set (Methods 6 to 9).
Fix a drive that stays hidden
How to unhide a drive in Windows 10
Disk Management, DiskPart and the drive-hiding policy work the same way in Windows 10 and 11.
- Right-click Start and select Disk Management.
- Right-click the volume, select Change Drive Letter and Paths > Add, and assign a letter.
- In File Explorer, select View > Options > Change folder and search options > View and clear Hide empty drives.
How to unhide a flash drive
A USB flash drive usually has no letter, or has lost its letter to a mapped drive.
- Plug the flash drive into a port directly on the PC.
- In Disk Management, find the removable disk and check it has a volume with a file system.
- Right-click the volume, select Change Drive Letter and Paths > Add, and choose a free letter.
- If the volume is RAW and the stick is empty, right-click it and select Format.
How to unhide a flash drive using cmd
The flash drive's volume has no letter or carries a DiskPart hidden flag.
- Open Command Prompt as administrator and run
diskpart. - Run
list volumeand find the removable volume by its size. - Run
select volume=5with your number, thenattributes volume clear hidden. - Run
assignto give it the next free letter, thenexit.
How to unhide files on a flash drive or in the C drive
The drive is visible, but individual files and folders carry the hidden attribute.
- Open the drive in File Explorer.
- Select View > Show > Hidden items.
- Hidden files now appear with faded icons. Open them normally.
What not to do when trying to unhide D:
Every dangerous step here looks like a fix. Each one below can destroy the files you are trying to reach.
| Do not | Why | Do this instead |
|---|---|---|
| Format a RAW drive that holds your files | Formatting erases all data on the partition | Recover the files first (Method 11) |
| Run New Simple Volume on unallocated space you need | It writes a new, empty volume over the space | Recover first, then create the volume |
| Run DiskPart without a backup | It acts instantly and has no undo | Back up, then check the volume number twice |
Run DiskPart clean or delete |
Both remove partitions | Use only assign and attributes volume clear |
| Change the letter of the drive that holds Windows or apps | Microsoft warns apps may stop finding their files | Change only data drives |
| Unhide or letter the EFI or Recovery partition | They are hidden on purpose and needed to start and recover | Leave them alone |
Delete the whole Policies\Explorer Registry key |
It holds other Explorer policies too | Delete only the NoDrives value |
When to get help
Stop and get help when the disk is missing from Disk Management on two different PCs, shows Unreadable or a critical health warning, or holds files you cannot lose and appears as RAW. At that point the problem is hardware, not a hidden setting, and every further write risks the data. Contact the drive or PC manufacturer, or Microsoft Support. For irreplaceable files, a professional data recovery lab is the safer route. On a work PC, ask IT first, because domain policy can hide drives and lock BitLocker keys.
Frequently Asked Questions
How do I unhide drives in Windows 11?
Open Disk Management from the Start button's right-click menu. Right-click the volume with no letter, select Change Drive Letter and Paths, select Add and choose a letter. If the drive already has a letter, remove the Hide these specified drives in My Computer policy instead.
How do I unhide a drive in Windows 10?
Use the same steps as Windows 11. Open Disk Management, right-click the volume, select Change Drive Letter and Paths and add a letter. Disk Management, DiskPart and the drive-hiding Group Policy work the same way in both versions.
How do I unhide a flash drive?
Plug it into a port directly on the PC and open Disk Management. Right-click the flash drive's volume, select Change Drive Letter and Paths, then Add, and pick a free letter. If it shows RAW and holds nothing you need, format it.
How do I unhide a flash drive using cmd?
Open Command Prompt as administrator and run diskpart. Type list volume, then select volume= followed by the flash drive's number. Run attributes volume clear hidden, then assign to give it a free letter, and type exit.
How do I unhide files on a flash drive?
Open the flash drive in File Explorer and select View > Show > Hidden items. Hidden files and folders then appear with faded icons. This shows hidden files; it does not change the drive's own visibility.
How do I unhide files in the C drive?
Open the C drive in File Explorer and select View > Show > Hidden items. Folders such as ProgramData and AppData then appear. Protected system files stay hidden unless you also change the option in File Explorer Options.
How do I unhide a folder in a hard disk?
Open the hard disk in File Explorer and select View > Show > Hidden items. Hidden folders then appear with faded icons, and you can open them normally. The setting applies to every folder you browse until you turn it off.
Why does my D drive keep disappearing after a restart?
Something reapplies the change at startup. The usual causes are the Hide these specified drives in My Computer policy, the NoDrives Registry value, or a DiskPart nodefaultdriveletter flag. On a work PC, a domain policy can also reapply it.
Can I unhide the D drive without losing data?
Yes. Assigning a drive letter, bringing a disk online, clearing a DiskPart hidden flag and removing a drive-hiding policy do not touch your files. Only formatting, initializing or creating a new volume erases data.



![Allow apps to access your microphone Windows 11 [tutorial]](https://techdows.com/wp-content/uploads/2026/10/Windows-10-Privacy-Microphone-page-with-the-apps-access-switch-on.jpg)
How to Add E Drive in Windows 11 - Techdows
[…] See the separate guide to unhiding the D drive […]