To create and format a hard disk partition in Windows 11 or 10, open Disk Management, shrink an existing volume if there is no unallocated space, then right-click the unallocated space and run New Simple Volume, which assigns a drive letter and formats the partition in one wizard.
This guide covers Disk Management, DiskPart and PowerShell, how to format an existing partition, how to delete one, and what to do when Shrink Volume or Extend Volume is unavailable.
The fastest way to create and format a partition in Windows 11 and 10
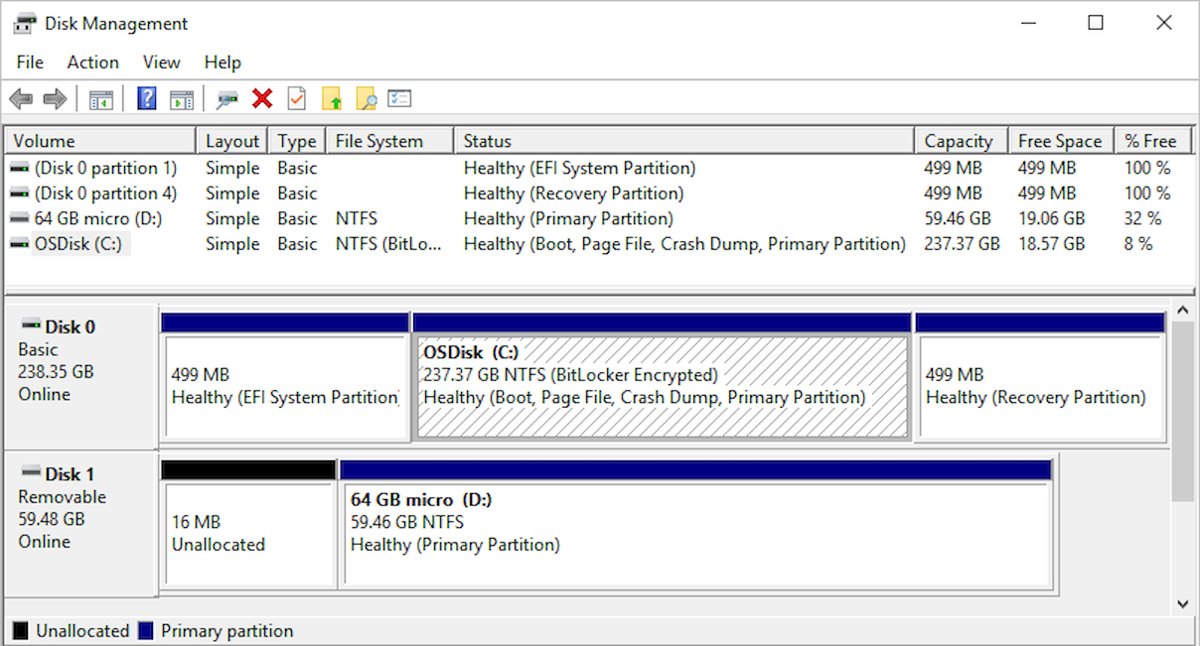
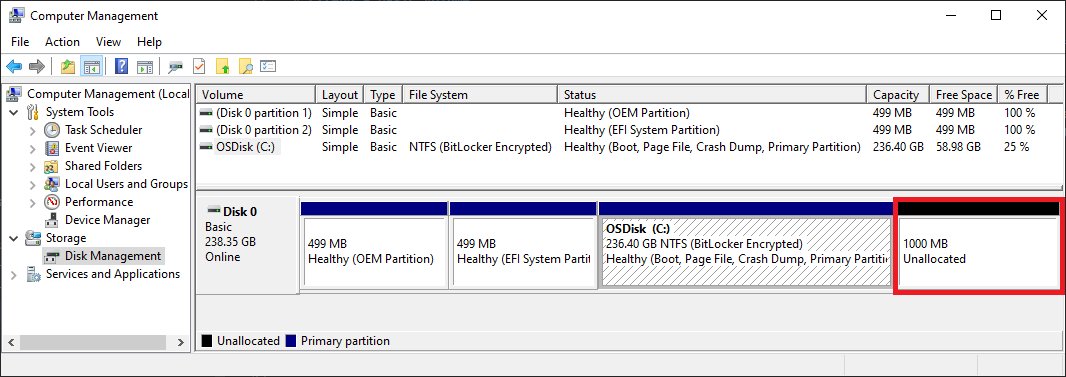
These steps assume the disk already shows a black Unallocated bar in Disk Management. If it does not, shrink a volume first as shown in Method 1.
- Right-click the Start button and select Disk Management.
- Right-click the Unallocated space on the disk and select New Simple Volume, then select Next.
- Enter the volume size in megabytes, or keep the default to use all of the free space, and select Next.
- Pick a drive letter from the list and select Next.
- Choose the file system (usually NTFS), type a volume label, and select Next.
- Select Finish. The new partition is formatted and appears in File Explorer under its drive letter.
Disk Management vs DiskPart vs PowerShell: which partition tool to use
| Your situation | Use this | Why |
|---|---|---|
| You want a visual map of the disk and a guided wizard | Disk Management | Shows every partition, its size and status, and formats in the same wizard |
| Disk Management will not open, or you work in Windows Recovery | DiskPart in Command Prompt | Runs from any elevated command prompt and works without the graphical tool |
| You set up several new disks at once or script the job | PowerShell storage cmdlets | One pipeline initializes, partitions and formats every raw disk |
| You need to move a partition to free space next to another one | A non-Microsoft partitioning app | Disk Management and DiskPart cannot move a volume without deleting it |
What is disk partitioning?
Disk partitioning divides one physical disk into separate chunks called partitions, and Windows treats each formatted partition as its own drive with its own letter. Microsoft uses the words partition and volume interchangeably.
| Term | What it means in Windows |
|---|---|
| Partition (volume) | A section of a disk that gets a file system, a drive letter and its own space |
| Partition style | Every disk has one, GPT or MBR, even when it holds a single partition; Windows normally picks it automatically |
| Primary and logical partitions | On an MBR basic disk, Disk Management makes the first three partitions primary and puts the fourth onward as logical drives inside an extended partition |
| Unallocated space | Disk space that belongs to no partition; a new partition can only be created there |
| Formatting | Writes a file system such as NTFS, exFAT or FAT32 to a partition so Windows can store files on it |
| Windows partition manager | Disk Management, which looks and works the same in Windows 10 and Windows 11 |
Why should you partition your hard drive? The key benefits
| Reason | What a separate partition gives you |
|---|---|
| Keep files apart from Windows | Personal data on its own volume stays put if you later reset or reinstall Windows on drive C |
| Add space without buying a disk | Shrinking a volume frees unallocated space on the same disk for a new partition |
| Use a different file system | A second partition can use NTFS, exFAT or FAT32 while drive C stays NTFS |
| Simpler backups | A data-only volume is smaller and quicker to back up than the whole system drive |
| Tidier organisation | Separate drive letters for projects, media or archives make each easy to find |
Understanding the partitions you already have
Windows normally creates three partitions on the main drive. Disk Management may show the EFI System and Recovery partitions as 100 percent free, but they hold files the PC needs to start and recover, so leave them alone.
| Partition | Purpose | Safe to change? |
|---|---|---|
| Local Disk (C:) | Holds the Windows installation and, by default, apps and files | You can shrink it to make room for a new partition |
| EFI System | Starts the computer and the operating system on modern PCs | No. Do not modify, format or delete it |
| Recovery | Holds tools that repair Windows when the PC does not start | No. Do not modify, format or delete it |
| Unallocated | Space that belongs to no partition yet | Yes. This is where a new partition goes |
Each disk also has a partition style. GPT is the default for new disks, supports more than four partitions and volumes larger than 2 TB. MBR is older, limited to four primary partitions and 2 TB disks.
Before you begin partitioning: back up the drive (the most important step)
Shrinking an NTFS volume moves files without deleting them, but initializing, formatting, deleting or converting a disk erases its data. The one rule that protects your files: back them up before you change any partition, because a backup is the single step that makes every mistake recoverable.
| Check | Why it matters |
|---|---|
| Back up important files to another drive or OneDrive | Initializing or formatting a disk erases everything on it |
| Sign in with an administrator account | Disk Management, DiskPart and the format command need Administrators (or Backup Operators for some tasks) rights |
| Find your BitLocker recovery key if the drive is encrypted | Microsoft lists it as a resource to prepare before Disk Management tasks |
| Create a restore point | Gives Windows a rollback point if a system change goes wrong |
| Close apps that use the target disk | Open files can block a format or a partition style conversion |
Method 1: Using Disk Management (the easiest method for most users)
Disk Management is the graphical tool behind the Control Panel entry Create and format hard disk partitions. If the right-click menu does not open it, you can open Disk Management from Run or Computer Management instead.
- Open Start, type Create and format hard disk partitions, right-click the result and select Run as administrator > Yes.
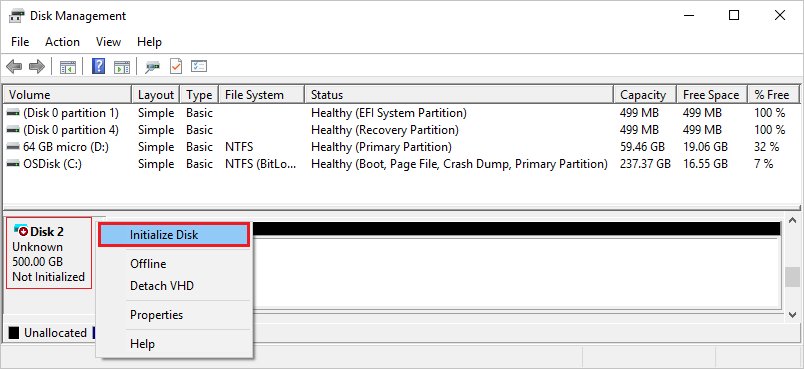
- If the disk shows Not Initialized, right-click the disk, select Initialize Disk, keep GPT and select OK. Skip this on a disk that already holds data.
- If there is no Unallocated space, right-click the volume you want to take space from (for example C:) and select Shrink Volume.
- Enter the amount of space to shrink in megabytes and select Shrink. A black Unallocated bar appears to the right of that volume.
- Right-click the Unallocated space, select New Simple Volume and select Next.
- Set the volume size, select Next, choose a drive letter and select Next again.
- Choose NTFS as the file system, type a volume label, select Next and then Finish.
- To format a partition that already exists instead, right-click it, select Format, choose the file system and label, and confirm. Formatting erases all data on that partition.
Method 2: Using the Command Prompt (DiskPart) for advanced users
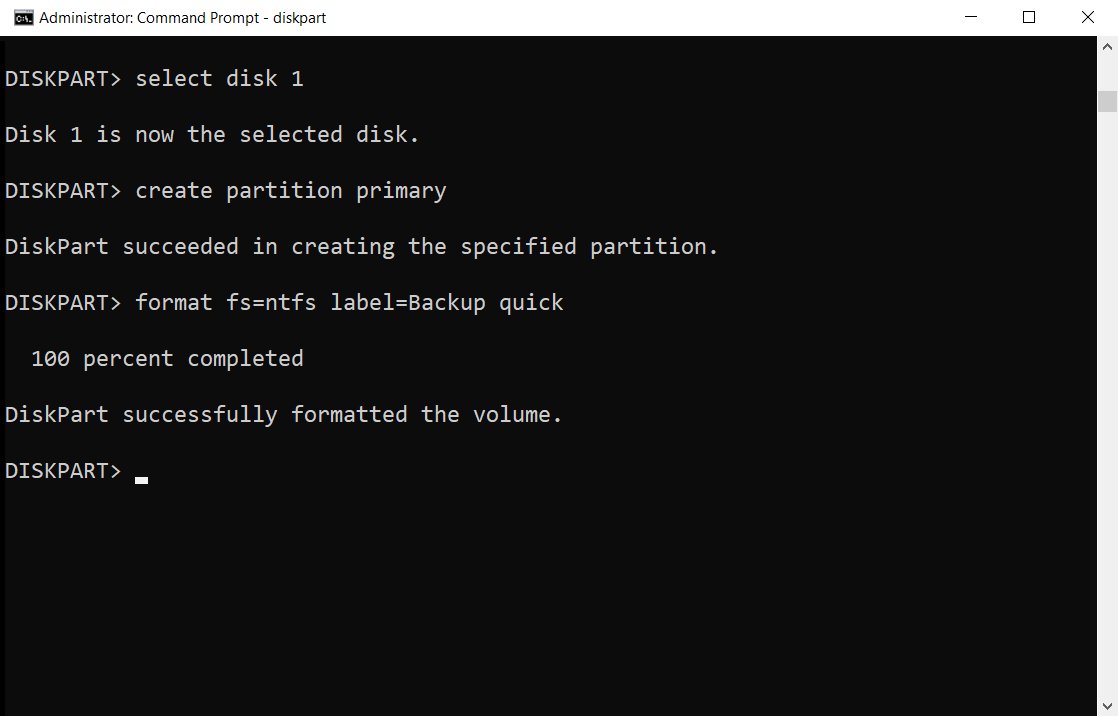
DiskPart commands act on whichever disk, partition or volume has focus, so always run list and select before any command that writes. Selecting the wrong disk number is the most common way to wipe the wrong drive.
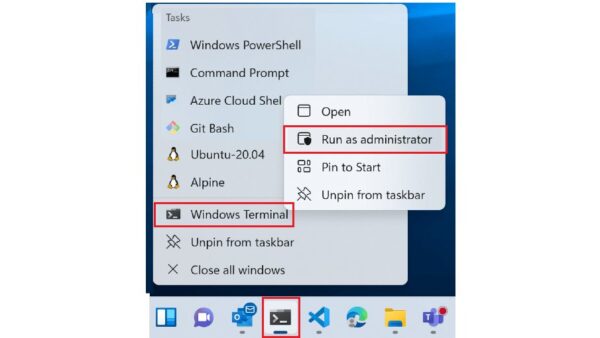
- Open Start, type cmd, right-click Command Prompt and select Run as administrator.
- Type
diskpartand press Enter. - Type
list diskand note the number of the disk with free space. - Type
select disk 1, replacing 1 with your disk number. - Type
create partition primary size=51200to make a 50 GB partition, orcreate partition primaryto use all free space. Focus moves to the new partition. - Type
format fs=ntfs label=Data quickto quick-format it as NTFS with the label Data. - Type
assign letter=Eto give it drive letter E, orassignto take the next free letter. - Type
exitto close DiskPart.
To make room on a disk that is full, run list volume, select volume <number> and then shrink desired=51200 before step 4. The shrink command moves ordinary files and does not delete data.
Method 3: Create and format a partition with PowerShell
PowerShell does the same job in one line, which helps when you prepare several disks. Run it in Windows PowerShell or Terminal opened as administrator, and change the disk number and letter to match your system.
New-Partition -DiskNumber 1 -UseMaximumSize -DriveLetter T | Format-Volume -FileSystem NTFS -NewFileSystemLabel "Data"New-Partition creates a partition on disk 1 that fills the free space and assigns drive letter T. Format-Volume then formats it as NTFS with the label Data. Use -Size 50GB instead of -UseMaximumSize for a fixed size.
You should see: PowerShell prints a table showing drive letter T, file system NTFS, health status Healthy and the size of the new volume.
To set up every brand-new raw disk at once, Microsoft documents this pipeline: Get-Disk | Where-Object PartitionStyle -Eq "RAW" | Initialize-Disk -PassThru | New-Partition -AssignDriveLetter -UseMaximumSize | Format-Volume. It only touches disks whose partition style is RAW, but check the Get-Disk output first.
Method 4: Using third-party partitioning software
Windows can shrink and extend volumes, but only into unallocated space directly to the right of a volume. Microsoft's own extend guide lists a non-Microsoft partitioning app that can move volumes without destroying data as one option when another volume sits in the way.
| Task | Built into Windows? | What to do |
|---|---|---|
| Create, format, shrink, delete a partition | Yes | Use Disk Management, DiskPart or PowerShell |
| Extend a volume into space directly to its right | Yes | Right-click the volume and select Extend Volume |
| Extend a volume when another partition sits between it and the free space | No | Delete the in-between partition after backing it up, create a separate volume instead, or use a partitioning app that can move volumes |
| Convert MBR to GPT without deleting data | Yes | Use the MBR2GPT tool documented by Microsoft |
| Merge two partitions and keep both sets of files | No | Copy the files off one partition, delete it, then extend the other |
If you choose a partitioning app, download it only from the developer's own site and back up the disk first, because moving a partition rewrites its data on disk.
How to check the new partition was created and formatted
- Open File Explorer and select This PC. The new drive letter and label appear under Devices and drives.
- In Disk Management, confirm the new block shows the file system (for example NTFS) and the status Healthy.
- In an elevated Command Prompt, run
diskpart, thenlist volume. The new volume is listed with its letter, label, file system and size. - Copy a small file to the new drive and open it to confirm the volume accepts writes.
How to format a hard drive in Windows 10 and 11
Use these steps to format an existing partition (volume), such as a second internal drive or an old data partition. Formatting destroys all data on the partition, so back it up first.
- Right-click Start and select Disk Management.
- Right-click the volume you want to format and select Format.
- In the Format dialog, set a label and a file system (NTFS for internal drives), or keep the default settings.
- Leave Perform a quick format checked for a healthy drive, or clear it for a full format that erases the existing data.
- Select OK, then select OK again at the warning.
Windows cannot format a disk or partition that is in use, including the partition that holds Windows. From an administrator Command Prompt, format E: /fs:ntfs /v:Data /q quick-formats drive E as NTFS with the label Data; use /q only on a previously formatted volume that you know is in good condition.
Change a drive letter in Disk Management
A new partition gets the next free letter, but you can pick another one. Do not change the letter of the drive that holds Windows or installed apps, because those apps might stop finding their files.
- Open Disk Management with administrator rights.
- Right-click the volume and select Change Drive Letter and Paths.
- Select Change to replace the current letter, or Add if the volume has no letter.
- Select Assign the following drive letter, choose a letter from the list and select OK.
- Select Yes in the confirmation dialog.
If the option is missing or greyed out, the disk needs to be initialized, the partition is an EFI System or Recovery partition, or your account lacks administrator rights.
Best practices for your new partition: file system, size and label
| Choice | Recommendation | Reason |
|---|---|---|
| File system for an internal data partition | NTFS | The usual choice in Microsoft's new-disk steps; only NTFS and ReFS volumes can be extended later |
| File system for a drive that must boot both BIOS and UEFI PCs | FAT32 | Microsoft uses FAT32 for Windows install USB drives for this reason |
| Files larger than 4 GB | Avoid FAT32 | FAT32 has a 4 GB per-file limit |
| Partition style for a new disk | GPT | Default in Windows, supports more than four partitions and disks over 2 TB |
| Quick or full format | Quick for a healthy, previously formatted disk | A quick format skips the sector-by-sector scan for bad areas |
| Volume label | A short descriptive name such as Backup or Media | Makes the drive easy to identify in File Explorer and DiskPart lists |
| Drive letter for the Windows drive | Do not change it | Apps installed on that drive may stop finding their files |
How to safely delete a partition and reclaim space
Deleting a partition destroys its data. Copy anything you need first. Windows will not delete the system partition, the boot partition or a partition holding the active page file.
- Back up the files on the partition you plan to remove.
- In Disk Management, right-click the partition and select Delete Volume, then select Yes. The space turns into Unallocated.
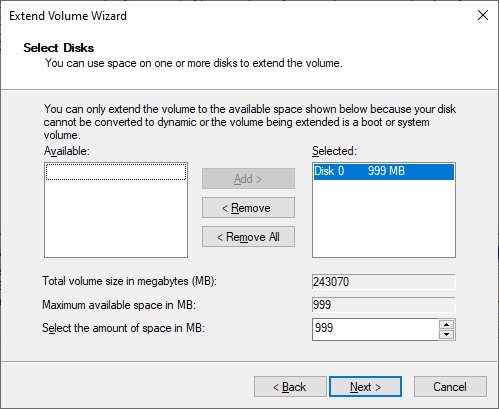
- To add the space to the volume on its left, right-click that volume and select Extend Volume.
- Select Next, keep Maximum available or enter a smaller amount, then select Next and Finish.
- In DiskPart, the same job is
select disk <n>,list partition,select partition <n>anddelete partition, followed byselect volume <n>andextendon the neighbouring volume.
Advanced tasks and troubleshooting for Windows disk partitions
Shrink Volume is greyed out, or Windows will not let you shrink very much
Only NTFS or raw volumes can shrink, and unmovable files such as the page file or shadow copies stop the shrink at their location.
- Confirm the volume uses NTFS. FAT32 and exFAT volumes cannot be shrunk.
- Open Event Viewer and check the Application log for event ID 259, which names the unmovable file.
- Move the paging file to another disk from Control Panel and delete stored shadow copies if needed.
- Shrink the volume again, then move the paging file back.
Extend Volume is not available
The free space is not directly to the right of the volume, the tool is not elevated, or the volume is not NTFS or ReFS.
- Close Disk Management and reopen it with Run as administrator.
- Check that the Unallocated block sits immediately after the volume on the same disk.
- If another partition is in between, back it up and delete it, or create a new volume in the free space instead.
A new disk doesn't appear in File Explorer or shows Not Initialized
The disk has never been initialized, is offline, or has no drive letter.
- In Disk Management, right-click a disk marked Offline and select Online.
- Right-click a new, empty disk and select Initialize Disk. Initializing erases any data.
- If a partition has a file system but no letter, right-click it, select Change Drive Letter and Paths > Add, and pick a letter.
- For an external disk, unplug it, reconnect it to a port on the PC rather than a hub, and select Action > Rescan Disks.
The partition shows as RAW
The partition has no recognised file system, either because it was never formatted or its file system is damaged.
- If the partition is empty, right-click it and select Format, then choose NTFS.
- If it holds files you need, do not format it. Recover the files first, because formatting erases the data.
Change Drive Letter and Paths is missing or greyed out
The space is unallocated, the volume is an EFI System or Recovery partition, or the account lacks administrator rights.
- Create and format a volume in unallocated space first.
- Leave EFI System and Recovery partitions without a letter.
- Reopen Disk Management as administrator and try again.
Hard disk partition FAQs for Windows 11 and 10
How do I create and format hard disk partitions in Windows 11?
Right-click Start, select Disk Management, right-click unallocated space and choose New Simple Volume. The wizard sets the size, drive letter and file system, then formats the partition. Shrink an existing volume first if the disk has no unallocated space.
What is the main benefit of partitioning a hard drive?
A separate partition keeps your files apart from the Windows installation on drive C. That makes backups smaller and lets you reset or reinstall Windows without touching the data on the other volume.
Can I partition a drive that already has data on it?
Yes. Shrinking an NTFS volume in Disk Management moves ordinary files and does not delete data. Unmovable files such as the page file limit how far it can shrink. Back up first, because initializing, formatting or deleting a partition does erase data.
Should I choose NTFS or FAT32 when formatting a partition?
Choose NTFS for internal drives. It is the usual Windows choice, and Disk Management can extend NTFS volumes later but not FAT32 ones. FAT32 suits drives that must boot on both BIOS and UEFI PCs, but it cannot store files larger than 4 GB.
What is the difference between MBR and GPT?
GPT is the modern partition style and the Windows default. It supports more than four partitions and disks larger than 2 TB. MBR is older, allows four primary partitions and works only with disks of 2 TB or smaller.
What is the Windows tool for creating and formatting hard disk partitions called?
It is Disk Management, whose file is diskmgmt.msc. Searching Start for Create and format hard disk partitions opens it, and it also sits inside Computer Management under Storage.
How do I create and format a partition with CMD?
Open Command Prompt as administrator and run diskpart. Then use list disk, select disk with your number, create partition primary, format fs=ntfs label=Data quick and assign letter=E. Check the disk number carefully before you create or format anything.
Do I need admin rights to create and format partitions?
Yes. Disk Management tasks need membership in the Administrators or Backup Operators group, and DiskPart and the format command need administrator rights. Run the tool with Run as administrator from a standard account.
Can I create and format partitions on a USB drive?
Yes, with the same tools. Some USB drives cannot be initialized, so Windows only formats them and assigns a drive letter. Right-click the drive in Disk Management and select Format for those.
Are there partitioning differences across Windows versions?
Not in the main tool. Disk Management works the same way in Windows 11 and Windows 10, so the create, format, shrink and extend steps in this guide apply to both versions.
Bottom line: the best way to partition a hard drive in Windows
Use Disk Management for one-off partitions, and switch to DiskPart or PowerShell only when the graphical tool is unavailable or you set up several disks. Disk Management shows the whole disk before you change it, which is the best protection against formatting the wrong partition, and its wizard creates, labels and formats the volume in one pass.