To add an E drive in Windows 11, open Disk Management, shrink C: (or initialize a new disk) to get Unallocated space, then right-click that space, select New Simple Volume and pick the letter E in the wizard.
This guide covers both routes: splitting the drive you already have, and setting up a second internal or external disk. It also covers the DiskPart commands, freeing the letter E when a DVD or USB drive holds it, and fixes for drives that will not appear.
How to Add E Drive in Windows 11
This is the route for a PC with a single drive, which covers most laptops. Back up anything important on C: before you start, because any partition change carries some risk.
- Right-click the Start button and select Disk Management.
- Right-click the C: volume and select Shrink Volume.
- Enter the amount of space to free, in MB, and select Shrink.
- Right-click the new black Unallocated block and select New Simple Volume, then select Next.
- Accept the maximum size, or type a smaller size in MB, and select Next.
- Choose E as the drive letter and select Next.
- Keep the default format settings, select Next, then select Finish.
The new E: volume appears in File Explorer under This PC a few seconds after formatting finishes. If you are adding a brand-new disk instead, initialize it first (step 2 below) and skip the shrink.
Which route fits your PC?
| Your situation | Do this | Why |
|---|---|---|
| One drive only (typical laptop) | Shrink C:, then create a new volume as E: | Shrinking frees space without reformatting C: |
| New internal SSD or HDD just installed | Initialize the disk, then create a new volume as E: | A new disk is not usable until Windows writes a partition style to it |
| Volume already exists but has no letter | Use Change Drive Letter and Paths to add E | No partitioning needed; the data stays in place |
| E is taken by a DVD drive or USB stick | Change that device's letter first, then assign E | Each letter can belong to only one volume at a time |
| You prefer the command line | Use DiskPart: shrink, create partition primary, assign letter=e |
Same result, scriptable, no wizard |
| Existing D: drive that went missing | See the separate guide to unhiding the D drive | That is a hidden-volume problem, not a new-drive job |
Prerequisites for Adding E Drive in Windows 11
| Requirement | Detail |
|---|---|
| Administrator account | Disk Management changes need membership in the Administrators or Backup Operators group |
| A current backup | Initializing or formatting a disk erases everything on it; back up before any partition change |
| Free space on C: (single-drive route) | Shrink only reclaims free space; files such as the paging file or shadow copies can limit how far C: shrinks |
| NTFS or raw volume to shrink | Windows shrinks only basic volumes that are NTFS or have no file system |
| Letter E available | If a DVD, card reader or USB drive already uses E, change that letter first |
| For a new disk: correct connection | The disk must be detected in Disk Management before you can initialize it |
Back up first: which steps can erase data
Some Disk Management actions are safe on a disk full of files, and some wipe it. Know which is which before you click.
| Action | Effect on existing data |
|---|---|
| Shrink Volume on an NTFS volume | Files are moved automatically; no reformat needed. Still back up first |
| Shrink Volume on a raw partition that holds data | Can destroy that data, according to Microsoft |
| Initialize Disk | Erases all data on the disk; use it only on a new, empty disk |
| Format | Destroys the data on that volume |
| Delete Volume | Destroys the data on that volume |
| Change Drive Letter and Paths | Keeps data, but apps installed on that drive can stop finding their files |
Windows Backup can save files, settings and apps, and OneDrive keeps synced files available online if a disk fails.
Understanding Disk Management in Windows 11
Disk Management is the built-in tool that initializes disks, creates and formats volumes, shrinks or extends them and changes drive letters. It looks and works the same in Windows 10 and Windows 11. These are the labels you will meet in it.
| Label in Disk Management | What it means |
|---|---|
| Disk 0, Disk 1 | A physical drive; the bottom pane shows each disk as a strip of partitions |
| Partition / volume | A section of a disk; a volume with a letter shows in File Explorer |
| Unallocated (black bar) | Space with no partition; this is where the E drive goes |
| Not Initialized | A new disk with no partition style yet |
| Offline | Windows sees the disk but has not mounted it |
| RAW | A partition with no recognised file system |
| Healthy | The volume is working normally |
| EFI System Partition, Recovery Partition | Partitions Windows needs to start and repair itself; leave them alone |
1. Open Disk Management
Every route in this guide starts here. The five ways to open Disk Management are covered in their own guide; the quickest is below.
- Right-click the Start button.
- Select Disk Management.
- If you are prompted by User Account Control, select Yes.
- Wait for the disk list to load; the lower pane shows each disk and its partitions.
Alternatively, press Windows + R, type diskmgmt.msc and select OK.
2. Initialize the Disk (if new)
A newly installed disk does not appear in File Explorer until you initialize it. Only do this on a new, empty disk, because initializing erases everything on it.
- In Disk Management, find the disk marked Not Initialized.
- If the disk shows Offline, right-click it and select Online.
- Right-click the disk and select Initialize Disk.
- Confirm the correct disk is ticked in the Initialize Disk dialog.
- Keep the default partition style, GPT, unless the disk is for older hardware that needs MBR.
- Select OK and wait for the status to change from Initializing to Online.
Some USB drives cannot be initialized; Windows only formats them and gives them a letter. The whole disk now shows as Unallocated, ready for step 3.
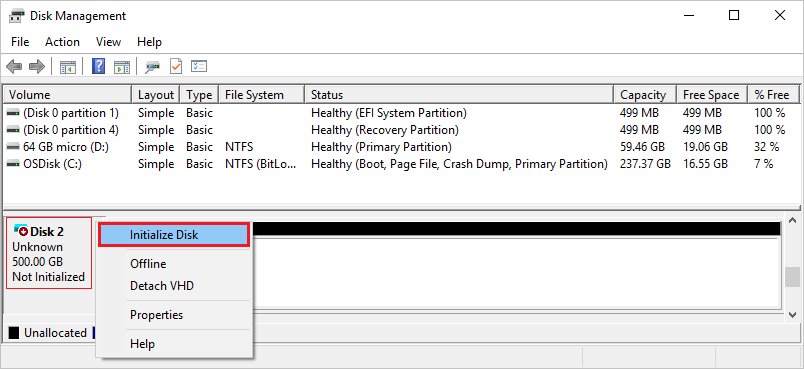
Locate Unallocated Space
The E drive needs empty, unpartitioned space. Match what the disk map shows to a row.
| What the disk map shows | What to do next |
|---|---|
| A black bar labelled Unallocated | Go straight to step 3 and create the volume there |
| No black bar anywhere; C: fills the disk | Shrink C: first (next section) |
| A partition with a file system but no letter | Skip partitioning and add the letter E (step 4) |
| A partition marked RAW | Format it only if you know it is empty |
| Only EFI System or Recovery partitions besides C: | Ignore them and shrink C: instead |
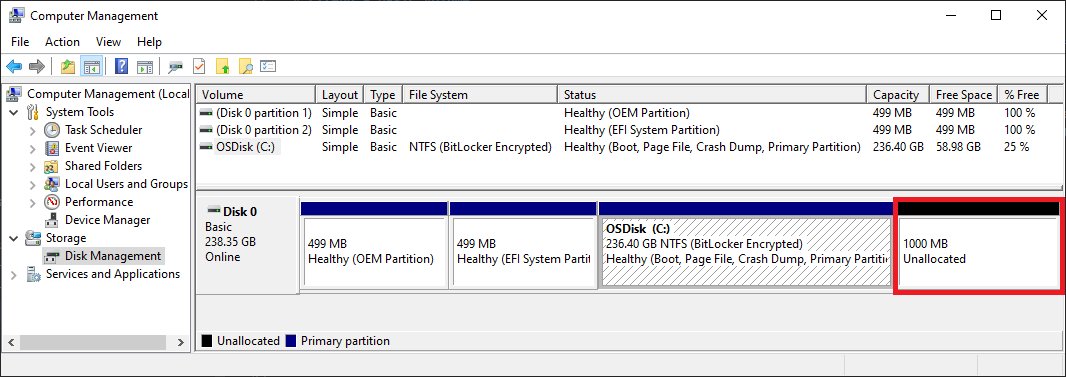
Shrink Existing Volume (if needed)
Shrinking takes space from the end of C: and turns it into unallocated space. Ordinary files move automatically, so C: does not need to be reformatted.
- Right-click the C: volume and select Shrink Volume.
- Wait while Windows calculates how much space it can release.
- Type the size of the future E drive in MB (1 GB is 1,024 MB).
- Select Shrink.
- Check that a black Unallocated block now sits to the right of C:.
Windows cannot move the paging file or shadow copy storage, so C: shrinks only up to the point where those files sit. If the operation fails, the Application log in Event Viewer records the blocking file as event ID 259.
3. Create a New Partition
This wizard creates the partition, gives it the letter E and formats it in one pass. It is the same wizard whether the space came from shrinking C: or from a new disk.
- Right-click the Unallocated space and select New Simple Volume.
- Select Next on the welcome page of the New Simple Volume Wizard.
- Accept the maximum size, or enter a smaller size in MB to leave room for another volume, then select Next.
- Choose E as the drive letter and select Next.
- Choose the format settings on the Format Partition page (next-but-one section) and select Next.
- Review the summary and select Finish.
To add both D and E, create a volume of the size you want for D:, then run the wizard again on the remaining unallocated space and pick E.
Create a New Volume with DiskPart
DiskPart does the same job from an elevated Command Prompt. Right-click Command Prompt in the Start menu results, select Run as administrator, type diskpart and press Enter. Run list volume and list disk first and note the numbers; picking the wrong one is how data gets lost.
select volume 2
shrink desired=102400
select disk 0
create partition primary
assign letter=e
exit
format E: /FS:NTFS /V:Data
Replace 2 with the number of C: from list volume and 0 with its disk from list disk. shrink desired=102400 frees 100 GB (the value is in MB). create partition primary with no size uses all the free space in that region. assign letter=e gives it the letter E; DiskPart returns an error if E is already in use. format then writes an NTFS file system labelled Data. On a new disk, skip the shrink line and select that disk instead.
You should see: DiskPart reports that it assigned the drive letter, and format ends with a completion message; list volume then shows volume E with file system NTFS.
Finalization
The Format Partition page is the last choice in the wizard, and it decides how E behaves. The defaults suit almost everyone.
| Setting | Recommended choice | Why |
|---|---|---|
| File system | NTFS | Microsoft's usual choice for internal drives; required if you later want to shrink or extend it |
| Perform a quick format | On for a healthy disk; off if you want the space fully erased | A quick format only builds a new file table, so it is much faster than a full format |
| Do not format this volume | Only if you will format it later | The volume gets a letter but cannot store files until formatted |
4. Assign Drive Letter
Use this when a volume already exists but has no letter, or has a different letter you want to change to E. Do not change the letter of the drive that holds Windows or installed apps.
- In Disk Management, right-click the volume and select Change Drive Letter and Paths.
- Select Add if the volume has no letter, or Change if it has one.
- Select Assign the following drive letter.
- Choose E from the drop-down list and select OK.
- Select Yes in the confirmation dialog.
If Change Drive Letter and Paths is greyed out, the space is unallocated or uninitialized, it is an EFI or Recovery partition, or your account lacks administrator rights.
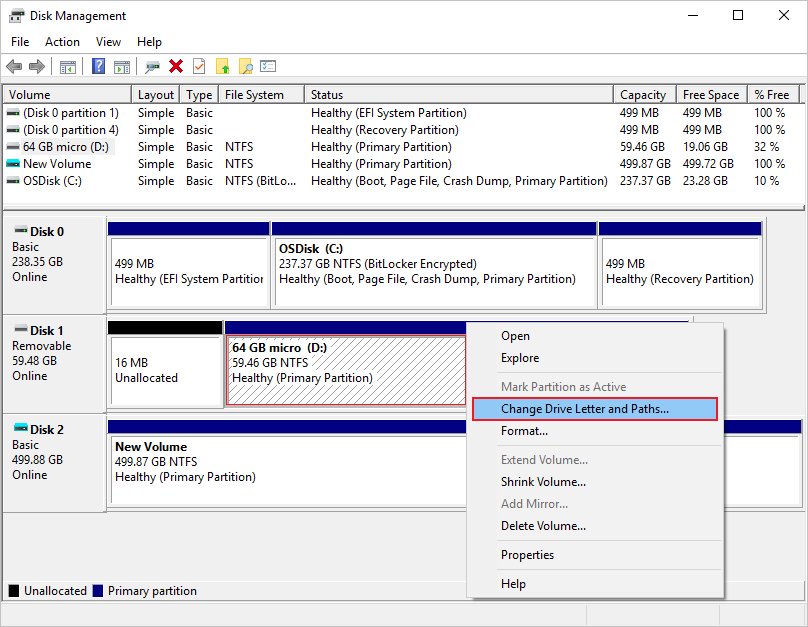
Assigning the Drive Letter E
On many PCs a DVD drive, card reader or USB stick already holds E. Windows allows one volume per letter, so move that device to another letter first.
- In Disk Management, find the device currently labelled E:.
- Right-click it and select Change Drive Letter and Paths.
- Select Change, then pick an unused letter further down the alphabet, such as R.
- Select OK, then Yes.
- Return to your new volume and assign E with the steps in the previous section.
Check the new drive in Settings > Disks & volumes
Windows 11 Settings also lists every disk and volume, and can create, format and resize volumes. It is a quick place to confirm the result without opening Disk Management.
- Open Settings from the Start menu.
- Select System, then Storage.
- Select Advanced storage settings, then Disks & volumes.
- Find the disk that holds E: and check its type, capacity and usage.
- Select Properties next to a volume to see its details or resize it.
5. Verify the E Drive
- Press Windows + E and select This PC; E: should now be listed with your other drives.
- Right-click E: and select Properties to confirm the capacity and NTFS file system.
- In Disk Management, confirm the E volume shows Healthy.
- Create a test folder on E: and delete it to confirm you can write to the drive.
- Optionally, run
chkdsk E: /scanfrom an administrator Command Prompt for an online check of the new file system.
How to remove the E drive and give the space back to C:
Deleting E destroys its data, so copy anything you need off it first. C: can only grow into unallocated space that sits immediately to its right.
- In Disk Management, right-click E: and select Delete Volume, then confirm.
- Right-click C: and select Extend Volume.
- Select Next in the Extend Volume Wizard.
- Keep the maximum available space and select Next.
- Select Finish.
If Extend Volume is greyed out, another partition sits between C: and the free space, or Disk Management is not running with administrator rights.
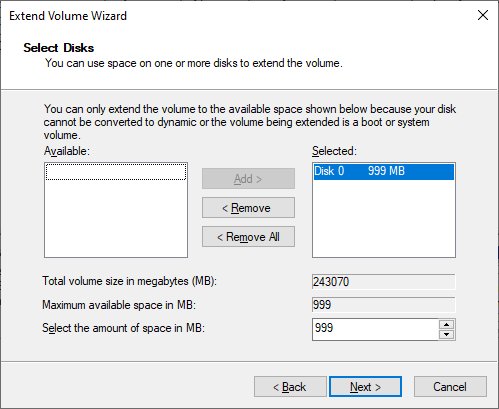
Troubleshooting Common Issues When Adding an E Drive in Windows 11
Drive Not Showing in File Explorer
The volume has no drive letter, or the disk is still offline or uninitialized.
- Open Disk Management and find the disk.
- If it shows Offline, right-click it and select Online.
- If a partition has a file system but no letter, add E with Change Drive Letter and Paths.
- If the space is Unallocated and you know it is empty, create a New Simple Volume there.
Drive Not Recognized by Windows
A connection, power or driver problem, or a failing disk.
- For an external disk, unplug it, plug it back in and select Action > Rescan Disks.
- Connect it to a USB port directly on the PC, not a hub, and try a different cable.
- Shut down the PC and the disk completely, then turn both back on.
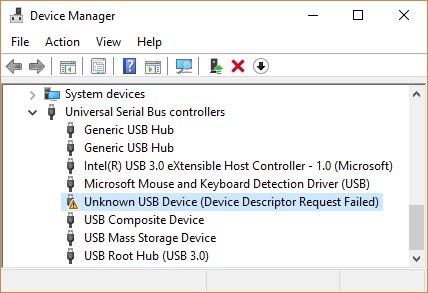
- Right-click Start, open Device Manager and look for a device with an exclamation point.
- Right-click that device, select Uninstall device, then select Action > Scan for hardware changes.
- Try the disk in another PC; if it fails there too, the disk itself is faulty.
Drive Letter Conflicts
Another device, often a DVD drive or USB stick, already uses E.
- In Disk Management, find the device that holds E:.
- Change its letter with Change Drive Letter and Paths > Change.
- Assign E to your new volume.
- In DiskPart, an error on
assign letter=emeans the same thing: the letter is in use.
Formatting Issues
The partition is RAW, in use, or the shrink step left too little space.
- If the partition shows RAW and holds nothing you need, right-click it and select Format.
- If it may hold files you want, do not format; copy the data off first.
- Close any app or window using the volume, because Windows cannot format a volume in use.
- If Shrink Volume freed less space than you wanted, an unmovable file such as the paging file is in the way; check event ID 259 in the Application log.
Persistent Problems
The disk reports errors or keeps dropping out, which usually means hardware failure.
- Back up the files on that disk now, before trying anything else.
- If the disk shows Missing or Offline after reconnecting it, right-click it and select Reactivate Disk.
- Run
chkdsk E: /ffrom an administrator Command Prompt to fix file system errors. - If the problem continues, contact the disk or PC manufacturer.
Additional Tips for Managing Drives in Windows 11
| Tip | How to do it |
|---|---|
| 1. Assign Drive Letters Strategically | Give fixed data volumes early letters such as D and E, and move DVD and card readers further down the alphabet. Never change the letter of the Windows or apps drive |
| 2. Format New Drives Properly | Use NTFS and the GPT partition style for internal drives; GPT supports volumes larger than 2 TB |
| 3. Enable Drive Encryption for Security | On Windows 11 Pro, Enterprise or Education, search BitLocker, open Manage BitLocker and select Turn on BitLocker next to E under Fixed data drives. It is not available on Windows 11 Home |
| 4. Regularly Check Drive Health | Run chkdsk E: /scan occasionally, and use Settings > System > Storage > Advanced storage settings > Drive optimization to optimize or trim the drive |
| 5. Manage Drive Space Efficiently | Turn on Storage Sense to clear temporary files and the Recycle Bin, and use Where new content is saved to send new apps, documents and media to E |
| 6. Backup Drive Data | Use Windows Backup for files, settings and apps, or sync important folders to OneDrive; disks fail without warning |
Frequently Asked Questions
How do I create an E drive on a laptop?
Shrink C: in Disk Management, then create a new simple volume in the unallocated space and give it the letter E. Most laptops have one drive, so splitting C: is the usual route. Back up your files first, because any partition change carries some risk.
How do I add a drive in Windows 11?
Connect the drive, open Disk Management, initialize it if it shows Not Initialized, then right-click the unallocated space and select New Simple Volume. The wizard sets the size, drive letter and file system, and the drive then appears in File Explorer.
Is adding a drive the same in Windows 10?
Yes. Microsoft states that Disk Management looks and works the same in Windows 10 and Windows 11, so the shrink, initialize, New Simple Volume and Change Drive Letter and Paths steps are identical on both versions.
How do I add both D and E drives in Windows 11?
Shrink C: by the combined size you want for D and E. Run New Simple Volume on part of the unallocated space and choose D, then run it again on the rest and choose E. Free either letter first if a DVD or USB drive holds it.
What is the E drive on a PC?
E: is simply a letter Windows gives to a volume, such as a second partition, a second disk, a DVD drive or a USB stick. When no letter is chosen, Windows assigns the next available one, so E often goes to whatever device was connected second or third.
How do I access my E drive?
Press Windows + E to open File Explorer, select This PC and double-click E:. If E does not appear there, open Disk Management and check that the volume has a letter and that its disk is online.
Why is there no E drive on my computer?
Windows only shows letters for volumes that exist. A single-drive PC often has just C:, so there is nothing to call E until you create a new volume or connect another drive. A volume without a letter also stays out of File Explorer.
Will creating an E drive delete my files?
Shrinking an NTFS C: volume moves files automatically and does not delete them. Initializing or formatting a disk does erase it, so use those only on new or empty disks. Back up before any partition change regardless.
How do I use the E drive once it is created?
Save or move files to it like any folder. In Settings > System > Storage > Advanced storage settings, Where new content is saved lets you send new apps, documents, music, pictures and videos to E by default.


Does Windows 11 26H2 corrupt SSD drives? - Techdows
[…] If the volume has no letter, right-click it and select Change Drive Letter and Paths, then Add, to assign a drive letter. […]