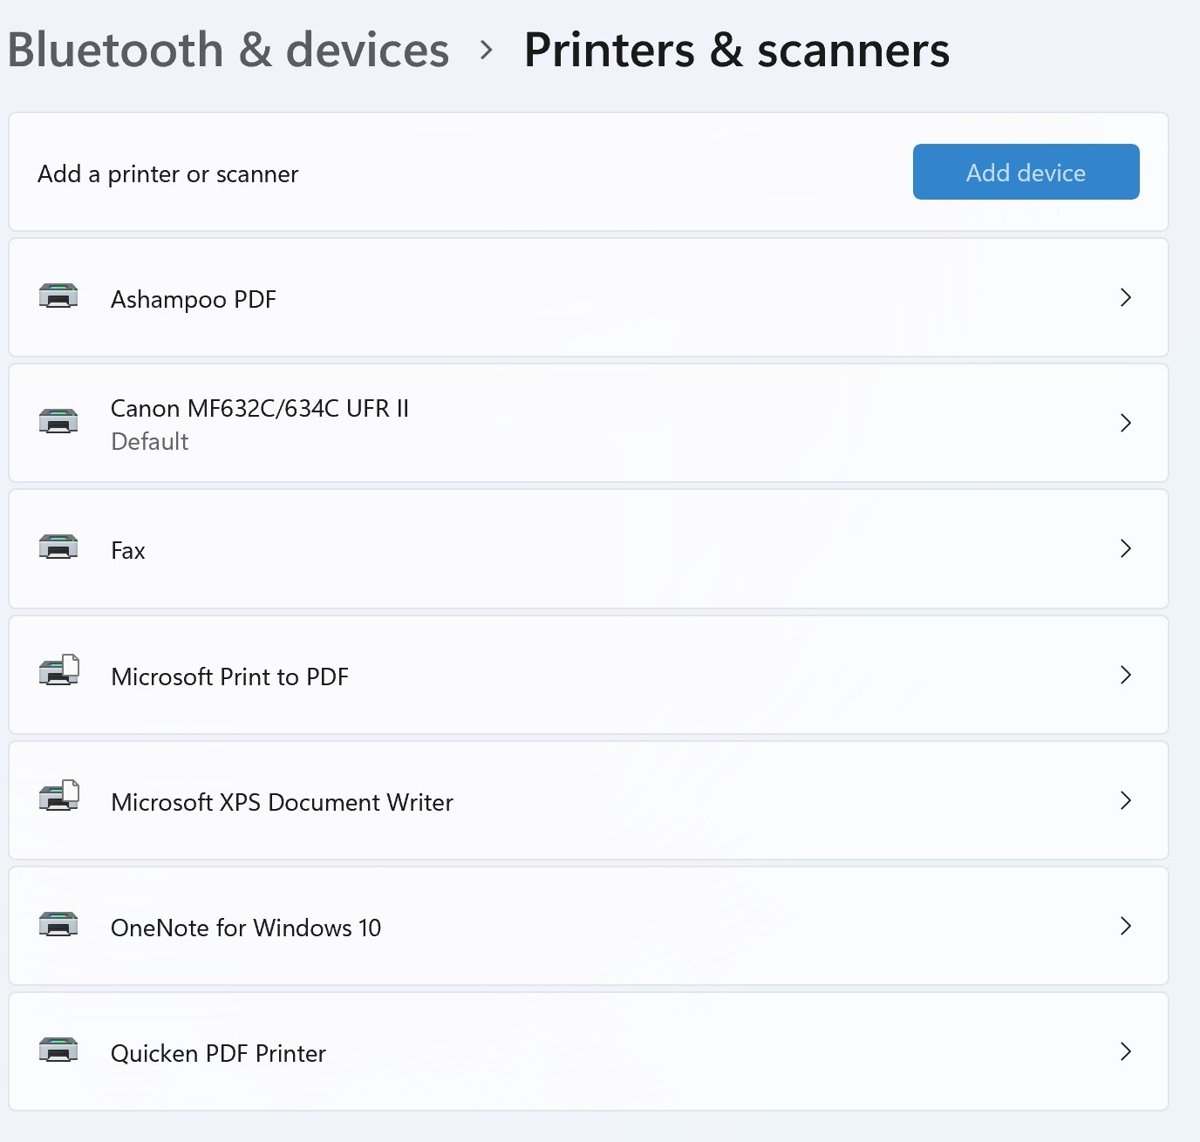
To add a printer in Windows 11, open Settings > Bluetooth & devices > Printers & scanners, select Add device, and then select Add device next to your printer when it appears.
This guide covers USB, Wi-Fi, Bluetooth and shared printers, adding a printer by IP address, the Windows 10 route, drivers, the default printer and what to do when Windows cannot find the printer.
How to add a printer in Windows 11
This route works for USB printers, Wi-Fi printers on the same network and printers shared from another PC. A USB printer usually installs by itself within a minute of being plugged in and switched on, so check the list first.
- Turn the printer on and connect it: plug in the USB cable, or join the printer to the same Wi-Fi network as the PC.
- Select Start > Settings > Bluetooth & devices > Printers & scanners.
- Check the list of installed printers. If your printer is already there, it is ready to use.
- Next to Add a printer or scanner, select Add device.
- Wait while Windows searches. The list can take a few minutes to fill.
- Select Add device next to your printer. Some printers install as soon as the search finds them.
- If the printer never appears, select Add manually next to The printer that I want isn't listed and use one of the manual methods below.
After the printer installs, a Find drivers button may appear next to it. The printer still works, but some features stay missing until the full driver arrives through Windows Update.
Which way to add a printer fits your connection?
| Your printer | Use this method | Why |
|---|---|---|
| USB cable to this PC | Plug in, then Printers & scanners > Add device | Windows installs most wired printers automatically |
| Wi-Fi or Ethernet printer on your network | Printers & scanners > Add device | Windows finds printers on the same network |
| Network printer that never shows in the list | Add manually > Add a printer using an IP address or hostname | Points Windows straight at the printer's address |
| Bluetooth printer | Put it in discoverable mode, then Add device | Bluetooth printers pair from the same page |
| Printer plugged into another Windows PC | Add manually > Select a shared printer by name | Connects to the share on the host PC |
| Many PCs or a script | PowerShell Add-Printer | Repeatable without clicking through Settings |
Before you start: what to check on the printer and PC
| Check | What to look for |
|---|---|
| Power and cables | The printer is on, and the USB cable is firmly seated at both ends |
| Same network | A wireless printer is on the same Wi-Fi network as the PC, not a guest network or a separate extender SSID |
| Printer's own setup | A new wireless printer has been joined to the network using its control panel or the maker's instructions |
| Model number | Printed on the printer or on the purchase paperwork; you need it to find a driver |
| IP address | Only for the manual IP method; find it on the printer's display or network configuration page |
| ARM PC | Settings > System > About shows an ARM-based processor under System type; use Settings instead of the maker's installer |
If the printer has an IP address you do not know, you can find the printer on your network from Windows 11 before you start.
Add a printer manually by IP address in Windows 11
Use this when a network printer works for other devices but never appears in the Add device list. Have the printer's IP address ready from its display or configuration page.
- Open Settings > Bluetooth & devices > Printers & scanners.
- Select Add device, wait for the search, then select Add manually (shown as Add a new device manually on some builds).
- In the Add Printer window, select Add a printer using an IP address or hostname, then select Next.
- For Device type, choose IPP Device if the printer supports IPP; otherwise keep the type Windows offers.
- Type the printer's IP address in Hostname or IP address and select Next.
- Pick the manufacturer and model if Windows asks for a driver, then select Next.
- Name the printer, choose whether to share it, and select Finish.
IPP uses the driver built into Windows, so no manufacturer software is needed for most current printers.
Add a Bluetooth printer in Windows 11
- Turn on the Bluetooth printer and put it in discoverable mode. The printer's manual explains how.
- Select Start > Settings > Bluetooth & devices > Printers & scanners.
- Next to Add a printer or scanner, select Add device.
- Wait while Windows searches for nearby printers and scanners.
- Select Add device next to your printer when it appears.
Add a shared network printer by name
A printer plugged into another Windows PC can be shared over a private network. Sharing must already be turned on for that printer on the host PC.
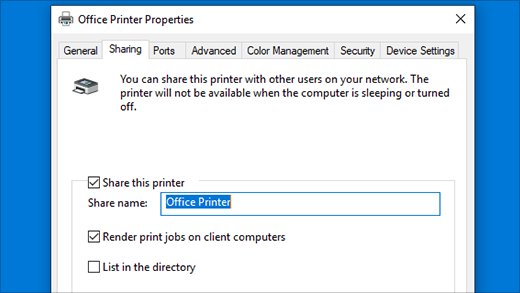
- On the host PC, note its device name from Settings > System > About, and the printer's share name from Printer properties > Sharing.
- On your PC, open Settings > Bluetooth & devices > Printers & scanners and select Add device.
- Select Add device next to the shared printer if it is listed. If it is not, select Add manually.
- Choose Select a shared printer by name.
- Type the path as
\\computer_name\printer_nameor\\ip_address\printer_name, or use Browse. - Enter the host PC's credentials if asked, then select Next.
- Select Next and Finish when the installation completes.
Install a printer in Windows 10
Windows 10 keeps printers under Devices rather than Bluetooth & devices. Microsoft ended Windows 10 support on October 14, 2025, but the steps still work.
- Turn on the printer and connect it by USB or to the same network.
- Select Start > Settings > Devices > Printers & scanners.
- Select Add a printer or scanner.
- Wait for the list of nearby printers to load.
- Select your printer, then select Add device.
- If it is missing, select The printer that I want isn't listed and follow the Add Printer window.
Add a printer with PowerShell
The Add-Printer cmdlet connects to a shared printer in one line, which helps when you set up several PCs. You may need an administrator PowerShell window.
Add-Printer -ConnectionName \\printServer\printerNameReplace printServer with the host PC's name and printerName with the printer's share name. For a printer with its own IP address, first create a port with Add-PrinterPort -Name "TCPPort:" -PrinterHostAddress "192.168.100.100", then run Add-Printer with -Name, -DriverName and -PortName.
You should see: The command returns no error, and running Get-Printer lists the new printer.
Printer drivers: do you need to install anything?
Usually not. Windows supports most printers out of the box, and Windows Update is the method Microsoft recommends for printer drivers.
| Situation | What to do |
|---|---|
| Printer installed and prints normally | Nothing; the built-in driver is enough |
| A Find drivers button shows next to the printer | Open Settings > Windows Update > Advanced options > Optional updates and install the listed printer driver |
| Windows Update has no driver | Download the driver from the support section of the printer maker's own website, using the exact model number |
| Printer came with a disc | Prefer the maker's website; drivers on the disc may be outdated |
| ARM PC, such as a Copilot+ PC | Add the printer from Printers & scanners instead of running the maker's installer, unless the maker gives Windows on ARM instructions |
For the Optional updates list to show device drivers, turn on Receive updates for other Microsoft products under Advanced options first, and restart the PC after installing.
How to check the printer was added
- Open Settings > Bluetooth & devices > Printers & scanners and confirm the printer is in the list.
- Select the printer and check that its status is not Offline.
- Print a short document from any app and pick the new printer in the print dialog.
- If you used the Add Printer window, select Print a test page on its last screen.
You can also list all installed printers with PowerShell or Command Prompt to confirm the name Windows gave it.
Set the default printer in Windows 11
By default, Windows 11 can manage the default printer for you and pick the last one used. Turn that off to choose a fixed default.
- Open Settings > Bluetooth & devices > Printers & scanners.
- Under Printer preferences, turn Let Windows manage my default printer off.
- Select the printer you want from the list.
- Select Set as default. The printer status changes to Default.
In Windows 10, go to Settings > Devices > Printers & scanners, clear Let Windows manage my default printer, select the printer, select Manage and then Set as default.
Remove a printer from Windows 11
- Open Settings > Bluetooth & devices > Printers & scanners.
- Select the printer you want to remove.
- Select Remove, then confirm with Yes.
Removing and adding the printer again is also one of Microsoft's standard fixes when a printer stops working.
If Windows can't find your printer or won't add it
On Windows 11, start with the automated printer troubleshooter in the Get Help app, then work through the symptom that matches yours.
Windows 11 can't find the printer in the Add device list
The printer is off, loosely connected, or on a different network or SSID from the PC.
- Turn the printer off, unplug it for 30 seconds, then turn it back on.
- For USB, reseat the cable at both ends or try a different USB port.
- For Wi-Fi, confirm the printer and PC use the same network, and run the printer's own wireless test.
- For Bluetooth, check that Bluetooth is on and the printer is in range.
- Select Add device again, or add the printer by IP address.
Why can't I add a printer to Windows 11 when it is found?
A stalled Print Spooler service or a bad driver stops the installation.
- Press Windows key + R, type
services.mscand press Enter. - Right-click Print Spooler and select Restart.
- Open Device Manager, expand Printers, right-click the printer and select Update driver.
- If no update is found, select Uninstall device, restart the PC, and let Windows reinstall the printer.
Why can't Windows open Add Printer or finish the manufacturer's installer?
On ARM PCs, some manufacturer installers fail to add the printer.
- Close the manufacturer's installer.
- Open Settings > Bluetooth & devices > Printers & scanners.
- Select Add device and add the printer from the list, or select Add manually.
- Follow the maker's own Windows on ARM guidance if it gives any.
Can't add a shared printer from another PC
Network discovery or file and printer sharing is off, or the share path is wrong.
- On both PCs, open Settings > Network & internet > Advanced network settings > Advanced sharing settings.
- Under Private networks, turn on Network discovery and File and printer sharing.
- Type
\\ComputerNamein the File Explorer address bar to check the host PC is reachable. - Add the printer again with Select a shared printer by name, trying the IP address if the name fails.
Printer added but still doesn't work
A partial driver or a stuck queue leaves the printer installed but unusable.
- Install the driver from Optional updates in Windows Update or from the printer maker's website.
- Restart the Print Spooler service.
- Remove the printer from Printers & scanners, restart the PC, and add it again.
Tips for adding a printer in Windows 11
| Tip | Why it helps |
|---|---|
| Check the installed list before adding | USB printers often install by themselves, and adding twice creates duplicates |
| Give the search a few minutes | The Add device list can take several minutes to fill |
| Use one SSID for printer and PC | Extenders and second routers with separate names hide the printer |
| Prefer Windows Update for drivers | It is Microsoft's recommended driver source and avoids outdated discs |
| Give a network printer a fixed IP address | A changing address breaks printers added by IP |
| Name printers clearly | The name you type in the wizard is what appears in every print dialog |
Windows also includes a virtual printer that saves documents as PDF files; you can add Microsoft Print to PDF back if it is missing from your list.
Step-by-step summary: adding a printer in Windows 11
| Step | Action |
|---|---|
| 1 | Turn the printer on and connect it by USB, Wi-Fi or Bluetooth |
| 2 | Open Settings > Bluetooth & devices > Printers & scanners |
| 3 | Select Add device next to Add a printer or scanner |
| 4 | Select Add device next to your printer |
| 5 | If it is missing, select Add manually and add it by IP address or share name |
| 6 | Install any driver offered in Windows Update > Optional updates |
| 7 | Set it as the default printer and print a test page |
Add a printer in Windows 11: frequently asked questions
How do I add a printer in Windows 10?
Open Settings > Devices > Printers & scanners and select Add a printer or scanner. Wait for the list to load, select your printer and select Add device. If it is not listed, select The printer that I want isn't listed and follow the Add Printer window.
How do I add a wireless printer in Windows 10 or 11?
Connect the printer to the same Wi-Fi network as the PC using its control panel, then open Printers & scanners and select Add device. If the printer does not appear, add it manually by IP address with Add a printer using an IP address or hostname.
How do I add a printer to a Windows laptop?
A laptop uses the same steps as a desktop. Connect the printer by USB, Wi-Fi or Bluetooth, open Settings > Bluetooth & devices > Printers & scanners, select Add device and then select Add device next to the printer.
Why can't I add a printer to Windows 11?
The usual causes are a printer on a different network, a stalled Print Spooler service, or a driver problem. Restart the printer, confirm the network, restart Print Spooler in Services, and run the printer troubleshooter in the Get Help app.
Why can't Windows open Add Printer?
If the manufacturer's installer will not open or finish, especially on an ARM PC, use Settings instead. Open Printers & scanners, select Add device, and select Add manually to open the Add Printer window directly.
How do I add a printer manually in Windows 11?
Select Add device in Printers & scanners, then select Add manually. The Add Printer window lets you add a printer by IP address or hostname, by shared printer name, or as a local printer with manual settings on a chosen port.
Can a USB printer work without internet?
Yes. A USB printer prints over its cable, and Windows supports most printers with built-in drivers. You need internet only if Windows has no suitable driver and must fetch one from Windows Update or the maker's website.
Do I need internet access to add a printer?
Not for printing itself. A Wi-Fi printer needs the same local network as the PC, not an internet connection. Internet access matters only for downloading a driver that Windows does not already include.
Can I add multiple printers in Windows 11?
Yes. Repeat Add device for each printer, and every one appears in Printers & scanners and in print dialogs. Only one printer is the default at a time, chosen by you or by Let Windows manage my default printer.
How do I set a printer as my default in Windows 11?
Open Printers & scanners, turn off Let Windows manage my default printer under Printer preferences, select the printer and select Set as default. If Set as default is missing, the Let Windows manage setting is still on.
Best way to add a printer in Windows 11
Use Settings > Bluetooth & devices > Printers & scanners > Add device for any printer, and switch to Add manually with the IP address only when the printer does not appear. Windows installs most printers with its own drivers from that page, and the IP route bypasses network discovery problems without extra software.