Press Windows logo key + Shift + S to screenshot a selected area on Windows 11, or Windows logo key + PrtScn to save the entire screen as a file.
This guide covers every built-in capture method, where each one saves your image, how to change the save folder, and what to do when a screenshot shortcut does nothing.
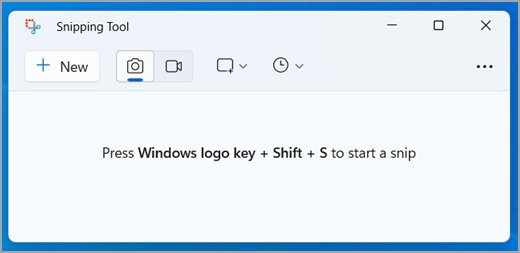
The fastest way to screenshot on Windows 11
Windows + Shift + S opens the Snipping Tool overlay on any Windows 11 PC, including Home, Pro and Enterprise editions. It captures a region, a window or the whole screen in one gesture.
- Press Windows logo key + Shift + S together to open the snipping overlay.
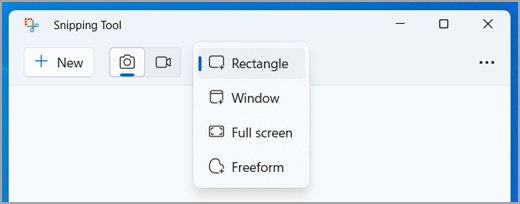
- Pick a mode on the toolbar: Rectangle, Window, Full screen or Freeform.
- Drag across the area you want, or click the window you want in Window mode.
- Open the notification that appears to mark up the image in Snipping Tool, or press Ctrl + V to paste it straight into a document or chat.
Which screenshot shortcut should you use?
Each method differs in what it captures and whether it creates a file. Match what you want to capture to a row.
| What you want to capture | Use this | Where it goes |
|---|---|---|
| The whole screen, saved as a file with no extra clicks | Windows + PrtScn | A PNG file in Pictures > Screenshots |
| A selected area or region | Windows + Shift + S | Clipboard, and saved to your Screenshots folder by Snipping Tool |
| One window only | Alt + PrtScn | Clipboard only |
| A menu or tooltip that closes when you click | Snipping Tool with Delay | Snipping Tool window and your Screenshots folder |
| A video of part of the screen | Windows + Shift + R | An MP4 file in Videos > Screen Recordings |
| A game or app while it runs full screen | Xbox Game Bar, Windows + Alt + PrtScn | Videos > Captures |
| A laptop keyboard with no PrtScn key | Fn + Windows + Space Bar | Pictures > Screenshots |
Capture the entire screen and save it automatically
Windows + PrtScn is the only keyboard shortcut that writes a file without opening any app. Use it when you want a record of the whole screen and plan to find the image later.
- Arrange the screen exactly as you want it captured.
- Press Windows logo key + PrtScn.
- On a keyboard without a PrtScn key, press Fn + Windows logo key + Space Bar instead.
- Open File Explorer, select Pictures in the navigation pane, and then open Screenshots to find the file.
Use the Print Screen key on its own
On current Windows 11 builds, pressing PrtScn opens the same Snipping Tool overlay as Windows + Shift + S. When that option is turned off, PrtScn copies an image of the entire screen to the clipboard and saves no file.
- Press PrtScn. If the snipping overlay opens, choose a mode and drag to capture.
- If nothing visible happens, the full screen is now on your clipboard. Press Ctrl + V in Paint, Word or a chat window to paste it.
- To change what the key does, select Start > Settings > Accessibility > Keyboard.
- Set Use the Print Screen button to open screen snipping to Off to make PrtScn copy the full screen, or On to make it open the snipping overlay.
Screenshot only the active window
Alt + PrtScn captures the window you are working in and skips the taskbar, desktop and other windows. Click inside the window first so it becomes the active one.
- Click the title bar of the window you want to capture.
- Press Alt + PrtScn. The window image is copied to the clipboard.
- Paste it with Ctrl + V into the app where you need it.
- To save the window as a file instead, press Windows + Shift + S, select Window on the toolbar and click the window.
Use the Snipping Tool app for delays, edits and text
Open the full app when you need a timer, annotations or text copied out of an image. To take better screenshots of menus and tooltips, use the delay so the menu stays open when the capture fires.
If Snipping Tool is missing from Start, the Snipping Tool download guide covers getting it back.
- Select Start, type Snipping Tool, and select it from the results.
- Select Snipping Mode and choose Rectangle, Window, Full screen or Freeform.
- To capture a menu, select Delay and choose a countdown, for example 5 seconds.
- Select New, then open the menu or tooltip before the countdown ends.
- Mark up the capture with the Pen, Highlighter, Eraser or crop tools.
- Select Text actions to copy text from the image or redact sensitive details.
- Select Save as to keep an extra copy with a name and folder you choose.
Record your screen as a video with Snipping Tool
Snipping Tool also records a selected part of the screen. Use it for short how-to clips or to show a bug in motion.
- Press Windows logo key + Shift + R, or open Snipping Tool, select the Record button and select New.
- Drag to select the area of the screen you want to record.
- Select Start to begin recording.
- Select Stop when you are done. The recording opens in Snipping Tool.
- Find the MP4 file in the Screen Recordings subfolder of your Videos folder, or select Edit in Clipchamp to trim it.
Take screenshots with Xbox Game Bar
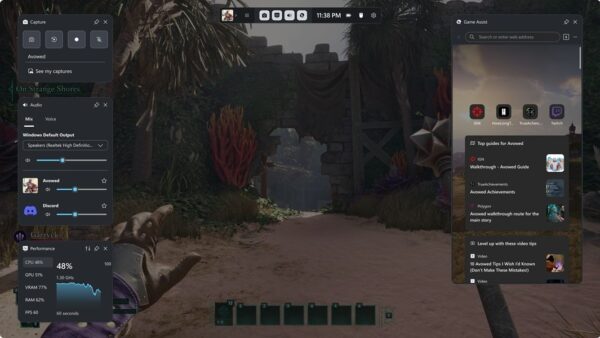
Game Bar is built for games and full-screen apps, where the snipping overlay can interrupt play. It saves captures as files rather than to the clipboard.
- Open the game or app you want to capture and click into it.
- Press Windows logo key + Alt + PrtScn to take a screenshot.
- Press Windows logo key + Alt + R to start a video clip, and press it again to stop.
- Press Windows logo key + G to open Game Bar if you prefer its on-screen controls.
- Open File Explorer > Videos > Captures to find the PNG screenshots and MP4 clips.
Screenshot on a Windows 11 tablet, Surface or 2-in-1
Without a keyboard attached, use hardware buttons or open Snipping Tool by touch. Button combinations differ by device, so the Surface row applies only to Microsoft hardware.
| Your device | Do this | Result |
|---|---|---|
| Surface Pro, Book, Go or Studio with no keyboard | Press and hold Power, then press Volume Up | Full-screen capture saved to Pictures > Screenshots |
| Surface Laptop | Press Windows logo key + PrtScn | The Power + Volume Up combination does not work on Surface Laptop |
| Surface keyboard with no PrtScn key | Press Fn + Spacebar for a snip, or Fn + Alt + Spacebar for the active window | Snipping overlay, or the window copied to the clipboard |
| Any tablet or 2-in-1 in touch mode | Tap Start, type Snipping Tool, open it, and tap New | Snip with your finger or pen; saved to your Screenshots folder |
How to paste, save and share a screenshot
Alt + PrtScn and PrtScn with the snipping option off leave the image on the clipboard only. Paste it somewhere before you copy anything else, or it is replaced.
- Open the destination, such as an email, a Word document, Teams or Paint.
- Press Ctrl + V to paste the screenshot.
- To keep a clipboard image as a file, paste it into Paint, then select File > Save as and choose PNG.
- To reach older captures, press Windows logo key + V to open clipboard history. Select Turn on the first time, because history is off by default.
- To share from Snipping Tool, select the See More menu at the top right, then select Share.
How to find your screenshots in Windows 11
Where a screenshot lands depends on the method. Check this table before assuming a capture failed.
| Method | Saved as a file? | Default location |
|---|---|---|
| Windows + PrtScn | Yes, PNG | Pictures > Screenshots |
| Fn + Windows + Space Bar | Yes, PNG | Pictures > Screenshots |
| Windows + Shift + S, or PrtScn with snipping on | Yes, plus clipboard | Your Screenshots folder, set in Snipping Tool settings |
| PrtScn with snipping off | No | Clipboard only |
| Alt + PrtScn | No | Clipboard only |
| Windows + Shift + R | Yes, MP4 | Videos > Screen Recordings |
| Xbox Game Bar | Yes, PNG and MP4 | Videos > Captures |
How to change the screenshot save folder
Snipping Tool and Game Bar each keep their own save setting. Change the one that matches the method you use.
- For Snipping Tool captures, open Snipping Tool, select See More, then select Settings.
- Change the automatic save option, or pick a different default Screenshots folder location.
- For Game Bar captures, select Start > Settings > Gaming > Captures.
- Change the captures location to the folder you want.
- Take a test capture with the matching shortcut and confirm it appears in the new folder.
How to check a screenshot worked
- After Windows + Shift + S, press Ctrl + V in Paint, or open your Screenshots folder, to confirm the snip exists.
- After Windows + PrtScn, open Pictures > Screenshots and sort by Date modified to see the newest file first.
- After Alt + PrtScn, open Paint and press Ctrl + V. An image of the window proves the capture reached the clipboard.
- After a Game Bar capture, open Videos > Captures and confirm the PNG or MP4 has the current time.
Troubleshooting: screenshot shortcuts not working on Windows 11
Most screenshot failures on Windows 11 come from a key setting, a clipboard-only method or an app that blocks capture. Find your symptom below.
Pressing PrtScn does nothing
The key either copies silently to the clipboard, or the laptop needs the Fn key for it.
- Press Ctrl + V in Paint. If an image pastes, PrtScn worked and only copied to the clipboard.
- Select Start > Settings > Accessibility > Keyboard and turn Use the Print Screen button to open screen snipping to On for a visible overlay.
- On a keyboard without a working PrtScn key, press Fn + Windows logo key + Space Bar.
- Use Windows + Shift + S, which does not rely on the PrtScn key at all.
Windows + Shift + S is not working
The shortcut belongs to Snipping Tool, so it fails when the app is missing or not responding.
- Select Start, type Snipping Tool, and confirm the app opens.
- Select Snipping Mode, choose a mode and select New to capture from inside the app.
- Restart the PC and try the shortcut again.
- If Snipping Tool is not installed, reinstall it using the Snipping Tool download guide.
The Screenshots folder is empty or missing
The capture went to the clipboard only, or the files are in a different synced or custom folder.
- Check the table above. Alt + PrtScn and PrtScn with snipping off never create a file.
- In File Explorer, select Pictures in the navigation pane and open Screenshots. If OneDrive backs up your Pictures folder, this opens the synced copy.
- Open Snipping Tool > See More > Settings and confirm automatic saving is on and which folder it uses.
- For game captures, look in Videos > Captures instead.
Screenshots of a video or app come out black
Windows lets an app protect its own window content, so capture tools record that window with no content.
- Confirm the rest of the screen captured normally. Only the protected window appears blank.
- Close or minimise the protected app if you need to capture something else on screen.
- Accept that no Windows setting overrides an app's content protection.
Frequently asked questions
What is the screenshot shortcut on Windows 11?
Windows logo key + Shift + S is the main screenshot shortcut on Windows 11. It opens the Snipping Tool overlay for a region, window or full-screen capture. Windows + PrtScn saves the whole screen to Pictures > Screenshots, and Alt + PrtScn copies the active window.
How do I screenshot on a Windows 11 laptop?
Press Windows + Shift + S on any Windows 11 laptop, or Windows + PrtScn to save the full screen. If your laptop keyboard has no PrtScn key, press Fn + Windows logo key + Space Bar. HP, Dell and other laptops use the same Windows shortcuts.
How do I screenshot on Windows 11 with the keyboard only?
Press Windows + PrtScn to save the entire screen as a file with no mouse needed. Alt + PrtScn copies the active window to the clipboard, and PrtScn alone either opens the snipping overlay or copies the full screen, depending on your Accessibility keyboard setting.
Is screenshotting different on Windows 11 Home, Pro and Enterprise?
No. Windows 11 Home, Pro and Enterprise use the same screenshot shortcuts, Snipping Tool and Xbox Game Bar. A work PC managed by an organisation can restrict apps, but the built-in shortcuts themselves do not change between editions.
How do I screenshot on Windows 11 using Game Bar?
Press Windows logo key + Alt + PrtScn while a game or app is open. Game Bar saves the screenshot as a PNG file in the Captures folder inside Videos. Press Windows + G to open Game Bar's on-screen controls instead.
How do I take a screenshot with Snipping Tool on Windows 11?
Open Snipping Tool from Start, select Snipping Mode, choose Rectangle, Window, Full screen or Freeform, and select New. The capture is saved to your Screenshots folder automatically, and Save as creates an extra copy wherever you choose.
Why can't I take a screenshot on Windows 11?
The most common reason is that the method used copies only to the clipboard, so no file appears. Other causes are a missing Snipping Tool app, a laptop that needs Fn for PrtScn, or an app that protects its window from capture.
Can Windows 11 take scrolling screenshots?
Snipping Tool offers four capture modes on Windows 11: Rectangle, Window, Full screen and Freeform. None of them scrolls a page. To capture a long page, take several snips in sequence, or use the capture feature of the app or browser you are viewing.
Where do screenshots go on Windows 11?
Windows + PrtScn and Snipping Tool captures go to the Screenshots folder inside Pictures. Screen recordings go to Videos > Screen Recordings, and Game Bar captures go to Videos > Captures. Alt + PrtScn saves nothing and only copies the image to the clipboard.
How do screenshots work in Windows 11?
Every Windows 11 screenshot either goes to the clipboard, becomes a file, or both. Snipping Tool shortcuts copy and save, Windows + PrtScn saves a file, and Alt + PrtScn only copies. Paste clipboard captures with Ctrl + V before copying anything else.

Where Is My Screenshot Folder Located (Windows 11 And Windows 10) - Techdows
[…] For the full set of capture shortcuts and modes, see How to Screenshot on Windows 11: A Step-by-Step Guide. […]
Official GTA 6 screenshots: every image Rockstar released and what they show - Techdows
[…] The artwork set makes better GTA 6 wallpapers in 4K, and Snipping Tool is only one way to take a screenshot on Windows 11. […]
How to Cast Oculus to Computer Screen - Techdows
[…] browser tab is a normal window, so standard Windows 11 screenshot tools capture […]
How to screenshot iPad: a step-by-step guide for every iPad model - Techdows
[…] See how to take a screenshot on Windows 11 […]