To take a screenshot on a Mac, press Shift + Command + 3 for the entire screen, Shift + Command + 4 for a selected area, or Shift + Command + 5 to open Apple’s Screenshot toolbar. These shortcuts work on MacBook Air, MacBook Pro, iMac, Mac mini, Mac Studio, and other supported Macs.
macOS saves screenshots to the desktop by default, usually as PNG files. You can also copy a screenshot directly to the clipboard, capture one application window without the background, change the save location, add a timer, or record the screen from the same built-in Screenshot tool.
This guide covers every useful Mac screenshot shortcut, including full-screen captures, selected areas, windows, menus, clipboard screenshots, Touch Bar captures, save locations, editing, and fixes when screenshots stop working.
Mac Screenshot Shortcuts
| What you want to capture | Keyboard shortcut |
|---|---|
| Entire screen | Shift + Command + 3 |
| Selected part of the screen | Shift + Command + 4 |
| One window | Shift + Command + 4, then Space |
| Screenshot toolbar | Shift + Command + 5 |
| Copy full-screen screenshot to clipboard | Control + Shift + Command + 3 |
| Copy selected screenshot to clipboard | Control + Shift + Command + 4 |
| Touch Bar on supported MacBook Pro models | Shift + Command + 6 |
Apple includes these screenshot shortcuts directly in macOS, so you do not need to install a screenshot app for normal screen captures.
How to Screenshot the Entire Screen on Mac
Press:
Shift + Command + 3
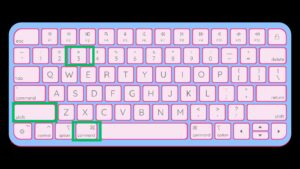
macOS immediately captures everything currently visible on the screen. If you use more than one display, macOS creates a separate screenshot for each screen.
A small thumbnail usually appears in the lower-right corner after the capture. Click it to edit or annotate the screenshot, or wait a few seconds and macOS saves the image automatically.
How to copy the entire screen instead of saving it
Press:
Control + Shift + Command + 3
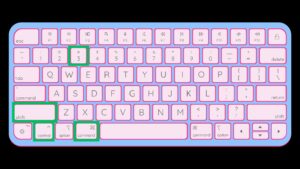
The screenshot goes to the clipboard rather than being saved as a file. You can then paste it into Messages, Mail, Slack, Pages, Photoshop, Preview, or another application with Command + V.
How to Screenshot Part of the Screen on Mac
Use Shift + Command + 4 when you only need a specific section of the screen.
- Press Shift + Command + 4.
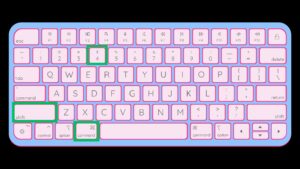
- The mouse pointer changes into a crosshair.
- Click and drag around the area you want to capture.
- Release the mouse or trackpad button to take the screenshot.
Press Esc before releasing the selection if you want to cancel.
Move the selected screenshot area before capturing
After drawing the selection, keep holding the mouse or trackpad button and press the Space bar. You can then move the entire selected box without changing its size.
Release Space to continue resizing the selection, or release the mouse button to capture it.
Copy a selected area directly to the clipboard
Press:
Control + Shift + Command + 4
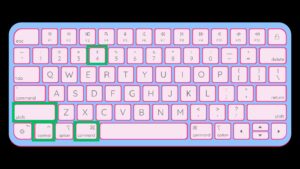
Select the area normally. macOS copies the result to the clipboard so you can paste it into another app without creating a screenshot file on the desktop.
How to Screenshot a Window on Mac
You can capture one application window without manually drawing around it.
- Open the window you want to capture.
- Press Shift + Command + 4.
- Press the Space bar.
- The pointer changes into a camera icon.
- Move the camera over the window.
- Click the highlighted window.
macOS captures the complete window and normally adds a drop shadow around it.
Take a Mac window screenshot without the shadow
After pressing Shift + Command + 4 and then Space, hold the Option key while clicking the window.
This removes the surrounding drop shadow and creates a tighter image, which is useful for documentation, tutorials, and website screenshots.
How to Screenshot a Menu on Mac
Open the menu first so that it remains visible, then use one of two methods.
Capture the menu and surrounding area
- Open the menu.
- Press Shift + Command + 4.
- Drag around the menu.
- Release to capture it.
Capture only the menu as a window
- Open the menu.
- Press Shift + Command + 4.
- Press Space.
- Move the camera icon over the menu.
- Click to capture it.
This method works well for capturing Finder menus, application menus, dropdowns, and other interface elements that remain open while the screenshot shortcut is pressed.
How to Use the Mac Screenshot Tool
Press Shift + Command + 5 to open the built-in Screenshot toolbar. Apple introduced this interface in macOS Mojave, and it remains the easiest way to access screenshot and screen-recording options from one place.
The toolbar includes controls for:
- Capturing the entire screen.
- Capturing one window.
- Capturing a selected portion.
- Recording the entire screen.
- Recording a selected portion.
Select the capture mode you want, adjust the selection if necessary, then click Capture.
Open Screenshot without a keyboard shortcut
You can also open the tool from Finder:
- Open Finder.
- Go to Applications.
- Open Utilities.
- Launch Screenshot.
Spotlight can open it as well. Press Command + Space, type Screenshot, and press Return.
How to Change Where Screenshots Are Saved on Mac
Mac screenshots save to the desktop by default, but the Screenshot toolbar lets you choose another folder.
- Press Shift + Command + 5.
- Click Options.
- Look under Save to.
- Select Desktop, Documents, Clipboard, Mail, Messages, Preview, or another available location.
- Select Other Location if you want a custom folder.
macOS remembers the selected location for future screenshots until you change it again.
Where are screenshots saved on Mac?
By default, screenshots appear on the desktop with a filename containing the word Screenshot followed by the date and time.
If you cannot find a screenshot, press Shift + Command + 5, open Options, and check the current location under Save to.
How to Copy a Screenshot to Clipboard on Mac
Add the Control key to a normal screenshot shortcut when you want to copy the image rather than save it.
| Action | Shortcut |
|---|---|
| Copy entire screen | Control + Shift + Command + 3 |
| Copy selected area | Control + Shift + Command + 4 |
| Copy a window | Control + Shift + Command + 4, then Space |
After taking the screenshot, press Command + V in the application where you want to paste it.
You can also Control-click the floating screenshot thumbnail and select Save to Clipboard.
How to Take a Timed Screenshot on Mac
A screenshot timer helps when you need time to open a menu, position the mouse, or arrange something on the screen before macOS captures it.
- Press Shift + Command + 5.
- Click Options.
- Find Timer.
- Select one of the available delays.
- Choose the capture mode.
- Click Capture.
The countdown begins before macOS takes the screenshot.
How to Screenshot on MacBook Air and MacBook Pro
MacBook Air and MacBook Pro use the same macOS screenshot shortcuts as desktop Macs.
Use Shift + Command + 3 for the whole screen, Shift + Command + 4 for a selected area, and Shift + Command + 5 for the Screenshot toolbar.
The shortcuts remain the same whether the MacBook uses an Intel processor or Apple silicon such as M1, M2, M3, M4, or newer chips.
How to Screenshot the Touch Bar on MacBook Pro
Older MacBook Pro models equipped with a Touch Bar support a dedicated screenshot shortcut:
Shift + Command + 6
macOS captures the current contents of the Touch Bar and saves them as an image. This shortcut only applies to Mac models that actually include the Touch Bar.
How to Edit a Screenshot on Mac
After taking a screenshot, a floating thumbnail usually appears in the lower-right corner. Click it before it disappears to open the screenshot editor.
You can then:
- Crop the screenshot.
- Draw or sketch on it.
- Add shapes and arrows.
- Add text.
- Add a signature.
- Rotate the image.
- Share it.
- Delete it.
Click Done when finished.
If the thumbnail has already disappeared, double-click the screenshot to open it in Preview and use the Markup tools there.
How to Turn Off the Screenshot Thumbnail on Mac
If you do not want the small preview appearing after every screenshot:
- Press Shift + Command + 5.
- Click Options.
- Turn off Show Floating Thumbnail.
Future screenshots save immediately without displaying the temporary preview.
How to Show the Mouse Pointer in a Mac Screenshot
Open the Screenshot toolbar with Shift + Command + 5, select Options, and enable Show Mouse Pointer when that option is available for the selected capture mode.
This is useful when creating instructional screenshots where the pointer indicates the control or button being discussed.
How to Change the Mac Screenshot Format
Standard Mac screenshots are saved as PNG files. On supported Macs running macOS Tahoe 26 or later, Apple also provides capture-format controls through the Screenshot tool.
Press Shift + Command + 5, open Options, and check the available format settings. Apple provides SDR (Most Compatible) captures using PNG and an HDR option that uses HEIF on supported hardware.
PNG remains the practical choice for website screenshots, documentation, and images that need broad compatibility.
How to Screen Record on Mac
The same Shift + Command + 5 toolbar can record video instead of taking a still screenshot.
- Press Shift + Command + 5.
- Select Record Entire Screen or the available selected-area recording option.
- Open Options if you need to select a microphone or save location.
- Click Record.
- Click the Stop button in the menu bar when finished.
Screen recordings save as MOV files by default.
How to Change Mac Screenshot Keyboard Shortcuts
macOS lets you change the default screenshot key combinations when they conflict with another application or you prefer different shortcuts.
- Open the Apple menu.
- Select System Settings.
- Open Keyboard.
- Select Keyboard Shortcuts.
- Open Screenshots.
- Select the shortcut you want to change.
- Enter the new key combination.
You can also disable individual screenshot shortcuts from this section without disabling the Screenshot app itself.
Fix Screenshot Not Working on Mac
Check the screenshot shortcuts
Open System Settings > Keyboard > Keyboard Shortcuts > Screenshots and make sure the shortcuts you want to use remain enabled.
If another application has assigned the same key combination, change one of the conflicting shortcuts.
Try the Screenshot app directly
Press Command + Space, search for Screenshot, and open it. If the application works but the keyboard shortcuts do not, the issue is probably related to shortcut settings rather than screenshot functionality itself.
Check the screenshot save location
A screenshot can appear to be missing when macOS is actually saving it somewhere other than the desktop.
Press Shift + Command + 5, click Options, and check the selected destination under Save to.
Restart the Mac
Restart macOS if screenshot shortcuts suddenly stop responding. This clears temporary problems involving Finder, keyboard services, or the Screenshot application.
Check whether the app blocks screenshots
Some applications restrict screen captures of protected content. Apple notes that certain apps can prevent screenshots of their windows, so a shortcut that works everywhere else does not necessarily indicate a Mac problem.
Check available storage
If the Mac has almost no free storage, screenshots can fail to save. Open System Settings > General > Storage and free some space if necessary.
Frequently Asked Questions
What is the shortcut to screenshot on Mac?
Press Shift + Command + 3 to screenshot the entire screen. Press Shift + Command + 4 to capture a selected area.
How do I screenshot part of the screen on a Mac?
Press Shift + Command + 4, drag the crosshair around the area you want, and release the mouse or trackpad button.
How do I screenshot one window on Mac?
Press Shift + Command + 4, then press Space. Move the camera icon over the window and click it.
How do I take a screenshot on a Mac without saving it?
Add the Control key to the screenshot shortcut. For example, Control + Shift + Command + 3 copies the entire screen to the clipboard.
Where do screenshots go on Mac?
macOS saves screenshots to the desktop by default. Press Shift + Command + 5 and check Options > Save to if you changed the location previously.
What format are Mac screenshots?
Standard screenshots are saved as PNG files. Supported Macs running macOS Tahoe 26 or later can also capture HDR screenshots in HEIF format.
How do I screenshot on a MacBook Pro?
Use Shift + Command + 3 for the full screen, Shift + Command + 4 for part of the screen, or Shift + Command + 5 for the Screenshot toolbar.
How do I screenshot on a MacBook Air?
The shortcuts are identical on MacBook Air. Press Shift + Command + 3 for the entire display or Shift + Command + 4 for a selected area.
How do I take a screenshot without the window shadow?
Press Shift + Command + 4, press Space, then hold Option while clicking the window.
Can I change where Mac screenshots are saved?
Yes. Press Shift + Command + 5, select Options, and choose a location under Save to.
Can I take a delayed screenshot on Mac?
Yes. Open the Screenshot toolbar with Shift + Command + 5, choose Options, and select an available timer delay.
Why is Shift + Command + 3 not working?
Check System Settings > Keyboard > Keyboard Shortcuts > Screenshots and make sure the shortcut is enabled. Also check for shortcut conflicts, restart the Mac, and test the Screenshot app directly.
Can I screenshot Netflix or protected video on Mac?
Some applications and protected video services restrict screenshots, so macOS can return a blank or blocked capture even when the screenshot shortcut works normally elsewhere.
Do I need an app to screenshot on Mac?
No. macOS includes screenshot shortcuts and the Screenshot application by default. Third-party screenshot software is only necessary when you need extra features such as scrolling capture, advanced annotation, OCR, or cloud sharing.


Snipping Tool Download: Official Setup for Windows 11 & 10 - Techdows
[…] to copy to the clipboard instead of saving a file. Techdows covers the Mac side in more depth in how to take a screenshot on a Mac and how to print screen on a […]
Is Snipping Tool Free? Pricing, Limits and Paid Look-Alikes - Techdows
[…] On a Mac the same job needs no download at all, as the Screenshot toolbar covers full screen, window and selection. […]