You can record your screen on a Mac without installing an app. Press Shift + Command + 5 to open Apple’s Screenshot toolbar, choose whether to record the entire screen or part of it, and click Record. Mac also includes QuickTime Player for screen recording.
The built-in recorder works on MacBook Air, MacBook Pro, iMac, Mac mini, Mac Studio, and other supported Macs. You can record the whole display, a selected area, a window on newer macOS versions, and microphone audio.
The method you should use depends mainly on what you want to capture, especially if you need your voice, Mac system audio, or only one section of the screen.
How to Screen Record on Mac With a Keyboard Shortcut
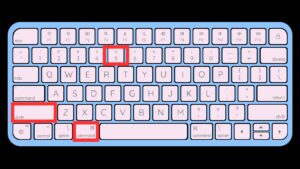
Shift + Command + 5 is the main Mac screen recording shortcut. It opens the Screenshot toolbar, which includes both screenshot and video recording controls.
- Press Shift + Command + 5.
- Select Record Entire Screen to capture everything on the display.
- Or select Record Selected Portion and resize the frame around the area you want to capture.
- Click Options if you want to change the microphone, save location, timer, or pointer settings.
- Click Record to begin.
On macOS Tahoe 26 or later, the Screenshot app also includes a Record Selected Window option. This lets you record one window without manually drawing a recording area around it.
Mac screen recording shortcut
| Action | Shortcut |
|---|---|
| Open screen recording controls | Shift + Command + 5 |
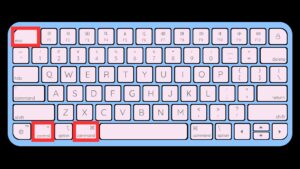
| Stop a screen recording | Command + Control + Esc |
The first shortcut is the one worth remembering. It opens all of Apple’s built-in screen capture controls in one place.
How to Stop Screen Recording on Mac
When you finish recording, click the Stop icon in the menu bar at the top of the screen. You can also press Command + Control + Esc.
A thumbnail of the recording appears briefly in the lower-right corner. Click it to review or edit the recording immediately, or leave it alone and macOS will save the file automatically.
How to Screen Record on Mac With Audio
The Screenshot toolbar can record audio from a microphone while it captures your screen. This works well for tutorials, presentations, demonstrations, and videos where you need to explain what is happening on screen.
- Press Shift + Command + 5.
- Choose a screen recording option.
- Click Options.
- Under Microphone, select your Mac microphone or a connected external microphone.
- Click Record.
Your voice will now be included in the screen recording. Selecting None under Microphone records the screen without microphone audio.
How to screen record on Mac with internal audio
Apple’s standard Screenshot recording controls are designed to let you choose a microphone. They do not provide the same simple system-audio source selector for capturing all sound playing through your Mac.
Recent versions of macOS include Screen & System Audio Recording permissions for apps that support system-audio capture. A compatible third-party recorder can request this permission and record Mac audio directly.
You can manage access under:
Apple menu > System Settings > Privacy & Security > Screen & System Audio Recording
Only give screen and audio recording permission to apps you trust because an approved app can capture information displayed or played on your Mac.
How to Screen Record on Mac With QuickTime Player
QuickTime Player is already installed with macOS, so you do not need to download a separate screen recorder.
- Open QuickTime Player.
- Select File from the menu bar.
- Click New Screen Recording.
- Choose whether to record the full screen or a selected area.
- Open Options to choose a microphone or save location.
- Click Record.
- Click the Stop button in the menu bar when finished.
On current versions of macOS, choosing New Screen Recording in QuickTime opens the same Screenshot controls available through Shift + Command + 5. QuickTime remains useful because you can open the finished video immediately and trim it before saving or sharing it.
How to Record Part of the Screen on Mac
You do not have to record your entire desktop. Recording a selected portion keeps unrelated windows, notifications, and desktop items out of the finished video.
- Press Shift + Command + 5.
- Select Record Selected Portion.
- Drag the recording frame to the required position.
- Drag its edges to change the recording area.
- Click Record.
Everything outside the selected frame remains outside the recording.
How to Record One Window on Mac
Macs running macOS Tahoe 26 or later have a dedicated option for recording a selected window.
- Press Shift + Command + 5.
- Select Record Selected Window.
- Choose the window you want to capture.
- Start the recording.
On an older macOS release, use Record Selected Portion and position the frame around the window instead.
How to Change Where Screen Recordings Are Saved on Mac
Screen recordings save to the desktop by default. You can choose another folder before starting the recording.
- Press Shift + Command + 5.
- Click Options.
- Look under Save to.
- Select Desktop, Documents, another listed location, or Other Location.
- Start the recording.
macOS remembers the selected location for later captures, so you do not need to move every recording manually.
Where Do Screen Recordings Go on Mac?
Unless you change the save location, Mac screen recordings appear on the desktop. Apple names automatically saved files using the date and time of the recording, with a name similar to Screen Recording [date] at [time].mov.
If you cannot find a recording, press Shift + Command + 5, open Options, and check the selected location under Save to.
How to Screen Record on Mac Without QuickTime
You do not need to open QuickTime Player to make a screen recording. Use Apple’s Screenshot app directly by pressing Shift + Command + 5.
You can also open Screenshot through Spotlight or find it in the Utilities folder inside Applications. The keyboard shortcut is usually faster because it takes you directly to the recording controls.
How to Screen Record on Mac Without Installing Software
Both Screenshot and QuickTime Player come with macOS. For a normal screen recording, you do not need OBS, a browser extension, or another screen recorder.
A third-party app becomes useful when you need features the standard recorder does not provide, such as advanced system-audio capture, webcam overlays, live streaming, annotations, or more detailed recording controls.
How to Add a Timer Before Screen Recording
The Screenshot app can delay the start of a recording, giving you time to open a menu or position the pointer before capture begins.
- Press Shift + Command + 5.
- Click Options.
- Select an available delay under Timer.
- Choose the recording mode.
- Click Record.
The countdown begins before macOS starts capturing the screen.
How to Show Mouse Clicks in a Mac Screen Recording
The recording options can make pointer activity easier to follow, which is useful when creating a tutorial.
- Press Shift + Command + 5.
- Click Options.
- Enable the available mouse pointer or click option.
- Start recording.
QuickTime Player also provides a mouse-click recording option when using its screen recording controls.
How to Edit a Screen Recording on Mac
You can trim the beginning or end of a recording with QuickTime Player without installing a video editor.
- Open the screen recording in QuickTime Player.
- Select Edit > Trim.
- Drag the yellow handles to keep the section you want.
- Click Trim.
- Save the edited recording.
For more detailed editing, including multiple clips, titles, transitions, and audio tracks, you can import the recording into iMovie or another video editor.
Fix Screen Recording Not Working on Mac
Apple’s own Screenshot app normally has the access it needs, but third-party apps and websites require permission before they can record your screen or system audio.
Allow screen recording permission
- Open the Apple menu > System Settings.
- Select Privacy & Security.
- Open Screen & System Audio Recording.
- Find the app you want to use.
- Enable the required recording permission.
- Restart the app if macOS asks you to do so.
Screen recording has no microphone audio
Press Shift + Command + 5, select Options, and confirm that a microphone is selected. Also check the app’s microphone permission under System Settings > Privacy & Security > Microphone.
The recording has no Mac system audio
Choosing your Mac’s microphone records sound picked up by the microphone. It does not directly capture every sound produced by macOS. Use a recorder that supports system-audio capture and give it the required permission under Screen & System Audio Recording.
The recording stops unexpectedly
Check the free storage available on your Mac, especially when making a long recording. Video files can grow quickly, and macOS needs enough free space to continue writing the recording.
A specific app shows a black screen
Some protected content cannot be captured. Apple specifically notes that apps such as the Apple TV app can prevent their windows from being recorded. Changing screen recording software does not necessarily bypass these restrictions.
Frequently Asked Questions
What is the shortcut to screen record on Mac?
Press Shift + Command + 5. Select Record Entire Screen, Record Selected Window where supported, or Record Selected Portion, then click Record.
How do I screen record on a MacBook?
The process is the same on MacBook Air and MacBook Pro. Press Shift + Command + 5, choose a recording mode, and click Record.
Can I screen record on Mac for free?
Yes. macOS includes the Screenshot app and QuickTime Player, so normal screen recording does not require paid software.
Can I screen record on Mac without downloading anything?
Yes. Press Shift + Command + 5 to use the built-in Screenshot recorder. QuickTime Player is also included with macOS.
Can I screen record on Mac with sound?
Yes. The built-in recorder can capture microphone audio. Select a microphone from the Options menu before recording. Direct system-audio capture requires software that supports the Mac’s system-audio recording permissions.
How do I screen record on Mac with my voice?
Press Shift + Command + 5, click Options, and select the Mac’s built-in microphone or a connected microphone. Start recording after selecting it.
Can QuickTime screen record with audio?
QuickTime screen recording lets you select a microphone, so it can record your voice or other sound picked up by that microphone while capturing the screen.
How do I stop a screen recording on Mac?
Click the Stop button in the menu bar or press Command + Control + Esc.
Where are Mac screen recordings saved?
They save to the desktop by default. Press Shift + Command + 5 and check Options > Save to if you previously selected another location.
What format does Mac screen recording use?
Apple saves standard screen recordings as .mov video files. You can play them in QuickTime Player and import them into compatible video editors.
Can I record only one part of my Mac screen?
Yes. Select Record Selected Portion from the Shift + Command + 5 toolbar and resize the frame around the area you want to record.
Can I record one app window on Mac?
Yes. macOS Tahoe 26 and later includes Record Selected Window in the Screenshot app. On older versions, use Record Selected Portion and position the recording frame around the app window.
Why can’t I screen record Netflix or Apple TV on Mac?
Streaming services can protect copyrighted video against screen capture. Apple notes that some apps, including the Apple TV app, can prevent their windows from being recorded.