To make a picture fill the whole page in Word, insert it, set its text wrapping to Behind Text, then drag or size it until it reaches all four page edges.
The steps below cover desktop Word for Microsoft 365 on Windows, with separate routes for a background on every page, a picture on one page only, printing to the edge and the limits of Word for the web.
Fastest way to make a picture fill a Word page
This route works for a cover page, a flyer or any single page that should be one picture from edge to edge. Text you type later sits on top of the image.
- Click on the page where the picture should go.
- Select Insert > Pictures and choose your image.
- Select the picture, then select the Layout Options icon beside it.
- Under With Text Wrapping, select Behind Text.
- Drag the picture so its top-left corner sits on the top-left corner of the page.
- Drag the bottom-right sizing handle until the picture reaches the bottom-right corner of the page.
- Click outside the picture to deselect it.
Dragging a side handle stretches the image. Hold Shift while you drag a corner handle to keep its proportions, then trim any overhang with Crop.
Which full-page picture method should you use in Word?
| Your goal | Use this | Why |
|---|---|---|
| One picture covers one page, such as a cover or flyer | Ordinary picture set to Behind Text | Full control over size, position and cropping |
| The same faded image behind text on every page | Picture watermark (Design > Watermark) | Lives in the header, so it repeats on each page automatically |
| A picture or texture as the page background on every page | Design > Page Color > Fill Effects > Picture | Covers the page background without an object to select |
| A picture on one page and plain pages elsewhere | Ordinary picture with Fix position on page | Stays on its own page and does not move with text |
| Picture must fill the page without distortion | Rectangle shape filled with the picture, then Crop > Fill | Word trims the overflow instead of stretching the image |
| You only have Word for the web | Open in the desktop Word app | The web version cannot insert watermarks or picture backgrounds |
Preparing your document: page size, orientation, and margins explained
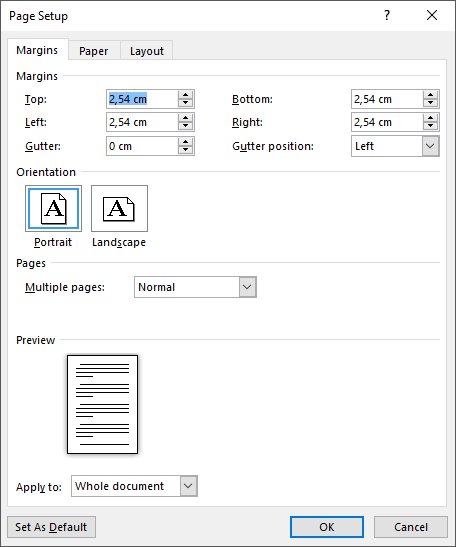
Set the paper size and orientation first. A picture sized for Letter will not fit an A4 page, and switching orientation afterwards leaves the image the wrong shape.
Margins do not stop a Behind Text picture from reaching the edge, but they decide where your text sits on top of it. Word starts every page with a one-inch margin.
- Select Layout > Orientation and choose Portrait or Landscape to match the picture.
- Select Layout > Margins > Custom Margins.
- Go to the Paper tab and select the Paper size you will print on, such as Letter or A4.
- Go back to the Margins tab and enter the margins you want for any text on the page.
- Select OK.
If the document has several sections, new margins apply only to the current section. That is useful when only the picture page needs different margins.
Method 1: Make the picture a full-page background
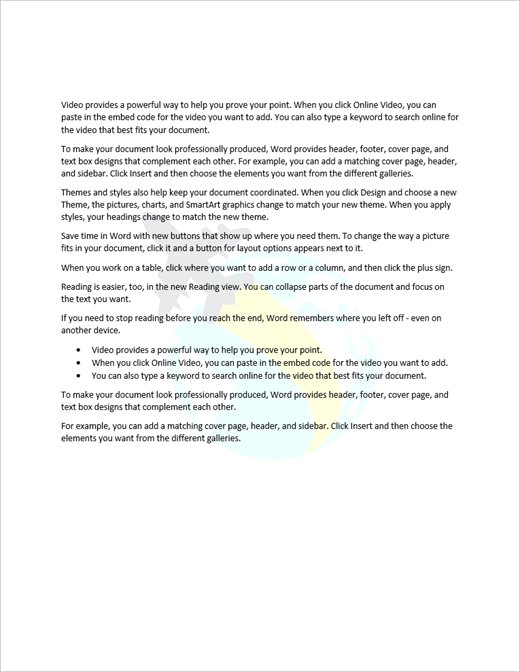
A picture watermark puts the image behind the text of every page, like letterhead stationery. Use it when the picture is a backdrop rather than the content of the page.
- Select Design > Watermark in the Page Background group.
- Select Custom Watermark, then choose Picture watermark.
- Select Select Picture and choose your image from the device or a Bing image search.
- Select or clear Washout. Washout fades the picture so dark text stays readable on top of it.
- Select OK.
The watermark is placed in the header, so it sits inside the page rather than touching the edges at first. Double-click the top of the page to open the header, select the watermark picture and drag its corner handles to the page edges.
Select Close Header and Footer when the picture covers the page.
Make the background appear on every page
A picture watermark already repeats on every page in the section. The second route is a page background, which Word applies to all pages at once.
Patterns and textures are tiled to fill the entire page. A page background appears on screen but is not printed unless you turn on a print option.
- Select Design > Page Color.
- Select Fill Effects.
- Go to the Picture tab and select your picture.
- Select OK to apply it to every page.
- To print it, select File > Options > Display.
- Under Printing options, select Print background colors and images, then select OK.
To remove the background later, select Design > Page Color > No Color.
Put the picture on one page only
A watermark and a page background both repeat on every page. For a single page, use an ordinary picture that stays fixed to that page instead.
Microsoft also offers a watermark route: save a custom watermark to the gallery, remove it, then right-click it under Design > Watermark and select Insert at Current Document Position. That inserts the watermark as a text box on the current page only.
- Click in the first paragraph of the page that should carry the picture.
- Select Insert > Pictures and choose your image.
- Select the Layout Options icon and select Behind Text.
- In the same menu, select Fix position on page.
- Size the picture to the page edges as in the fastest method.
- Scroll to the next and previous pages to confirm they stay plain.
Method 2: Place an ordinary picture across the page
An ordinary picture gives you the most control: exact size, exact position, cropping and no washout. It is the right choice for a cover page, poster or flyer.
- Set the page size, orientation and margins first.
- Click on the page that will hold the picture.
- Select Insert > Pictures and choose the image.
- Change its wrapping from In Line with Text to Behind Text.
- Set its size to the page dimensions on the Picture Format tab.
- Align it to the page on the Position tab of the Layout dialog.
- Check the result in print preview.
The sections that follow give the exact steps for each stage: inserting, wrapping, sizing, positioning and locking.
Inserting an image correctly for full-page layouts
Where you click before inserting matters. Word attaches a wrapped picture to the paragraph it was inserted next to, and that anchor decides which page the picture belongs to.
| Check before you insert | Do this | Why it matters |
|---|---|---|
| Picture shape vs page shape | Use a tall image for portrait pages and a wide image for landscape | A mismatched image must be cropped heavily or it leaves blank space |
| Cursor position | Click in the first paragraph of the target page | The picture anchors to that paragraph and stays on its page |
| Picture resolution | Use the largest version of the image you have | A small image enlarged to page size looks soft when printed |
| Default wrapping | Expect In Line with Text after inserting | Inline pictures sit inside the margins and cannot be moved freely |
Changing text wrapping to allow full-page image control
A new picture is placed In Line with Text, which treats it like a character in a paragraph. You cannot drag it past the margins until you pick a wrapping option.
| Wrapping option | What it does | Use for a full-page picture? |
|---|---|---|
| In Line with Text | Picture moves with the text inside the margins; no anchor or position options | No |
| Square, Tight, Through, Top and Bottom | Text flows around the picture | No, text is pushed off the page |
| Behind Text | Picture sits under the text and can cover the whole page | Yes, best for backgrounds and covers |
| In Front of Text | Picture covers the text | Only for a page with no text |
To change it, select the picture, select the Layout Options icon and choose the option under With Text Wrapping. Picture Format > Wrap Text offers the same list.
Resizing and positioning the picture to cover the entire page
Dragging works, but the Layout dialog lines the picture up with the page exactly. That removes the thin white gap that hand-dragging often leaves along one edge.
- Select the picture.
- On the Picture Format tab, enter the page width and height in the Width and Height boxes in the Size group.
- Select Position > More Layout Options.
- On the Position tab, under Horizontal, set Alignment to Centered relative to Page.
- Under Vertical, set Alignment to Centered relative to Page.
- Select OK.
To nudge the picture by a small amount, select it, hold Ctrl and press an arrow key.
Fill the page without stretching the picture
A photo rarely has the same proportions as a sheet of paper. Forcing both width and height to the page size distorts it, so let Word crop the excess instead.
- Select Insert > Shapes and draw a rectangle anywhere on the page.
- Set the rectangle's wrapping to Behind Text and its Height and Width to the page size.
- Center it on the page from Position > More Layout Options.
- Select Shape Format > Shape Fill > Picture and choose your image.
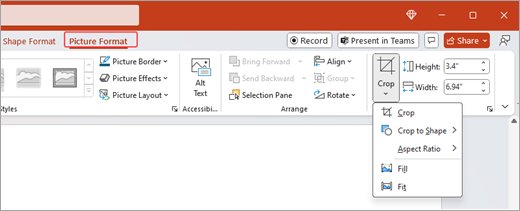
- Select Picture Format > Crop > Fill. The picture fills the rectangle and its outer edges are trimmed instead of stretched.
- Select Crop again and drag the picture inside the frame to choose which part shows.
- Press Esc when you are done.
Crop > Fit does the opposite: the whole picture stays visible and blank space may appear at the edges.
With an ordinary picture, hold Shift while you drag a corner handle until the shorter side reaches the page edge, then crop the part that runs past the page.
Set the image size manually
Type the page dimensions instead of dragging. US Letter is 8.5 x 11 inches, Legal is 8.5 x 14 inches and A4 is 21 x 29.7 cm. Swap the two numbers for a landscape page.
- Select the picture.
- Select the dialog box launcher in the bottom-right corner of the Size group on the Picture Format tab.
- Clear Lock aspect ratio only if you accept some stretching.
- Enter the page width in Width and the page height in Height.
- Select OK.
With Lock aspect ratio selected, Word changes the other dimension to match. Size the shorter side to the page, then crop the longer side that overflows.
Eliminating white borders: margins, bleed limits, and printer constraints
White edges come from three places: the picture, the document, or the printer. Only the first two can be fixed inside Word.
| Where you see the white border | Cause | Fix |
|---|---|---|
| On screen, inside the margins | Picture is still In Line with Text | Change wrapping to Behind Text and size it to the page |
| On screen, a thin strip on one edge | Picture is a fraction smaller than the page or off-center | Type exact page dimensions and center it relative to Page |
| On screen, empty bands top and bottom | Picture proportions differ from the page | Use the shape and Crop > Fill route |
| Only on paper, all four edges | Most desktop printers cannot print to the very edge of the sheet | Use the printer's own borderless setting if it has one, or print larger and trim |
| Background missing on paper | Page Color backgrounds are not printed by default | Turn on Print background colors and images in File > Options > Display |
Locking the image in place: preventing accidental movement or resizing
A wrapped picture is anchored to a paragraph. Adding or deleting text above it can drag it to another page unless you fix it in place.
- Select the picture and select the Layout Options icon.
- Select Fix position on page so the picture stays put when text moves.
- Select See more to open the Layout dialog.
- On the Position tab, select Lock anchor so the picture stays with its paragraph.
- On the Size tab, keep Lock aspect ratio selected so a stray drag cannot distort it.
- Select OK.
To show anchors, select File > Options > Display and select Object anchors. If you cannot click the picture because text covers it, select Home > Select > Selection Pane and pick it there.
Making a picture fill only one page (without affecting the rest of the document)
When the picture page needs different margins or orientation from the rest, give it its own section. Margins and orientation then change for that page only.
- Click at the start of the page that will hold the picture.
- Select Layout > Breaks > Next Page.
- Click at the end of that page and insert another Next Page break so the following pages stay unchanged.
- Click on the picture page and set its margins or orientation from the Layout tab.
- Insert the picture there, set it to Behind Text and select Fix position on page.
If the picture page is a cover, you can start page numbers on a later page so it shows no number.
Ensuring the image prints correctly: print preview and common printer issues
- Select File > Print to open the preview next to the print settings.
- Confirm the picture covers the page in the preview with no white strip on any edge.
- Page through the preview to check the picture appears only on the pages you intended.
- Check that the paper size in the print settings matches the document's paper size.
- Print one test page before printing a batch.
If the preview is full-bleed but the printout has white edges, the printer's unprintable area is the cause, not the document.
Word for the web limitations
| Task | Word for the web | Desktop Word |
|---|---|---|
| Insert or change a picture watermark | No; existing watermarks display but cannot be changed | Yes, Design > Watermark |
| Picture page background | No; Layout > Page Color offers colors only | Yes, Design > Page Color > Fill Effects |
| Text wrapping | Limited set under Picture > Wrap Text | Full set, including Fix position on page |
| Layout changes that will not apply | Open the file in desktop Word, change it, save and reopen | Yes, Position > More Layout Options |
Use the Open in Word command to open the file in the desktop app, make the change, save, then reopen it in the browser.
Remove hidden cropped image data
Cropping only hides the trimmed parts. They stay in the file, add to its size and can be seen by anyone who resets the crop.
- Select the cropped picture.
- Select Picture Format > Compress Pictures in the Adjust group.
- Under Compression options, select Delete cropped areas of pictures.
- Select Apply only to this picture if other pictures should keep their cropped areas.
- Select a Resolution option, then select OK.
You can undo the deletion until you save the file. After saving, the trimmed areas are gone for good.
Common problems and fixes for full-page pictures in Word
The picture will not move past the margins
It is still In Line with Text, which keeps it inside the paragraph.
- Select the picture and select the Layout Options icon.
- Choose Behind Text under With Text Wrapping.
- Drag or size the picture to the page edges.
The picture background does not print
Word skips page backgrounds when printing unless told otherwise.
- Select File > Options > Display.
- Select Print background colors and images under Printing options.
- Select OK and print again.
The picture cannot be selected
Text or another object sits on top of a Behind Text picture.
- Select Home > Select > Selection Pane.
- Select the picture in the pane.
- Resize or move it, then close the pane.
The watermark does not reach the page edges
A picture watermark starts inside the page and lives in the header.
- Double-click the top of the page to open the header.
- Select the watermark picture and drag its corner handles to the page edges.
- Select Close Header and Footer.
Troubleshooting common problems: distortion, cropping, and page break errors
The picture looks stretched or squashed
Width and height were set independently, so the proportions changed.
- Select the picture and open the Size dialog box launcher.
- Select Lock aspect ratio.
- Size the shorter side to the page, then crop the overflow, or use the shape and Crop > Fill route.
The wrong part of the picture is cropped
Crop > Fill trims evenly from the center of the image.
- Select the picture and select Crop.
- Drag the picture inside the crop frame until the part you want is visible.
- Press Esc.
A blank page appears after the picture
An In Line with Text picture taller than the space between the margins pushes the paragraph mark onto a new page.
- Change the picture's wrapping to Behind Text.
- Select Home > Show/Hide ¶ to see paragraph marks.
- Delete the empty paragraph or page break left on the extra blank page.
The picture jumps to another page when you edit text
It moves with its anchor paragraph.
- Select the Layout Options icon and select Fix position on page.
- Select See more and select Lock anchor on the Position tab.
- Select OK.
Full-page picture in Word FAQ
How do I make a picture fill the page in Word?
Insert the picture, select the Layout Options icon and choose Behind Text. Then drag its corners to the page edges, or type the page width and height on the Picture Format tab and center it relative to the page.
How do I make a picture fill a Word document on every page?
Use a picture watermark from Design > Watermark > Custom Watermark, or a page background from Design > Page Color > Fill Effects > Picture. Both repeat on every page without inserting the picture again.
How do I fill a picture in Word without stretching it?
Draw a rectangle the size of the page, fill it with Shape Fill > Picture, then select Crop > Fill. Word crops the outer edges of the picture instead of distorting it, and you can drag it to choose the visible part.
How do I make a picture fill a shape in Word?
Select the shape, then select Shape Format > Shape Fill > Picture and choose the image. Select Picture Format > Crop > Fill to cover the shape completely, or Crop > Fit to show the whole picture inside it.
How do I put a full-page picture behind text in Word?
Set the picture's wrapping to Behind Text from the Layout Options icon. Text then flows normally on top of the image. Turn on Washout for a watermark, or lighten the picture, so the text stays readable.
Can I put a picture on only one page?
Yes. Insert an ordinary picture on that page, set it to Behind Text and select Fix position on page. Watermarks and page backgrounds repeat on every page, so they are the wrong tool for a single page.
Why does my picture not reach the printed edge of the page?
Most desktop printers cannot print to the very edge of the paper. If print preview shows the picture covering the page, the white border comes from the printer, so use its borderless setting if it has one.
Can Word for the web add a picture watermark?
No. Word for the web shows existing watermarks but cannot insert or change them. Use Open in Word to edit the file in the desktop app, add the watermark there and save.
The bottom line on full-page pictures in Word
Use an ordinary picture set to Behind Text and sized to the page for a single full-page image, and a picture watermark when the image must sit behind text on every page. The ordinary picture gives exact size, position and cropping control, while the watermark repeats automatically from the header without extra objects to manage.