To move emails into a folder automatically, right-click a message from the sender, select Rules > Create rule, pick the destination folder and select OK; every new message that matches then lands in that folder.
This guide covers the steps for new Outlook for Windows, classic Outlook, Outlook on the web and Outlook.com, how to apply a rule to mail you already have, and what to do when a rule stops moving messages.
How to automatically move emails into folders in Outlook
This quick route works in new Outlook for Windows and Outlook.com, and it builds a sender-based rule in a few seconds.
- Right-click any email from the sender whose mail you want filed.
- Hover over Rules and select Create rule (in Outlook.com, select Rule > Create rule).
- Choose the folder the messages should move to.
- Select OK to save the rule.
- To add more conditions or exceptions instead, select More options before you save.
A new rule only acts on messages that arrive after you create it. To sort mail that is already in your inbox, use Run rule now, covered further down.
Which Outlook are you using?
Rules sit in a different place in each version of Outlook, so identify yours first. The toggle in the top-right corner of the Windows app is the quickest tell.
| What you see | Your Outlook | Where rules live |
|---|---|---|
| A Try the new Outlook toggle in the upper-right corner and a File tab | Classic Outlook for Windows (Microsoft 365 desktop, Outlook 2019 or 2021) | File > Manage Rules & Alerts |
| A New Outlook toggle, and Go to classic Outlook on the Help tab | New Outlook for Windows | Settings > Mail > Rules |
| Outlook in a browser, signed in with a work or school account | Outlook on the web (OWA) | Settings > Mail > Rules |
| Outlook in a browser, signed in with a personal Outlook.com or Hotmail account | Outlook.com | Settings > Mail > Rules |
If classic Outlook shows no toggle at all, your admin may have hidden it or your account may not support new Outlook. Rules still work there through File > Manage Rules & Alerts.
Step 1: Create your destination folders first
A rule needs a folder to move messages into. Create the folders before you build the rule, so they appear in the folder picker.
- In new Outlook or Outlook on the web, select New folder at the bottom of the folder list.
- Type a name such as Newsletters or Invoices and press Enter.
- To nest a folder, right-click the parent folder and select Create new subfolder, then type a name and press Enter.
- In classic Outlook, right-click Inbox in the folder pane, select New Folder, type a name and press Enter.
- Keep the folders inside your mailbox, not in a local data file, if the rule must run when Outlook is closed.
A server-side rule cannot move mail to a folder that exists only on your device, such as a folder in a PST file. That is the most common reason a rule saves but never moves anything.
How to set up rules in classic Outlook (Microsoft 365 desktop / Outlook 2019–2021)
Classic Outlook has two routes: a quick rule from a message, and the full Rules Wizard for more conditions.
- Right-click a message from the sender and select Rules > Create Rule.
- Tick the condition you want, such as the sender's name, then choose the move-to-folder action and pick your destination folder.
- Tick Run this new rule now on messages already in the current folder if you want existing mail filed too.
- Select OK to save it.
- For more control, select File > Manage Rules & Alerts > New Rule (or Move > Rules > Manage Rules & Alerts on the ribbon).
- Choose a template that moves messages to a folder, select the underlined values in the rule description to set the sender and folder, and select Next.
- Add any extra conditions, select Next, name the rule, then select Finish and OK.
Classic Outlook warns you when a rule can only run while Outlook is open. Those are client-side rules, and they run only on that PC under the account that created them.
How to set up rules in new Outlook for Windows (2026)
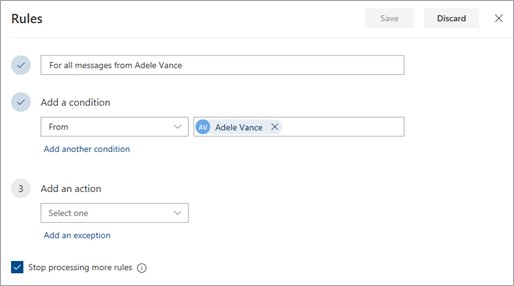
New Outlook builds every rule from Settings, and the quick right-click route opens the same editor.
- Select Settings (the gear icon) at the top of the window.
- Select Mail > Rules, then select Add new rule.
- Give the rule a name you will recognise later.
- Under the condition drop-down, choose what to match, such as the sender or words in the subject.
- Under the action drop-down, choose to move the message and pick the destination folder.
- Use Add a condition, Add an action or Add an exception to refine it, and tick Stop processing more rules if later rules should ignore these messages.
- Select Save.
Rules in new Outlook are not supported for Gmail, Yahoo or iCloud accounts added to the app. Some client-side rules made in classic Outlook also will not run here, so recreate them in new Outlook.
How to set up rules in Outlook on the web (OWA)
Once you open Outlook on the web, it uses the same Settings > Mail > Rules page for work and school accounts, and rules made here run on the server.
- Sign in to Outlook on the web and select Settings (the gear icon).
- Select Mail > Rules, then select Add new rule (the plus sign).
- Enter a name for the rule.
- Choose a condition from the first drop-down, such as who the message is from.
- Choose the move action from the action drop-down and select the destination folder.
- Select Add a condition, Add an action or Add exception if you need more than one.
- Leave Stop processing more rules ticked (it is on by default here) unless another rule must also act on these messages, then select Save.
Create a rule in Outlook.com to move emails to a folder
Personal Outlook.com and Hotmail accounts have the same rule editor, with one limit: rules apply only to new mail.
- Select Settings > Mail > Rules.
- Select Add new rule.
- Enter a name, then pick the condition and the move-to-folder action.
- Select Save.
- To file mail you already have from that sender, use Sweep or Move to on the message instead, because Outlook.com cannot run a rule on existing messages.
Rules created in another version of Outlook may not run or be editable in Outlook.com. Recreate them in Outlook.com if they show a warning.
Run Outlook rules on existing emails in a folder
By default a rule acts only on messages received after you create it. Classic Outlook and new Outlook can apply it to mail already in a folder.
- In new Outlook, select Settings > Mail > Rules and select the Run rule now icon beside the rule.
- In classic Outlook, select File > Manage Rules & Alerts > E-mail Rules > Run Rules Now.
- Tick the rules you want to run.
- Select the folder to process, and tick Include subfolders if needed.
- Choose which messages to include under Apply rules to, then select Run Now.
Bonus: Create rules with Microsoft 365 Copilot
If your account has Copilot in Outlook, you can manage inbox rules from the Copilot chat in plain language instead of filling in the rule form. Microsoft lists creating, viewing, updating and deleting Outlook rules as Copilot tasks.
| What you want | What to ask Copilot | Where to confirm it |
|---|---|---|
| Create a rule | Describe the sender or subject and the folder, for example: move all email from a newsletter sender to my Newsletters folder | Settings > Mail > Rules |
| View rules | Ask Copilot to list your inbox rules | Compare with the list in Settings > Mail > Rules |
| Update a rule | Name the rule and the change, such as a different destination folder | Open the rule with Edit and check the condition and action |
| Delete a rule | Name the rule you want removed | The rule no longer appears in the Rules list |
Copilot features in Outlook are available across classic Outlook, new Outlook, Outlook on the web, Outlook for Mac and the mobile apps, but only on accounts that have Copilot. Without it, the manual steps above do the same job.
Useful rules to create right now
These rules cover the mail most people want out of the inbox. Each uses a standard condition and the move-to-folder action available in every version.
| Rule | Condition | Action |
|---|---|---|
| Newsletters | From a newsletter sender, or subject includes a newsletter's name | Move to a Newsletters folder |
| Receipts and invoices | Subject includes words such as invoice, receipt or order | Move to a Receipts folder |
| Boss or key client | From a specific person | Move to a priority folder, with Stop processing more rules ticked |
| Copied-only mail | Your name is in the Cc box | Move to a Cc folder to read later |
| Project mail | Subject or body includes the project name | Move to the project folder |
| Automated alerts | From a no-reply or alerts address | Move to an Alerts folder |
Rules run from top to bottom in the order shown in the Rules list. Put the most specific rules, such as a key client, above broad ones, and tick Stop processing more rules on them.
Classic Outlook vs. new Outlook rules — what's different
Both versions move mail with rules, but new Outlook supports only server-side rules. That difference explains most migration problems.
| Feature | Classic Outlook | New Outlook |
|---|---|---|
| Where rules are managed | File > Manage Rules & Alerts | Settings > Mail > Rules |
| Client-side rules (run only while Outlook is open) | Supported, on the PC that created them | Not supported; shows "This rule can't be edited or viewed" |
| Run a rule on existing mail | Run Rules Now, with Include subfolders | Run rule now icon beside the rule |
| Custom actions from add-ins | Supported through third-party add-ins | Not supported |
| Actions such as Clear message's flags and Print it | Available | Not supported |
| Turn a rule off temporarily | Clear the rule's check box | Use the toggle beside the rule |
| Rules migrated from the other version | Broken rules are marked in red with "Error" | Some classic rules will not process; recreate them |
Edit, turn off or reorder Outlook rules
| Task | Classic Outlook | New Outlook, web and Outlook.com |
|---|---|---|
| Edit a rule | File > Manage Rules & Alerts, tick the rule, select Change Rule | Settings > Mail > Rules, select Edit (pencil icon), then Save |
| Turn a rule off | Clear the rule's check box | Switch off the toggle beside the rule |
| Delete a rule | Tick the rule and select Delete, then OK | More actions (…) > Delete rule, or the trash icon |
| Change the order | Select the rule and use the up or down arrow | Select the rule and use the up or down arrow |
| Stop later rules acting | Change Rule > Edit Rule Settings, then tick Stop processing more rules | Open the rule with Edit and tick Stop processing more rules |
If you use rules to hold outgoing mail as well, you can delay sending for all emails with a classic Outlook rule built in the same wizard.
Check that an Outlook rule moved your emails
- Open Settings > Mail > Rules (or File > Manage Rules & Alerts in classic Outlook) and confirm the rule is switched on or ticked.
- Ask the sender to send a test message, or send one yourself that matches the condition.
- Watch the destination folder: its unread count should rise while the inbox stays unchanged.
- If the message stays in the inbox, open the rule and check the condition matches the sender address or subject exactly.
- Check that no rule above it has Stop processing more rules ticked for the same messages.
Messages filed by a rule do not appear in the inbox, so it is easy to think emails are missing from the inbox when a rule has filed them. Check the destination folder for unread counts after a busy day.
Outlook rules not moving emails to a folder
"This rule can't be edited or viewed"
The rule is client-side and was created in classic Outlook; new Outlook, Outlook on the web and Outlook.com support only server-side rules.
- Note what the old rule did.
- Delete it, or leave it for classic Outlook.
- Create the rule again in the version you use now, with conditions and actions that version supports.
Rule shown in red with "Error" in classic Outlook
The rule is broken, often because its destination folder was renamed, moved or deleted.
- Select File > Manage Rules & Alerts and select OK on the broken-rule prompt.
- Tick the rule marked with the error.
- Select the underlined links under Rule description, pick a valid folder and select OK.
Rule works only when classic Outlook is open
It is a client-side rule, or it moves mail to a folder that exists only on your PC.
- Move the destination folder into your mailbox instead of a PST data file.
- Remove any condition or action that only classic Outlook supports.
- Recreate the rule in Outlook on the web so it runs on the server.
You can't create any more rules or update a rule
Exchange Online limits all enabled inbox rules to 256 KB in total; long names and many conditions use more space.
- Turn off or delete rules you no longer need, because the limit counts only enabled rules.
- Merge several sender rules into one rule with multiple senders.
- Shorten rule names and remove unused exceptions, then save again.
Rules don't work at all on a work mailbox
Inbox rules do not run on mailboxes with a Microsoft 365 F1 licence or on journaling mailboxes.
- Ask your IT admin which licence your mailbox has.
- If it is F1 or a journaling mailbox, file mail manually or ask for a licence change.
Existing emails didn't move
Rules act only on mail that arrives after you create them.
- Use Run rule now in new Outlook, or Run Rules Now in classic Outlook.
- In Outlook.com, select the messages and use Move to or Sweep.
Outlook rules to move emails FAQ
How do I automatically move emails to a folder in Outlook?
Right-click a message from the sender, select Rules > Create rule, choose the destination folder and select OK. Outlook then moves every new message from that sender into the folder. Use More options to add subject or recipient conditions.
Can Outlook rules move emails that are already in my inbox?
Yes, in classic Outlook and new Outlook. In new Outlook, select the Run rule now icon beside the rule in Settings > Mail > Rules. In classic Outlook, use File > Manage Rules & Alerts > Run Rules Now. Outlook.com rules apply only to new mail.
Do Outlook rules run when Outlook is closed?
Server-side rules do, because Exchange or Outlook.com runs them as mail arrives. Client-side rules made in classic Outlook run only while classic Outlook is open on the PC that created them. Classic Outlook warns you when a rule is client-side.
Where are rules in new Outlook for Windows?
Select Settings, the gear icon at the top of the window, then select Mail > Rules. From there you can add a new rule, edit or delete one with More actions, switch a rule off with its toggle and run it on existing mail.
Why does my rule say this rule can't be edited or viewed?
The rule is a client-side rule created in classic Outlook. New Outlook, Outlook on the web and Outlook.com support only server-side rules, so they cannot open it. Recreate the rule in the version you use now.
How many rules can I have in Outlook?
There is no maximum number of rules in Exchange Online, but all enabled rules together are limited to 256 KB. Each rule's size depends on its name and how many conditions it has. Disabled rules do not count toward the limit.
Can I create Outlook rules for a Gmail account?
Not in new Outlook for Windows, which does not support rules for Gmail, Yahoo or iCloud accounts added to the app. For those accounts, set up the sorting filter in the email provider's own web app, which then files the mail before Outlook syncs it.
What does stop processing more rules do in Outlook?
It tells Outlook to ignore every later rule for a message this rule has already handled, even if those rules also match. Tick it on a rule that moves a key sender's mail so a broader rule further down does not act on the same messages.