Press Ctrl + Alt + T on a Chromebook to open Crosh, then type help or help_advanced to list the commands your ChromeOS build supports.
The 45 commands below are grouped by job: system information, networking, hardware checks, files and logs, Linux virtual machines, security flags and developer-mode customisation, with a note on which ones need developer mode.
How to access Crosh on Chrome OS devices
Crosh is the ChromeOS shell, a small set of command-line tools built into every Chromebook for troubleshooting. It has no icon in the launcher, so the keyboard shortcut is the only way in.
- Sign in to your Chromebook. A guest session also works.
- Press Ctrl + Alt + T together.
- Wait for the
crosh>prompt to appear in a new window. - Type
helpand press Enter to see the common commands. - Type
help_advancedand press Enter to see every command available on your device.
Nothing needs to be installed first. Google built Crosh in so it still works when the network is down, which is exactly when you need it.
Steps to open Crosh, switch windows and run several sessions
Crosh behaves like any other window once it is open. These steps cover the parts people trip over: getting back to the browser, opening a second session and reaching the full shell.
- Press Ctrl + Alt + T to open the first Crosh session.
- Press Alt + Tab to return to the browser without closing Crosh.
- Press Ctrl + Alt + T again to open another, independent session.
- Press Alt + Tab to move between the open sessions.
- On a device in developer mode, type
shelland press Enter to get the full Linux command prompt. - Close the window when you are done to end that session.
Important tips before you run Crosh commands on a Chromebook
The command list changes between releases, channels, admin settings and developer mode. Check these points before you assume a command is broken.
| Check | Why it matters |
|---|---|
| Your ChromeOS release and channel | Google adds and removes Crosh tools between versions, so help_advanced on your device is the final word |
| Work or school management | An administrator can limit what runs and can block developer mode entirely |
| Developer mode on or off | Commands after shell only work in developer mode; in normal mode Crosh refuses the shell command |
| Your files are backed up | Turning developer mode on or off triggers a wipe of the device's user data |
| Linux development environment | The vmc commands manage the Linux virtual machine, so they matter only if Linux is set up |
Understanding the importance of using commands in Crosh
Crosh is one of three command lines on a Chromebook, and each reaches a different layer. It works much like the Windows 11 Run commands do on a PC: short names that open tools the regular interface hides.
| Command line | How to open it | What it can reach | Developer mode needed |
|---|---|---|---|
| Crosh | Ctrl + Alt + T | Built-in diagnostics, the Linux VM manager (vmc) and modem logging |
No |
Crosh shell |
Type shell inside Crosh |
The full ChromeOS Linux system, with sudo for root |
Yes |
| VT-2 console | Ctrl + Alt + → (the F2 key position) | A text login as the chronos user, outside the browser |
Yes |
| Linux Terminal app | Launcher, after Linux is turned on | A Debian container inside a virtual machine, separate from ChromeOS | No |
Use Crosh for the ChromeOS side of a problem and the Terminal app for software you install with APT. The two never share a prompt.
Which Crosh commands work without developer mode?
Every command in this list is numbered. Match your situation to a row to see which numbers apply to you.
| Your situation | Commands you can use | Why |
|---|---|---|
| Normal Chromebook, Linux turned off | #1–5 and #8 | Help, architecture and modem logging run in plain Crosh |
| Normal Chromebook, Linux turned on | #1–5, #8, #25–34, #45 | The vmc and vsh tools manage the Linux virtual machine without developer mode |
| Developer mode on | All of them | shell (#6) unlocks the Linux prompt that the remaining commands need |
| Managed work or school device | Whatever help_advanced lists |
The administrator decides which tools and modes are available |
Basic commands for system information in Crosh
Start with these. The help commands describe every other command on your build, so learn them first.
| # | Command | What it does | Mode |
|---|---|---|---|
| 1 | help |
Lists the most common Crosh commands | Normal |
| 2 | help_advanced |
Lists every available command, including debugging tools; scroll up to see the full list | Normal |
| 3 | help <command> |
Shows usage for one command, for example help vmc |
Normal |
| 4 | <command> --help |
Same detail as help <command>, typed after the command name |
Normal |
| 5 | uname -m |
Prints the processor architecture, such as x86_64 for Intel or AMD |
Normal |
| 6 | shell |
Opens the full Linux prompt as the chronos user |
Developer |
| 7 | sudo -i |
Switches the shell to a root prompt for system-level commands | Developer |
Press Tab after typing the first letters of a command to complete it. That is the quickest way to find a tool when you half remember its name.
Network troubleshooting commands in Crosh
Google documents these for cellular modems, the hardest network fault to diagnose from Settings. For Wi-Fi and Ethernet tools, run help_advanced; the network commands on your build are listed there.
| # | Command | What it does | Mode |
|---|---|---|---|
| 8 | modem set-logging debug |
Turns on debug logging in ModemManager without restarting it | Normal |
| 9 | sudo stop modemmanager |
Stops the modem service so you can talk to the modem directly | Developer |
| 10 | ls /dev/ttyACM* /dev/ttyUSB* |
Lists the serial ports the modem exposes | Developer |
| 11 | sudo restart modemmanager MM_LOGLEVEL=DEBUG |
Restarts the modem service with debug logging from the start | Developer |
Debug logs land in /var/log/messages. Run your test, then read that file with command #21.
Battery and power management commands in Crosh
Battery tools in Crosh vary by device and release, so check help_advanced for them. The built-in Diagnostics app runs the same kind of battery, CPU and memory checks without any typing.
- In Crosh, type
help_advancedand look for battery or power entries on your build. - Type
helpfollowed by the tool name to read its options before you run it. - For a guided check, open the launcher, search for Diagnostics and open the app.
- Read the battery section of the app, which checks for battery problems as well as CPU, memory and Wi-Fi faults.
- In a developer-mode root shell, type
reboot(command #12) to restart the Chromebook from the command line.
Device and hardware diagnostics commands in Crosh
These run from the developer-mode shell. Bluetooth tools are documented for developer devices, so a command not found reply means your image does not ship that tool.
| # | Command | What it does | Mode |
|---|---|---|---|
| 13 | grep '^flags\s*:.* vmx ' /proc/cpuinfo |
Shows whether an Intel processor reports VMX virtualisation support | Developer |
| 14 | dmesg | tail |
Prints the latest kernel messages, useful right after a device or mount error | Developer |
| 15 | btmgmt advinfo |
Shows how many Bluetooth advertisements are registered | Developer |
| 16 | btmgmt clr-adv |
Clears registered Bluetooth advertisements | Developer |
| 17 | restart bluetoothd && restart ui |
Restarts the Bluetooth service and the ChromeOS interface together (root) | Developer |
| 18 | btmon -w /var/log/btmon.log |
Records Bluetooth traffic to a log file until you press Ctrl + C | Developer |
| 19 | dbus-monitor --system > /var/log/dbus.log |
Records system D-Bus messages between services to a file | Developer |
Managing files and directories with Crosh
Plain Crosh has no file commands; file work happens in the developer-mode shell. Knowing where ChromeOS keeps things is most of the job.
| Location | What is there |
|---|---|
/var/log/messages |
Operating system and kernel log; older copies are messages.1, messages.2 and so on |
/var/log/chrome/chrome |
Chrome's log before sign-in, and during the session in developer mode |
/var/log/ui/ui.LATEST |
Chrome's log between sign-in and the start of the user log |
/home/chronos/user/MyFiles/Downloads |
Your Downloads folder, the same one the Files app shows |
/media/removable/ |
USB drives and SD cards, one folder per drive label |
/etc/chrome_dev.conf |
Extra Chrome startup flags, editable only after rootfs verification is removed |
Basic file operations in the Crosh shell
Logs are the files you will read most. These commands read them and copy them somewhere the Files app can see.
| # | Command | What it does | Mode |
|---|---|---|---|
| 20 | cat /var/log/chrome/chrome | grep -e "keyword 1" -e keyword2 |
Prints only the Chrome log lines that contain your search terms | Developer |
| 21 | tail /var/log/messages |
Shows the last lines of the system log | Developer |
| 22 | cp /var/log/chrome/chrome /home/chronos/user/MyFiles/Downloads |
Copies the Chrome log to Downloads so you can attach or share it | Developer |
File management commands for ChromeOS config and log files
Editing system files is the step that changes how ChromeOS starts, so it needs the extra unlock covered under security below.
| # | Command or address | What it does | Mode |
|---|---|---|---|
| 23 | sudo vi /etc/chrome_dev.conf |
Opens the Chrome flags file; each line becomes a startup argument such as --enable-logging |
Developer, rootfs verification removed |
| – | file:///var/log/chrome/chrome |
Typed in the Chrome address bar, opens the same log without any shell | Normal |
The vi on ChromeOS behaves like classic vi. Press i to type, then Esc and :wq to save and quit.
Accessing external storage from Crosh
USB drives and SD cards mount under /media/removable/. The vmc commands can also store Linux disks and backups there, and those work without developer mode.
| # | Command | What it does | Mode |
|---|---|---|---|
| 24 | ls /media/removable |
Lists the label of every connected USB drive or SD card | Developer |
| 25 | vmc create-extra-disk --size=1G extra-disk.img "USB Drive" |
Creates a 1 GB data disk on the drive labelled USB Drive | Normal |
| 26 | vmc start termina --extra-disk "/media/removable/USB Drive/extra-disk.img" |
Starts the Linux VM with that external disk attached; stop the VM first | Normal |
| 27 | vmc export termina termina-backup "USB Drive" |
Saves the Linux VM disk as a compressed archive on the drive, or in Downloads if you leave the drive name off | Normal |
Put quotes around any drive label that contains spaces, such as "My USB Drive". Without them the command reads each word as a separate argument.
Tips for effective file management on a Chromebook command line
- Copy files into
/home/chronos/user/MyFiles/Downloadswhen you want to open them in the Files app. - Press Shift + Alt + M to open the Files app and check that the copy arrived.
- Quote every path or label that contains a space.
- Add
| grepand a keyword when reading long logs, rather than scrolling the whole file. - Use
vmc exportbefore you remove Linux or powerwash, so the Linux disk survives. - Delete large exports from Downloads once they are safely stored elsewhere.
Process and task management commands in Crosh
On a Chromebook the processes you manage from Crosh are mostly the Linux virtual machines and the ChromeOS interface itself. Pick the row that matches what you want to stop or restart.
| What you want to manage | Commands | Mode |
|---|---|---|
| See which Linux VMs exist | #28 | Normal |
| Get a prompt inside a VM | #29 | Normal |
| Create, start, stop or delete a VM | #30–33 | Normal |
| Open the default Linux container | #34 | Normal |
| Restart the ChromeOS interface | #35–36 | Developer |
| Reset every VM service at once | #37 | Developer |
Viewing active processes and Linux VMs in Crosh
| # | Command | What it does | Mode |
|---|---|---|---|
| 28 | vmc list |
Lists the virtual machines that exist on your account | Normal |
| 29 | vsh |
Connects to a running VM instance; run help vsh for the arguments your build expects |
Normal |
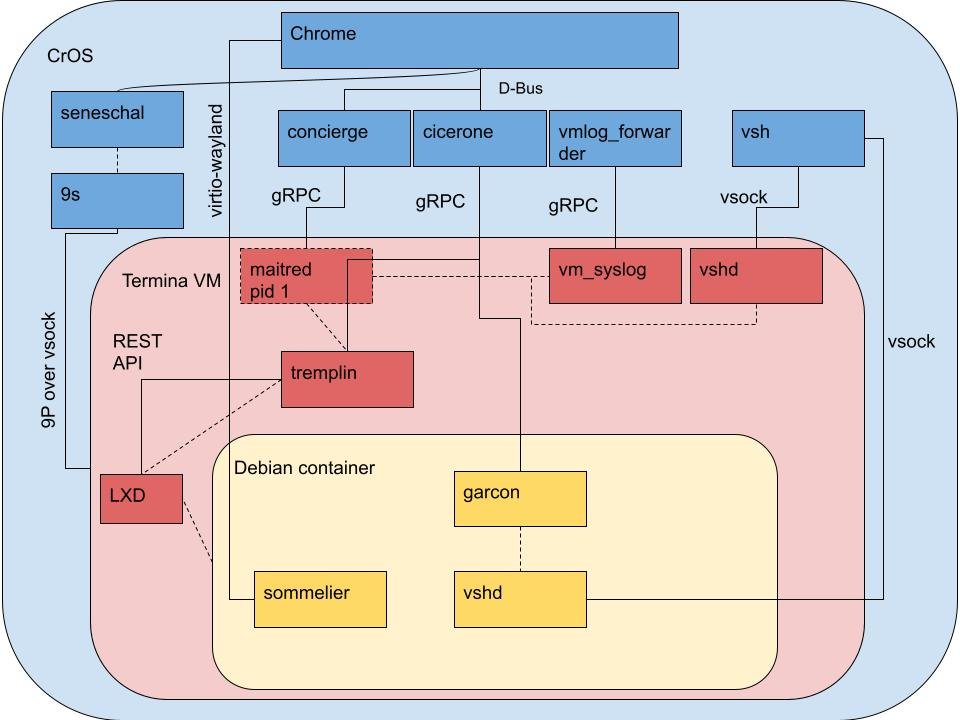
The default Linux VM is named termina. Inside it you can run cat /etc/lsb-release to see which VM image version is running.
Managing processes and VMs with Crosh commands
Closing the Terminal app does not stop the Linux VM. Use these commands when you want it shut down, rebuilt or restarted cleanly.
| # | Command | What it does | Mode |
|---|---|---|---|
| 30 | vmc create <VM name> |
Creates a new, separate VM | Normal |
| 31 | vmc start <VM name> |
Starts a VM, for example vmc start termina |
Normal |
| 32 | vmc stop <VM name> |
Shuts a VM down | Normal |
| 33 | vmc destroy <VM name> |
Deletes a VM and its disk permanently | Normal |
| 34 | vmc container termina penguin |
Starts the default penguin Linux container inside termina |
Normal |
| 35 | sudo restart ui |
Restarts the ChromeOS interface, including Chrome itself | Developer |
| 36 | stop ui |
Stops the ChromeOS interface entirely (root); used before system-level resets | Developer |
| 37 | stop vm_concierge && start vm_concierge |
Stops every running VM and the services around them, then starts them fresh (root) | Developer |
Monitoring system resources on a Chromebook
Live CPU and memory figures are easier to read in the Diagnostics app than in a terminal. Use Crosh to find any resource tools your build adds.
- Open the launcher and search for Diagnostics.
- Open the Diagnostics app and review its CPU and memory checks.
- Note any check that reports a problem before you change anything.
- Open Crosh with Ctrl + Alt + T and type
help_advancedto check for extra monitoring tools on your release. - If a Linux app is the suspect, run
vmc stop terminaand watch whether the figures drop.
Additional tips for Crosh and Linux VM processes
| Behaviour | What to do about it |
|---|---|
| VMs keep running after you close every Linux app | Stop them with vmc stop termina or from the Terminal app's right-click menu |
| VM and container processes end when you sign out | Save work inside Linux before signing out; nothing restarts on its own at the next sign-in |
| VM data survives sign-out and sign-in | Use vmc destroy only when you really want that data gone |
| A VM stopped by a power loss can lose data | Shut VMs down with vmc stop before you close the lid on low battery |
| Secondary profiles cannot open the Terminal app | They can still start VMs from Crosh, though Files app integration may not work |
Security and privacy commands in Crosh
These change how the Chromebook protects itself. Run them only on a device you own and are prepared to recover.
| # | Command | What it does | Mode |
|---|---|---|---|
| 38 | crossystem dev_boot_usb=0 |
Turns booting from USB and SD cards back off | Developer, root |
| 39 | crossystem clear_tpm_owner_request=1 |
Asks the firmware to clear the TPM owner at the next reboot; Google uses it with a full data wipe to send a test device back to setup | Developer, root |
| 40 | sudo /usr/share/vboot/bin/make_dev_ssd.sh --remove_rootfs_verification |
Removes root filesystem verification so system files can be changed; you may be asked to re-run it with --partitions |
Developer |
Once rootfs verification is removed, returning to normal mode needs a recovery image, and automatic updates may fail until a full update downloads.
Advanced troubleshooting commands in Crosh
Both commands below need a root prompt, so type shell and then sudo -i first.
| # | Command | What it does | Mode |
|---|---|---|---|
| 41 | generate_logs |
Packs everything under /var/log into a /tmp/debug-logs_<date>.tgz archive and prints its path |
Developer, root |
| 42 | flashrom -r /tmp/bios.bin |
Reads the firmware into a file so you can inspect it; this only reads and does not write | Developer, root |
Copy the log archive to Downloads with cp (as in #22) before you restart, because /tmp is cleared on reboot.
Customizing and optimizing Chrome OS with commands
These commands change how the Chromebook boots or how its Linux VM starts. The first two need developer mode; the third does not.
| # | Command | What it does | Mode |
|---|---|---|---|
| 43 | crossystem dev_boot_usb=1 |
Allows booting from a USB drive or SD card from the developer-mode boot screen | Developer, root |
| 44 | crossystem dev_boot_legacy=1 |
Turns on the alternative bootloader feature after one has been installed | Developer, root |
| 45 | vmc start --kernel $KERNEL --initrd $INITRD termina |
Boots the Linux VM with your own kernel and initrd files from MyFiles/Downloads | Normal |
For Chrome flags, edit /etc/chrome_dev.conf (#23) and then run sudo restart ui (#35) so Chrome picks up the change.
Best practices for using Crosh commands safely
- Run
help <command>before any command you have not used, and read what it changes. - Back up your files before you turn developer mode on or off, because the switch wipes local data.
- Export the Linux VM with
vmc exportbefore runningvmc destroyor rebuilding Linux. - Avoid commands that write to firmware or system partitions unless you have a recovery USB ready.
- Leave managed work or school devices alone; ask the administrator instead of forcing developer mode.
- Turn USB boot back off with
crossystem dev_boot_usb=0once you no longer need it. - Return to normal mode by pressing Spacebar at the firmware screen when you are finished.
How to check a Crosh command worked
- Look for the
crosh>prompt again; it returns when a command finishes. - After
shell, confirm the prompt changed tochronos@localhost. - After any
vmc startorvmc stop, runvmc listand check the VM's state. - After
vmc exportorgenerate_logs, press Shift + Alt + M and find the file in Downloads or on the drive. - After a
crossystemchange, restart and check the developer-mode boot screen for the new option.
Crosh commands on Chrome OS FAQ
How do you open Crosh on a Chromebook?
Press Ctrl + Alt + T while signed in, including in a guest session. Crosh opens in its own window with a crosh> prompt. It has no launcher icon, so that shortcut is the only way to start it.
How do you use Chrome OS commands in Crosh?
Open Crosh with Ctrl + Alt + T, type a command and press Enter. Start with help for the common commands and help_advanced for the full list. Add –help after any command name, or type help followed by the name, to see its options.
Does Crosh need developer mode?
No. Crosh itself, the help commands, modem logging and the vmc Linux VM tools all run in normal mode. Developer mode is needed only for the shell command, which opens the full Linux prompt that most file, Bluetooth and boot commands require.
Why does the shell command not work in Crosh?
The shell command works only when the Chromebook is in developer mode. In normal mode Crosh refuses it by design. Turning developer mode on wipes the device, and work or school administrators can block it completely.
Is Crosh the same as the Linux Terminal on a Chromebook?
No. Crosh talks to ChromeOS itself and opens with Ctrl + Alt + T. The Linux Terminal app runs a Debian container inside a virtual machine after you turn on Linux in Settings, under About ChromeOS and Developers.
How do you put Chrome OS on a PC?
Install ChromeOS Flex, Google's version of ChromeOS for existing PCs and Macs. You need a USB drive of 8 GB or more, and the PC needs an x86-64 Intel or AMD processor, 4 GB of RAM and 16 GB of storage.
How do you get Chrome OS on a Windows computer?
Create a ChromeOS Flex USB installer and boot the Windows computer from it. You can run ChromeOS Flex from the USB drive first to try it, then install it, which replaces Windows on that drive. Google guarantees support only on certified models.
How do you change the Chrome OS channel?
Sign in as the owner, open Settings, select About ChromeOS, then Additional details, and select Change channel next to Channel. Moving to a more stable channel powerwashes the Chromebook and deletes local data, so back up first.
How do you turn developer mode off after using Crosh?
Restart the Chromebook and press the Spacebar at the firmware screen. On a tablet without a keyboard, use the volume keys to choose Enable OS Verification and press Power. If you changed system files, you may need a recovery image.
Bottom line: which Crosh commands to learn first
Learn help_advanced, help <command> and the vmc family first, and only move on to shell commands if you really need developer mode. Those commands work on any Chromebook without a wipe, they describe every other tool on your exact build, and vmc fixes and backs up the Linux environment that most Crosh users are troubleshooting.