To clean a hard drive in Windows 10, search the taskbar for Disk Cleanup, pick the drive, select Clean up system files, tick the file types to remove and select OK > Delete files.
This guide then walks through Storage Sense, removing apps, browser caches, duplicates, drive optimization, restore points, secure deletion and a full wipe before you sell the PC.
Step 1: Use Disk Cleanup Utility
Disk Cleanup is built into Windows 10 and removes temporary files, the Recycle Bin contents, old update files and leftovers from a previous Windows version. It is the single biggest win for most PCs.
- In the search box on the taskbar, type disk cleanup and select Disk Cleanup from the results.
- Choose the drive to clean, usually C:, and select OK.
- Tick the file types you want to delete. Downloaded Program Files, Temporary Internet Files and Thumbnails are ticked by default.
- Select Clean up system files, choose the same drive and select OK to add system files to the list.
- Wait while Windows calculates the space, then tick the system file types you want to remove.
- Select OK, then Delete files to confirm.
If you upgraded Windows in the last 10 days, a previous Windows installation appears in the list. Deleting it frees a lot of space but removes the option to go back to that version.
Which cleanup step should you start with?
Work down the list in order and check free space after each step, as Microsoft recommends. Stop once you have enough room.
| Your situation | Do this | Why |
|---|---|---|
| Low disk space warning on C: | Disk Cleanup with Clean up system files | Removes temporary, update and previous-Windows files in one pass |
| You want Windows to keep cleaning on its own | Turn on Storage Sense | Empties temporary files and old Recycle Bin items on a schedule |
| Drive filled up over months of installs | Uninstall unused apps | Programs and games are often the largest single items |
| Browser feels slow or storage shows large app data | Clear the browser cache | Each browser keeps its own cache outside Disk Cleanup's reach |
| Photos and downloads copied many times | Find and remove duplicates in File Explorer | Only you can tell which copy to keep |
| Old spinning hard drive feels sluggish | Run Optimize in Defragment and Optimize Drives | Defragmenting helps HDDs; SSDs get a trim instead |
| Selling, donating or recycling the PC | Reset with Remove everything and Clean data | Makes deleted files harder to recover |
Preparing to Clean Your Hard Drive
- Back up your important files to an external drive or OneDrive, because several steps below delete data for good.
- Close all running apps and browsers so their temporary files and caches are not in use.
- Sign in with an administrator account; Clean up system files, BitLocker and the command-line steps need one.
- Open File Explorer, select This PC, and note the free space shown under Devices and drives so you can measure the result.
- If the drive is encrypted with BitLocker, find your recovery key before resetting the PC.
Step 2: Using Windows 10 Built-in Storage Sense
Storage Sense deletes temporary files and old Recycle Bin items automatically. It works on the system drive only, normally C:, and it is off by default.
With default settings it runs when the PC is low on space. It leaves your Downloads folder and OneDrive files alone unless you tell it otherwise.
- Select Start > Settings > System > Storage.
- Set the Storage Sense switch to On.
- Select the Storage Sense settings link under the switch to open its options.
- Under Run Storage Sense, pick how often it should run.
- Choose how long files may stay in the Recycle Bin, and in Downloads if not opened, before they are deleted.
- If you are signed in to OneDrive, choose when unused cloud files become online-only.
Storage Sense only runs while you are signed in and online for more than 10 minutes. Settings apply to your account only; other users set their own.
Step 3: Uninstall Unnecessary Applications
Apps you no longer use often take more space than all the temporary files combined. Control Panel lists every desktop program in Windows 10.
- In the search box on the taskbar, type Control Panel and select it.
- Select Programs > Programs and Features.
- Right-click a program you no longer need and select Uninstall or Uninstall/Change.
- Follow the on-screen prompts, then repeat for the next program.
- For Microsoft Store apps, open Start, right-click the app in the list and select Uninstall.
Step 4: Clear Temporary Files and Browser Cache
Disk Cleanup clears the Windows temporary files, but each browser keeps its own cache. Clear the ones you use.
- Windows temporary files: press Windows logo key + R, type
%temp%and press Enter. Press Ctrl + A, then Delete, and select Skip for any file that is in use. - Microsoft Edge: select Settings and more > Settings > Privacy, search, and services. Under Clear browsing data, select Choose what to clear, tick Cached images and files and select Clear now.
- Google Chrome: select More > Delete browsing data, choose a time range such as All time, tick the items to remove and select Delete data.
- Empty the Recycle Bin on the desktop afterwards so the deleted files actually free space.
Clearing cookies as well signs you out of websites. Tick only the cache option if you want to stay signed in.
Step 5: Remove Duplicate Files
Windows 10 has no built-in duplicate finder, so the safe approach is a manual search in File Explorer where you see every copy before deleting it.
- Open File Explorer and select This PC, then open the folder to check, such as Pictures, Videos or Downloads.
- Select View > Details so name, date and size are shown.
- Right-click an empty area and select Sort by > Size to group identical-size files together.
- Look for pairs with the same size and similar names, such as
photo (1).jpgandphoto.jpg, and open both to confirm they match. - Delete the extra copy, then search the next folder by typing a file name in the search box at the top right.
- Empty the Recycle Bin when you finish.
Step 6: Defragment and Optimize Your Drive (HDDs Only)
Defragmenting reorganizes files on a hard disk drive so they are easier to read. Solid-state drives are trimmed instead, and Windows picks the right action for each drive type. Windows optimizes drives once a week by default.
- In the search box on the taskbar, type defrag.
- Select Defragment and Optimize Drives from the results.
- Select the drive you want to work with from the list.
- Select Analyze to check whether a hard drive needs optimization.
- Select Optimize to run defragmentation on a hard drive, or the trim on an SSD.
- To change the schedule, select Change settings under Scheduled optimization and choose Daily, Weekly or Monthly.
Step 7: Use Third-Party Cleanup and Optimization Tools
Every job that paid cleaners advertise has a free built-in tool in Windows 10. Use the built-in option first; it cannot remove files Windows still needs.
| What a cleanup tool offers | Built-in Windows 10 tool | Where to find it |
|---|---|---|
| Junk and temporary file removal | Disk Cleanup | Search disk cleanup on the taskbar |
| Scheduled automatic cleaning | Storage Sense | Settings > System > Storage |
| Program uninstaller | Programs and Features | Control Panel > Programs |
| Disk optimizer | Defragment and Optimize Drives | Search defrag on the taskbar |
| File shredder | cipher /w command |
Command Prompt as administrator |
| Malware cleanup that frees space | Windows Security virus scan | Search Windows Security on the taskbar |
If you do install a cleanup tool, take it only from the developer's own website, and never let it delete registry entries or system files you cannot identify.
Step 8: Manage System Restore and Shadow Copies
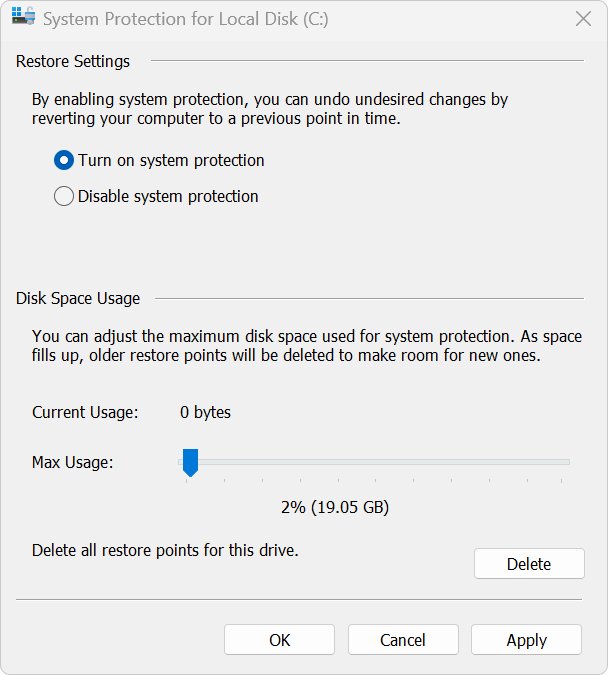
Restore points are shadow copies of system files, apps and settings, and they can use a large share of the drive. Cap their size rather than switching them off, so you keep a way back after a bad update.
- Select Start, type Create a restore point and select it from the results.
- On the System Protection tab, select the system drive and select Configure.
- Use the slider to set the maximum disk space restore points may use, then select Apply.
- To remove only the oldest restore point, open Command Prompt as administrator and run
vssadmin delete shadows /for=c: /oldest. - To check what is left, run
vssadmin list shadows. - Select Create on the System Protection tab to make a fresh restore point once cleanup is finished.
Deleting a shadow copy is permanent, and any restore point or previous file version that depends on it is lost too. You can also run these commands in the Windows Terminal app opened as administrator.
Step 9: Encrypt or Delete Sensitive Files
Deleting a file and emptying the Recycle Bin leaves its data on the disk until it is overwritten. Use these steps for tax records, ID scans and similar files.
- Delete the sensitive files and empty the Recycle Bin.
- Open Command Prompt as administrator and run
cipher /w:C:\to overwrite all unused space on drive C:. Use the drive letter where the files were stored. - Wait for the command to finish; it can take a long time on a large drive.
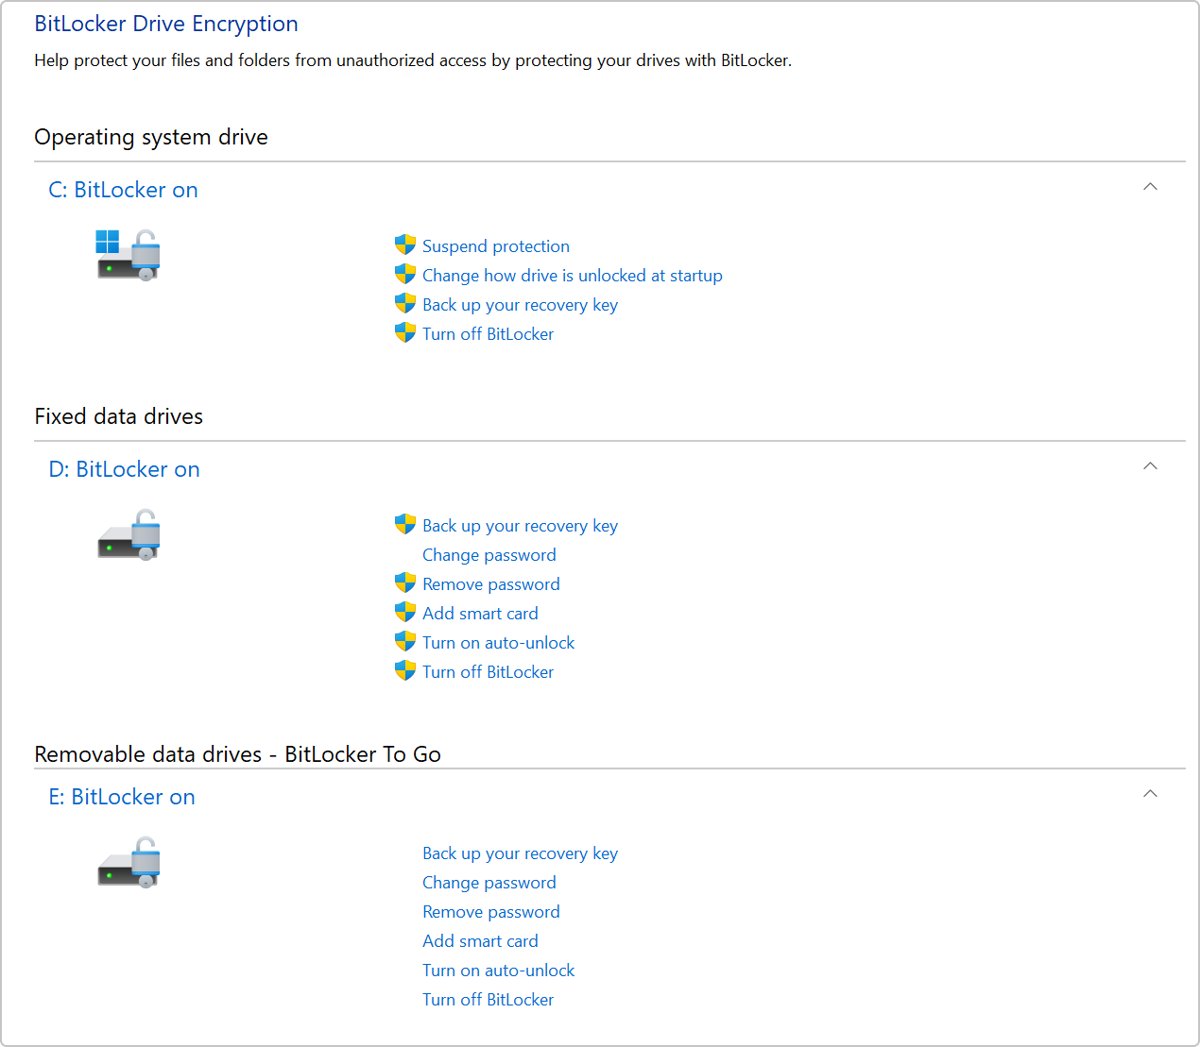
- To encrypt files you keep instead, sign in as an administrator, type BitLocker in Start and select Manage BitLocker.
- Select Turn on BitLocker next to the drive and follow the wizard, saving the recovery key somewhere other than the PC.
- If Manage BitLocker is missing, your PC runs Windows 10 Home, which does not include BitLocker Drive Encryption.
How to completely clean a hard drive before selling the PC
To wipe everything, reset Windows with the drive-cleaning option on. Microsoft notes this consumer erasure does not meet government or industry data erasure standards.
- Back up every file you want to keep and note your BitLocker recovery key if the drive is encrypted.
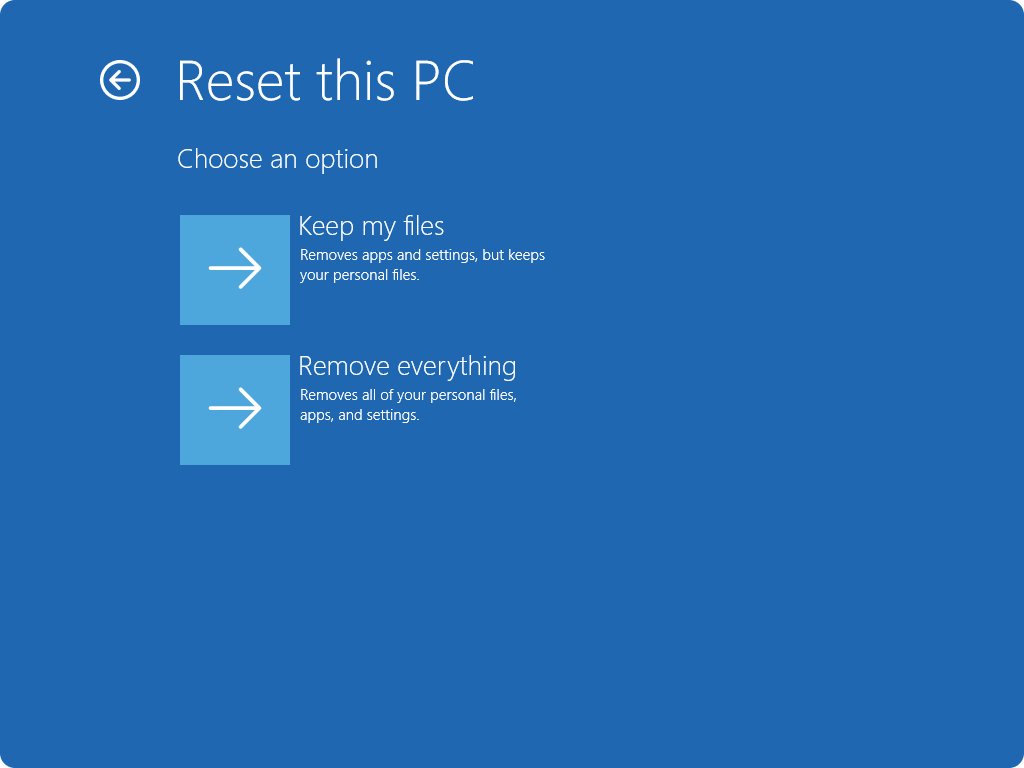
- Open Settings, type Reset this PC in the search box and select it.
- Under Reset this PC, start the reset and choose Remove everything.
- Change the settings so Clean data is turned on.
- Choose Cloud download or Local reinstall, then follow the prompts.
- Leave the PC alone until it finishes; the screen can stay black for 15 minutes or more, and restarting it yourself can make the reset fail.
How to check the cleanup worked
- Open File Explorer and select This PC.
- Compare the free space under Devices and drives with the figure you noted before you started.
- Open Settings > System > Storage and check that the capacity bar is no longer red, which marks a low-disk state.
- Open Settings > Apps and check that the apps you removed no longer appear in the list.
Why Is Hard Drive Cleaning Important?
| Problem on a full drive | What cleaning fixes |
|---|---|
| Slower performance | Windows and apps get room for temporary files and updates again |
| Windows updates fail to install | Feature updates need free space; Microsoft lists low space as a cause |
| Low Disk Space notifications | Removing junk clears the red capacity bar and the warnings |
| Old personal data left on the disk | Secure deletion or a clean reset stops others recovering it |
| Hidden malware using space | A Windows Security scan removes infected files |
Additional Tips for Maintaining a Clean Hard Drive
- Keep Storage Sense on with a monthly schedule so temporary files never build up.
- Save new files to a second drive: select Start > Settings > System > Storage > More storage settings > Change where new content is saved and pick a drive for each content type.
- Turn on OneDrive Files On-Demand so cloud files sit on the disk as small placeholders.
- Move photos and videos you rarely open to a USB drive or SD card: select them in File Explorer, choose Home > Move to > Choose location, pick the external drive and select Move.
- As a last resort on a small drive, right-click C: in File Explorer, select Properties, tick Compress this drive to save disk space and select Apply > OK.
- Run a Windows Security virus scan if space disappears for no clear reason.
Fix problems when cleaning the hard drive
Low Disk Space error returns right after cleanup
The Temp folder is filling with Microsoft Store app (.appx) files.
- Select Start > Settings > Update & Security > Troubleshoot, select Windows Store Apps and select Run the troubleshooter.
- Press Windows logo key + R, type
wsreset.exeand select OK; the window closes after about ten seconds and the Store opens. - In the same Troubleshoot page, select Windows Update > Run the troubleshooter.
- Restart the PC and check free space again.
Disk Cleanup shows only a few megabytes to free
System files are not included until you ask for them.
- Open Disk Cleanup again and select Clean up system files.
- Choose the Windows drive; on other drives only the Recycle Bin and catalog file options are available.
- Tick the larger system items, then select OK > Delete files.
Storage Sense does not clean drive D: or an external drive
Storage Sense works on the system drive only.
- Run Disk Cleanup and select the other drive.
- Open that drive in File Explorer, sort by Size, and delete or move the files you no longer need.
`vssadmin` says snapshots were outside your allowed context
Those shadow copies were not created as client-accessible copies, so vssadmin cannot delete them.
- Lower the disk space slider under System Protection > Configure instead.
- Leave copies created by backup software to that software to manage.
Potential Risks and Precautions
| Action | Risk | Precaution |
|---|---|---|
| Deleting the previous Windows installation | You cannot roll back the latest upgrade | Wait until the new version has run smoothly for a few days |
| Deleting restore points | No way to undo a bad driver or update | Keep at least one recent restore point |
Running cipher /w or a clean reset |
Data becomes very hard to recover | Back up first and check the backup opens |
| Clearing browser cookies | You are signed out of websites | Tick only cached files if you want to stay signed in |
| Using unknown cleaner apps | System files or settings can be removed | Stick to the built-in Windows tools |
| Compressing the C: drive | Files open more slowly on older PCs | Use it only when other steps did not free enough |
Frequently Asked Questions
How do I clean my hard drive in Windows 10?
Search the taskbar for Disk Cleanup, choose drive C:, select Clean up system files, tick the file types and select Delete files. Then turn on Storage Sense, uninstall unused apps and empty the Recycle Bin to free more space.
How do I clean a hard drive in Windows 11?
Open Start > Settings > System > Storage > Cleanup recommendations and remove temporary files, large or unused files and unused apps. Storage Sense, Disk Cleanup and Defragment and Optimize Drives also work in Windows 11, and you can open the C drive to sort large files.
How do I completely clean a hard drive?
Back up your files, then reset Windows with Remove everything and the Clean data setting turned on. This reinstalls Windows and cleans the drive so removed files are harder to recover. It suits a PC you plan to sell, donate or recycle.
How do I clean the hard drive on a laptop?
The steps are the same as on a desktop running Windows 10. Run Disk Cleanup with Clean up system files, turn on Storage Sense, uninstall unused apps and clear browser caches. Plug the laptop in before a reset or a long cipher command.
Is it safe to delete everything in Disk Cleanup?
Most items are safe, including temporary files, thumbnails and Recycle Bin contents. Think twice about the previous Windows installation, which removes your rollback option, and about the Recycle Bin if it still holds something you want back.
Does cleaning the hard drive make the PC faster?
It helps when the drive is nearly full, because Windows needs free space for temporary files and updates. Microsoft notes low storage can slow performance. On a drive with plenty of room, cleaning mainly frees space rather than speed.
Should I defragment an SSD?
No manual step is needed. Windows trims SSDs instead of defragmenting them, and Defragment and Optimize Drives chooses the right action for each drive type automatically once a week by default.
Final Thoughts
Run Disk Cleanup with Clean up system files, uninstall the largest unused apps, then leave Storage Sense on a monthly schedule. Those three built-in steps recover most of the space on a typical Windows 10 PC without risking files Windows needs, and Storage Sense stops the junk returning.