To use the Bitwarden extension in Chrome, add it from the Chrome Web Store, log in with your Bitwarden account, then click a suggested login on any sign-in page to fill it.
This guide covers installing and pinning the extension, setting up your vault, saving and autofilling logins, generating passwords, folders, security settings and fixes for common problems.
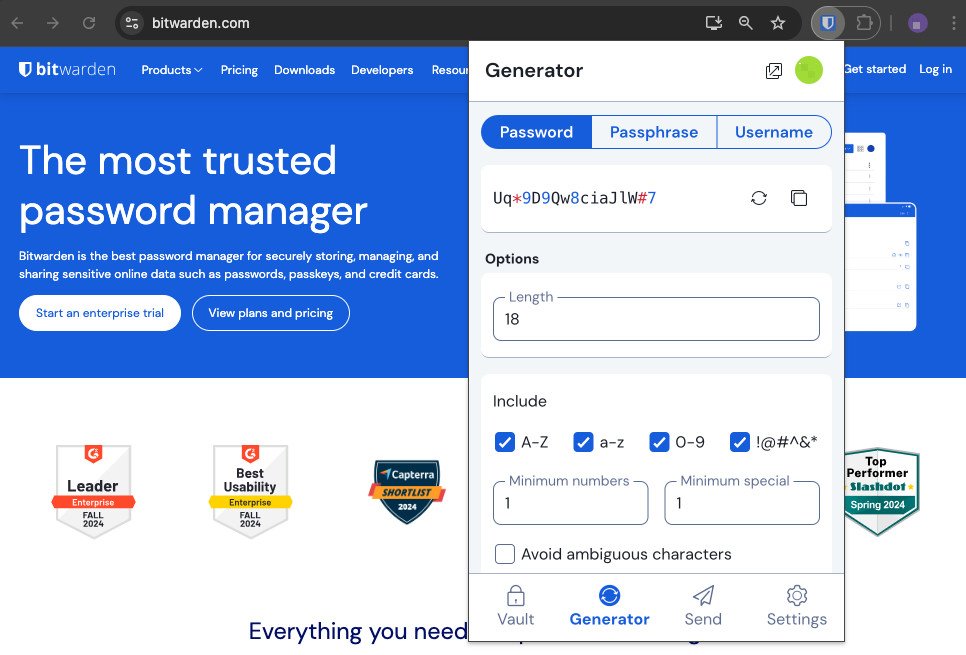
How to use the Bitwarden extension in Chrome in six steps
These steps take you from a fresh Chrome profile to your first autofilled login. Each one is expanded in the sections below.
- Open the Bitwarden listing in the Chrome Web Store and select Add to Chrome, then Add extension.
- Select the Extensions icon next to the address bar and select the Pin icon next to Bitwarden.
- Click the Bitwarden icon and log in with your email address and master password.
- Go to a website's sign-in page and click the Bitwarden icon.
- On the Vault tab, click the login listed under Autofill suggestions to fill your username and password.
- When you sign in to a site Bitwarden does not know yet, select Save on the banner that appears.
Install the Bitwarden Chrome extension
You cannot add extensions in an Incognito window or a guest profile, and a work or school administrator can block them.
- Open the Chrome Web Store, or open the Bitwarden Downloads page at bitwarden.com/download and select Chrome under Web browser extensions.
- Open the Bitwarden Password Manager listing and select Add to Chrome.
- Review the permissions prompt and select Add extension.
- If Bitwarden asks to become your default password manager, select Continue, then Allow.
- Select the Extensions icon (the puzzle piece) to the right of the address bar.
- Select the Pin icon next to Bitwarden so its shield icon stays on the toolbar.
The extension and the Bitwarden desktop app share one vault, so anything saved in Chrome also appears in the desktop app when you log in there.
Sign in and set up your Bitwarden vault in Chrome
A Bitwarden account is required before the extension does anything. Your account exists only on the server region where you created it, either bitwarden.com in the US or bitwarden.eu in the EU.
- If you have no account yet, go to bitwarden.com, select Get Started Free, enter your Email address and pick your server region.
- Open the verification email and select Verify email.
- Enter a strong Master password, optionally tick Check known data breaches for the password, and select Create account.
- Click the Bitwarden icon in Chrome and check the server dropdown on the login screen matches the region you chose.
- Enter your email address and master password to log in.
- To add a second account, select the account in the top-right corner of the extension and choose Add account.
Write the master password down somewhere safe. Bitwarden cannot recover it for you, and it is the one password the extension cannot fill.
The extension can stay logged in to up to five accounts at once, such as a personal and a work vault.
Import Chrome saved passwords into Bitwarden
Passwords already saved in Chrome do not move into Bitwarden by themselves. Export them as a CSV file, import that file, then delete the CSV because it stores every password in plain text.
- Type
chrome://password-manager/settingsin the Chrome address bar and press Enter. - Use the export passwords option, confirm with your computer's password if asked, and save the CSV file.
- In the Bitwarden extension, open Settings and select Vault options.
- Select Import items; a new window opens.
- Choose My vault (and a folder if you want one) from the Vault dropdown.
- Pick the Chrome format from the File format dropdown, select Choose File and pick the CSV.
- Select Import data, then delete the CSV file from your computer.
Importing does not check for duplicates, so run it once. A direct import from Chrome, without the CSV step, is only available in the Bitwarden desktop app.
Save and autofill logins in Chrome with Bitwarden
Every autofill method depends on the login item having a Website (URI) saved. When a page matches, a number appears on the Bitwarden toolbar icon showing how many logins fit that site.
| What you want to do | How to do it in Chrome | Notes |
|---|---|---|
| Save a new login while browsing | Sign in or register on the site, then select Save on the Bitwarden banner | The banner also offers Select folder… or editing before you save |
| Add a login by hand | Vault tab > New icon > Login, fill Item name, Username, Password and Website (URI), then Save | Use the full sign-in address, such as https://instagram.com/login |
| Autofill from the toolbar | Click the Bitwarden icon on the sign-in page and click the item under Autofill suggestions | With several matches, the last-used login fills first |
| Autofill with the keyboard | Click into the username field and press Ctrl + Shift + L (Cmd + Shift + L on a Mac) | Press it again to cycle through other matching logins |
| Autofill from the right-click menu | Right-click the username field and choose Bitwarden > Autofill | A locked vault opens an unlock window first |
| Autofill from the field itself | Settings > Autofill > tick Show autofill suggestions on form fields, then click the username field | Press Esc to close the inline menu if it gets in the way |
| Update a changed password | Select the update option on the banner after you sign in with the new password | Bitwarden compares what you typed with the saved item |
| Fill automatically when a page loads | Settings > Autofill > tick Autofill on page load | Off by default because a compromised site could abuse it |
Bitwarden warns you before filling a field inside an untrusted iframe, or an HTTP page when the saved address uses HTTPS. Read that warning before you continue.
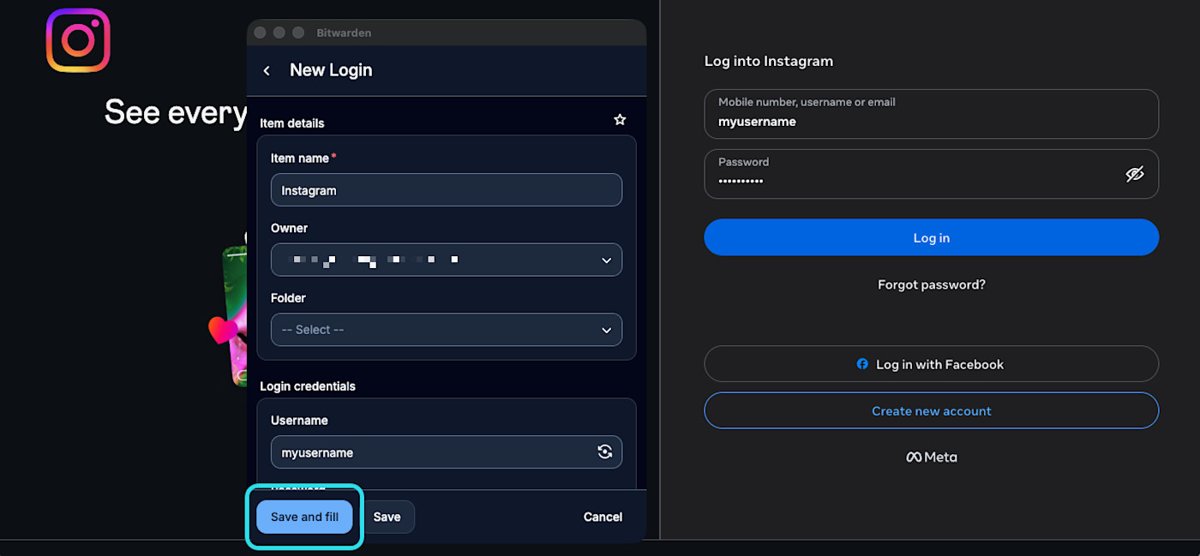
Generate strong passwords from the Bitwarden extension
Use the generator whenever you create an account or change a weak password. Bitwarden's own advice is to keep minimum numbers and special characters low unless a site demands them.
- Click the Bitwarden icon and select the Generator tab.
- Choose Password for random characters or Passphrase for random words that are easier to type.
- Set the length, or the number of words, and tick the character types the site accepts.
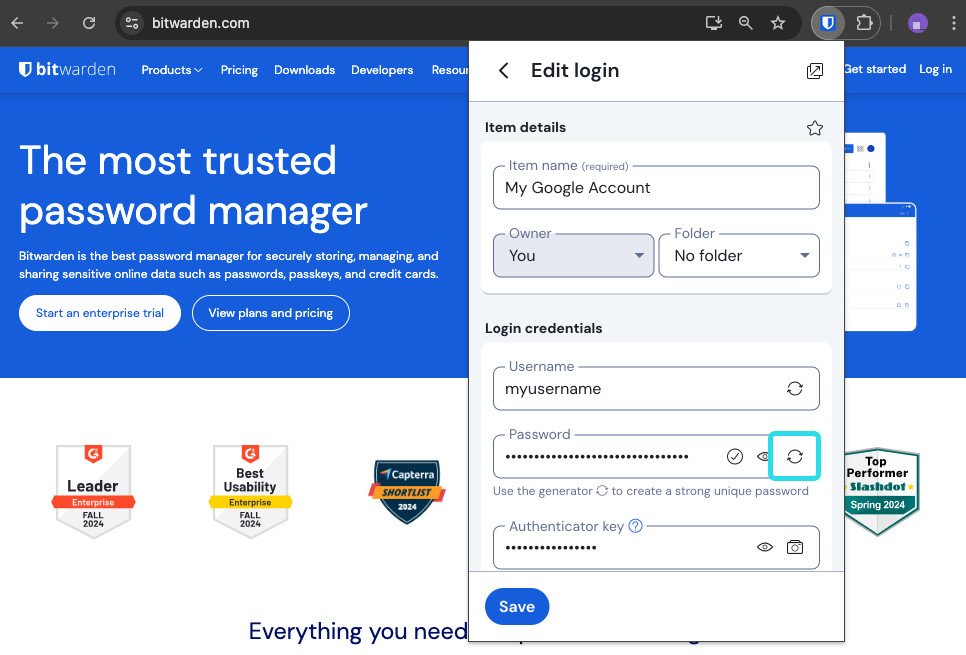
- Select the regenerate icon until you get a result you like, then copy it.
- To attach it to a saved login, open the item, select Edit, select Generate in the Password box, then Use this password and Save.
Press Ctrl + Shift + 9 on any page to generate a password and copy it straight to the clipboard. Generator history keeps recent results until you log out, even ones you never saved.
Manage Bitwarden vault items and folders
The vault holds five item types: logins, cards, identities, secure notes and SSH keys. Folders only organise your own view; deleting a folder never deletes the items inside it.
| Task | Where to do it in the extension |
|---|---|
| Create a folder | Select New and choose Folder |
| Nest a folder | Name it Parent/Child, for example Socials/Forums |
| Rename or delete a folder | Settings > Vault > Folders |
| Move a login into a folder | Open the item, select Edit, choose from the Folder dropdown, then Save |
| Edit or delete an item | Select the item's options menu, then Edit or Delete |
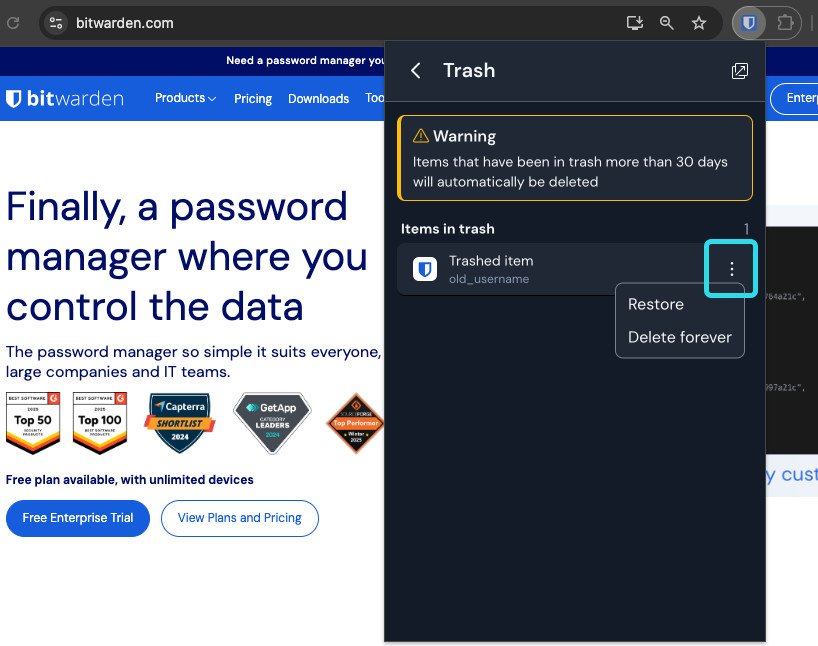
| Restore a deleted item | Open the Filters menu and select Trash; items stay there for 30 days |
| Copy a username or password | Select the Copy icon next to the item and choose Copy username or Copy password |
| Find an item fast | Use the search box or the Filters icon above All items |
| Pull changes from another device | Settings > Vault options > Sync vault now |
Turn on Show quick copy actions on Vault under Settings > Appearance to get one-click username, password and code buttons next to each item.
How to check Bitwarden autofill is working in Chrome
- Open the sign-in page of a site you have saved in Bitwarden.
- Check the Bitwarden toolbar icon shows a number badge for matching logins.
- Click the icon and confirm the login appears under Autofill suggestions on the Vault tab.
- Click the username field and press Ctrl + Shift + L; both fields should fill.
- Sign in and confirm Chrome no longer offers to save the password itself.
No badge and no suggestion means the item's Website (URI) does not match the page. The troubleshooting section below fixes that.
Bitwarden Chrome extension keyboard shortcuts
These are the default shortcuts in Chrome on Windows; use Cmd instead of Ctrl on a Mac. Change any of them at chrome://extensions/shortcuts if another extension already uses the keys.
| Action | Shortcut |
|---|---|
| Open the Bitwarden extension | Ctrl + Shift + Y |
| Autofill the last-used login for the current site | Ctrl + Shift + L |
| Generate a password and copy it | Ctrl + Shift + 9 |
| Lock the vault | Ctrl + Shift + N |
| Autofill a card or identity | No default; create one in Chrome's shortcut settings |
Chrome lets you set keyboard shortcuts for extensions from the same page, including the card and identity actions that ship without one.
Adjust Bitwarden extension settings and security options
Most of these live under the extension's Settings tab. Settings are stored per account, so repeat them for each account you log in to.
| Setting | Where it is | What to choose |
|---|---|---|
| Session timeout | Settings > Account security | Immediately, a time interval, On system lock, On browser restart, Never or Custom |
| Timeout action | Settings > Account security | Lock keeps data on the device for offline unlock; Log out removes it |
| Unlock with PIN | Settings > Account security > Unlock with PIN | Untick Lock with master password on browser restart to use the PIN after Chrome restarts |
| Unlock with biometrics | Settings > Account security > Unlock with biometrics | Needs the desktop app with Windows Hello turned on |
| Default password manager | Settings > Autofill > Make Bitwarden your default password manager | Select Allow so Chrome's own manager stops competing |
| Clear clipboard | Settings > Autofill > Clear clipboard | Default is five minutes; shorter is safer |
| URI matching | Settings > Autofill > Default URI match detection | Base domain is the default; Host is stricter for subdomains |
| Blocked domains | Settings > Autofill > Blocked domains | Stops autofill on sites you list |
| Save and update prompts | Settings > Notifications | On by default; add Excluded domains to silence specific sites |
Biometric unlock in Chrome works through the desktop app, so install the Bitwarden desktop app from Bitwarden's own installer first; the Microsoft Store version does not support it. Then turn on Allow access to file URLs for Bitwarden at chrome://extensions and select Allow when the extension asks to communicate with native applications.
If Bitwarden cannot switch Chrome's password manager off, open chrome://password-manager/settings and turn off Offer to save passwords and passkeys and Sign in automatically.
Troubleshoot common Bitwarden Chrome extension issues
Bitwarden extension keeps locking or will not stay logged in
The session timeout is short, or closing the Chrome window ends the session.
- Open Settings > Account security in the extension.
- Set Session timeout to a longer interval, On browser restart or Never.
- Make sure the timeout action is Lock, not Log out, so unlocking does not need two-step login.
- Set up Unlock with PIN and untick Lock with master password on browser restart for a quicker unlock.
- If the options are limited, your organisation's timeout policy controls them; ask its administrator.
Bitwarden does not show the correct login for a website
The item's saved URI does not match the page under the current match detection rule.
- Open the login item and select Edit.
- Check the Website (URI) field holds the address of the actual sign-in page.
- Select the settings icon on that field and try Host or Base domain match detection.
- Select Save and reload the sign-in page.
- If you autofill from the item anyway, choose the option to add this website to the login item.
Bitwarden extension not working or not loading in Chrome
The extension is turned off, damaged, restricted to some sites, or blocked by policy.
- Open More > Extensions > Manage extensions in Chrome.
- Turn the Bitwarden toggle on if it is off.
- If Chrome marks it as corrupted, select Repair and confirm with Repair extension.
- Select Details and set site access to On all sites so it can fill pages without a click first.
- On a work or school computer, ask the administrator whether extensions are blocked.
New or changed passwords do not appear in the Chrome extension
The extension has not synced yet, or a VPN or ad blocker extension blocks the connection.
- Open Settings > Vault options and select Sync vault now.
- Check your computer's date, time and time zone are correct.
- Turn off any VPN or ad blocker extension briefly and sync again.
Chrome and Bitwarden both offer to save or fill passwords
Chrome's built-in password manager is still on.
- In Bitwarden, open Settings > Autofill and turn on Make Bitwarden your default password manager.
- Select Allow in the dialog that appears.
- If both still appear, turn off Offer to save passwords and passkeys and Sign in automatically at
chrome://password-manager/settings.
Chrome's repair option for corrupted extensions is the first thing to try before removing Bitwarden and adding it again.
Bitwarden Chrome extension FAQ
What is the Bitwarden extension?
The Bitwarden extension is a browser add-on that connects Chrome to your encrypted Bitwarden vault. It saves logins as you sign in, fills usernames and passwords on matching sites, generates strong passwords and syncs everything with the Bitwarden apps on your phone and desktop.
How do I download the Bitwarden extension?
Install it from the Chrome Web Store by selecting Add to Chrome, then Add extension. The Bitwarden Downloads page at bitwarden.com/download links to the correct store listing for Chrome, Edge, Firefox, Safari, Opera, Brave, Vivaldi and other browsers.
How do I start using Bitwarden?
Create a free account at bitwarden.com with your email and a master password, install the browser extension, and log in. Then import your Chrome passwords from a CSV export or let Bitwarden save each login the next time you sign in to a site.
How do I set up Bitwarden for daily use?
Pin the extension to the Chrome toolbar, make Bitwarden the default password manager under Settings > Autofill, and set a session timeout and PIN unlock under Settings > Account security. Those three changes make filling and unlocking quick without weakening the vault.
How do I keep the Bitwarden extension logged in?
Open Settings > Account security and set the session timeout to On browser restart or Never, with the timeout action set to Lock. Lock keeps you logged in and only asks for your master password, PIN or biometrics to reopen the vault.
How do I use the Bitwarden extension in Edge?
The Edge extension works the same way as the Chrome one: the same Vault, Generator and Settings tabs and the same autofill methods. If a keyboard shortcut does nothing in Edge, change it at edge://extensions/shortcuts, because Edge has default shortcuts that can clash with Bitwarden's.
How do I add the Bitwarden extension to Edge?
Open bitwarden.com/download, select Edge under Web browser extensions, and add Bitwarden from Edge's extension store. Log in with the same email and master password you use in Chrome, and the same vault appears with all your saved logins.
Is the Bitwarden Chrome extension free?
Yes. The extension and the core password manager are free on Bitwarden's free plan. Some features, such as storing verification codes for logins and archiving items, need a paid plan.
Does Bitwarden autofill work without opening the extension?
Yes. Press Ctrl + Shift + L in a username field, right-click the field and choose Bitwarden > Autofill, or turn on Show autofill suggestions on form fields to get a menu right under the field.
Bottom line: is the Bitwarden Chrome extension worth setting up?
Install the extension, make it Chrome's default password manager, and use Ctrl + Shift + L or the inline menu for everyday sign-ins. Turning off Chrome's own manager removes duplicate prompts, and a PIN with a Lock timeout keeps the vault both protected and quick to reopen.

![How to enable DLNA media server in Windows 11 [solution]](https://techdows.com/wp-content/uploads/2026/10/Windows-11-Network-folder-banner-offering-to-turn-on-network-discovery.jpg)