To uninstall a problematic Windows update, open Start > Settings > Windows Update > Update history > Uninstall updates, then select Uninstall next to the update. If Windows will not start, remove the latest update from the Windows Recovery Environment (Windows RE) instead, under Troubleshoot > Advanced options > Uninstall Updates.
This guide covers every route that works on Windows 11 and Windows 10: Settings, Control Panel, Command Prompt, PowerShell, Windows RE and safe mode. It also shows how to stop the same update from coming straight back, and what to do when an update has no Uninstall button.
How to remove Windows 11 updates
Pick the method that matches what still works on the PC. All of them remove the same thing: the changes one update made to Windows. None of them deletes your files.
| Your situation | Method | What it can remove |
|---|---|---|
| Windows starts and you can sign in | Settings > Windows Update > Update history > Uninstall updates | Any update that Windows lists with an Uninstall button |
| You know the KB number | wusa /uninstall /kb:<number> in Command Prompt |
Standalone updates, not the combined monthly package |
| The monthly cumulative update will not leave | DISM /Online /Remove-Package or Remove-WindowsPackage in PowerShell |
The cumulative update (LCU) part of the monthly package |
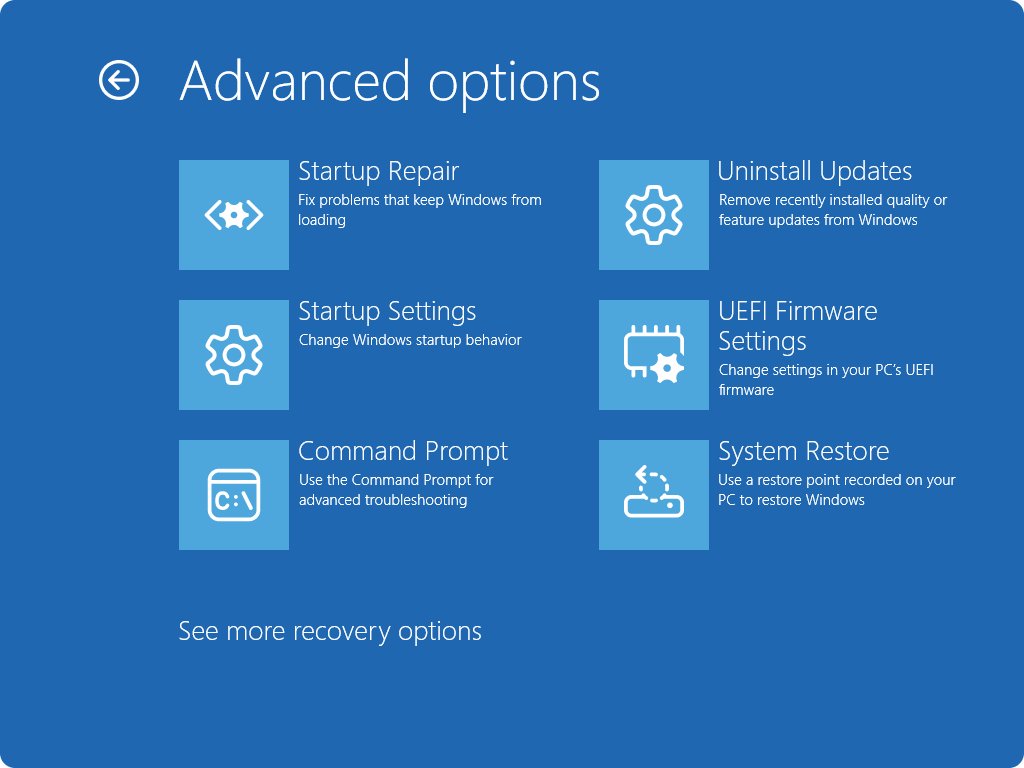
| Windows will not start | Windows RE > Troubleshoot > Advanced options > Uninstall Updates | Only the latest quality update or the latest feature update |
| The desktop crashes before you can act | Safe mode, then the Settings route | The same list as Settings |
| A driver update caused the problem | Device Manager > Roll Back Driver | The driver, if the previous version is still on the PC |
Microsoft does not recommend removing an update unless it is necessary, and it notes that some updates cannot be uninstalled. If you are on Windows 11 and the update is a security update, Microsoft suggests trying to reinstall your current version of Windows first. Microsoft’s handling of the January 2026 KB5074109 update is one example: it fixed the known issues in later updates instead of advising removal.
Uninstall update on Windows 11 from Settings
This is the route Microsoft documents first, and it works on Windows 11 and Windows 10 as long as you can reach the desktop.
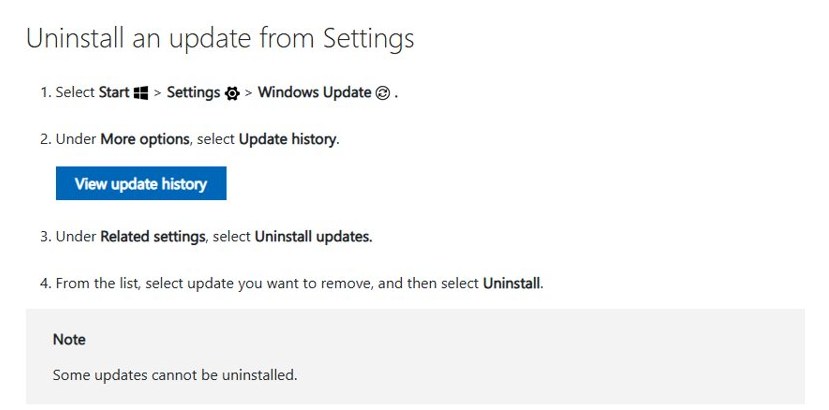
- Select Start > Settings > Windows Update.
- Under More options, select Update history.
- Under Related settings, select Uninstall updates.
- Find the update that installed just before the problem started, and note its KB number.
- Select Uninstall next to that update and confirm the prompt.
- Restart the PC when Windows asks you to.
If the update you want is not in the list, or it has no Uninstall button, Windows treats it as permanent. Skip to the missing button fix below.
How to uninstall updates in Windows 10
Windows 10 keeps the same list under a different Settings page. Microsoft ended support for Windows 10 on October 14, 2025, so an unpatched Windows 10 PC should get the replacement update as soon as one is available.
- Select Start > Settings > Update & Security > Windows Update.
- Select View update history.
- Select Uninstall updates.
- Select the update you want to remove, then select Uninstall.
- Restart the PC.
Uninstall updates from Programs & Features in Windows Control Panel
Older guides send you to Control Panel, and the classic list is still reachable on many PCs. Microsoft’s current instructions point to Settings instead, so use this route only if you prefer the old view.
- Press Windows + R, type
appwiz.cpland press Enter to open Programs and Features. - Select View installed updates on the left.
- On Windows 10, the installed updates list opens. Right-click an update and select Uninstall.
- On recent Windows 11 builds, the link opens Settings > Uninstall updates. Continue with the Settings steps above.
Uninstall update on Windows 11 from Command Prompt
Command Prompt is the quickest route when you already know the KB number. It uses the Windows Update Standalone Installer, wusa.exe, whose /uninstall switch removes a package by its KB number.
- Note the KB number from Update history, for example KB5066835.
- Select Start, type
cmd, then select Run as administrator. - Type
wusa /uninstall /kb:5066835, using your own number after/kb:, and press Enter. - Confirm the removal when Windows Update Standalone Installer asks.
- Restart the PC.
If you have not opened an elevated prompt before, this guide explains how to run as administrator in Windows 11.
Remove the monthly cumulative update with DISM
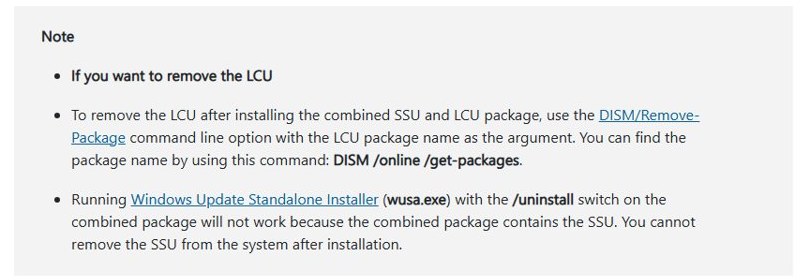
The monthly update now ships as a combined servicing stack update (SSU) and latest cumulative update (LCU). Microsoft’s release notes say that running wusa.exe with /uninstall on the combined package will not work, and that the SSU cannot be removed after installation. Remove only the LCU with DISM:
- In the elevated Command Prompt, run
DISM /Online /Get-Packages /Format:Table. - Find the package whose name contains RollupFix or matches the cumulative update you want to remove, and copy its full name.
- Run
DISM /Online /Remove-Package /PackageName:<name>with that name. - Restart when DISM finishes.
The DISM image repair guide covers the tool’s other switches, and cumulative updates now ship combined with the servicing stack, which is why wusa fails on them.
Uninstall update on Windows 11 from PowerShell
PowerShell has built-in DISM cmdlets that do the same job as the DISM commands above, so you do not need a third-party module.
- Right-click Start and select Terminal (Admin), or open PowerShell as administrator.
- Run
Get-WindowsPackage -Online | Where-Object PackageName -like "*RollupFix*"to list cumulative update packages. - Copy the PackageName of the update you want to remove.
- Run
Remove-WindowsPackage -Online -PackageName "<name>". - Restart the PC when prompted.
Microsoft’s documentation notes that Remove-WindowsPackage works on .cab packages only. It cannot remove a .msu file directly, which is why you remove the installed package by name rather than by pointing at the downloaded update.
Uninstall update on Windows 11 from WinRE
Windows RE can remove the most recent update before Windows loads, which makes it the method to use when an update stops the PC from starting. Microsoft states that this option leaves your files and apps in place.
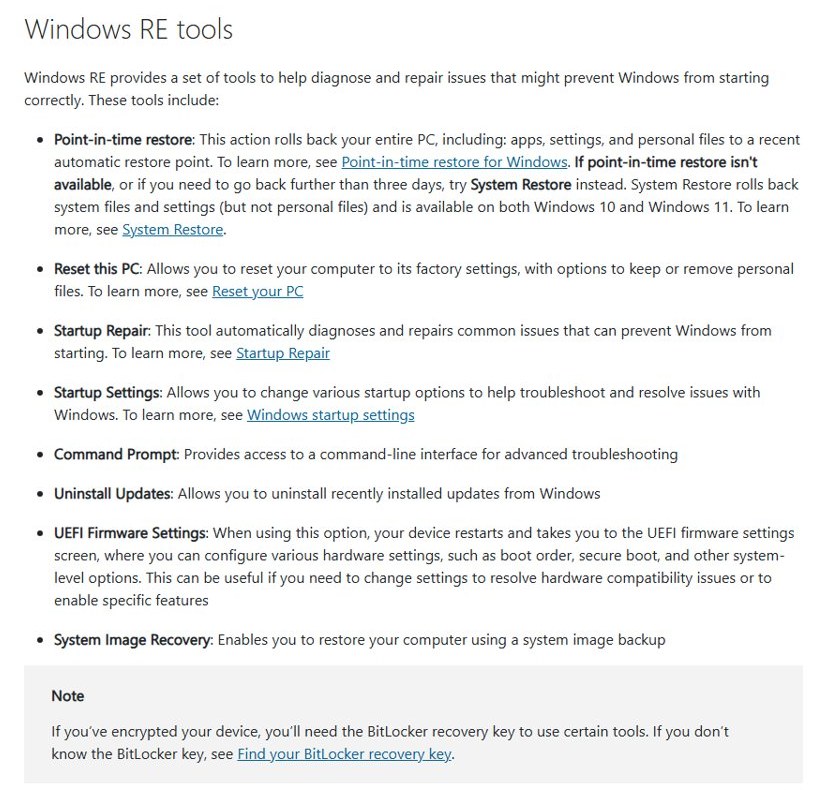
If BitLocker encrypts the drive, have your BitLocker recovery key ready, because some Windows RE tools ask for it.
Uninstall updates when Windows won’t boot
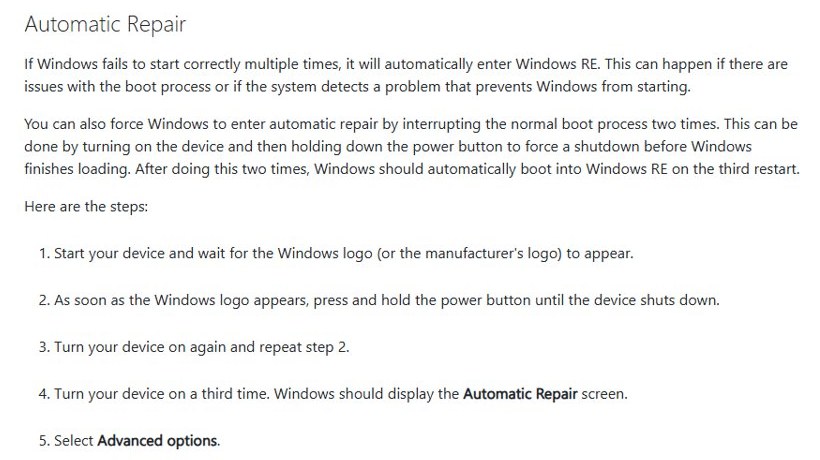
- Turn the PC on and wait for the Windows or manufacturer logo.
- As soon as the logo appears, hold the power button until the PC shuts down.
- Turn it on and interrupt startup the same way a second time.
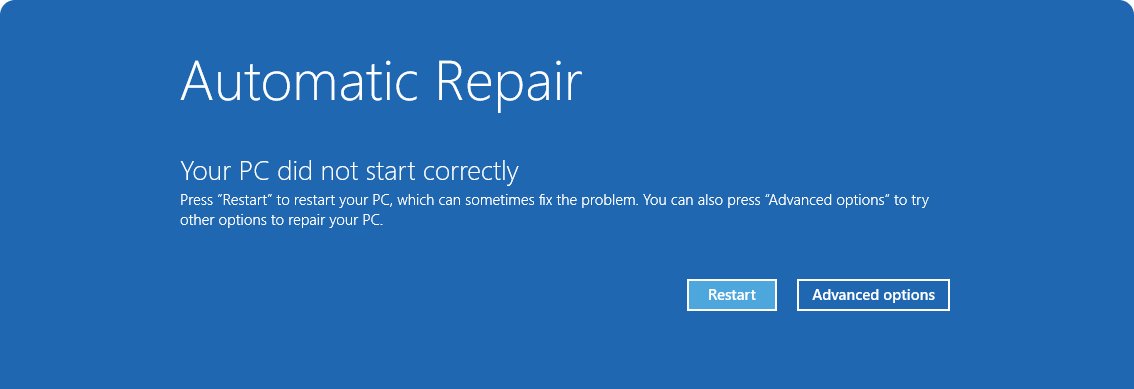
- Turn it on a third time. Windows shows the Automatic Repair screen.
- Select Advanced options.
Open Windows RE when Windows still starts
- Open Settings > System > Recovery, then select Restart now next to Advanced startup. On Windows 10 the page is under Update & Security > Recovery.
- Or hold Shift while you select Power > Restart.
Remove the latest quality or feature update
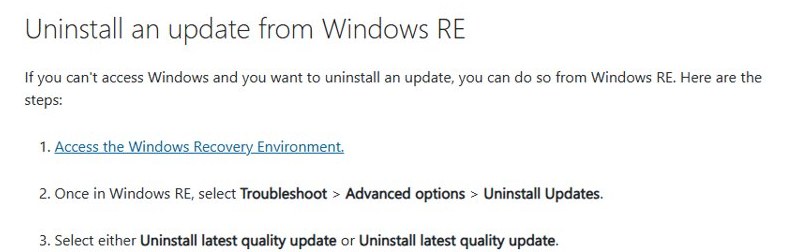
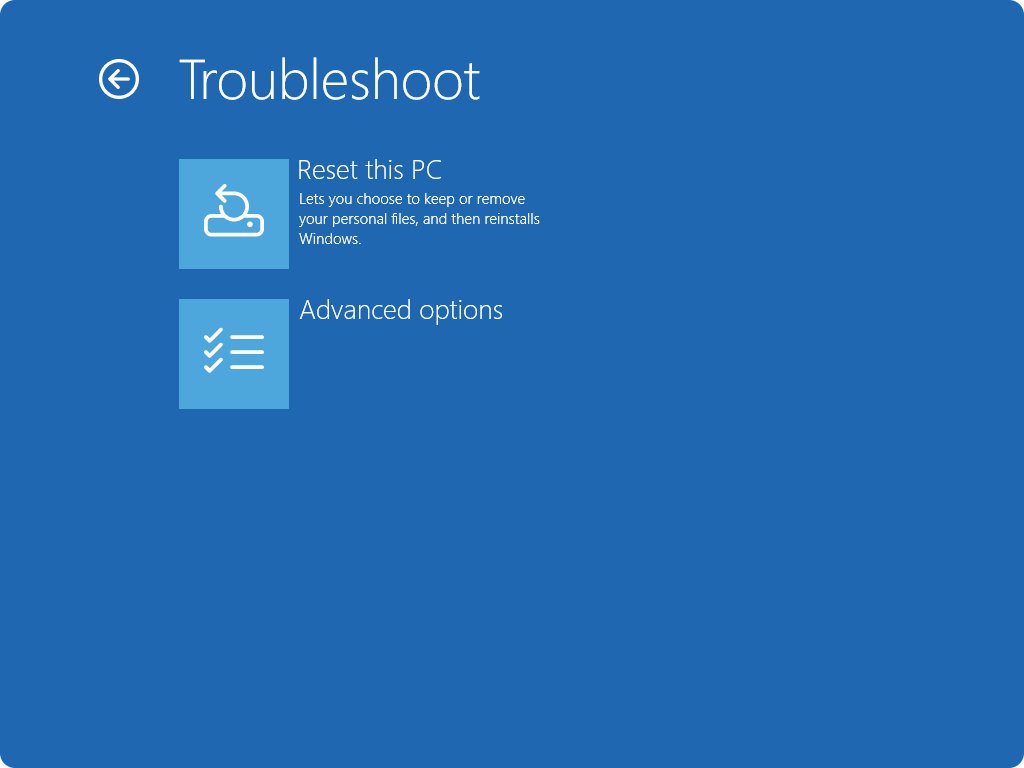
- In Windows RE, select Troubleshoot > Advanced options > Uninstall Updates.
- Select Uninstall latest quality update for a monthly patch, or Uninstall latest feature update for a version upgrade.
- Enter the BitLocker recovery key if asked, then confirm.
- Let the PC restart into Windows.
Windows RE only offers the latest update of each type. To go back further, use System Restore from the same menu, or restore an earlier restore point.
Uninstall update on Windows 11 from safe mode
Safe mode starts Windows with a minimal set of drivers and services. When the normal desktop crashes too quickly to use Settings, the same Settings route often works from safe mode.
- Open Windows RE using either method above.
- Select Troubleshoot > Advanced options > Startup Settings > Restart.
- When the list of options appears, press 4 or F4 for safe mode.
- Sign in, then follow the Settings steps at the top of this guide.
- Restart the PC normally.
If you reach safe mode often, it is worth setting up the F8 boot menu so you do not have to go through Windows RE each time.
What are quality and feature updates?
Windows RE asks you to choose between the two, so it helps to know which one you installed.
| Update type | What it is | How to remove it |
|---|---|---|
| Quality update | The monthly cumulative update with security and reliability fixes, plus optional preview updates | Settings, DISM /Remove-Package, or Uninstall latest quality update in Windows RE |
| Feature update | A new Windows version, such as a move to the next yearly release | Uninstall latest feature update in Windows RE, or Go back under Settings > System > Recovery while it is still offered |
| Servicing stack update | The component that installs other updates | Cannot be removed after installation |
| Driver update | A device driver delivered through Windows Update | Roll Back Driver in Device Manager |
For a feature update you installed recently, the dedicated guide on how to roll back a Windows 11 update covers the Go back option in more detail.
When should you uninstall a Windows update?
Uninstall an update only when a problem clearly started right after it installed. Check these points first.
| Check this first | What it tells you |
|---|---|
| The problem began on the day the update appears in Update history | The update is a likely cause; a problem that started earlier is not |
| The update is a security update | Removing it reopens the flaws it fixed, so plan to install its replacement |
| Windows RE started on its own | Windows enters Windows RE after it fails to start correctly several times, a sign the last change broke startup |
| The update installation itself keeps failing | Nothing needs uninstalling; run the Windows Update troubleshooter instead |
How to find recently installed Windows updates
- Open Settings > Windows Update > Update history.
- Compare the install dates with the day the problem started.
- Note the KB number of the update that installed just before the first failure.
- For a driver, check the Driver updates group in the same history list.
- Search Microsoft’s Windows release health pages for the KB number to see whether the problem is a known issue.
On a PC that will not start, Windows RE does not show the history at all, so start with Uninstall latest quality update, which removes the monthly patch.
Uninstall a driver update with Roll Back Driver
Driver updates from Windows Update are not removed from the Uninstall updates list. Roll them back in Device Manager instead.
- Right-click Start and select Device Manager.
- Expand the category, right-click the device and select Properties.
- Select the Driver tab, then select Roll Back Driver.
- Choose a reason, select Yes, and restart the PC.
Roll Back Driver works only if the previous driver version is still on the PC. If it is greyed out, install the older driver from the manufacturer, as described in the guide to updating drivers on Windows 11.
How to pause or prevent the update from reinstalling
Windows Update offers a removed update again at its next scan. Pause updates straight after the uninstall so the same patch does not return while you wait for a fixed release.
- Uninstall the update with one of the methods above.
- Select Start > Settings > Windows Update.
- Select Pick a date on the Pause updates control and choose an end date.
- Restart the PC.
- Before the pause ends, check whether Microsoft has released a newer update that fixes the problem.
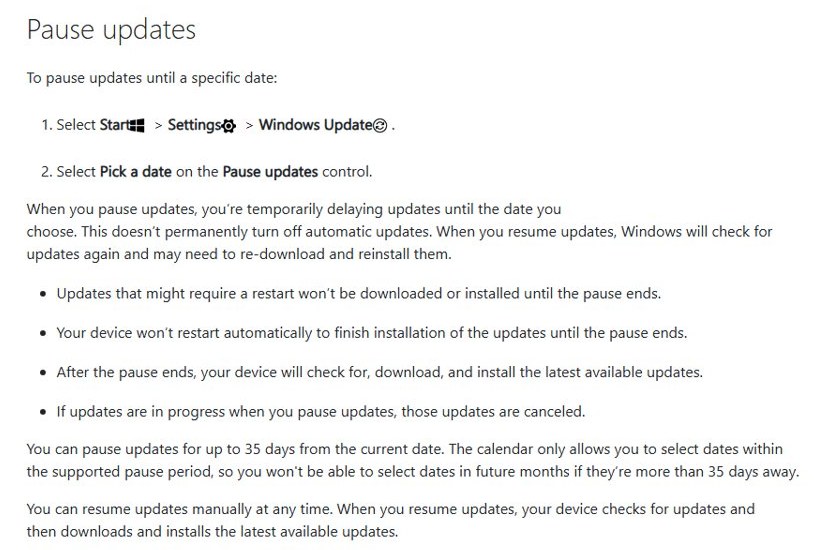
Microsoft allows a pause of up to 35 days from the current date. You can extend it, but the new end date can still be no more than 35 days away, and updates resume automatically when the pause expires. If updates were in progress when you paused, Windows cancels them.
Check if a Windows update was uninstalled
- Open Settings > Windows Update > Update history > Uninstall updates and confirm the KB number is gone.
- For a DISM removal, run
DISM /Online /Get-Packages /Format:Tableagain and confirm the package no longer shows as Installed. - Confirm Pause updates still shows your end date on the Windows Update page.
- Repeat the action that failed before, such as printing, signing in or opening an app.
If the problem remains with the update gone, the update was not the cause. Select Check for updates to reinstall it so the PC does not stay unprotected.
Windows update won’t uninstall
The Uninstall button is missing for an update
Windows marks some updates as permanent, so Settings shows no Uninstall option. Microsoft states that servicing stack updates cannot be removed after installation.
- Check whether the entry is a servicing stack update. If it is, it cannot be removed.
- For a cumulative update, remove only its LCU package with
DISM /Online /Remove-Package, as shown above. - If no removable package exists, use System Restore from Windows RE.
wusa says the update cannot be uninstalled
The monthly update is the combined SSU and LCU package, which wusa /uninstall cannot remove.
- Run
DISM /Online /Get-Packages /Format:Tablefrom an elevated Command Prompt. - Find the cumulative update package in the list.
- Run
DISM /Online /Remove-Package /PackageName:<name>and restart.
Windows 11 will not boot after an update
- Interrupt startup twice with the power button to reach Automatic Repair.
- Select Advanced options > Troubleshoot > Advanced options > Uninstall Updates.
- Remove the latest quality update first.
- If Windows still fails, remove the latest feature update, or use Startup Settings to reach safe mode.
The same problematic update keeps reinstalling
- Uninstall the update again.
- Pick a pause date under Settings > Windows Update > Pause updates straight away.
- For a driver, use Roll Back Driver rather than waiting for Windows Update.
- Install the replacement update once Microsoft releases it.
Uninstall Windows updates FAQ
How do I know which Windows update caused the problem?
Open Settings > Windows Update > Update history and compare the install dates with the day the problem started. The update installed just before the first failure is the likely cause. Note its KB number, then check Microsoft’s Windows release health pages for known issues with it.
Is it safe to uninstall a Windows update?
It is safe for your files, but Microsoft does not recommend it unless it is necessary. Removing a security update reopens the flaws it fixed, so pause updates only briefly and install the replacement update as soon as Microsoft releases one.
What should I do if the Uninstall button is missing for an update?
Windows does not allow that update to be removed, as with servicing stack updates. For a cumulative update, run DISM /Online /Get-Packages in an elevated Command Prompt and remove its LCU package with DISM /Online /Remove-Package. Otherwise use System Restore.
How can I uninstall a bad update if Windows 11 or Windows 10 will not boot?
Use Windows RE. Interrupt startup twice with the power button, select Advanced options, then Troubleshoot > Advanced options > Uninstall Updates, and choose Uninstall latest quality update or Uninstall latest feature update. Your files and apps are not affected.
How do I stop Windows from reinstalling the same problematic update?
Pause updates right after uninstalling it. Select Start > Settings > Windows Update and use Pick a date on Pause updates. The pause can run up to 35 days from today, after which Windows installs the latest updates again.
How do I uninstall a Windows update using cmd?
Open Command Prompt as administrator and run wusa /uninstall /kb:<number> with the update’s KB number, then restart. For the monthly cumulative update, use DISM /Online /Remove-Package instead, because wusa cannot remove the combined SSU and LCU package.
How do I uninstall a problematic Windows driver update?
Open Device Manager, right-click the device and select Properties. On the Driver tab, select Roll Back Driver and restart. The button works only if the previous driver version is still on the PC; otherwise it stays greyed out.
Will uninstalling a Windows update delete my files?
No. Uninstalling an update removes only that update’s changes to Windows, and Microsoft states that the Windows RE Uninstall Updates option leaves your files and apps in place. Reset this PC is the recovery option that can remove files, so do not confuse the two.






Windows 11 KB5127646 issues: Should you install the update? - Techdows
[…] same Settings page lets you uninstall problematic Windows updates from earlier months […]
Windows 11 KB5074109 issues: How to remove the update if it's causing issues - Techdows
[…] same screen is used to uninstall problematic Windows updates of any kind, so the steps carry over to later KB […]