To roll back a Windows 11 version update, open Settings > System > Recovery and select Go back, which works for 10 days after the upgrade in most cases.
To remove a monthly update instead, open Settings > Windows Update > Update history > Uninstall updates. This guide covers both routes, the recovery-screen method for a PC that will not start, DISM commands, restore points, and fixes when the option is missing.
How to roll back a Windows 11 update
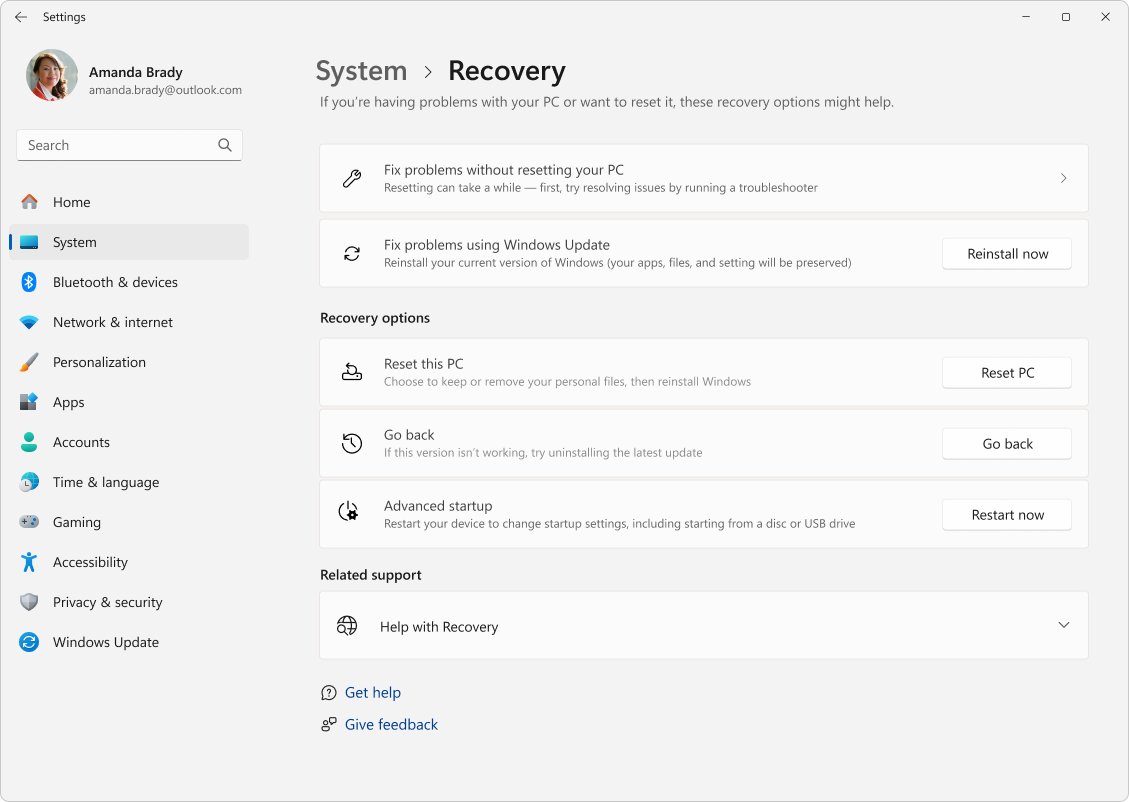
A version update, such as 23H2 to 24H2 or Windows 10 to Windows 11, is rolled back with Go back. Your personal files stay, but apps and drivers installed after the upgrade are removed, along with any settings you changed since.
- Select Start > Settings > System > Recovery. You can also press Win + R, type
ms-settings:recoveryand press Enter. - Back up important files and note the password of the account you used before the upgrade.
- Under Recovery options, select Go back.
- Follow the on-screen prompts to confirm, and keep the PC plugged in while it restarts into the earlier version.
If Go back is missing or greyed out, the 10-day window has passed or the files it needs were removed. The troubleshooting section below lists the causes.
For a single monthly security or quality update (a KB number), use Method 1 instead. It removes that update and leaves the Windows version alone.
Methods to roll back Windows 11 updates
| Your situation | Use this | Why |
|---|---|---|
| Version upgrade in the last 10 days (24H2, 25H2, Windows 10 to 11) | Settings > System > Recovery > Go back | Restores the earlier version and keeps your files |
| One monthly update broke something, Windows starts | Method 1: Settings > Windows Update > Update history > Uninstall updates | Removes only that update; files and apps are not affected |
| Windows will not start after an update | Method 2: Advanced startup > Troubleshoot > Advanced options > Uninstall Updates | Works from the recovery screen without signing in |
| You want to script it or the Settings page fails | Method 3: DISM in Command Prompt, or Remove-WindowsPackage in PowerShell | Lists and removes update packages by name |
| An update changed drivers or settings and you have a restore point | Method 4: System Restore | Reverts system files, registry and programs to the restore point date |
| You prefer Control Panel | Control Panel > Recovery > Open System Restore | In Windows 11, Microsoft's update-removal steps use Settings; Control Panel opens System Restore |
| Windows 11 version 24H2 or later, PC changed in the last few days | Point-in-time restore from Windows RE | Rolls back apps, settings and personal files to a recent automatic restore point |
Important considerations before rolling back Windows 11
| Check | Why it matters |
|---|---|
| Time since the upgrade | Go back is available for 10 days in most cases; after that the previous version is deleted automatically |
| Windows.old and $Windows.~bt folders | Go back needs both. Deleting Previous version of Windows in Storage > Temporary files removes them for good |
| User accounts added after the upgrade | Remove them before you use Go back |
| USB drive used for the upgrade | Keep it connected if you upgraded from one |
| Security updates | Removing one leaves the fix it delivered uninstalled; Microsoft advises understanding that risk first |
| BitLocker recovery key | Most options in Windows RE ask for it when the drive is encrypted |
| Backup of your files | Go back and Uninstall updates keep files, but point-in-time restore and Reset this PC can lose data |
| Apps installed or updated since the upgrade | They might be missing or misbehave after going back |
Method 1: Uninstall updates via Windows Settings
This removes a quality update, such as a monthly cumulative update, while Windows is running. Microsoft notes that some updates cannot be uninstalled.
- Select Start > Settings > Windows Update.
- Under More options, select Update history.
- Note the KB number and install date of the update that matches when the problem began.
- Under Related settings, select Uninstall updates.
- Find that update in the list and select Uninstall.
- Confirm, then restart the PC when asked.
Update history sits alongside the other Windows Update settings in Windows 11, including pause and active hours.
Method 2: Use Advanced Startup options to uninstall updates
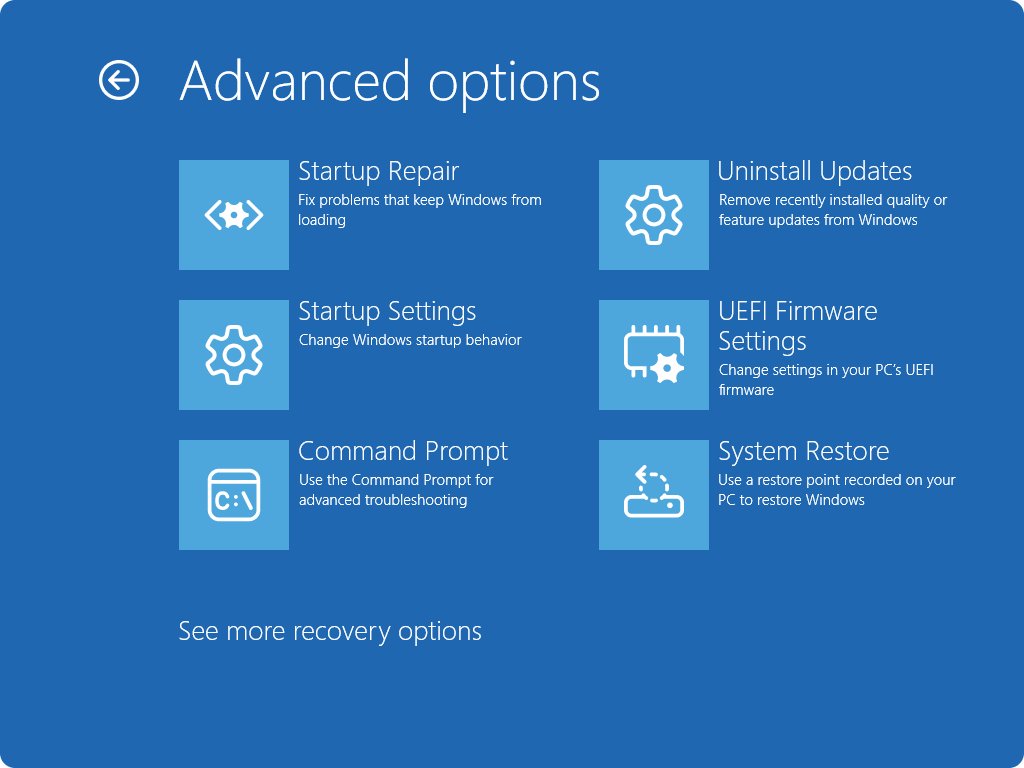
Use this when Windows crashes, freezes or loops at startup after an update. If Windows fails to start several times, it opens the Windows Recovery Environment (Windows RE) on its own.
- If Windows starts, select Settings > System > Recovery, then select Restart now next to Advanced startup. From the sign-in screen, hold Shift while you select Power > Restart.
- If Windows does not start, turn the PC on and hold the power button to shut it down as soon as the Windows logo appears. Repeat once, then start it a third time to reach Automatic Repair.
- Select Advanced options if you are on the Automatic Repair screen.
- Select Troubleshoot > Advanced options > Uninstall Updates.
- Select Uninstall latest quality update for a monthly update, or Uninstall latest feature update for a version upgrade.
- Enter your BitLocker recovery key if asked, confirm, and let the PC restart.
No recovery screen at all? Boot from a USB recovery drive or Windows installation media and select Repair my PC to reach the same menu.
Method 3: Use Command Prompt or PowerShell to remove updates
DISM lists every installed package and removes one by its full name. Run these from an elevated Command Prompt or PowerShell window. DISM's /Remove-Package works on .cab packages only, not .msu files.
- Select Start, type
cmd, right-click Command Prompt and select Run as administrator. - Run
DISM /Online /Get-Packages /Format:Tableto list installed packages with their state and install time. - Copy the full Package Identity of the update you want to remove, matched by its install date.
- Run
DISM /Online /Remove-Package /PackageName:<package identity>with that name pasted in. - In PowerShell you can run
Remove-WindowsPackage -Online -PackageName "<package identity>"instead. - Restart when DISM asks. To roll back a whole version upgrade from the command line, run
DISM /Online /Initiate-OSUninstallinstead; it prompts for a restart.
Running DISM /Online /Initiate-OSUninstall a second time after it succeeds returns error 1168 (ERROR_NOT_FOUND), but the uninstall still runs at the next restart.
Method 4: Restore your Windows 11 system using a restore point
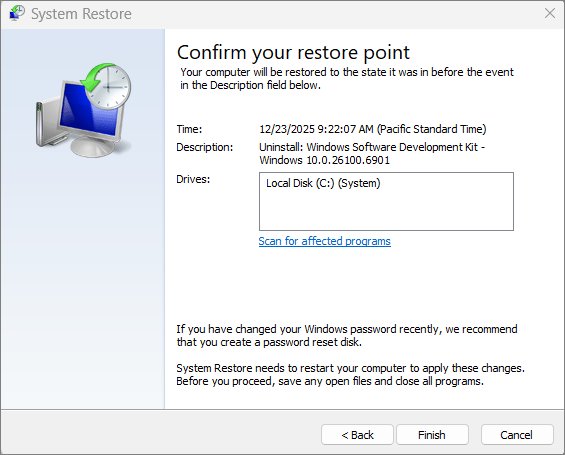
System Restore returns system files, registry settings and installed programs to the state they had when a restore point was made. Personal files are not touched. Windows creates restore points automatically before updates when System Protection is on.
- Press Win + R, type
rstrui.exeand press Enter. From Control Panel, select Recovery > Open System Restore. - In Restore system files and settings, select Next.
- Pick a restore point dated just before the update. Tick Show more restore points if the one you need is hidden.
- Select Scan for affected programs to see which apps will be removed or restored.
- Select Next, then Finish. Windows restarts and applies the restore point.
- If Windows will not start, open Windows RE and select Troubleshoot > Advanced options > System Restore instead.
Roll back Windows 11 24H2, 25H2, Insider builds and Windows 10
| Rollback you want | Route | Limit |
|---|---|---|
| Windows 11 24H2 to 23H2 | Settings > System > Recovery > Go back | 10 days after the upgrade, unless the window was extended with DISM |
| Windows 11 25H2 to 24H2 | Check Go back first, then Update history > Uninstall updates | 25H2 reaches 24H2 PCs as a small enablement package that switches on features already present |
| Windows 11 to Windows 10 | Settings > System > Recovery > Go back | 10 days; Windows 10 support ended on October 14, 2025, so it gets no free security updates |
| Insider Preview build to the earlier build | Settings > System > Recovery > Go back | You stay in the Insider Program and the next preview build installs when ready |
| Insider Experimental (Future Platforms) or version 26H1 back to a retail build | Clean install of Windows 11 | Microsoft states no in-place route back exists |
| A broken driver, such as an NVIDIA or audio driver | Device Manager > device Properties > Driver > Roll Back Driver | Only when a previous driver version is still stored |
Extend the Windows 11 rollback period with DISM
IT admins and careful upgraders can check or lengthen the Go back window before it expires. Values below 2 or above 60 fall back to the default of 10 days.
DISM /Online /Set-OSUninstallWindow /Value:30Sets the number of days after an upgrade during which Go back stays available, here 30. Run DISM /Online /Get-OSUninstallWindow first to see the current value. Both need an elevated window and only work while the rollback files still exist.
You should see: DISM reports that the operation completed successfully, and DISM /Online /Get-OSUninstallWindow then shows the new number of days.
If more days have already passed than the new value, Go back is no longer possible. DISM /Online /Remove-OSUninstall does the opposite and deletes the ability to go back.
Check the Windows 11 update was removed
- Open Settings > Windows Update > Update history > Uninstall updates and confirm the KB number is no longer listed.
- For a version rollback, open Settings > System > Recovery and confirm Go back is no longer offered.
- In an elevated terminal, run
DISM /Online /Get-Packages /Format:Tableand check the package is gone or no longer shows Installed. - Repeat whatever failed before, such as the app, device or game that broke, and confirm it works.
Prevent future problems with Windows 11 updates
A removed update comes back at the next scan unless you pause updates. Pausing buys time for Microsoft to ship a fix, but it cannot block updates forever.
- Select Start > Settings > Windows Update.
- Next to Pause updates, pick the pause length you want.
- Before the pause ends, check Update history and the update's release notes to see whether the problem has a fix.
- Set Active hours so update restarts happen when you are not using the PC.
- Create a restore point before large changes so Method 4 always has a recent date to return to.
Once the pause limit is reached, Windows installs the latest updates before you can pause again.
Driver problems after a version upgrade often clear once you update drivers on Windows 11 from the PC maker's support page.
Windows 11 rollback troubleshooting and additional tips
Go back option is missing or greyed out
More than 10 days have passed, Disk Cleanup or Storage removed the previous version, or accounts were added after the upgrade.
- Check whether the Windows.old folder still exists on the system drive. Without it, Go back cannot return.
- Remove any user accounts created after the upgrade, then reopen Settings > System > Recovery.
- If the files are gone, use Troubleshoot > Advanced options > Uninstall Updates in Windows RE, or System Restore.
- As a last resort, reinstall the earlier version from installation media, which removes everything on the drive.
An update has no Uninstall button
Some updates cannot be uninstalled, including servicing components the system depends on.
- Run
DISM /Online /Get-Packages /Format:Tableto see whether the update appears as a removable package. - Use System Restore to a point dated before the update if one exists.
- On Windows 11 version 22H2 or later, reinstall the current version of Windows from Settings > System > Recovery; it keeps your files, apps and settings.
Can't roll back driver in Windows 11
Roll Back Driver is available only when a previous driver version is still stored on the PC.
- Open Device Manager, right-click the device and select Properties.
- On the Driver tab, select Roll Back Driver if it is available.
- If it is greyed out, install the older driver from the hardware maker's own site, then restart.
- For a graphics card, firmware or chipset issue, also update the Windows 11 firmware from the PC maker.
Windows 11 keeps rolling back updates on its own
After repeated startup failures, Windows removes recent driver or quality updates and shows "We removed some recently installed updates to recover your device from a startup failure."
- Let Windows keep the updates removed. It blocks them from installing automatically for 30 days.
- Check the PC maker's site for newer drivers and BIOS before the 30 days end.
- Send details through the Feedback Hub app so Microsoft can investigate the failing update.
- If the PC still fails to start after the updates return, Windows removes them again automatically.
PC won't start after the update
A faulty update, driver or corrupt file blocks startup.
- Force Windows RE with two interrupted boots, as in Method 2.
- Try Troubleshoot > Point-in-time restore on Windows 11 version 24H2 or later, or Uninstall Updates on any version.
- If neither helps, select Startup Repair, then Reset this PC and choose to keep your personal files as the final option.
Tips for rolling back a Windows 11 update
| Tip | Detail |
|---|---|
| Act inside 10 days | Windows deletes the previous version 10 days after an upgrade unless the window was changed with DISM |
| Match the update to the date | Compare install dates in Update history with when the problem began before you remove anything |
| Remove one update at a time | Restart and test after each removal so you know which update caused the fault |
| Leave Windows.old alone | Skip Previous version of Windows in Storage cleanup until you are sure the upgrade is fine |
| Keep the BitLocker key handy | Windows RE asks for it on encrypted drives |
| Pause updates afterwards | Otherwise Windows Update reinstalls the update you just removed |
| Try a reinstall first for security updates | On Windows 11, Microsoft suggests reinstalling the current version before removing a security update |
Roll back Windows 11 update FAQ
Can I roll back Windows 11?
Yes. Within 10 days of an upgrade, open Settings > System > Recovery and select Go back. For a single monthly update, open Settings > Windows Update > Update history > Uninstall updates and remove it at any time, although some updates cannot be removed.
How long do I have to roll back a Windows 11 update?
In most cases you have 10 days to go back after a version upgrade. After that, Windows deletes the previous version automatically. Individual monthly updates have no fixed limit and can be uninstalled from Update history while they are listed there.
Can I roll back Windows 11 to Windows 10?
Yes, if you upgraded within the last 10 days and the Windows.old folder still exists. Use Settings > System > Recovery > Go back. After that window, only a clean install of Windows 10 works. Windows 10 support ended on October 14, 2025.
How do I roll back Windows 11 24H2 to 23H2?
Open Settings > System > Recovery and select Go back within 10 days of installing 24H2. If the PC will not start, use Windows RE and select Troubleshoot > Advanced options > Uninstall Updates > Uninstall latest feature update.
How do I roll back Windows 11 25H2 to 24H2?
25H2 arrives on 24H2 PCs as a small enablement package, so check Settings > System > Recovery for Go back first. If it is not offered, look for the 25H2 package in Update history > Uninstall updates. Windows RE also offers Uninstall latest feature update.
Will I lose my files if I roll back the update?
No. Go back, Uninstall updates and System Restore keep personal files. Go back removes apps and drivers installed after the upgrade and undoes settings changes. Point-in-time restore and Reset this PC are different and can remove recent files.
Will rolling back affect my installed applications?
It can. Going back removes apps installed after the upgrade, and apps updated since then might not work. System Restore removes programs installed after the restore point; select Scan for affected programs to see the list before you confirm.
What if the rollback option is not available?
The Go back option disappears after 10 days, after Windows.old is deleted, or when accounts were added after the upgrade. Use Uninstall Updates in Windows RE, System Restore, or point-in-time restore on 24H2 and later instead.
How do I roll back a Windows 11 Insider Preview build?
Use Settings > System > Recovery > Go back within 10 days. Going back does not remove you from the Insider Program, and the next preview build installs when ready. Leaving the Experimental Future Platforms channel requires a clean install of Windows 11.
Can I roll back to an even older version of Windows?
Go back only returns to the version you upgraded from, not two versions back. To reach an older release, reinstall it from installation media, which removes everything on the drive, so back up your files first.
Why can't I roll back my driver in Windows 11?
Roll Back Driver in Device Manager is available only when a previous driver version exists on the PC. If the button is greyed out, install the older driver from the hardware maker's site, or use a restore point made before the driver changed.
How do I roll back my PC in Windows 11 to an earlier date?
Use System Restore. Press Win + R, type rstrui.exe, pick a restore point from before the problem and select Next and Finish. Windows 11 version 24H2 and later also offers point-in-time restore from Windows RE for the last few days.
Should you roll back a Windows 11 update?
Roll back only the update that caused a real fault, using Go back for a version upgrade within 10 days and Uninstall updates for a monthly patch, then pause updates until a fix ships. Both routes keep your personal files and are reversible, while staying on an older build for long leaves security fixes uninstalled.