Network and Sharing Center is always present in Windows 11, so you open it rather than turn it on: press Win + R, run control.exe /name Microsoft.NetworkAndSharingCenter, and select OK.
What most people actually need to turn on is Network discovery and File and printer sharing, which live in Advanced sharing settings. This guide covers opening the window, switching those settings on, sharing a folder, and fixing sharing when other PCs still cannot see yours.
The fastest way to open Network and Sharing Center and turn on sharing
This route works on every Windows 11 edition and takes under a minute. It opens the classic window, then the sharing settings most readers came for.
- Press Win + R to open the Run box.
- Type
control.exe /name Microsoft.NetworkAndSharingCenterand select OK. The Network and Sharing Center window opens. - Select Change advanced sharing settings in the left pane.
- Expand Private networks and turn on Network discovery and File and printer sharing.
- Save the change. Windows may ask for administrator approval.
To jump straight to the sharing page, run control.exe /name Microsoft.NetworkAndSharingCenter /page Advanced instead. Microsoft documents Advanced as the page name that opens Advanced sharing settings.
What Network and Sharing Center does in Windows 11
Network and Sharing Center is a Control Panel item that Windows has shipped since Vista. In Windows 11 it is mostly a doorway to older dialogs that the Settings app has not fully replaced.
| What you see | What it does | Settings app equivalent |
|---|---|---|
| Network overview | Shows the network you are connected to | Network & internet status at the top of the page |
| Change adapter settings | Opens the classic Network Connections window of adapters | Network & internet > Advanced network settings |
| Change advanced sharing settings | Turns network discovery, file and printer sharing, and password-protected sharing on or off per profile | Advanced network settings > Advanced sharing settings |
| Media streaming options | Opens the media streaming page (page name ShareMedia) |
No direct equivalent |
| Canonical name | Microsoft.NetworkAndSharingCenter, used with control.exe /name |
Not applicable |
Microsoft's canonical-name reference still lists supported versions only up to Windows 8.1. If the command ever fails, the Control Panel route in the next section reaches the same window.
How to open Network and Sharing Center in Windows 11
All four routes end in the same place. Pick the one that matches where your hands already are.
- From Control Panel: select Start, type
control panel, open Control Panel, then select Network and Internet > Network and Sharing Center. - From the Run box: press Win + R, type
control.exe /name Microsoft.NetworkAndSharingCenter, and select OK. - From Windows Terminal or Command Prompt: type the same
control.exe /name Microsoft.NetworkAndSharingCentercommand and press Enter. - From Settings: press Win + I, select Network & internet > Advanced network settings > Advanced sharing settings to reach the same sharing switches without the classic window.
- If Control Panel opens in icon view, select Network and Sharing Center directly from the item list.
How to turn on network discovery in Windows 11
Network discovery lets your PC see other computers and devices on the network, and lets them see it. Microsoft's own troubleshooting pages use the Settings route on Windows 11.
- Select Start > Settings > Network & internet > Advanced network settings.
- Select Advanced sharing settings.
- Expand Private networks and turn on Network discovery.
- Or, in Network and Sharing Center, select Change advanced sharing settings, select Turn on network discovery under Private, and select Save changes.
- Or open File Explorer > Network. If a Network discovery is turned off banner appears, select it, then select Turn on network discovery and file sharing.
Leave discovery off for public networks. Microsoft recommends the Public profile for most networks precisely because it hides your PC.
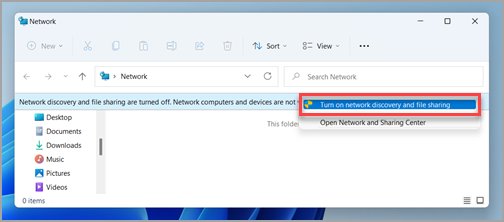
How to turn on file and printer sharing
File and printer sharing lets other PCs open folders and printers you share. Shared printers need it on the host PC, not only on the PC that prints.
- Select Start > Settings and type
manage advanced sharing settingsin the Find a setting box. - Select Manage advanced sharing settings from the suggestions.
- Under Private networks, turn on File and printer sharing.
- In Control Panel instead, open Network and Sharing Center > Change advanced sharing settings, select Turn on file and printer sharing under Private, and select Save changes.
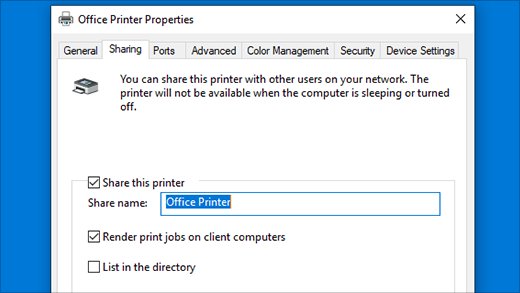
- To share a printer, open Settings > Bluetooth & devices > Printers & scanners, select the printer, select Printer properties, and on the Sharing tab select Share this printer, then Apply and OK.
Change your network from public to private
Windows 11 sets every new network to Public. Sharing settings under Private networks do nothing until the network you use is marked Private.
- Open Settings > Network & internet.
- For Wi-Fi, select Wi-Fi, then the Wi-Fi network you are connected to.
- For a cable connection, select Ethernet, then the Ethernet network you are connected to.
- Under Network profile type, select Private network.
- Do this only on a network where you know and trust the people and devices. Keep cafes, hotels and airports on Public network (Recommended).
How to share a folder after turning on sharing
Turning on sharing does not share anything by itself. You still pick each folder and the people who can open it.
- In File Explorer, right-click the folder and select Show more options.
- Select Give access to > Specific people.
- Choose a user on the network, or select Everyone to give all network users access, then confirm.
- For finer control, right-click the folder, select Properties, open the Sharing tab, and select Advanced Sharing.
- Select Permissions to set what each user or group can do, then select OK on each dialog.
- To check what you have shared, type
\\localhostin the File Explorer address bar.
To share files with people outside your home or office network, Microsoft points to OneDrive rather than network sharing.
How to access another shared PC on your network
Both PCs must be on the same local network, such as the same router. Run these steps on the PC that wants to open the share.
- Open File Explorer with Win + E.
- Type
\\ComputerNamein the address bar, using the other PC's name, and press Enter. - When prompted, enter the user name and password of an account on the other PC.
- Open the shared folder you need.
- To keep it one click away, select This PC, then More > Map network drive, pick a drive letter, enter the folder path, select Reconnect at sign-in, and select Finish.
- From Command Prompt,
net use Z: \\ComputerName\ShareNameconnects the same share to drive Z.
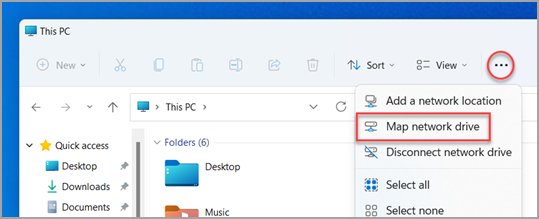
Check Windows Firewall settings
Network discovery needs its firewall rules allowed. Microsoft lists a blocking firewall as one of the two causes when discovery will not stay on.
- Open the Windows Security app and select Firewall & network protection.
- Select Allow an app through firewall.
- Select Change settings and approve the administrator prompt.
- Find Network discovery in the list and make sure it is checked, then select OK.
- If you use a third-party firewall, allow network discovery in its own settings as well.
Microsoft calls adding an app to the allowed list less risky than opening a port. Never allow an item you do not recognise, and never open ports just to fix discovery.
Turn on required Windows services
Discovery depends on background services. If any of them is stopped, the switches in Advanced sharing settings may not stay on.
- Press Win + R, type
services.msc, and select OK. - Right-click Function Discovery Provider Host and select Properties.
- If the service is not running, select Start. Next to Startup type, select Automatic, then OK.
- Repeat for Function Discovery Resource Publication, SSDP Discovery, and UPnP Device Host.
- Confirm DNS Client is running; Microsoft lists it as a discovery dependency too.
- Restart the PC, then check Advanced sharing settings again.
Use password-protected sharing safely
Password-protected sharing sits under All networks in Advanced sharing settings. With it on, people opening your shares must sign in with an account and password on your PC.
Microsoft's file-sharing troubleshooter suggests turning it off when sharing fails. That removes the sign-in step for everyone on the network, so treat it as a test, not a setting to leave.
Keep password-protected sharing on, and give each person who needs access an account on the sharing PC. If turning it off fixes access, the problem is credentials, not sharing. Fix the account or saved password, then turn protection back on so strangers on the same network cannot open your shares.
What about Public folder sharing?
Advanced sharing settings also has a Public folder sharing option. It shares the Windows Public folders on top of anything you share yourself.
| Your situation | Public folder sharing | Why |
|---|---|---|
| You share one or two specific folders | Leave it off | Give access to already shares exactly what you chose |
| You want a drop zone every PC in the house can use | Turn it on | Everyone can copy files into one known place without per-folder setup |
| Work or school PC | Leave it as your administrator set it | Sharing policy is usually managed centrally |
| Other PCs still cannot see the Public folder | Check discovery, profile and firewall first | Public folder sharing needs the same prerequisites as any other share |
Create a desktop shortcut to Network and Sharing Center
A shortcut saves typing the canonical name each time. The same command works in the Run box, Command Prompt and Windows Terminal.
control.exe /name Microsoft.NetworkAndSharingCenter
control.exe /name Microsoft.NetworkAndSharingCenter /page Advanced
control.exe netconnections
Right-click an empty part of the desktop, select New > Shortcut, and paste the first line as the item location. Name it Network and Sharing Center and finish. Use the second line instead for a shortcut that opens Advanced sharing settings directly. The third line opens the Network Connections folder of adapters.
You should see: Double-clicking the shortcut opens the Network and Sharing Center window, or Advanced sharing settings for the /page Advanced version.
When to use Settings instead of Network and Sharing Center
Both tools change the same underlying settings. Choose by the job, not by habit.
| Your task | Use | Why |
|---|---|---|
| Turn on network discovery or file and printer sharing | Settings > Advanced sharing settings | Microsoft's current Windows 11 instructions use this path |
| Change a network from Public to Private | Settings > Wi-Fi or Ethernet > Network profile type | The profile switch lives only in Settings |
| Change IP address or DNS | Settings > IP assignment > Edit | Settings also offers DNS over HTTPS |
| See every adapter or open adapter Properties | Network and Sharing Center > Change adapter settings | The classic Network Connections window shows protocol bindings |
| Reset all network adapters | Settings > Advanced network settings > Network reset | There is no reset button in the classic window |
| Script or shortcut the page | control.exe /name Microsoft.NetworkAndSharingCenter |
One command opens it from anywhere |
Best settings for a typical home network
These values let PCs in one household share files and printers while keeping the laptop safe when it leaves home.
| Setting | Where | Home value |
|---|---|---|
| Network profile type | Settings > Wi-Fi or Ethernet > your network | Private network on your own router only |
| Network discovery | Advanced sharing settings > Private networks | On |
| File and printer sharing | Advanced sharing settings > Private networks | On |
| Network discovery and sharing on public networks | Advanced sharing settings, public profile section | Off |
| Password-protected sharing | Advanced sharing settings > All networks | On |
| Firewall | Windows Security > Firewall & network protection | On, with Network discovery allowed |
Best settings for a work or school PC
Organisation PCs are usually managed by policy, and the firewall page shows a separate Domain network when the PC is joined to one.
| Setting | Recommended | Why |
|---|---|---|
| Network profile | Leave as set; do not switch a public network to Private | The office network may already be a managed Domain network |
| Discovery and sharing on Public | Off | Public networks such as hotels and cafes should hide the PC |
| Sharing folders from the work PC | Use the organisation's file server or OneDrive | Local shares bypass the organisation's access controls |
| Settings that will not change | Ask the IT administrator | Group Policy can lock these switches |
| Password-protected sharing | On | Every share should require an account |
How to check network discovery and sharing are on
- Open Settings > Network & internet, select your network, and confirm Network profile type shows Private network.
- Reopen Advanced sharing settings and confirm Network discovery and File and printer sharing are still on under Private networks. If they switched back off, go to the services and firewall sections above.
- Open File Explorer > Network. Other PCs and devices on the network should appear, with no Network discovery is turned off banner.
- On a second PC, type
\\YourComputerNamein the File Explorer address bar. Your shared folders should be listed. - On the sharing PC, type
\\localhostto see everything it currently shares.
Troubleshooting: Network and Sharing Center or sharing is not working
Run the fix under your symptom on every PC involved, not only the one that shares. Microsoft's own sharing checklist starts with updating Windows on each machine.
Network discovery turns itself back off
A discovery service is stopped, or the firewall blocks network discovery.
- Press Win + R, run
services.msc, and start Function Discovery Resource Publication, SSDP Discovery, UPnP Device Host and DNS Client. - Set Startup type to Automatic for the Function Discovery, SSDP and UPnP services.
- In Windows Security > Firewall & network protection > Allow an app through firewall, check Network discovery.
- Turn on Network discovery again and restart the PC.
Other PCs do not show up under Network
The PCs are on different networks, or one of them is still on the Public profile.
- Confirm both PCs connect through the same router or Wi-Fi network.
- On each PC, set the network to Private network in Settings > Network & internet.
- Restart the router and both PCs.
- Skip browsing and type
\\ComputerNamedirectly in the File Explorer address bar.
"You do not have permission to access" a shared folder
The folder's share permissions do not include your account.
- On the sharing PC, right-click the folder and select Properties.
- On the Sharing tab, select Advanced Sharing > Permissions.
- Add the user who needs access and allow the level they need, then select OK.
- Try the
\\ComputerName\ShareNamepath again from the other PC.
Windows keeps using the wrong user name for a share
Credential Manager has saved an old or wrong password for that PC.
- Type
credential managerin the taskbar search box and open Credential Manager. - Select Windows Credentials.
- Remove the entry for the other PC's name.
- Open the share again and enter the correct user name and password when prompted.
A shared printer will not connect
The printer is not shared on the host PC, or Windows cannot find it automatically.
- On the host PC, confirm Share this printer is selected under Printer properties > Sharing, and note the share name.
- On the client PC, open Settings > Bluetooth & devices > Printers & scanners > Add device.
- Select Add manually, choose Select a shared printer by name, and enter
\\ComputerName\PrinterShareName.
How to reset network settings if nothing works
Microsoft calls network reset the last step to try. It also fixes the case where the internet works but shared network drives do not.
Sharing still fails after every fix above
Corrupt adapter settings, often after an upgrade from Windows 10 to Windows 11.
- Save your work, because the PC restarts.
- Open Settings > Network & internet > Advanced network settings > Network reset.
- Select Reset now, then Yes to confirm.
- After the restart, reinstall any VPN client or Hyper-V virtual switches you use.
- Set your home network back to Private network, because reset can return known networks to Public.
- Turn Network discovery and File and printer sharing back on in Advanced sharing settings.
Network reset removes every installed network adapter and its settings. Windows reinstalls the adapters with default settings, so any static IP address or custom DNS you entered is gone.
How to turn sharing off again
- To stop sharing one folder, right-click it, select Show more options > Give access to > Remove access.
- To stop all sharing, open Advanced sharing settings and turn off File and printer sharing under Private networks.
- Turn off Network discovery to hide the PC from other devices.
- Set the network back to Public network (Recommended) under Network profile type.
File Explorer shows Remove access on every folder, even ones you never shared, so seeing it does not mean a folder is shared.
Frequently asked questions
How do I turn on Network and Sharing Center?
Network and Sharing Center cannot be switched off, so you only need to open it. Press Win + R, type control.exe /name Microsoft.NetworkAndSharingCenter, and select OK. It also opens from Control Panel > Network and Internet > Network and Sharing Center.
How do I turn on network and file sharing in Windows 11?
Open Settings > Network & internet > Advanced network settings > Advanced sharing settings. Under Private networks, turn on Network discovery and File and printer sharing. Then set your network's Network profile type to Private network so the settings apply.
How do I turn on network discovery?
Go to Settings > Network & internet > Advanced network settings > Advanced sharing settings and turn on Network discovery under Private networks. If File Explorer shows a Network discovery is turned off banner, select it and choose Turn on network discovery and file sharing.
Why does network discovery keep turning off?
Microsoft names two causes: a stopped dependency service or a firewall blocking discovery. Start DNS Client, Function Discovery Resource Publication, SSDP Discovery and UPnP Device Host in services.msc, then allow Network discovery under Allow an app through firewall in Windows Security.
How do I turn on a network adapter?
Open Settings > Network & internet > Advanced network settings and enable the adapter from its entry in the list. If it is missing there, open Device Manager, expand Network adapters, right-click the adapter, and select Enable device.
How do I go to network settings in Windows 11?
Right-click the network or Wi-Fi icon on the taskbar and select Network and internet settings, or select Start > Settings > Network & internet. The connection status appears at the top of that page, with Advanced network settings further down.
How do I turn on local network sharing between two PCs?
Connect both PCs to the same router, set each network to Private network, and turn on Network discovery and File and printer sharing on both. Share a folder with Give access to > Specific people, then open \\ComputerName in File Explorer on the other PC.
How do I get to my network in File Explorer?
Open File Explorer with Win + E and select Network in the left pane. Other PCs appear there once network discovery is on and the network is Private. To reach one PC directly, type \\ComputerName in the address bar and press Enter.
Is it safe to set my network to Private?
Yes, on a network where you know and trust the people and devices, such as your own home router. Private makes the PC discoverable for file and printer sharing. Keep public Wi-Fi in cafes, hotels and airports on Public network (Recommended), which hides the PC.

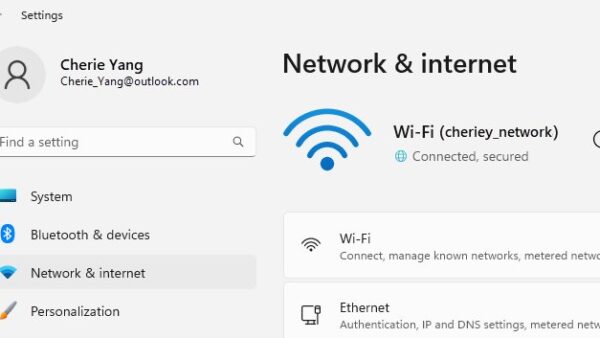
ncpa.cpl command: A Guide to Network Connections in Windows - Techdows
[…] It opens the Network Connections folder under Control Panel's Network and Sharing Center, and control.exe netconnections opens the same folder. Inside Control Panel, the route is Network […]