To enable the DLNA media server in Windows 11, set your network to Private, open Control Panel > Network and Sharing Center > Media streaming options, and turn media streaming on.
This guide covers each step, how to put your videos, music and photos where a TV can find them, how to play them on a smart TV, VLC or a console, and what to do when the server does not show up.
How to enable DLNA media server in Windows 11 quickly
Windows 11 has no app called "DLNA server". The feature is media streaming, run by the Windows Media Player Network Sharing Service, and it shares your Music, Pictures and Videos libraries with devices on the same home network.
- Open Settings > Network & internet, select Wi-Fi or Ethernet, and set Network profile type to Private network.
- Press Win + R, type
control.exe /name Microsoft.NetworkAndSharingCenter /page ShareMediaand press Enter. - In the Media streaming options window, select the button that turns on media streaming.
- Type a name for your media library so you can recognise the PC on your TV.
- Leave your TV or other device allowed in the device list and select OK.
- On the TV, open its media or source app and pick the library name you typed.
Everything in the Music, Pictures and Videos libraries is now visible to allowed devices on your local network.
What DLNA media server does in Windows 11
DLNA (Digital Living Network Alliance) guidelines define how a Digital Media Server offers files and how players and renderers find and play them over a home network. Windows media streaming makes your PC a Digital Media Server that DLNA and UPnP devices can browse.
| Part | What it does in Windows 11 |
|---|---|
| Media streaming (Control Panel) | The switch that turns sharing on and decides which devices may see your media |
| Windows Media Player Network Sharing Service | Shares the media in your libraries with other players and devices on your home network |
| Music, Pictures and Videos libraries | The content that gets shared; a file outside these libraries is not offered |
| SSDP Discovery service | Announces and discovers UPnP devices on the network, so a TV can find the PC |
| Network profile set to Private | Lets other devices discover the PC; a Public profile hides it |
| Your TV, VLC or console | The player that browses the server and plays the file |
The PC only serves files. It does not convert them, so the TV must be able to play each format on its own.
Windows 11 DLNA server requirements to check before you start
| Requirement | Why it matters | How to check |
|---|---|---|
| PC and TV on the same network | DLNA discovery works inside one local network | Both connect to the same router, not a guest network |
| Network profile set to Private | On a Public profile the PC is hidden from other devices | Settings > Network & internet > your connection |
| Administrator account | Media streaming and sharing settings change system-wide options | Sign in with an account that has admin rights |
| Windows media components | N editions ship without media technologies and need the Media Feature Pack | Settings > Apps > Optional features |
| A DLNA or UPnP player | The TV, app or console must be able to browse a media server | Check the device's media, source or network menu |
| Media in supported formats | The player decodes the file itself | Test one file you know the TV plays from USB |
Step 1: Set your network profile to private in Windows 11
Microsoft describes a Private network as one where your PC is discoverable and can be used for sharing. A Public network hides the PC, which is why a DLNA server often fails to appear.
- Open Start > Settings > Network & internet.
- For Wi-Fi connections, select Wi-Fi, then select the network you are connected to.
- For Ethernet connections, select Ethernet.
- Under Network profile type, select Private network.
Only do this on a network you trust, such as your home router. Keep café, hotel and airport Wi-Fi on Public.
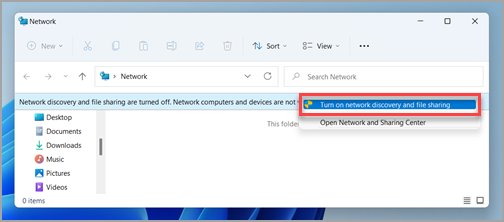
Step 2: Turn on network discovery and file sharing in Windows 11
- Open Settings from the Start button.
- Type
manage advanced sharing settingsin the Find a setting box and select Manage advanced sharing settings. - Under Private networks, turn on Network discovery.
- Under Private networks, turn on File and printer sharing.
Leave the Public networks settings off. Media streaming only needs discovery on the Private profile you set in Step 1.
Step 3: Open the media streaming options panel in Windows 11
Media streaming options is a page of the classic Network and Sharing Center. Windows 11 Settings has no equivalent page, so use one of these two routes.
| Route | What to do | Best for |
|---|---|---|
| Method 1: Open it from Control Panel | Open Control Panel, select Network and Internet > Network and Sharing Center, then select Media streaming options in the left pane | Seeing where the setting lives |
| Method 2: Open it with a Run command | Press Win + R, type control.exe /name Microsoft.NetworkAndSharingCenter /page ShareMedia and press Enter |
Jumping straight to the page |
ShareMedia is the documented page name for Media streaming options inside Network and Sharing Center, so the command skips the menus.
Step 4: Enable media streaming in Windows 11
- In Media streaming options, select the button that turns on media streaming.
- Approve the administrator prompt if Windows shows one.
- In the media library name box, type a clear name such as
Living room PC. - Check the device list below the name; each TV, console or PC on the network appears with a setting that allows or blocks it.
- Allow the devices you own.
- Select OK to save and start the server.
If the button does nothing or the page says media streaming is blocked, jump to the troubleshooting section below; a policy or a stopped service is the usual cause.
Step 5: Add folders to your Windows media libraries
Media streaming shares libraries, not arbitrary folders. Windows includes four default libraries (Documents, Music, Pictures and Videos), and each one is a view of folders you choose; files are not moved when you add a folder.
- Open File Explorer, select See more (…) > Options, open the View tab, select Show libraries and select OK.
- Select Libraries in the left pane.
- To add a video folder to the Videos library, right-click Videos and open its properties.
- Add the folder that holds your films or recordings to the library; the files stay where they are.
- Repeat for Music and Pictures with your music and photo folders.
- Select OK and give Windows a few minutes to index new folders.
Use separate libraries for cleaner browsing: keep films in Videos, albums in Music and photos in Pictures, because most TVs open each library as its own category.
Libraries accept fixed local drives and indexed network shares. Removable drives and DVDs are not supported locations.
Step 6: Access the Windows 11 DLNA server from a TV or device
| Device | Where to look | What you should see |
|---|---|---|
| On a smart TV | The TV's Source, Input, media player or connected devices menu (the name varies by brand) | The library name you typed in Step 4, with Music, Pictures and Videos inside |
| On VLC | Open the playlist view and look under the local network services for Universal Plug'n'Play | Your PC listed as a UPnP server; open it and play files directly |
| On Xbox or PlayStation | A media player app on the console that can browse DLNA or UPnP servers | The PC under the app's network or media server list, if the app supports it |
| On another Windows PC | File Explorer > Network | The PC's library name among the network devices |
Browse into a library, pick a file and start playback. If the device lists the server but a file refuses to play, the format is the problem, not the server.
How to check the Windows 11 DLNA server is running
- Press Win + R, type
services.mscand press Enter. - Find Windows Media Player Network Sharing Service and confirm its status is Running.
- Confirm SSDP Discovery is also Running; without it, other devices cannot discover the PC.
- Open File Explorer > Network on a second PC and look for your library name under media devices.
- Play one short video from the TV to confirm both browsing and playback work.
How to customize which devices can access your media
- Open Media streaming options with the Run command from Step 3.
- Find the device in the list; each one has a setting next to its name that allows or blocks it.
- Block any unknown or unused device.
- Use the allow-all or block-all option to change every listed device at once.
- Select OK to save.
A blocked device can still see the PC on the network, but it cannot browse or play your shared media.
How to keep the PC available for DLNA streaming
The server stops answering when the PC sleeps, so a TV that worked an hour ago can suddenly show nothing.
- Adjust sleep settings: open Start > Settings > System > Power & battery.
- Open Screen, sleep, & hibernate timeouts.
- Set Make my device sleep after to a longer time, or to Never while you stream.
- Leave Turn my screen off after short; the screen can switch off while the server keeps running.
- Use Ethernet for best results on the PC, and on the TV where possible, so large video files do not stutter over weak Wi-Fi.
How to turn off DLNA media streaming in Windows 11
- Open Media streaming options with the Run command from Step 3.
- Block every device so none can browse your libraries, then select OK.
- To stop the server completely, press Win + R, type
services.mscand press Enter. - Double-click Windows Media Player Network Sharing Service, select Stop, set Startup type to Disabled, and select OK.
- Switch your network profile back to Public network if you only made it Private for streaming.
Disabling the Windows Media Player Network Sharing Service turns off Windows media sharing entirely. Set the service back to Manual and start it again to undo this.
Troubleshooting: DLNA server not showing up in Windows 11
DLNA server not showing up on the TV
The PC and TV are on different networks, or the PC's network profile is Public.
- Confirm both devices are on the same network: same router, same band, and not a guest network.
- Set the PC's Network profile type to Private network (Step 1).
- Turn on Network discovery under Private networks (Step 2).
- Restart the PC, router, and TV, then search for media servers on the TV again.
Media streaming will not turn on or options are greyed out
A required service is stopped, or the Prevent Media Sharing policy is enabled.
- Check Windows services: open
services.mscand start Windows Media Player Network Sharing Service, SSDP Discovery and UPnP Device Host if they are stopped. - On Windows 11 Pro, Enterprise or Education, open
gpedit.mscand go to Computer Configuration > Administrative Templates > Windows Components > Windows Media Player. - Open Prevent Media Sharing and set it to Not Configured or Disabled; when enabled, it blocks media sharing for every user.
- On a work or school PC, ask your administrator, because the policy may be managed centrally.
- Reopen Media streaming options and turn media streaming on again.
TV finds the server but cannot connect
Windows Defender Firewall is blocking the sharing service on the Private profile.
- Open Windows Security > Firewall & network protection.
- Select Allow an app through firewall, then select Change settings.
- Find the Windows Media Player network sharing entries in the list and tick the Private box.
- Select OK, then try the TV again.
TV shows the server but not all files
The files are outside the shared libraries, still being indexed, or in a format the TV cannot play.
- Make sure media files are in shared libraries: add their folder to Videos, Music or Pictures (Step 5).
- Give Windows time to index large libraries; new folders are added to the index first and appear on the TV after that.
- Check file format compatibility in the TV manual; the PC sends the file as-is and the TV must decode it.
- Restart the Windows Media Player Network Sharing Service in
services.mscto refresh what the server offers.
Security and privacy tips for DLNA sharing
| Tip | Why |
|---|---|
| Share only on a Private home network | On a Public profile Windows hides the PC; keep it that way on networks you do not control |
| Block devices you do not recognise | Any allowed device on the network can browse every shared library |
| Keep personal photos out of the Pictures library | DLNA has no per-file password; whatever is in a shared library is visible to allowed devices |
| Do not open sharing to the internet | Internet access to home media is off by default; DLNA is designed for local network use |
| Install Windows updates | The sharing service has had security fixes in the past, delivered through Windows Update |
| Turn streaming off when you stop using it | Block every device or disable the service so the PC no longer offers media |
Built-in DLNA vs Plex, Jellyfin, and other media servers
| Your situation | Use this | Why |
|---|---|---|
| You want a TV to play files from one PC at home | Built-in Windows 11 media streaming | Nothing to install; it shares your existing libraries |
| Your TV cannot play some formats | A media server app such as Plex | Server apps can prepare media for the player instead of sending the raw file |
| You want a poster-style library with artwork and watch progress | Plex or Jellyfin | They build their own library database and apps |
| You also need plain DLNA for an older device | Plex with its DLNA enabled setting | Plex Media Server can act as a DLNA server alongside its normal functions |
| You only stream occasionally | Built-in media streaming | Turn it on when needed and block devices afterwards |
If you outgrow the built-in server, you can set up Plex Media Server on the same PC and turn off Windows media streaming.
DLNA media server in Windows 11 FAQ
What is a DLNA media server?
A DLNA media server is a device or program that offers music, photos and videos to other devices on a home network using the DLNA guidelines. Smart TVs, consoles and media apps browse the server and play its files without copying them first.
Does Windows 11 still support DLNA?
Yes. Windows 11 still includes media streaming in Control Panel's Network and Sharing Center, backed by the Windows Media Player Network Sharing Service. It is a legacy feature with no page in the Settings app, so you reach it through Control Panel or a Run command.
How do I enable DLNA on Windows 11?
Set your network profile to Private, turn on network discovery, then open Control Panel > Network and Sharing Center > Media streaming options and turn media streaming on. Name your library, allow your devices and select OK.
How do I create a DLNA media server?
On a Windows PC, turning on media streaming makes the PC a DLNA media server for its Music, Pictures and Videos libraries. For more control, install a server app such as Plex and enable its DLNA setting instead.
How do I create a DLNA server on Windows 10?
Windows 10 uses the same steps as Windows 11: set the network to Private, turn on network discovery, open Media streaming options in Network and Sharing Center and turn media streaming on. The Run command in Step 3 works on both versions.
Do I need Windows Media Player installed?
Media streaming relies on the Windows Media Player Network Sharing Service and the Windows media components. Standard editions include them; N editions do not, so install the Media Feature Pack from Settings > Apps > Optional features first.
How do I use DLNA once it is turned on?
Open the media or source menu on your TV, a UPnP-capable app such as VLC, or a console media app, and pick your PC's library name. Browse to a file and play it; the PC streams it over your home network.
How do I activate DLNA on my TV?
Most smart TVs need no switch; they list media servers in their source, input or media player menu once the PC is sharing. Some brands keep the option in a network or device-connection menu, so check the TV manual if nothing appears.
Can I stream files from an external hard drive?
Only through a library, and Windows libraries do not accept removable drives. If Windows treats the external drive as removable, copy the media to an internal drive or use a server app such as Plex that can share any folder.
Can DLNA stream over the internet?
No, not in normal use. DLNA discovery is built for the local network, and Windows keeps internet access to home media off by default. For remote viewing, use a media server app with its own remote access feature instead of exposing DLNA.
Why does my TV show the server but not all files?
The missing files are usually outside the shared Music, Pictures and Videos libraries, still being indexed, or in a format the TV cannot decode. Add the folder to a library, wait for indexing, and test the format from a USB stick.
Is the Windows 11 built-in DLNA server enough?
Use the built-in Windows 11 media streaming if you want a TV or VLC to play files from one PC on your home network. It takes a few minutes to set up, installs nothing and shares the libraries you already have; switch to a server app such as Plex only when your TV cannot play your formats or you want remote access.