Network adapter settings in Windows 11 live at Settings > Network & internet > Advanced network settings, and the classic adapter window still opens when you press Win + R and run ncpa.cpl.
Settings handles enabling, disabling, IP addresses, DNS and network reset, while the classic Network Connections window, Device Manager and PowerShell cover protocol bindings, driver options and scripted changes. Each section below finishes one of those jobs.
The fastest way to open network adapter settings in Windows 11
Both routes take under ten seconds. Use Settings for everyday changes and the Run command when you want the classic list of adapters.
- Press Win + I to open Settings, or right-click the network or Wi-Fi icon on the taskbar and select Network and internet settings.
- Select Network & internet in the left pane.
- Select Advanced network settings to see your network adapters and the Network reset option.
- For the classic view instead, press Win + R, type
ncpa.cpl, and select OK. The Network Connections window opens with every adapter listed.
The Advanced network settings page also has its own Settings address, ms-settings:network-advancedsettings, which is useful for shortcuts and help-desk scripts.
Best route for each network adapter task: Settings, ncpa.cpl or PowerShell
Windows 11 splits adapter management across three tools. Find the job you came to do, then use the route in its row.
| What you want to do | Settings route (Windows 11) | Network Connections (ncpa.cpl) route | PowerShell |
|---|---|---|---|
| See every adapter in one place | Network & internet > Advanced network settings | Win + R > ncpa.cpl |
Get-NetAdapter -Name * |
| Disable or enable an adapter | Advanced network settings, then disable or enable the adapter in the list | Use Settings or PowerShell | Disable-NetAdapter / Enable-NetAdapter |
| Rename an adapter | Use PowerShell | Use PowerShell | Rename-NetAdapter -Name "Ethernet" -NewName "Office LAN" |
| Set a static IP address | Wi-Fi > Manage known networks > your network, or Ethernet > your connection, then IP assignment > Edit > Manual | Right-click the adapter > Properties > Internet Protocol Version 4 (TCP/IPv4) > Properties > Use the following IP address | Not covered here |
| Change DNS servers | Same Edit IP settings dialog: Preferred DNS and Alternate DNS | Same TCP/IPv4 dialog: Preferred DNS server and Alternate DNS server | Not covered here |
| Turn on DNS over HTTPS | Edit IP settings > DNS over HTTPS | Use Settings | Not covered here |
| Change IPv6 or other protocol items | Edit IP settings > turn on IPv6 | Properties > Networking tab > This connection uses the following items | Not covered here |
| View hardware and driver properties | Use Device Manager > Network adapters | Properties > Configure > Advanced tab | Get-NetAdapterAdvancedProperty |
| Check status, speed or MAC address | Your Wi-Fi or Ethernet network > Properties shows the IPv4 address | Right-click the adapter > Status > General tab | Get-NetAdapter -Name "Wi-Fi" | Format-List -Property * |
| Reinstall all adapters with default settings | Advanced network settings > Network reset | Not available | Not covered here |
What counts as a network adapter in Windows 11
Windows lists more adapters than the network ports you can see. Knowing which kind you are looking at stops you disabling the wrong one.
| Adapter type | Examples | Where it shows up | How to list only this kind |
|---|---|---|---|
| Physical network adapter | Wi-Fi card, Ethernet port, USB-to-Ethernet dongle | Settings, Network Connections, Device Manager | Get-NetAdapter -Name * -Physical |
| Logical interface | Dial-up or VPN connections | Network Connections and ipconfig /all |
Get-NetAdapter -Name * |
| Virtual adapter | Hyper-V virtual switches, VPN tunnel adapters | Network Connections and Device Manager | Check the Virtual property in Format-List -Property * output |
| Hidden adapter | Adapters Windows keeps out of the user interface | Device Manager with View > Show hidden devices turned on | Get-NetAdapter -Name * -IncludeHidden |
Microsoft's ipconfig reference describes adapters the same way: physical interfaces such as installed network adapters, or logical interfaces such as dial-up connections.
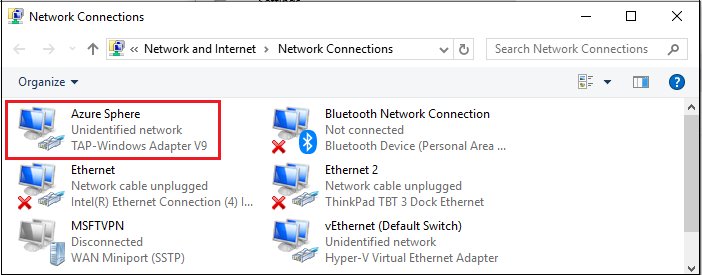
Open classic Network Connections in Control Panel
The classic window is where adapter Properties, protocol bindings and the Status dialog still live. Any of these routes opens the same window.
- Press Win + R, type
ncpa.cpl, and select OK. - Or select Start, type
View Network Connections, and open the result. - Or run
control netconnectionsfrom the Run box, Command Prompt, or Windows Terminal. - Or open Control Panel > Network and Internet > Network and Sharing Center and select Change adapter settings in the left pane.
- Right-click an adapter to reach Status or Properties.
Change IP address and DNS settings from the Windows 11 Settings app
Settings is the only route that exposes DNS over HTTPS. Every change here applies to the network you select, not to all adapters at once.
- Open Settings > Network & internet.
- For Wi-Fi, select Wi-Fi > Manage known networks, then your network. For a cable, select Ethernet, then your connection.
- Next to IP assignment, select Edit.
- Choose Manual, then turn on IPv4 (or IPv6).
- Enter the IP address, Subnet mask and Gateway. For IPv6, enter the Subnet prefix length instead of a subnet mask.
- Type your DNS servers in Preferred DNS and Alternate DNS.
- Set DNS over HTTPS to Off, On (automatic template), or On (manual template), and choose whether Fallback to plaintext stays on.
- Select Save.
To return the adapter to router-assigned addresses, open the same Edit dialog and choose Automatic (DHCP). That setting hands both the IP address and DNS servers back to your router.
Open adapter Properties for IPv4, IPv6, sharing and protocols
The Properties dialog shows every protocol and service bound to one adapter. It is also where a static address goes when you prefer the classic dialog.
- Press Win + R, run
ncpa.cpl, and right-click the adapter you want. - Select Properties. The Networking tab lists items under This connection uses the following items.
- Clear a check box to unbind that protocol or service from this adapter, or select it to bind it again.
- Double-click Internet Protocol Version 4 (TCP/IPv4) to open its settings.
- Select Use the following IP address, then fill in IP address, Subnet mask and Default gateway.
- Fill in Preferred DNS server and Alternate DNS server.
- Select Advanced for the extra tabs, such as WINS, where Enable NetBIOS over TCP/IP sits.
- Select OK on each dialog, then Close.
Enable or disable a network adapter
A disabled adapter cannot connect to any network. Disable the one you are not using, never the one carrying a remote session to this PC.
- Open Settings > Network & internet > Advanced network settings.
- Find the adapter in the list of network adapters.
- Disable it from its entry in the list. The connection on that adapter drops at once.
- Return to the same entry and enable it to turn the adapter back on.
- If the adapter is missing from the list entirely, open Device Manager, expand Network adapters, right-click it, and select Enable device.
Microsoft's own connectivity guide uses this page for the same job: disable the adapter in Advanced network settings, then enable it again to force a fresh connection test.
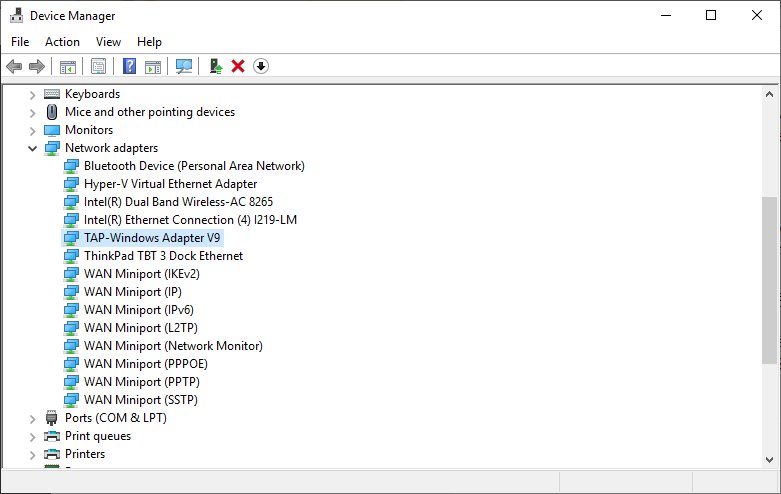
Access network adapter driver settings in Device Manager
Driver-level options such as link speed, wake features and power saving come from the adapter's manufacturer. Device Manager and the Configure button both reach them.
- Select Start, type
device manager, and open Device Manager. - Expand Network adapters and right-click your Wi-Fi or Ethernet adapter.
- Select Update driver and let Windows search automatically for an updated driver.
- To undo a bad update, select Properties > Driver tab > Roll Back Driver.
- To stop Windows powering the adapter off, open Properties > Power Management and clear Allow the computer to turn off this device to save power.
- For manufacturer options, open
ncpa.cpl, right-click the adapter, select Properties > Configure, then the Advanced tab.
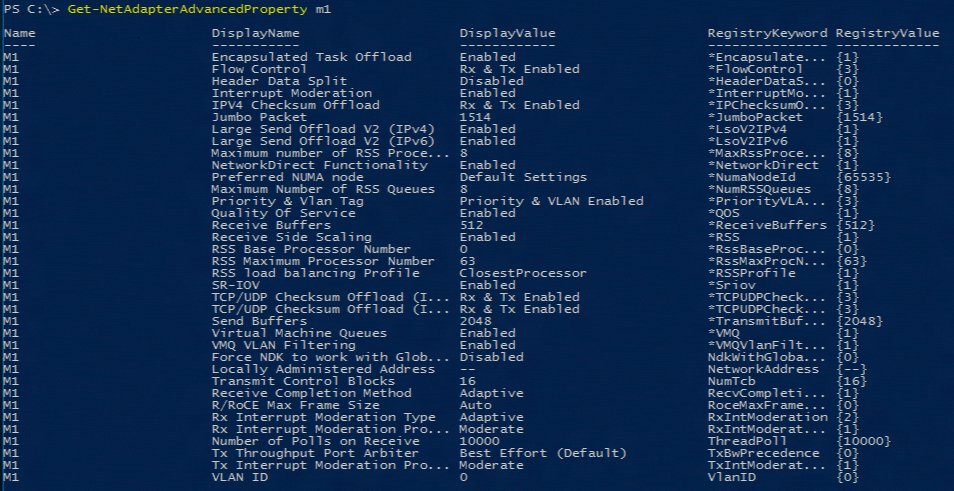
The Advanced tab entries match the output of Get-NetAdapterAdvancedProperty in PowerShell, so either place shows the same driver settings.
Manage adapters from Command Prompt, PowerShell or Windows Terminal
The NetAdapter cmdlets run in PowerShell or a PowerShell tab in Windows Terminal. ipconfig and ncpa.cpl also work from Command Prompt.
ncpa.cpl                                              Opens the Network Connections window
ipconfig /all                                         Full TCP/IP configuration for all adapters
Get-NetAdapter -Name *                                Lists all visible adapters as a table
Get-NetAdapter -Name * -Physical                      Lists physical adapters only
Get-NetAdapter -Name "Wi-Fi" | Format-List -Property *   Every property of one adapter
Disable-NetAdapter -Name "Ethernet 2"                 Disables an adapter (asks to confirm)
Enable-NetAdapter -Name "Ethernet 2"                  Enables an adapter
Rename-NetAdapter -Name "Ethernet" -NewName "Office LAN"  Renames an adapter
Get-NetAdapterAdvancedProperty                        Driver options from the Advanced tab
Use the adapter name exactly as Get-NetAdapter shows it, in quotes when it contains a space. Disable-NetAdapter asks Are you sure you want to perform this action? by default; add -Confirm:$False to skip the prompt. Rename-NetAdapter changes the name only, never the interface description. In the full property list, PermanentAddress is the hardware (MAC) address, Speed is the link speed in bits per second, MediaConnectState shows connected or disconnected, and DriverVersionString is the driver version.
You should see: Get-NetAdapter returns a table with one row per adapter. After Enable-NetAdapter, the adapter reappears in Advanced network settings and in ncpa.cpl.
Disable-NetAdapter -Name "*" disables every adapter at once. On a PC you manage remotely, that cuts the session and cannot be undone from afar.
Change network profile, metered connection, sharing and firewall-related settings
These settings belong to the network you are connected to rather than the adapter hardware, but readers reach them from the same pages.
| Setting | Where to change it | What it does |
|---|---|---|
| Network profile: public or private | Network & internet > Wi-Fi or Ethernet > your network > Network profile type | Public network (Recommended) hides the PC; Private network makes it discoverable for file and printer sharing on trusted networks |
| Metered connection | Network & internet > Wi-Fi or Ethernet > your network > Metered connection | Marks that one connection as metered; each Wi-Fi network and Ethernet connection has its own toggle |
| Data limit | Network & internet > Wi-Fi > your network > Set a data limit to help control data usage on this network | Select Enter limit, pick the limit type, and Save |
| Advanced sharing settings | Search Settings for manage advanced sharing settings, or Control Panel > Network and Sharing Center > Advanced sharing settings |
Network discovery and File and printer sharing per profile |
| Firewall | Windows Security > Firewall & network protection | Shows the active Domain, Private or Public network, Allow an app through firewall, and Advanced settings for inbound and outbound rules |
How to check your adapter change worked
- Open Settings > Network & internet, select your Wi-Fi network or Ethernet, and confirm the address next to IPv4 address matches what you entered.
- Run
ipconfig /alland check the adapter's IP address, subnet mask, default gateway and DNS servers. - Run
Get-NetAdapter -Name *and confirm the adapter you enabled or disabled shows the status you expect. - After a rename, confirm the new name appears in
ncpa.cpland in Advanced network settings. - Open a website. If it fails after a static IP change, return IP assignment to Automatic (DHCP) and test again.
Fix network adapter settings that are missing or unavailable
Match the symptom, then run only the fix under it. Network reset comes last because it removes every adapter's settings.
The network adapter is missing from Settings and ncpa.cpl
The driver is not loaded, the device is hidden, or the adapter is disabled in Device Manager.
- Select Start, type
device manager, and open Device Manager. - Select View > Show hidden devices, then expand Network adapters.
- If the adapter is there but turned off, right-click it and select Enable device.
- If it is listed but not working, right-click it, select Uninstall device, check Attempt to remove the driver for this device, and select Uninstall.
- Restart the PC. Windows reinstalls the driver automatically.
- Run
Get-NetAdapter -Name * -IncludeHiddento confirm Windows now sees it.
You cannot enable the network adapter from Settings
The device is disabled in Device Manager or its driver has failed, so the Settings list has nothing to switch on.
- Run
Enable-NetAdapter -Name "Wi-Fi"in PowerShell, using the name fromGet-NetAdapter -Name * -IncludeHidden. - If PowerShell cannot find it, open Device Manager > Network adapters and select Enable device on the adapter.
- If Device Manager shows no enable option, select Update driver, or Properties > Driver > Roll Back Driver after a recent update.
- Return to Advanced network settings and confirm the adapter is listed.
Advanced network settings is not in Settings
The PC runs Windows 10, where the equivalent links sit on the Network & Internet Status page.
- Open Settings > Network & Internet > Status.
- Under Advanced network settings, select Change adapter options to open Network Connections.
- Find Network reset near the bottom of the Status page.
- On either version, press Win + R and run
ncpa.cplto skip Settings entirely.
Nothing else fixes the connection: reset network adapters
Corrupt network stack settings or an adapter configuration that no single change repairs.
- Type
cmdin Search, right-click Command Prompt, and select Run as administrator. - Run
netsh winsock reset, thennetsh int ip reset, thenipconfig /release,ipconfig /renewandipconfig /flushdns, and restart. - If the problem remains, open Settings > Network & internet > Advanced network settings > Network reset.
- Select Reset now, then Yes. Save your work first, because the PC restarts.
- After the restart, reinstall any VPN software or Hyper-V virtual switches, and set trusted networks back to Private network.
Network reset removes every network adapter you have installed and its settings. After the restart, Windows reinstalls the adapters with default settings, so static IP and DNS values you entered are gone.
Frequently asked questions
How do I open network adapter settings in Windows 11?
Press Win + I, select Network & internet, then Advanced network settings. For the classic adapter list, press Win + R, type ncpa.cpl and select OK. Both show every adapter on the PC; the classic window adds Properties and Status dialogs.
How do I change network adapter settings?
Change the IP address and DNS in Settings > Network & internet > your Wi-Fi or Ethernet network > IP assignment > Edit. For protocol bindings, open ncpa.cpl, right-click the adapter and select Properties. Driver options sit under Properties > Configure > Advanced.
How do I configure a network adapter with a static IP address?
Open your network in Settings, select Edit next to IP assignment, choose Manual, and turn on IPv4. Enter the IP address, subnet mask, gateway and DNS servers, then select Save. Choose Automatic (DHCP) later to hand control back to the router.
How do I access the network adapter hardware properties?
Open Device Manager, expand Network adapters, right-click the adapter and select Properties. The Driver tab updates or rolls back the driver, and Power Management controls power saving. Manufacturer options appear on the Advanced tab reached through ncpa.cpl > Properties > Configure.
How do I find network adapter settings in Control Panel?
Open Control Panel > Network and Internet > Network and Sharing Center, then select Change adapter settings in the left pane. The same Network Connections window opens faster with Win + R and ncpa.cpl, or by searching Start for View Network Connections.
How do I set up a new network adapter in Windows 11?
Connect the adapter and let Windows install its driver through Windows Update, which Microsoft calls the best source for network adapter drivers. Confirm it appears under Network adapters in Device Manager, then set its IP, DNS and network profile in Settings > Network & internet.
How do I enable a network adapter?
Open Settings > Network & internet > Advanced network settings and enable the adapter in the list. In PowerShell, run Enable-NetAdapter -Name "Ethernet". If the adapter does not appear, open Device Manager, right-click it under Network adapters and select Enable device.
How do I access network settings in Windows 11?
Right-click the network or Wi-Fi icon on the taskbar and select Network and internet settings, or press Win + I and select Network & internet. That page covers Wi-Fi, Ethernet, VPN, mobile hotspot and data usage, with adapter tools under Advanced network settings.
What is the command to open network adapter settings?
Run ncpa.cpl from the Run box, Command Prompt or PowerShell to open Network Connections. control netconnections opens the same window. In PowerShell, Get-NetAdapter -Name * lists every visible adapter, and ipconfig /all shows the full TCP/IP configuration for each one.


ncpa.cpl command: A Guide to Network Connections in Windows - Techdows
[…] you want the Settings-app side of adapter management as well, network adapter settings in Windows 11 covers every route across Settings, Device Manager and […]