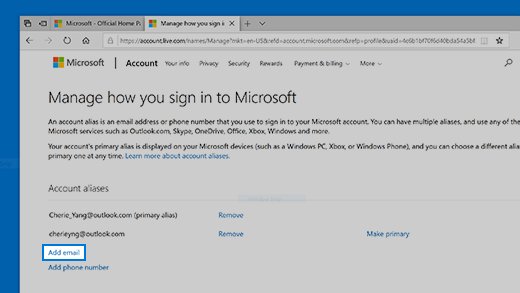
To create an alias in Outlook.com, sign in to your Microsoft account at account.live.com/names/manage, select Add email, and add the new address; a Microsoft 365 admin adds work aliases from Manage username and email in the admin center.
This guide covers personal Outlook.com and Hotmail accounts, Microsoft 365 work or school mailboxes, Exchange Online PowerShell, sending from an alias, and removing one.
How to create Outlook email alias
These steps are for a personal Outlook.com or Hotmail address. The alias is added to your Microsoft account, not inside the Outlook app, so it works in every Outlook app you sign in to.
- Open account.live.com/names/manage in a browser and sign in with your Microsoft account.
- On the Your info page, select Add email.
- Create a new Outlook.com address, or enter an address you already own at another provider such as gmail.com or yahoo.com.
- Follow the on-screen prompts to finish adding the address.
Mail sent to the new alias lands in the same inbox as your existing address. You can also use the alias to sign in, because all aliases share one password.
Choose the correct Outlook alias procedure
The word alias means the same thing everywhere in Outlook: a second address that delivers to one mailbox. Where you create it depends on who owns the account.
| Your situation | Use this | Why |
|---|---|---|
| Personal Outlook.com, Hotmail or Live address | Your Microsoft account page | Aliases belong to the Microsoft account, not to the mailbox settings |
| Work or school address, and you are the admin | Microsoft 365 admin center | Manage username and email adds an alias on any domain in the tenant |
| Admin who wants every address type in one view | Exchange admin center | Manage email address types shows all addresses and the default reply address |
| Admin adding aliases to many mailboxes | Exchange Online PowerShell | One command or a CSV file updates many mailboxes at once |
| Work or school user without admin rights | Ask your IT admin | Users cannot add aliases to a Microsoft 365 mailbox themselves |
| Mailbox synced from on-premises Active Directory | Active Directory Users and Computers | The admin center refuses edits to synced users |
Create an alias for a personal Outlook.com account
An Outlook.com alias is any extra email address attached to your Microsoft account. It shares the same contacts, storage, subscriptions and account settings as your main address.
- Sign in to your Microsoft account and open Your info, or go straight to account.live.com/names/manage.
- Select Add email.
- Choose a new Outlook.com address, or add an existing address from another provider.
- Complete the prompts, including any security check Microsoft asks for.
- Return to the list of addresses and confirm the new alias appears.
A new Outlook.com address gives the tightest integration with Outlook. An address from another provider works for sign-in, but mail sent to it still arrives at that provider's mailbox.
Your organization may block you from adding its email addresses to a personal Microsoft account.
Make an Outlook.com alias the primary address
The primary alias is the address shown on your Microsoft account and the default From address in Outlook.com. Change it when you want the new alias to be your main address.
- Sign in to the Microsoft account website and enter any extra security information it asks for.
- Select Your info.
- Select Manage how you sign in to Microsoft.
- Select Make primary next to the alias you want as your primary address.
If Outlook shows your account under a long generated name such as outlook_ followed by letters and numbers, a third-party address is probably the primary alias. Making your Outlook.com address primary fixes the display.
It can take up to 48 hours for an alias change to apply across all Microsoft services.
Send an email from an Outlook.com alias
Outlook.com lets you send from any alias on your Microsoft account. Sent messages go to Sent Items whichever address you choose.
- Select New mail in Outlook.com.
- In the compose window, select Options, then select Show From.
- Select the down arrow next to From.
- Choose the alias you want to send from.
- If the alias is missing, select Other email address and start typing the address.
- Write the message and select Send.
To make an alias the default From address for every new message, make it your primary alias in the section above.
A plus address such as [email protected] cannot be used to send mail or sign in. Create a real alias when you need a separate sending address.
Create an alias for a Microsoft 365 work or school mailbox
Only an admin with an Exchange role, such as Exchange Administrator, can add aliases to a work or school mailbox. Each user can have up to 400 aliases, with no extra licence or fee.
- Sign in to the Microsoft 365 admin center and go to Users > Active users.
- Select the user you want to manage.
- Under Aliases, select Manage username and email. The option is hidden if the user has no licence assigned.
- Type the new alias in the Username field and pick a domain from the drop-down list.
- Select Add.
- Select Save changes.
The new alias can take up to 24 hours to start working. The alias must end with a domain already added to the tenant.
When the user replies, Outlook on the web uses the alias the message was sent to, while Outlook desktop uses the primary address.
Setting up a brand-new personal mailbox rather than an alias? Create an Outlook email account first.
Use the Exchange admin center
The Exchange admin center adds the same alias and shows every address on the mailbox, with the default reply address in bold.
- In the Exchange admin center, go to Recipients > Mailboxes.
- Select the mailbox you want to add an address to.
- Under General > Email addresses, select Manage email address types.
- Select Add email address type, then select SMTP.
- Type the alias in the Email address box and choose the domain from the drop-down list.
- Select OK, then select Save.
Add an alias with Exchange Online PowerShell
PowerShell is the fastest route for one alias on many mailboxes. Connect first with Import-Module ExchangeOnlineManagement and Connect-ExchangeOnline -UserPrincipalName [email protected], using your own admin account.
To add several aliases to one mailbox, separate them with commas: @{add="[email protected]","[email protected]"}. Run Disconnect-ExchangeOnline when you finish, or abandoned sessions can use up your session allowance.
Set-Mailbox "Dan Jump" -EmailAddresses @{add="[email protected]"}Adds [email protected] as an extra SMTP address on the mailbox named Dan Jump. The add keyword appends to the EmailAddresses list instead of replacing it, so existing addresses are kept.
You should see: The command returns to the prompt with no error, and the new address shows under the mailbox's email addresses in the Exchange admin center.
To add aliases from a CSV file with the columns Mailbox,NewEmailAddress, run Import-CSV "C:\Users\Administrator\Desktop\AddEmailAddress.csv" | ForEach {Set-Mailbox $_.Mailbox -EmailAddresses @{add=$_.NewEmailAddress}}.
How to check the Outlook alias works
Test the alias from outside the account before giving it to anyone.
- For Outlook.com, open account.live.com/names/manage and confirm the alias is listed under your addresses.
- For Microsoft 365, open the mailbox in the Exchange admin center, select Manage email address types, and confirm the alias is listed. The default reply address is the one in bold.
- From a different email account, send a test message to the new alias.
- Confirm the message arrives in the same inbox as your main address.
- In Outlook.com, start a new message, select Show From, and confirm the alias appears in the From list.
Wait up to 24 hours before testing a new Microsoft 365 alias, because the admin center can take that long to apply it.
How to remove alias email from Outlook
Removing an alias stops mail to that address reaching your inbox. Licences linked to a Microsoft account stay with the account.
- For Outlook.com, sign in at account.live.com/names/manage.
- If the alias is your primary address, select Make primary next to a different alias first.
- Select Remove next to the alias you no longer want.
- For Microsoft 365, open the Exchange admin center and go to Recipients > Mailboxes.
- Select the mailbox, then select Manage email address types under General > Email addresses.
- Select the alias, select the Remove icon, then select Save.
In PowerShell, Set-Mailbox "Janet Schorr" -EmailAddresses @{remove="[email protected]"} removes one address from a work mailbox.
If you only want to stop an Outlook.com alias being used to sign in, keep it and turn off sign-in for it under Your info > Sign-in preferences instead.
What is not an Outlook alias?
Several features look like an alias but behave differently. Pick the right one before you start.
| Feature | What it actually is | How it differs from an alias |
|---|---|---|
| A plus address (name+tag@domain) | A receive-only variation of your address, on by default in Exchange Online | Nothing is created on the mailbox, and you cannot send from it |
| A display name | The name shown next to your address | It changes how you appear, not which address receives mail |
| An address created in Outlook desktop | A separate email account added to the Outlook app | It has its own mailbox and password; an alias shares one mailbox and one password |
| A shared mailbox | One address such as info@ or sales@ that several people manage | An alias delivers to one person only |
| A contact list or distribution list | A name or address that sends to many people | It fans mail out to a group instead of adding an address to your mailbox |
When several people need the same address, create a distribution list in Outlook or ask the admin for a shared Microsoft 365 mailbox instead of an alias.
What to check when alias creation fails
Manage username and email is missing in the admin center
The option only appears for users with a licence assigned.
- Open the user under Users > Active users.
- Assign a licence that includes Exchange Online.
- Reopen the user and select Manage username and email under Aliases.
The domain you want is not in the drop-down list
An alias must end with a domain already added to Microsoft 365.
- Add and verify the domain in the Microsoft 365 admin center.
- Return to Manage username and email and pick the new domain.
- Select Add, then Save changes.
"This user is synchronized with your local Active Directory"
Synced users are edited on-premises, not in the admin center.
- Open Active Directory Users and Computers and select the user.
- If Attribute Editor is not visible, turn on Advanced Features from the View menu.
- Select Properties > Attribute Editor > proxyAddresses.
- Add the alias with the lowercase prefix smtp:, for example smtp:[email protected].
- Wait for the change to sync to Microsoft Entra ID.
"A parameter cannot be found that matches parameter name EmailAddresses"
The tenant or a newly added custom domain has not finished setting up, which can take up to 4 hours.
- Wait for the setup process to finish.
- Run the command again.
- If the error persists, contact Microsoft support to request a full sync.
Your work address cannot be added to a personal Outlook.com account
Your organization restricts adding its addresses to Microsoft accounts.
- Add a new Outlook.com address or a personal address from another provider instead.
- Ask your IT admin for a work alias on your Microsoft 365 mailbox.
Users cannot pick the alias in the From box of a work mailbox
Sending from an alias in Outlook on the web is off until an admin turns it on for the organization.
- Connect to Exchange Online PowerShell as an admin.
- Run
Set-OrganizationConfig -SendFromAliasEnabled $true. - Ask the user to tick the alias in Outlook on the web settings so it appears in the From drop-down when composing.
The primary alias cannot be removed
Microsoft requires a new primary alias to be selected before the old one is removed.
- Select Make primary next to a different alias.
- Select Remove next to the old address.
You bought Microsoft 365 through GoDaddy or another partner
Partner-managed subscriptions set the primary address in the partner's console.
- Sign in to the GoDaddy or partner management console.
- Set the new alias as the primary address there.
Outlook alias FAQ
How do you create an alias in Outlook 365?
A Microsoft 365 admin opens Users > Active users, selects the user, selects Manage username and email under Aliases, enters the alias, picks a domain and selects Add then Save changes. Users cannot add work aliases themselves.
How do you create an alias in Hotmail?
Hotmail addresses are Microsoft accounts, so the steps match Outlook.com. Sign in at account.live.com/names/manage, select Add email, and add a new Outlook.com address or an existing address from another provider.
How do you create an alias in Exchange?
In the Exchange admin center, open Recipients > Mailboxes, select the mailbox, select Manage email address types, choose Add email address type > SMTP, enter the address and select Save. PowerShell uses Set-Mailbox with @{add=...}.
How do you create an alias in Active Directory for Microsoft 365?
For a synced user, open Active Directory Users and Computers, select the user, then Properties > Attribute Editor > proxyAddresses. Add the alias with the lowercase prefix smtp: and wait for it to sync to Microsoft Entra ID.
Does an Outlook alias have a separate inbox?
No. Mail sent to an alias arrives in the same inbox as your primary address. Use an Inbox rule if you want alias mail sorted into its own folder, or add a separate account if you need a separate mailbox.
Can I create an Outlook alias in the Outlook desktop app?
No. Outlook.com aliases are created on your Microsoft account page, and work aliases are created by an admin in the Microsoft 365 or Exchange admin center. Adding an address in Outlook desktop adds a separate account, not an alias.
How long does a Microsoft 365 alias take to work?
Up to 24 hours. Microsoft states that new aliases added in the Microsoft 365 admin center can take that long to update, so wait before testing delivery or reporting a fault.
Can I send mail from an Outlook.com alias?
Yes. In the compose window select Options > Show From, then pick the alias from the From list. Make the alias your primary address if you want it used by default.
Can I use a plus address as an Outlook alias?
Only for receiving. Plus addresses such as name+tag@domain deliver to your mailbox, but you cannot send from them or sign in with them. Create a real alias when you need a separate sending address.
What happens if I delete an Outlook.com alias?
Mail sent to that address stops reaching your inbox and you can no longer sign in with it. Licences linked to your Microsoft account remain, and changes can take up to 48 hours to apply across Microsoft services.
How many aliases can a Microsoft 365 user have?
Up to 400 aliases per user. Adding them requires no extra licence or fee, but every alias must use a domain that is already added to the Microsoft 365 tenant.
How do you create an alias name in Outlook?
Pick the part before the @ sign when you add the address: on the Microsoft account page for Outlook.com, or in the Username field of Manage username and email for Microsoft 365. Changing only your display name does not create an alias.
The bottom line on Outlook aliases
Add an Outlook.com alias from your Microsoft account page, and ask your Microsoft 365 admin to add work aliases from the admin center or PowerShell. An alias gives you a second address with no extra mailbox, password or licence, while a separate account or shared mailbox adds a whole inbox to manage.