To add a shared mailbox in Outlook, have your Microsoft 365 admin create it and add you as a member, then close and restart Outlook; the mailbox appears in the folder pane automatically, or you add it by its address with Add shared folder or mailbox.
This guide covers the admin setup, permissions, adding the mailbox in new Outlook, classic Outlook, Outlook on the web, Mac and mobile, sending from it, and fixing access problems.
Add the mailbox in new Outlook for Windows
If your admin has added you as a member, close and restart new Outlook first. The shared mailbox usually shows up in the folder pane on its own; if it does not, add it manually.
- Select Mail in the navigation pane of new Outlook.
- In the folder pane, right-click your account name and select Add shared folder or mailbox.
- Type the shared mailbox address, for example [email protected], and confirm.
- Expand Shared with me in the folder pane.
- Select the shared mailbox to show its Inbox, Drafts and Sent Items folders.
To manage the mailbox's own rules, categories and automatic replies, add it as an account instead: select Settings > Accounts > Shared with me, select the mailbox and choose Convert, or + Add if it is not listed. This needs Full Access permission.
Before you start
| Requirement | Details |
|---|---|
| Subscription with email | A Microsoft 365 for business plan that includes Exchange Online, such as Business Standard; Microsoft 365 Apps for business has no email |
| Admin role | Someone with an Exchange admin role creates the mailbox |
| User licence | Each member needs their own licensed Exchange Online mailbox; the shared mailbox itself needs none up to 50 GB |
| Members inside your organization | People outside the business, such as Gmail users, cannot be members |
| Up to 25 users | More users at once can cause connection failures; use a Microsoft 365 group instead |
| An Outlook app | New or classic Outlook for Windows, Outlook on the web, Outlook for Mac, or Outlook for iOS and Android |
If you still need the desktop app, download Microsoft Outlook for Windows or Mac before following the steps below.
Create the shared mailbox in Microsoft 365
An admin does this once. In a hybrid Exchange setup, create the mailbox in the on-premises Exchange admin center instead.
- Sign in to the Microsoft 365 admin center with an account that has the Exchange admin role.
- Go to Teams & groups > Shared mailboxes; select Show all in the left pane if you do not see Teams & groups.
- Select + Add a shared mailbox.
- Enter a name; it fills in the email address, which you can edit.
- Select Save changes and wait a few minutes before adding members.
- Leave sign-in blocked for the mailbox account; every new shared mailbox has sign-in blocked by default.
Add members
- Right after creating the mailbox, under Next steps, select Add members to this mailbox.
- Select Add members, choose the people who will use the mailbox and select Add, then close.
- To add members later, go to Teams & groups > Shared mailboxes, select the mailbox and select Edit under Members.
- Select Add members, search for each person and select Save.
- Assign permissions to each person directly rather than through a security group, so Outlook can add the mailbox automatically.
Choose the correct mailbox permissions
Three permissions control a shared mailbox: Full Access opens it, and Send As or Send on Behalf lets someone send from it. Microsoft notes that Full Access and Send As are both needed for normal shared mailbox use.
| Permission | What the member can do | What recipients see |
|---|---|---|
| Full Access | Open the mailbox; read, delete and change mail; create calendar items, tasks and contacts. Cannot send without another permission | Nothing, because no mail is sent |
| Send As | Send mail as the shared mailbox | The message comes from the shared mailbox only |
| Send on Behalf | Send mail on behalf of the shared mailbox | "Your name on behalf of the shared mailbox" |
To change them, open the Exchange admin center, go to Recipients > Mailboxes, select the mailbox, select Manage mailbox delegation, add or remove people for each permission and select Save. Send As and Send on Behalf do not work in desktop Outlook if the mailbox is hidden from the global address list.
Add the mailbox in classic Outlook for Windows
With automapping, which is on by default, the mailbox appears in classic Outlook after you close and restart it. Use these steps if it does not.
- Select File > Account Settings > Account Settings.
- On the Email tab, highlight your account and select Change.
- Select More Settings > Advanced > Add.
- Type the shared address, such as [email protected], and select OK > OK.
- Select Next > Finish > Close.
- Find the shared mailbox in the folder pane under your own mailbox.
Use the mailbox in Outlook on the web
Outlook on the web works on any computer and is also Microsoft's suggested route on a phone browser. Sign in to Outlook on the web with your work account first.
- To add it under your own mailbox, right-click Folders in the left pane and select Add shared folder or mailbox.
- Type the shared mailbox name or address, such as [email protected], and add it.
- To open it in a separate window instead, select your name on the navigation bar and select Open another mailbox.
- Type the shared mailbox address and select Open; it opens in its own browser tab.
How to Add a Shared Mailbox in Outlook for Mac
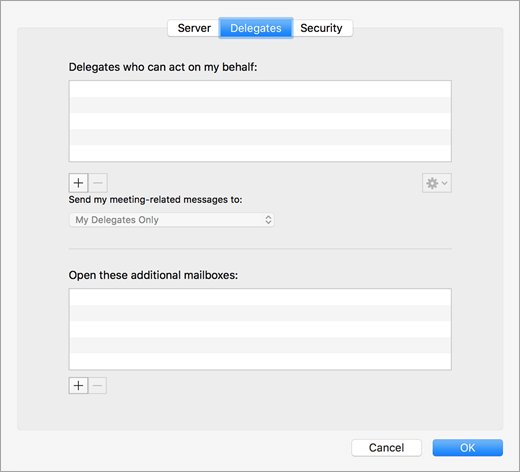
Outlook for Mac supports only Full Access permission for shared mailboxes, and it needs an Exchange account.
- In the Tools menu, choose Accounts and select the account that has access to the mailbox.
- Select Delegation and Sharing.
- Choose the Shared With Me tab.
- Choose + and add the shared mailbox.
- Alternatively, go to File > Open > Shared Mailbox.
How to Add a Shared Mailbox in Outlook Mobile
- Sign in to your own work account in Outlook for iOS or Android.
- Tap the Add Account button in the left navigation pane.
- Tap Add a Shared Mailbox.
- If you have several accounts, choose the one with access to the shared mailbox.
- Wait for setup to finish; the shared mailbox appears in your account list.
- To remove it later, go to Settings > Accounts, tap the shared mailbox and select Delete Account.
Use the shared mailbox to send email
You need Send As or Send on Behalf permission. Recipients see the shared address, not your own.
- New Outlook: select Home > New > Mail; if From is missing, select Options > Show From.
- Classic Outlook: select New Email; if From is missing, select Options > From.
- Outlook on the web: select New mail, then More actions > Show From.
- Select From and choose the shared address; if it is not listed, choose Other email address and type it.
- Write the message and select Send; the address stays in the From list for next time.
- To reply, open the message in the shared mailbox and check From shows the shared address before sending. In Outlook on the web, remove your own address from From and type the shared one.
Where Sent Items Are Saved
By default, a message sent from the shared mailbox is saved in the Sent Items folder of the person who sent it, not in the shared mailbox. Other members cannot see it until an admin changes this.
- In the Microsoft 365 admin center, go to Teams & groups > Shared mailboxes.
- Select the shared mailbox.
- Select Edit under Sent items.
- Choose to keep a copy of messages sent as, and sent on behalf of, the mailbox in its own Sent Items folder.
- Select Save, then send a test message to confirm a copy appears in the shared Sent Items folder.
Search, calendar, and contacts
| Task | New Outlook | Classic Outlook |
|---|---|---|
| Search mail | Select a folder in the shared mailbox, type in Search and press Enter | Select a shared mailbox folder, then search as you would your own mailbox |
| Calendar | Go to calendar view and choose the shared mailbox | Go to calendar view and choose the shared mailbox |
| Contacts | Not available for shared mailboxes yet | Select People, then the shared contacts folder under My Contacts |
| Search calendar events | Not yet supported when the mailbox is added as an account | Supported |
How to Use the Shared Mailbox Calendar
Every shared mailbox comes with a calendar, which suits team schedules such as customer visits or reception bookings.
- Close and restart Outlook after you are added as a member; the shared calendar is added to your calendars list.
- Go to calendar view and select the shared mailbox's calendar.
- Create an appointment or meeting in it as you would in your own calendar.
- Check that other members see the entry; every member can create, view and manage appointments there.
How to check the shared mailbox works
- Confirm the mailbox appears in the folder pane, under Shared with me in new Outlook.
- Open its Inbox and check recent messages load.
- Send a test message from the shared address to your own mailbox and check the sender shows as the shared mailbox.
- In new Outlook with the mailbox added as an account, check it is listed on the Your accounts settings page.
Shared Mailbox vs Microsoft 365 Group vs Distribution List
| Option | Best for | Key difference |
|---|---|---|
| Shared mailbox | A team answering one address such as info@ or support@ | One mailbox and calendar; replies come from the shared address; up to 25 users; internal members only |
| Microsoft 365 group | Collaboration with email, files, calendar, Planner and Teams | Can include people outside the company; deleting group mail does not remove members' copies |
| Distribution list | Broadcasting mail to a fixed set of people | No shared mailbox; each message goes to members' own inboxes |
A shared mailbox cannot be migrated to a Microsoft 365 group later, so choose before you set it up.
Licensing, storage, and mailbox choice
A shared mailbox needs a licence only in the cases below. Otherwise it stores up to 50 GB free, and members open it with their own licensed mailboxes.
| Situation | Licence needed |
|---|---|
| Under 50 GB of mail | None |
| More than 50 GB (up to 100 GB) | Exchange Online Plan 2 |
| In-place archive | Exchange Online Plan 2, or Plan 1 plus Exchange Online Archiving |
| Litigation hold | Exchange Online Plan 2, or Plan 1 plus Exchange Online Archiving |
| Forwarding mail sent to it | None |
| Shared mailbox created before July 2018 | None; unlicensed ones have 100 GB |
When the mailbox hits its limit, it can receive mail for a while but cannot send; later senders get a non-delivery receipt.
Best Practices for Using a Shared Mailbox
| Practice | Why |
|---|---|
| Grant permissions to people directly, not via security groups | Automapping only works with explicit permissions |
| Give senders both Full Access and Send As | Full Access alone cannot send |
| Turn on shared Sent Items copies | Everyone sees what the team has already answered |
| Keep membership at 25 or fewer | Larger numbers cause connection failures and duplicate messages |
| Set automatic replies and forwarding in the admin center | Only an admin can set them for a shared mailbox |
| Watch the 50 GB limit | A full mailbox stops sending first, then stops receiving |
Security and Compliance Tips
| Risk | What to do |
|---|---|
| Someone signs in to the shared account directly | Keep sign-in blocked; the account has a system-generated password nobody should use |
| Members delete messages others need | Deletion cannot be blocked in a shared mailbox; use a Microsoft 365 group if that matters |
| Encrypted mail from the shared address | Not possible, because the mailbox has no security context of its own |
| Members encrypt with their own keys | Other members might not be able to read those messages |
| Legal hold or retention needs | Assign the required Exchange Online licence before applying them |
Fix synchronization and common access problems
Shared mailbox does not appear in Outlook
Membership was added recently, or permission came through a security group so automapping did not run.
- Wait a few minutes, then close and restart Outlook.
- Add the mailbox manually with Add shared folder or mailbox in new Outlook or Outlook on the web, or More Settings > Advanced > Add in classic Outlook.
- Ask the admin to grant you Full Access directly rather than through a group.
New mail does not sync in new Outlook
Inbox folders of automapped shared mailboxes are not synchronized automatically in new Outlook.
- Select Sync in the View section of the ribbon, or select the folder you want to sync.
- For automatic sync and notifications, add the mailbox as an account under Settings > Accounts > Shared with me.
"You do not have the permission to send the message on behalf of the specified user"
The mailbox or permission is new and still replicating, or you lack Send As or Send on Behalf.
- Wait about an hour and send again.
- If it still fails, ask the admin to add Send As or Send on Behalf for you.
- Check that the mailbox is not hidden from the global address list.
Can open the mailbox but not send from it
You have Full Access only.
- Ask the admin to grant Send As in Manage mailbox delegation.
- Restart Outlook and choose the shared address in From.
Admin gets a proxy address error creating the mailbox
The name is already used by another address.
- Create the mailbox with a different name first.
- Rename it afterwards in the Microsoft 365 admin center.
Frequently Asked Questions
Why add users to a shared mailbox?
Only members can see and work in a shared mailbox. Adding users lets a team watch one address such as info@ or support@, reply from it, and share its calendar, while each person keeps their own sign-in and mailbox.
Can users sign in directly to a shared mailbox?
No. A shared mailbox is not meant for direct sign-in. Its account has a system-generated password and sign-in should stay blocked. Members open it from their own licensed account in Outlook.
Why can a user open the mailbox but not send from it?
Full Access lets a user open and manage the mailbox but not send from it. The admin must also grant Send As or Send on Behalf. A brand-new permission can take about an hour to start working.
How long does it take for a shared mailbox to appear in Outlook?
Usually a few minutes after the admin adds you. Close and restart Outlook. If it still does not appear, add it manually by its email address.
Why does automapping fail when the user is in a security group?
Automapping is set on each user's mailbox, so permissions granted through a security group do not trigger it. Grant permissions to each user explicitly, or add the mailbox manually in Outlook.
Can a shared mailbox send automatic replies?
Yes, but only an admin can turn them on. In the Microsoft 365 admin center, open Teams & groups > Shared mailboxes, select the mailbox, select Edit under Automatic replies, and save the reply.
Does a shared mailbox need a Microsoft 365 license?
Not usually. It holds up to 50 GB without a licence. It needs Exchange Online Plan 2, or Plan 1 with Exchange Online Archiving, for more storage, archiving or litigation hold. Every member needs their own licence.
The Bottom Line
Have the admin create the mailbox, grant each member Full Access and Send As directly, and turn on shared Sent Items; members then just restart Outlook. Direct permissions make automapping add the mailbox everywhere, Send As covers replies, and shared Sent Items keeps the whole team in step.