Grant Send As with Add-ADPermission in Exchange Server or Add-RecipientPermission in Exchange Online, and grant Send on Behalf with Set-Mailbox -GrantSendOnBehalfTo in both.
This guide covers the admin center and PowerShell routes for user mailboxes, shared mailboxes and groups, plus how to check, remove and troubleshoot each permission.
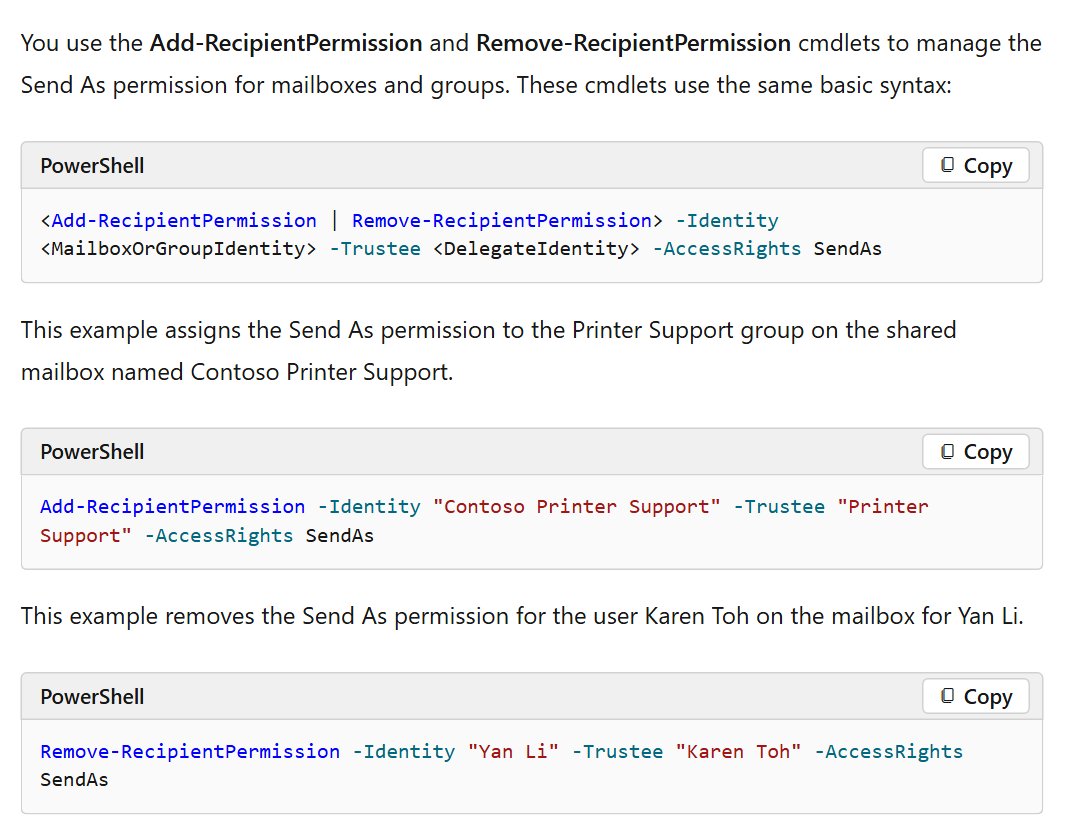
Send As and Send on Behalf PowerShell commands
These four commands do the job for a single mailbox. Replace Mailbox with the mailbox name and Delegate with the person who gets the permission.
| Permission | Exchange Server (Exchange Management Shell) | Microsoft 365 (Exchange Online PowerShell) |
|---|---|---|
| Send As | Add-ADPermission -Identity "Mailbox" -User Delegate -ExtendedRights "Send As" |
Add-RecipientPermission -Identity "Mailbox" -Trustee Delegate -AccessRights SendAs |
| Send on Behalf | Set-Mailbox -Identity "Mailbox" -GrantSendOnBehalfTo @{Add="Delegate"} |
Set-Mailbox -Identity "Mailbox" -GrantSendOnBehalfTo @{Add="Delegate"} |
Changes in Microsoft 365 can take up to 60 minutes to take effect. The delegate then picks the mailbox in the From field of a new message.
Send As vs Send on Behalf in Exchange and Outlook
Both permissions let a delegate send from a mailbox or group. The difference is what the recipient sees, so pick the one that matches how open the sender should be.
| Question | Send As | Send on Behalf |
|---|---|---|
| What the recipient sees | The message appears to come directly from the mailbox or group, with no sign of the delegate | The From address shows "Delegate on behalf of Mailbox" |
| Where replies go | The mailbox or group shown as the sender | The mailbox or group, not the delegate |
| Can the delegate read the mailbox? | No | No |
| If a user holds both permissions | Send As is always used | Ignored while Send As is present |
| Exchange admin center for shared mailboxes | Available | Not available, use Set-Mailbox |
| Good fit | A team address such as [email protected], where the individual stays out of view | An assistant sending for a manager, where the real sender should stay visible |
Full Access is a separate, third permission. It lets the delegate open the mailbox and manage its contents, but it does not let them send from it, so grant it as well when the delegate also has to read mail.
Exchange admin roles needed to assign mailbox permissions
You can test these commands in a lab built from the Exchange Server trial download before you change production mailboxes.
| Environment | Role group that covers recipient work | Where you run the commands |
|---|---|---|
| Exchange Server 2016, 2019 and Subscription Edition | Organization Management or Recipient Management | Exchange admin center or Exchange Management Shell |
| Exchange Online | Organization Management or Recipient Management (the "Mailbox settings" entry) | Exchange admin center or Exchange Online PowerShell |
| Microsoft 365 admin center | An admin account that can manage users | Users > Active users |
Mailbox permissions work inside one organization only. Microsoft 365 cannot give a user in another tenant Send As or Send on Behalf rights.
How to grant Send As permissions in Exchange Server?
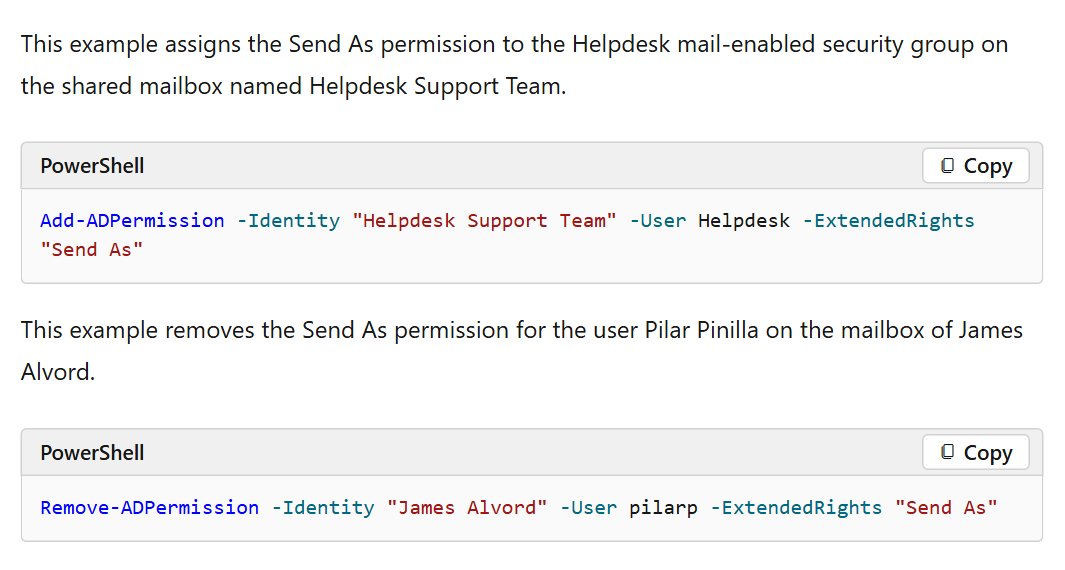
Exchange Server stores Send As as an Active Directory extended right, so it uses Add-ADPermission rather than a mailbox cmdlet. The -Identity value must be the Name or distinguished name of the mailbox or group, not its email address.
- Open the Exchange Management Shell with an account in one of the role groups above.
- Look up the mailbox Name if you only have the address:
Get-Recipient -Identity [email protected] | Format-List Name,DistinguishedName. - Grant the permission:
Add-ADPermission -Identity "Helpdesk Support Team" -User Helpdesk -ExtendedRights "Send As". - Confirm the delegate is listed:
Get-ADPermission -Identity "Helpdesk Support Team" | where {$_.ExtendedRights -like 'Send*'} | Format-Table -Auto User,Deny,ExtendedRights.
The command works with or without -AccessRights ExtendedRight, so older scripts that include it still run. The same syntax applies to groups: pass the group's Name as -Identity.
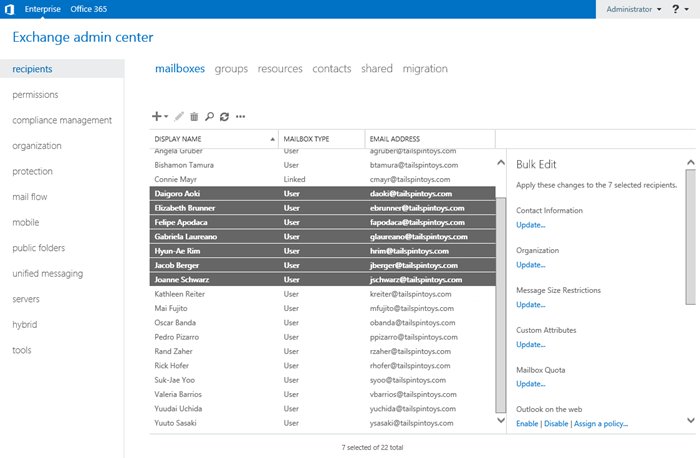
Exchange admin center mailbox delegation in Exchange Server
The on-premises admin center handles Send As, Send on Behalf and Full Access from one page, which suits one-off changes.
- In the Exchange admin center, select Recipients.
- Open the Mailboxes, Resources or Shared tab, depending on the mailbox type.
- Select the mailbox and select Edit.
- Select Mailbox delegation on the properties page.
- Select Add under Send As or Send on Behalf.
- Choose the user or group, select Add, then select OK.
- Select Save.
To change many mailboxes at once, select them under Recipients > Mailboxes with Shift or Ctrl, select More options in the details pane, then choose Add or Remove under Mailbox Delegation. The selected mailboxes must all be the same type.
Adding Send on Behalf permissions in Microsoft 365 (Exchange Online)
The Microsoft 365 admin center is the shortest route for a user mailbox, and it needs no PowerShell.
- In the Microsoft 365 admin center, go to Users > Active users.
- Select the user whose mailbox the delegate will send from.
- On the Mail tab, select Send on behalf of permissions.
- Select Add permissions, then choose the users who should send on behalf of this mailbox.
- Select Add.
- Allow up to 60 minutes for the permission to take effect.
In Exchange Online PowerShell, the equivalent is Set-Mailbox -Identity [email protected] -GrantSendOnBehalfTo @{Add="hollyh"}.
How to grant Send As permission in Microsoft 365 admin center
- In the Microsoft 365 admin center, go to Users > Active users.
- Select the user whose mailbox the delegate will send from.
- On the Mail tab, select Send as permissions.
- Select Add permissions, then choose the person who should get the permission.
- Select Add.
- Allow up to 60 minutes before you test it.
Add-RecipientPermission SendAs in Exchange Online PowerShell
Use PowerShell for scripted changes, or when the recipient is a group or shared mailbox. Send As has its own cmdlet in Exchange Online because Add-ADPermission is an on-premises command.
- Load the module in a PowerShell window:
Import-Module ExchangeOnlineManagement. - Sign in with an admin account:
Connect-ExchangeOnline -UserPrincipalName [email protected]. - Grant the permission:
Add-RecipientPermission "Help Desk" -AccessRights SendAs -Trustee "Ayla Kol". - Answer the confirmation prompt, or add
-Confirm:$falseto skip it in a script. - Check the result:
Get-RecipientPermission "Help Desk".
SendAs is the only valid -AccessRights value for this cmdlet, so there is nothing else to choose.
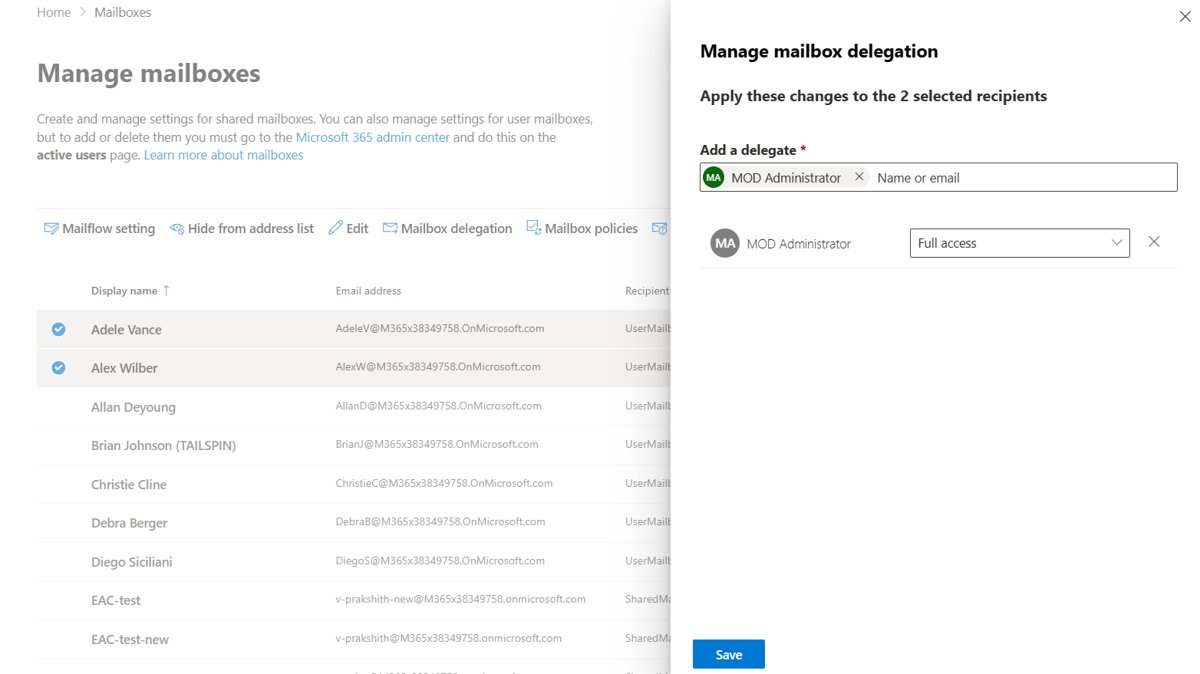
Exchange admin center mailbox delegation in Exchange Online
- In the Exchange admin center, go to Recipients > Mailboxes.
- Select the mailbox.
- Select Mailbox Delegation.
- Select Edit under Send as or Send on behalf, then select Add members.
- Choose the user or group. You can search by typing part of the name.
- Select Save, then Confirm.
To add one delegate to several mailboxes, select all of them under Recipients > Mailboxes, select Mailbox delegation, enter the delegate, then pick the permission in the Select permission types dropdown.
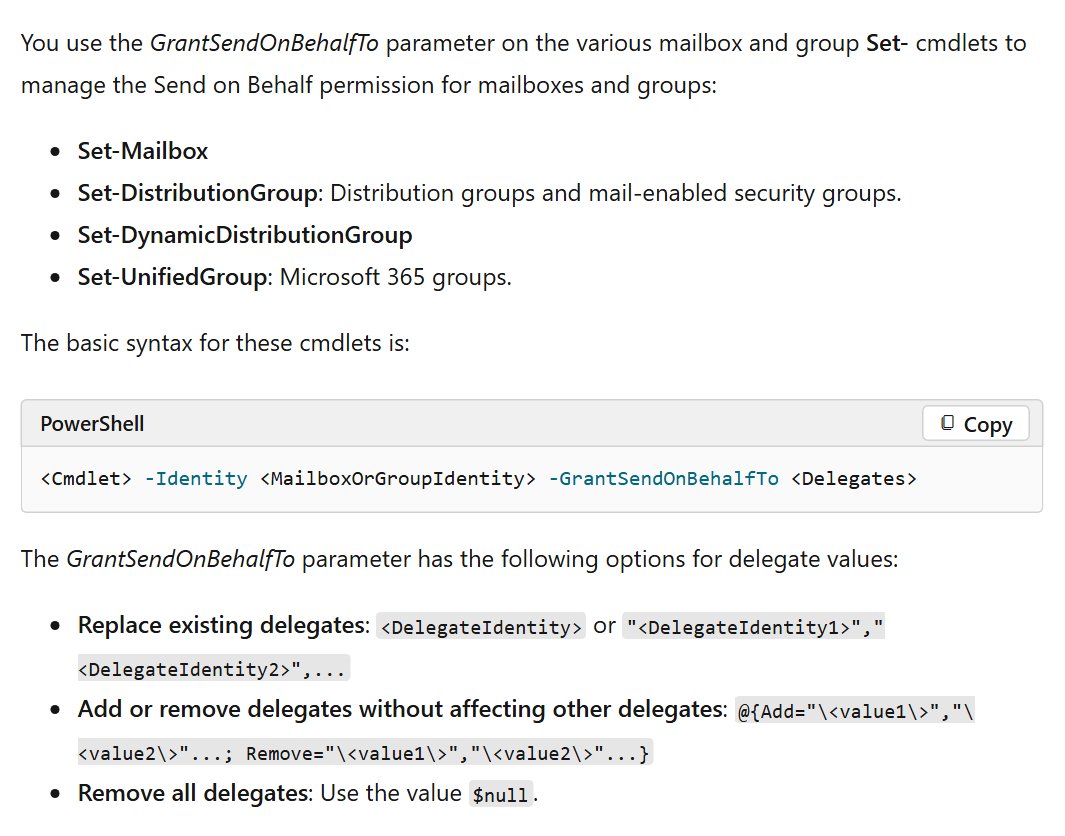
Set-Mailbox GrantSendOnBehalfTo examples
A plain value replaces the entire delegate list, which silently removes everyone already on it. Use the @{Add=...} form unless you intend to overwrite the list.
| What you want | Command |
|---|---|
| Add a delegate and keep the others | Set-Mailbox "Contoso Executives" -GrantSendOnBehalfTo @{Add="[email protected]"} |
| Replace all delegates with one person | Set-Mailbox -Identity [email protected] -GrantSendOnBehalfTo hollyh |
| Remove one delegate | Set-Mailbox -Identity [email protected] -GrantSendOnBehalfTo @{Remove="hollyh"} |
| Remove every delegate | Set-Mailbox -Identity [email protected] -GrantSendOnBehalfTo $null |
These forms work in both the Exchange Management Shell and Exchange Online PowerShell.
Send on Behalf permission for a shared mailbox
The Exchange admin center does not offer Send on Behalf for shared mailboxes, so this one has to go through PowerShell. Send As is available in the admin center for the same mailboxes.
- Connect to the Exchange Management Shell or Exchange Online PowerShell.
- Run
Set-Mailbox "Contoso Executives" -GrantSendOnBehalfTo @{Add="[email protected]"}. - Grant Full Access if the delegate also needs to open the mailbox:
Add-MailboxPermission -Identity "Contoso Executives" -User [email protected] -AccessRights FullAccess -InheritanceType All. - Ask the delegate to add the shared mailbox in Outlook and restart the app.
A mail-enabled security group works as the delegate here, which saves repeating the command as staff change.
Send As and Send on Behalf for distribution groups and Microsoft 365 groups
Groups take the same permissions as mailboxes, but each group type has its own Set- cmdlet for Send on Behalf. In the Exchange Online admin center, go to Recipients > Groups, select the group, select Settings, then Edit manage delegates under Manage delegates.
| Group type | Send As in Exchange Online | Send on Behalf |
|---|---|---|
| Distribution group or mail-enabled security group | Add-RecipientPermission -Identity "Printer Support" -Trustee sarad -AccessRights SendAs |
Set-DistributionGroup -Identity [email protected] -GrantSendOnBehalfTo sarad |
| Dynamic distribution group | Add-RecipientPermission -Identity "All Employees" -Trustee sarad -AccessRights SendAs |
Set-DynamicDistributionGroup "All Employees" -GrantSendOnBehalfTo @{Add="sarad"} |
| Microsoft 365 group (Exchange Online only) | Add-RecipientPermission -Identity "Marketing" -Trustee sarad -AccessRights SendAs |
Set-UnifiedGroup -Identity "Marketing" -GrantSendOnBehalfTo @{Add="sarad"} |
In Exchange Server, use Add-ADPermission with the group's Name for Send As, and the first two Send on Behalf cmdlets above.
How to send as another user in Outlook
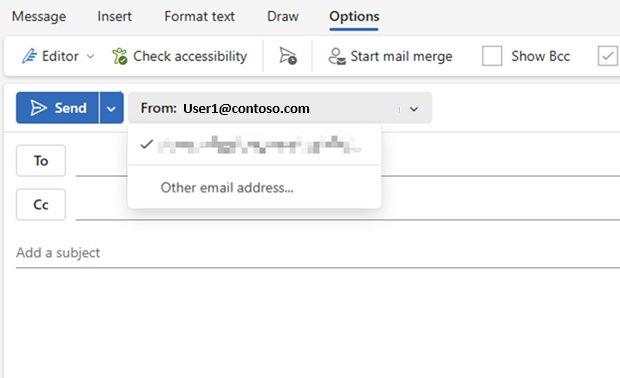
An admin grants the permission, but the delegate has to choose the address on each message. To pick a different address on your own mailbox instead, send from an alias in Exchange Online.
- Start a new message in Outlook.
- Show the From field if it is hidden. In new Outlook, select Show From on the Options tab. In classic Outlook, select Options > From.
- Select From, then select the mailbox.
- If the mailbox is not listed, select Other email address and enter its address.
- Finish the message and select Send.
In Outlook on the web, select More > Show from at the bottom of the message, remove the current address, then enter the mailbox or group address. It appears in the From list next time.
How to check who has Send As permission on a mailbox
Each permission is stored in a different place, so each one has its own check. The delegate should appear in the output for the permission you granted.
- Send As in Exchange Online: run
Get-RecipientPermission "Help Desk". - Everything one person can send as in Exchange Online: run
Get-RecipientPermission -Trustee "Kim Akers". - Send As in Exchange Server: run
Get-ADPermission -Identity "Help Desk" | where {$_.ExtendedRights -like 'Send*'} | Format-Table -Auto User,Deny,ExtendedRights. - Send on Behalf on a mailbox: run
Get-Mailbox -Identity "Help Desk" | Format-List GrantSendOnBehalfTo. - Send on Behalf on a group: run
Get-DistributionGroup -Identity "Printer Support" | Format-List GrantSendOnBehalfTo. UseGet-DynamicDistributionGrouporGet-UnifiedGroupfor those group types.
How to remove Send As and Send on Behalf permissions
- Send As in Exchange Online: run
Remove-RecipientPermission -Identity "Yan Li" -Trustee "Karen Toh" -AccessRights SendAs. - Send As in Exchange Server: run
Remove-ADPermission -Identity "James Alvord" -User pilarp -ExtendedRights "Send As". - Send on Behalf for one person: run
Set-Mailbox -Identity [email protected] -GrantSendOnBehalfTo @{Remove="hollyh"}. - Send on Behalf for a group: run
Set-DynamicDistributionGroup "All Employees" -GrantSendOnBehalfTo @{Remove="Administrator"}. - In the admin center: open the mailbox's delegation page, select the delegate under the permission, then remove them and save.
Save sent items to the shared mailbox with MessageCopyForSentAsEnabled
By default, a message sent from a shared mailbox lands in the delegate's own Sent Items folder. Both settings below default to $false, and they work on user mailboxes too in Exchange Online and Exchange 2016 CU6 or later, but not on linked user mailboxes.
| Messages you want copied | Run this command |
|---|---|
| Sent with Send As | Set-Mailbox "Help Desk" -MessageCopyForSentAsEnabled $true |
| Sent with Send on Behalf | Set-Mailbox "Help Desk" -MessageCopyForSendOnBehalfEnabled $true |
This is the only method that applies to new Outlook. Classic Outlook in Cached Exchange mode also has a client-side option: add the DWORD DelegateSentItemsStyle with value 1 under HKEY_CURRENT_USER\Software\Microsoft\Office\16.0\Outlook\Preferences. Back up the registry first.
Do not combine the two. With DelegateSentItemsStyle at 1 and MessageCopyForSentAsEnabled on, the shared mailbox gets two copies and the delegate's mailbox gets none.
Send As permission not working in Outlook
"You do not have the permission to send the message on behalf of the specified user"
In Exchange Server, sending from a shared mailbox through its own Outlook profile requires Send As, even when the user has Full Access and Send on Behalf. In Cached mode the same fault arrives as a non-delivery report with error 0x80070005.
- Grant Send As on the shared mailbox with
Add-ADPermission. - Confirm the delegate is listed with
Get-ADPermission. - Send the message again from Outlook.
Full Access granted but the delegate cannot send from the mailbox
Full Access covers opening and managing the mailbox only. It does not include either sending permission.
- Add Send As or Send on Behalf for the same delegate.
- Wait up to 60 minutes in Microsoft 365, then try again.
Send As or Send on Behalf fails on a hidden mailbox
Both permissions need the mailbox to be visible in the Global Address List, so a mailbox hidden from address lists blocks the delegate.
- Check the setting:
Get-Mailbox "Help Desk" | Format-List HiddenFromAddressListsEnabled. - If it returns
Trueand the mailbox can be listed, runSet-Mailbox "Help Desk" -HiddenFromAddressListsEnabled $false. - Try sending again once the address list has updated.
Send on Behalf is missing for a shared mailbox in the Exchange admin center
The admin center does not offer this permission for shared mailboxes.
- Run
Set-Mailbox "Help Desk" -GrantSendOnBehalfTo @{Add="Delegate"}in PowerShell. - Confirm it with
Get-Mailbox "Help Desk" | Format-List GrantSendOnBehalfTo.
Get-RecipientPermission -Trustee returns nothing for a delegate who has access
This cmdlet can return unexpected results when the trustee has several SID values on record, for example after an account change.
- Query the mailbox instead of the person:
Get-RecipientPermission "Help Desk". - Look for the delegate in the output.
Send As and Send on Behalf permissions FAQ
What is the difference between Send As and Send on Behalf?
Send As makes a message appear to come directly from the mailbox, with no sign of the delegate. Send on Behalf shows both names in the From address, as "Delegate on behalf of Mailbox". Replies to Send on Behalf messages still go to the mailbox.
Does Send As permission let someone read the mailbox?
No. Send As and Send on Behalf only allow sending, and neither one lets the delegate read the mailbox contents. Reading requires the separate Full Access permission, called Read and manage in the Microsoft 365 admin center.
How long does Send As permission take to work in Microsoft 365?
Microsoft says mailbox permissions can take up to 60 minutes to propagate after you set them. Test again after that window before you change anything else, because a recent grant can look like a failed one.
Which permission wins if a user has both Send As and Send on Behalf?
Send As is always used when a user holds both permissions on a mailbox or group. Recipients see only the mailbox as the sender, so remove Send As if you want the delegate's name to appear.
Can I give Send As permission to a group instead of one user?
Yes. A mail-enabled security group can hold Send As or Send on Behalf on a mailbox or group. Microsoft's own example grants Send As to a Helpdesk mail-enabled security group on a shared mailbox, which keeps delegate changes in one place.
Can I grant Send As to a user in another Microsoft 365 tenant?
No. Mailbox permissions can only be set up within the current organization, so a user in a different tenant cannot receive Send As or Send on Behalf rights on your mailboxes through these tools.
Why do Send As emails go to my own Sent Items folder?
You sign in to your own mailbox and open the shared one from there, so Outlook saves the message in your Sent Items. Set MessageCopyForSentAsEnabled to true on the mailbox to keep a copy in its Sent Items as well.
Do I need Full Access as well as Send As on a shared mailbox?
Microsoft requires both for full shared mailbox use. Full Access lets a person open the mailbox and work with its items, and Send As lets them send from it. Grant only Send As if they never need to read the mailbox.