To install or reinstall Windows 11 or Windows 10, back up your files, link your license to your Microsoft account, then use Windows Update, Reset this PC, or a bootable USB made with Microsoft's media creation tool.
This guide covers the requirements for both versions, every installation path, the clean install screens, activation, drivers, and fixes for the setup errors people hit most.
How to install or reinstall Windows 11 and Windows 10
This is the clean install route, and it works on any PC that can boot from USB. Use it when the PC needs a fresh start or will not start at all.
- Back up your personal files to an external drive, a USB flash drive or OneDrive.
- Open Settings > System > Activation and confirm the status reads Windows is activated with a digital license linked to your Microsoft account.
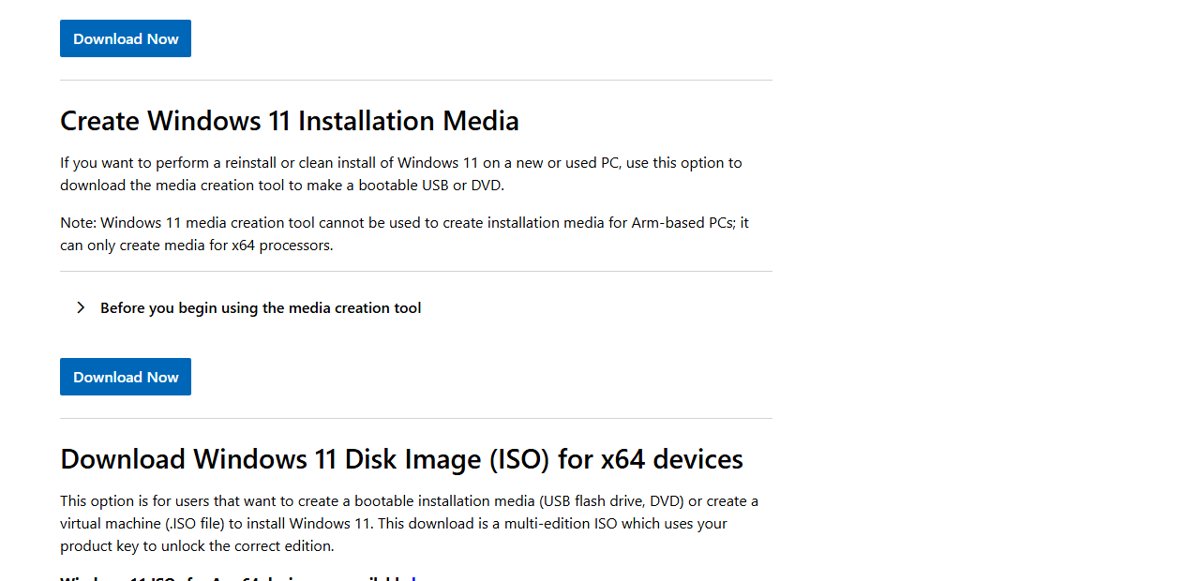
- On a working PC, open the Microsoft Download Windows 11 page, select Download Now under Create Windows 11 Installation Media, and run the tool with a blank USB flash drive of at least 8 GB.
- Plug the USB drive into the target PC and start the PC from it, using the boot menu key your PC maker documents.
- Choose your language and keyboard, select Install Windows 11, and tick I agree everything will be deleted including files, apps, and settings.
- Select I don't have a product key if asked, pick the edition that matches your license, and accept the license terms.
- Delete the partitions on Disk 0, select Disk 0 Unallocated Space, then select Next and Install.
- Sign in with your Microsoft account during setup so the digital license activates Windows automatically.
Understanding Windows installation paths
Windows offers four installation paths, and they differ in what they keep. Pick the lightest one that solves your problem.
| Path | Where you start it | Keeps files | Keeps apps | Best for |
|---|---|---|---|---|
| Upgrade through Windows Update or Installation Assistant | Windows 10, signed in | Yes | Yes | Moving an eligible Windows 10 PC to Windows 11 |
| In-place reinstall with setup.exe | Installation media opened inside Windows | Your choice | Your choice | Repairing a damaged Windows without wiping it |
| Reset this PC | Settings > System > Recovery, or Windows RE | Keep my files or Remove everything | No | Starting over without a USB drive |
| Clean install from USB | Booting the PC from installation media | No | No | New drives, major hardware changes, a PC that will not start |
Minimum system requirements and compatibility checks
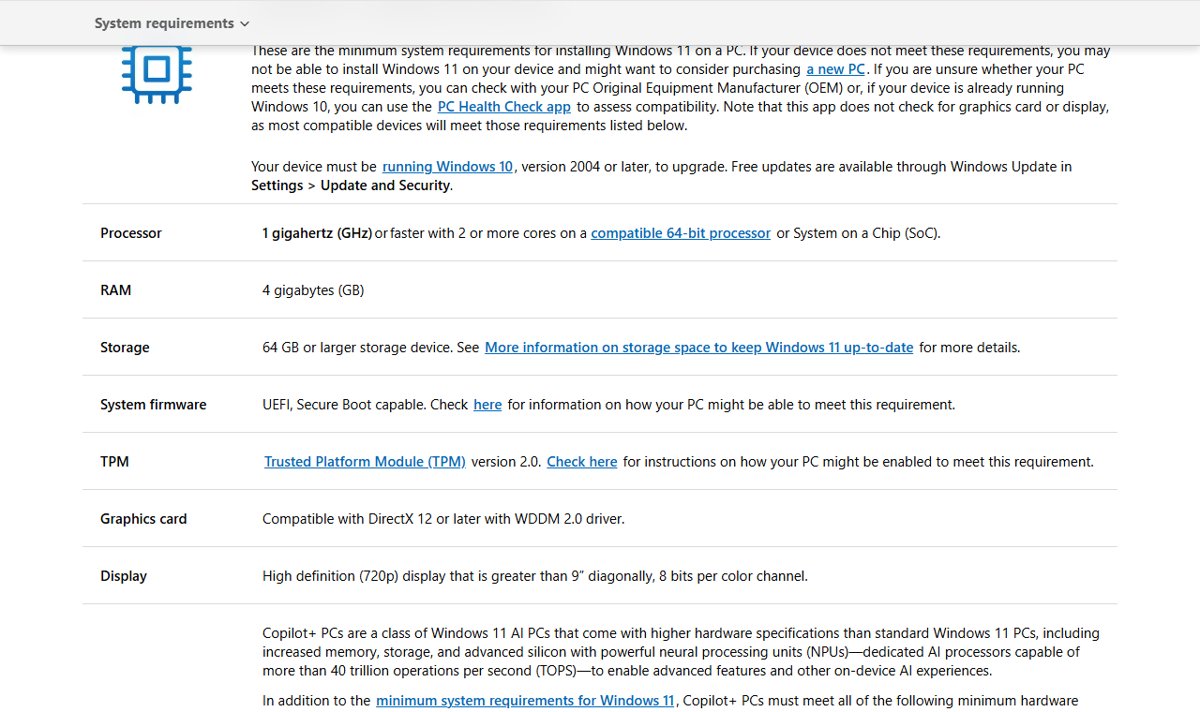
The table compares the Windows 11 minimum requirements with the Windows 10 system requirements from Microsoft's own specification pages.
| Component | Windows 11 minimum requirements | Windows 10 system requirements |
|---|---|---|
| Processor | 1 GHz or faster with 2 or more cores on a compatible 64-bit processor or SoC | 1 GHz or faster processor or SoC |
| RAM | 4 GB | 1 GB for 32-bit or 2 GB for 64-bit |
| Storage | 64 GB or larger | 32 GB or larger for newer versions |
| System firmware | UEFI, Secure Boot capable | No firmware requirement listed |
| TPM | TPM version 2.0 | No TPM requirement listed |
| Graphics card | DirectX 12 or later with a WDDM 2.0 driver | DirectX 9 or later with a WDDM 1.0 driver |
| Display | 720p, greater than 9 inches diagonally, 8 bits per color channel | 800 x 600 |
| Internet and account | Windows 11 Home and Pro for personal use need internet and a Microsoft account during first setup | Not listed |
| Architecture | 64-bit only, x64 or Arm64 | 32-bit or 64-bit |
Windows 10 reached end of support on October 14, 2025, so a new installation should be Windows 11 whenever the hardware qualifies.
Verifying compatibility
Microsoft recommends the PC Health Check app for the Windows 11 check. It does not test the graphics card or display, which most compatible PCs already meet.
- On Windows 10, search for PC Health Check from the taskbar and open it, or install it from aka.ms/GetPCHealthCheckApp.
- Select Check now to see whether the PC can run Windows 11.
- Open Settings > System > About and read System type under Device specifications to confirm a 64-bit operating system and processor.
- Read Edition under Windows specifications on the same page, and note it for the reinstall.
- Open Settings > Update & Security > Windows Update on Windows 10 and check whether the Windows 11 upgrade is offered.
Preparing for installation: Backing up data and keys
A clean install deletes personal files, apps, manufacturer customizations and every change made in Settings. Do these steps first.
- Copy your personal files to an external hard drive, a USB flash drive or OneDrive.
- Open Settings > System > Activation and confirm Windows is activated.
- If the status reads Windows is activated with a digital license, select Add an account and sign in with your Microsoft account to link the license.
- Find your 25-character product key if you activated with a key rather than a digital license.
- Write down your Windows edition, such as Home or Pro, because the reinstall must use the same edition.
- Have your BitLocker recovery key ready if the drive is encrypted.
- Keep installers and activation details for any apps you plan to reinstall.
Creating Windows installation media
You need a PC with a reliable internet connection and a blank USB flash drive of at least 8 GB. Everything on the drive is deleted.
If you only need the disk image, you can download the Windows 11 ISO instead of making a USB drive.
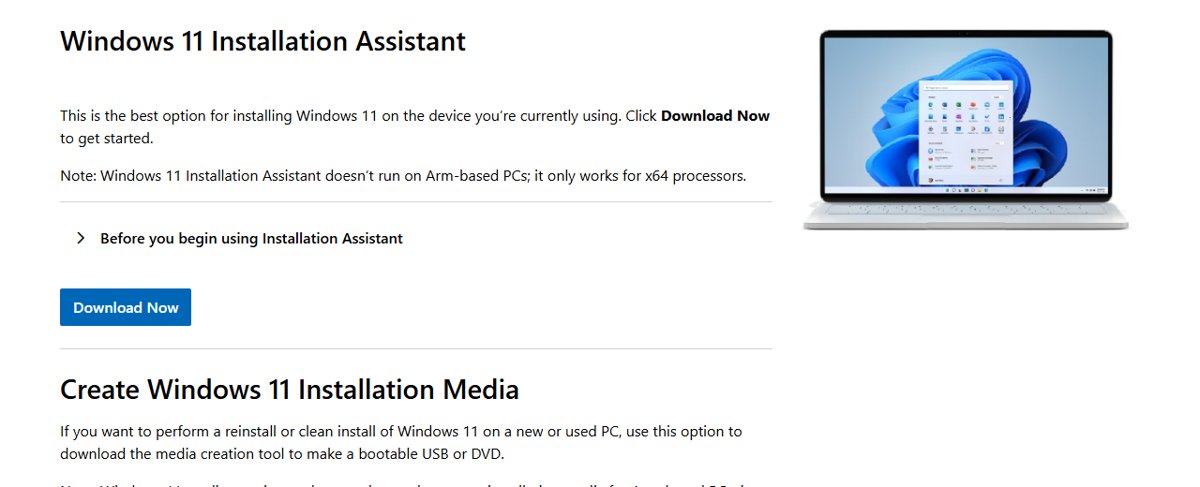
- For Windows 11, open the Microsoft Download Windows 11 page and select Download Now under Create Windows 11 Installation Media.
- For Windows 10, open the Download Windows 10 page and select Download Now under Create Windows 10 installation media.
- Run MediaCreationTool.exe and accept the license terms.
- Choose the language and edition, then choose USB flash drive as the media.
- Select your USB drive and wait for the tool to finish writing the files.
- Choose ISO file instead if you need media for a DVD or a virtual machine.
The Windows 11 media creation tool and Installation Assistant only work for x64 PCs. Arm64 PCs use the separate Windows 11 Arm64 ISO from the same download page.
Upgrading vs. clean install: What's best?
| Your situation | Use this | Why |
|---|---|---|
| Windows 10 works and the PC meets Windows 11 requirements | Upgrade | Files and apps move across, and you can go back within 10 days |
| Windows runs but is unstable or corrupted | In-place reinstall or Reset this PC | Repairs system files without a USB boot |
| You replaced the motherboard or main drive | Clean install | No old drivers or partitions carry over |
| The PC will not start | Clean install from USB, or Reset this PC from Windows RE | Both work without a running desktop |
| You are selling or giving away the PC | Reset this PC with Remove everything and Clean data | Cleaning the drive makes file recovery harder |
Option 1: Upgrading (e.g., Windows 10 to Windows 11)
Upgrades from Windows 10 to Windows 11 are free. The PC must run Windows 10 version 2004 or later with the September 14, 2021 security update or later. These are the upgrade steps through Windows Update.
- Open Settings > Update & Security > Windows Update on Windows 10.
- Select Check for updates and install any pending Windows 10 updates first.
- When the Windows 11 offer appears, select Download and install.
- Select Accept and install in the Software License Terms window.
- Wait until the status changes to Restart required, then select Restart now.
- Let the PC restart several times until the sign-in screen appears.
The Windows 11 Installation Assistant does the same job before Windows Update offers it, but Microsoft recommends waiting for the offer.
Option 2: Clean install (recommended for major hardware changes or issues)
These clean install steps follow the Windows 11 Setup screens. Only touch Disk 0, and leave any other disk alone.
- Start the PC from your installation media; check your PC maker's site for the boot key.
- In Select language settings and Select keyboard settings, choose your options and select Next.
- In Select setup option, select Install Windows 11, tick I agree everything will be deleted including files, apps, and settings, and select Next.
- If the Product key window appears, select I don't have a product key, then pick your edition in Select Image.
- Select Accept in Applicable notices and license terms.
- In Select location to install Windows 11, select each Disk 0 partition and choose Delete Partition.
- Select Disk 0 Unallocated Space, select Next, then select Install in Ready to install.
- Complete the setup wizard and sign in with your Microsoft account.
If you have no product key and none is linked to your Microsoft account, close Setup and link the license first. On Windows 10 media the screens are similar, and the Windows 10 installation steps show each one.
Reinstall Windows 11 and 10 with Reset this PC
Reset this PC reinstalls Windows without a USB drive. Keep my files removes apps and settings, while Remove everything also removes personal files.
- On Windows 11, open Settings > System > Recovery and select Reset PC.
- On Windows 10, open Settings > Update & Security > Recovery and select Get started under Reset this PC.
- Choose Keep my files or Remove everything.
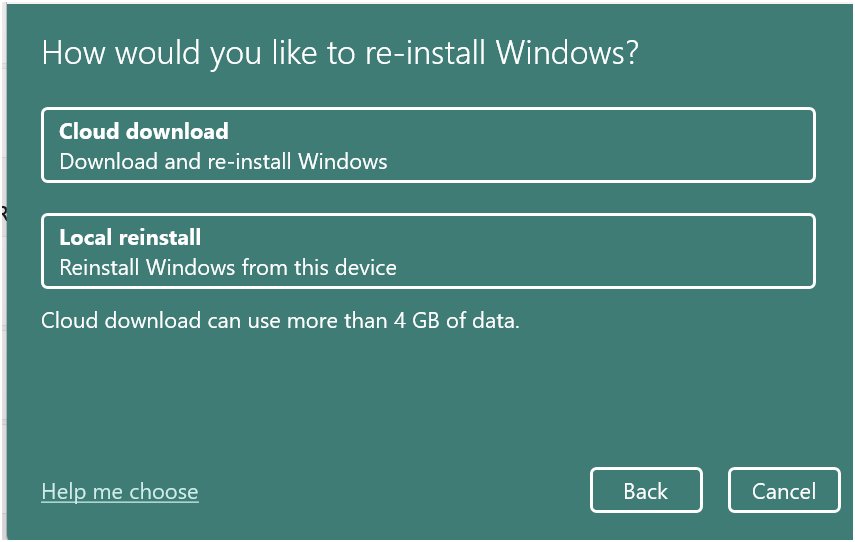
- Choose Cloud download for a fresh copy with recent updates, or Local reinstall to use files already on the PC.
- Follow the prompts and leave the PC alone, even if the screen stays black for over 15 minutes.
If Windows will not start, open Windows RE and select Troubleshoot > Reset this PC.
Reinstall Windows without losing files and apps
An in-place reinstall runs Setup from inside Windows. It repairs the system while keeping files, settings and apps.
- Connect the installation media you created.
- Open File Explorer and select the installation media drive.
- Open setup.exe from the root of the drive and select Yes at the prompt.
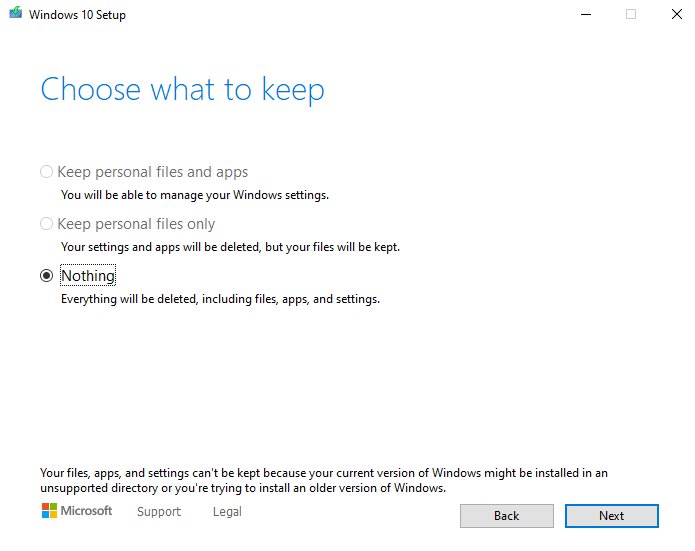
- Select Change what to keep.
- Choose Keep personal files and apps, Keep personal files only or Keep nothing, then select Next.
- Select Install and let the PC restart several times.
Advanced preparation: BIOS/UEFI and boot mode settings
Windows 11 needs UEFI with Secure Boot capability. A PC set to Legacy BIOS, also called CSM mode, must switch to UEFI first.
- Open Settings > System > Recovery and select Restart now next to Advanced startup.
- Select Troubleshoot > Advanced options.
- Select UEFI Firmware Settings, then select Restart.
- Set the boot mode to UEFI, making it the first or only option if both are offered.
- Turn on Secure Boot if your firmware shows it as off.
- Change the boot order so the USB drive comes first, or use your PC maker's one-time boot menu.
- Save the changes and exit the firmware.
Firmware menus differ between PC makers, so check your manufacturer's support site for the exact labels and the boot menu key.
Legacy BIOS vs. UEFI
| Point | Legacy BIOS (CSM) | UEFI |
|---|---|---|
| Windows 11 support | Not supported for installation | Required, Secure Boot capable |
| Secure Boot | Not available | Available; allows only trusted, signed software to run during boot |
| Windows 10 support | Supported | Supported |
| When both are offered | Disable it or move it down | Set UEFI as the first or only option |
Completing post-install setup
These initial steps get the new installation signed in and connected. The additional setup steps restore your data.
- Connect to Wi-Fi or Ethernet during setup, because Windows 11 Home needs internet for first setup.
- Sign in with the Microsoft account linked to your digital license.
- Set a PIN when Windows prompts for Windows Hello.
- Restore personal files from your external drive or OneDrive.
- Reinstall your apps from the Microsoft Store or each vendor's own site.
- Reconnect printers and other devices one at a time.
Installing or updating drivers
Windows Update installs most drivers automatically after setup. Check Device Manager for anything it missed, and reinstall Bluetooth drivers separately if pairing fails.
- On Windows 11, open Settings > Windows Update > Advanced options > Optional updates and install listed driver updates.
- On Windows 10, open Settings > Update & Security > Windows Update and select View optional updates.
- Type device manager in the taskbar search and open it.
- Look for devices with a yellow exclamation mark.
- Right-click each one and select Update driver.
- Download chipset, graphics or network drivers from your PC or motherboard maker's site if Windows has none.
Activating Windows
Activation usually happens on its own once the PC goes online. The edition you installed must match your license.
- Open Settings > System > Activation on Windows 11, or Settings > Update & Security > Activation on Windows 10.
- Read the message next to Activation status.
- If you have a product key, select Change next to Change product key on Windows 11, or Change product key on Windows 10, and enter it.
- If you have a digital license and changed hardware, sign in as an administrator and select Troubleshoot to run the Activation troubleshooter.
- Sign in with the Microsoft account linked to the license when the troubleshooter asks.
Running Windows Update
- Open Settings > Windows Update on Windows 11, or Settings > Update & Security > Windows Update on Windows 10.
- Select Check for updates.
- Install everything offered, then select Restart now when asked.
- Repeat Check for updates until no more updates appear.
If updates stall, run the Windows troubleshooters for Windows Update before trying again.
Confirm Windows is installed and activated after a reinstall
- Open Settings > System > Activation and confirm Windows is activated with a digital license linked to your Microsoft account.
- Open Settings > System > About and confirm Edition matches the edition you had before.
- Check that System type reads a 64-bit operating system.
- Open Device Manager and confirm no device shows a yellow exclamation mark.
- Open Windows Update and confirm it reports you are up to date.
Troubleshooting installation issues
Setup fails with error 0xC1900101
A driver problem, usually from added hardware or an outdated driver.
- Free at least 20 GB on the system drive for a 64-bit installation.
- Unplug external drives, docks and other hardware you do not need.
- Run Windows Update several times and install all driver updates.
- Fix devices showing a yellow exclamation mark in Device Manager.
- Run
chkdsk/f C:in an elevated Command Prompt and restart when prompted. - Run
DISM.exe /Online /Cleanup-image /Restorehealthin an elevated Command Prompt, then retry Setup.
Error 0x80070070 or a not enough disk space message
The system drive is too full for Setup.
- Open File Explorer > This PC and check free space on the system drive.
- Delete or move large files you no longer need.
- Run Setup again.
The PC does not boot from the USB drive
The boot order or boot mode is not set for USB.
- Open UEFI Firmware Settings from Advanced startup.
- Move the USB drive to the top of the boot order, or use the one-time boot menu.
- Set the boot mode to UEFI for Windows 11 media.
- Recreate the media with the media creation tool if the drive still is not listed.
This PC doesn't meet the minimum system requirements to install Windows 11
A missing requirement such as TPM 2.0, Secure Boot or a supported processor.
- Run PC Health Check and select Check now to see which requirement fails.
- Turn on TPM and Secure Boot in the firmware if the PC supports them.
- Stay on Windows 10 if the processor is not supported, as Microsoft recommends.
Error 0x800F0922 during an upgrade
The PC cannot reach Windows Update servers, or the System Reserved partition is too small.
- Disconnect from any VPN.
- Confirm the PC is online and retry the upgrade.
Windows is not activated after a reinstall
The license is not linked to your account, the edition differs, or the hardware changed.
- Confirm the installed edition matches your license in Settings > System > Activation.
- Sign in with the Microsoft account linked to the digital license.
- Run the Activation troubleshooter with Troubleshoot on the Activation page.
Security first: Preparing for safe and supported installations
| Rule | Why it matters |
|---|---|
| Download media only from microsoft.com | Microsoft's tools and ISOs are the only official installation source |
| Avoid installing Windows 11 on unsupported hardware | Microsoft does not recommend it and advises rolling back to Windows 10 |
| Move off Windows 10 or enrol in ESU | Windows 10 stopped getting free security fixes on October 14, 2025; ESU extends fixes to October 12, 2027 |
| Keep the BitLocker recovery key | An encrypted drive asks for it during reset and recovery |
| Keep Microsoft Defender on | Windows includes it, so a fresh install is protected from the first sign-in |
The case for clean installations
Choose a clean installation after a motherboard or drive change, a malware infection, or repeated upgrade failures. It removes old partitions, drivers and apps, so nothing from the previous setup can cause the same fault again. The cost is reinstalling apps and restoring files, so back up first.
After installation: Final security and performance steps
- Open Windows Security and confirm virus protection and firewall show no warnings.
- Turn on Windows Backup to save files, settings and apps to OneDrive.
- Create a recovery drive on a spare USB stick so you can recover the PC later.
- Remove apps you do not use from Settings > Apps > Installed apps.
- Check free space in Settings > System > Storage.
Windows 10 and 11 installation: Frequently asked questions
Can I install Windows without a license key?
Yes. Select I don't have a product key during setup. Windows activates automatically if a digital license is linked to your Microsoft account or a key is stored in the PC firmware. Without either, Windows stays unactivated until you buy a digital license or enter a key.
How do I upgrade from Windows 7 or 8.1 to Windows 10 or 11?
There is no direct upgrade to Windows 11 from Windows 7 or 8.1, because a direct upgrade needs Windows 10 version 2004 or later. Back up your files, create installation media, and run a clean install with a valid license on hardware that meets the requirements.
Is my device 32-bit or 64-bit, and what should I install?
Open Settings > System > About and read System type. Windows 11 is 64-bit only, so install the x64 version on Intel and AMD PCs and the Arm64 version on Arm PCs. Moving from 32-bit to 64-bit Windows always needs a clean install.
How long does the installation take?
Microsoft gives no fixed time, because it depends on internet speed and hardware. A Windows 11 upgrade usually takes longer than a normal Windows 10 feature update, and the PC restarts several times. A reset can show a black screen for over 15 minutes.
Why does Windows keep failing to activate?
The most common causes are a different edition than your license, a license not linked to your Microsoft account, or a motherboard replacement. Install the matching edition, sign in with the linked account, and run the Activation troubleshooter from Settings > System > Activation.
Is the Windows 11 upgrade free?
Yes. Upgrades from Windows 10 to Windows 11 are free on PCs that meet the minimum requirements. Your internet provider may still charge for the large download on a metered connection.
Can I go back to Windows 10 after upgrading?
Yes, for 10 days after the upgrade. Open Settings > System > Recovery and use the go back option. After 10 days, returning to Windows 10 needs a backup of your files and a clean install.
How big does the USB drive need to be?
Use a blank USB flash drive with at least 8 GB of space. The media creation tool deletes everything on it, so copy off any files first.
Does a reinstall remove viruses?
A clean install or Reset this PC with Remove everything deletes all apps and files on the system drive, including malware stored there. Make sure the backup you restore from is clean, and keep Microsoft Defender up to date.