The Microsoft Word ribbon is the band of tabs and buttons across the top of the window, and every command you need for creating documents lives on one of its tabs.
This guide covers what each tab does, how to show, hide or collapse the ribbon, how to drive it from the keyboard, how to customize it, and how to fix it when it disappears. The steps apply to Word for Microsoft 365, Word 2024, 2021, 2019 and 2016, with notes for Word on the web.
How to show the ribbon in Word right now
If the ribbon is hidden or shows only tab names, set it back to full view with the Ribbon Display Options button.
- If no tabs are visible at all, select the ellipsis (…) in the upper-right corner of the Word window, or press Alt, to bring the ribbon back temporarily.
- Select the Ribbon Display Options icon in the lower-right corner of the ribbon.
- Choose Always show Ribbon.
- If only the tab names remain, right-click any tab, such as Home, and clear the check mark next to Collapse the ribbon.
The tabs and their buttons now stay visible every time you open a document.
What is the Microsoft Word Ribbon?
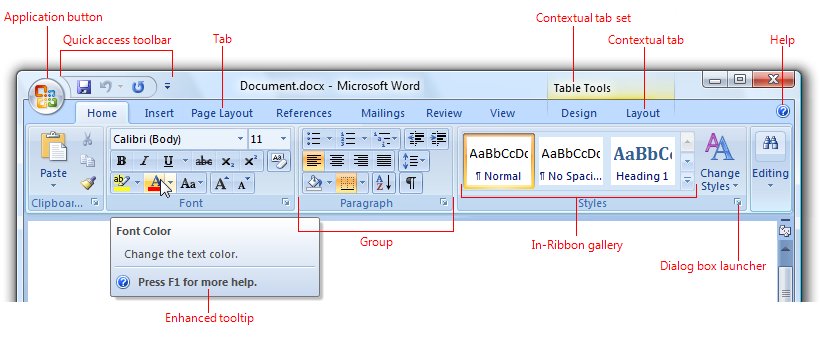
Microsoft describes the ribbon as a set of toolbars at the top of the window, built to help you find the command you need quickly.
It arrived with Office 2007 and replaced the old layered menus, toolbars and task panes. Every part of it has a name, and knowing the names makes help articles far easier to follow.
| Ribbon component | What it is | Where you see it |
|---|---|---|
| Tabs | The labelled headings across the top, such as Home and Insert. Each tab holds one area of work. | Top row of the ribbon |
| Groups | Labelled sets of related commands inside a tab, such as the Font and Styles groups on Home. | Group name printed under each block of buttons |
| Commands | The buttons, lists and menus you click to act on the document. | Inside each group |
| Dialog box launcher | A small button at the bottom of some groups that opens a dialog with every related setting. | Bottom-right corner of a group |
| Galleries | Visual lists of choices, such as styles, that show the result instead of a name. | Inside groups like Styles |
| ScreenTips | Enhanced tooltips that explain a command and show its shortcut key. | Hover over any button |
| File tab | Opens file commands such as open, save, print and Options. | Far left of the tab row |
| Quick Access Toolbar | A small customizable toolbar for commands you use all the time. | Above or below the ribbon |
The Main Tabs and Their Functions
Word's built-in tabs are Home, Insert, Design, Layout, References, Mailings, Review and View. Developer exists but is hidden until you turn it on, and add-ins can add their own tabs.
| Tab | Use it to | Typical commands |
|---|---|---|
| Home | Format text and paragraphs, the work you do most | Font, paragraph alignment, bullets, Styles gallery, cut, copy and paste |
| Insert | Add objects to the page | Tables, pictures, shapes, links, headers and footers, page numbers |
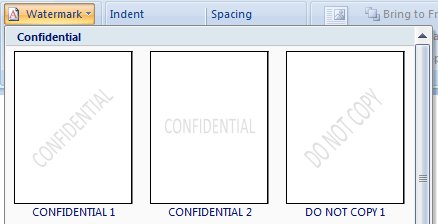
| Design | Change the look of the whole document at once | Themes, style sets, colours, fonts, watermark, page borders |
| Layout (Page Layout in older versions) | Set up the page itself | Margins, orientation, paper size, columns, breaks, indents and spacing |
| References | Build long, structured documents | Table of contents, footnotes, citations, captions, index |
| Mailings | Create personalised mail | Envelopes, labels, mail merge |
| Review | Check and collaborate | Spelling and grammar, comments, Track Changes, compare documents |
| View | Change how you see the document | Read mode, Print Layout, zoom, rulers, split window, macros |
| Developer (hidden by default) | Work with macros and form controls | Visual Basic, Macros, Record Macro |
| Contextual tabs | Edit a selected object | Appear only when you select a table, picture or similar object |
Which ribbon display option should you use?
The Ribbon Display Options menu decides how much of the ribbon you see. Pick the row that matches how you work.
| Your situation | Choose this | What happens |
|---|---|---|
| You are learning Word and want every button in sight | Always show Ribbon | All tabs and commands stay visible all the time |
| You switch tabs often but want more of the page | Show tabs only | Only tab names show; click a tab to open its commands |
| You are reading or writing without distractions | Full-screen mode | The ribbon hides; select … or press Alt to call it back |
| You use Word on the web and want the full layout | Classic Ribbon | The full ribbon familiar from desktop Word |
| You use Word on the web on a small screen | Single Line Ribbon | A compact ribbon that takes less space |
| You use Word on the web and want the ribbon out of the way | Adjust automatically | The ribbon shows when you move the pointer to the top of the page |
On the desktop, the same toggle is also available by right-clicking any tab and selecting Collapse the ribbon.
Navigating the Ribbon: Tips and Tricks
Every ribbon command can be reached from the keyboard with KeyTips. You never need the mouse to switch tabs or press a button.
- Press and release Alt. Small letter badges, called KeyTips, appear over each tab and over the Quick Access Toolbar commands.
- Press the letter shown on the tab you want. The tab opens and new KeyTips appear on its commands.
- Press the one or two letters shown on the command to run it.
- Hover the mouse over any button when you are unsure what it does. The ScreenTip explains it and lists its shortcut key, if it has one.
- In Word on the web, press Ctrl + F6 or Windows + Alt to move focus to the ribbon.
When the Word window is narrow, groups shrink to smaller icons and then fold into a single button. Maximize the window to see every label again.
How to Use the Ribbon Effectively
The ribbon works the same way for every task: select what you want to change, pick the tab, then pick the command in its group. Two common jobs show the pattern.
- Formatting text: select the words you want to change.
- Open the Home tab and use the Font group to change the font, size, bold, italic or colour.
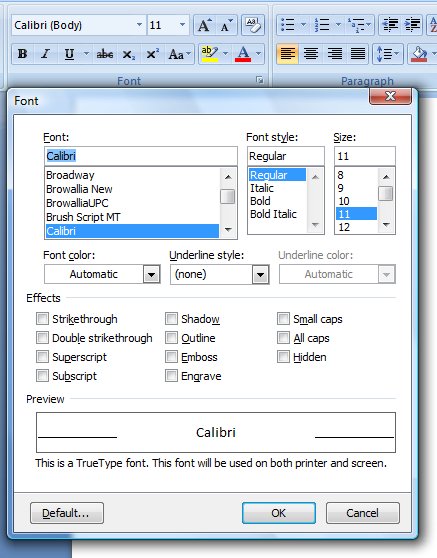
- For settings that are not on the ribbon, select the dialog box launcher in the corner of the Font group to open the full Font dialog.
- Point at a style in the Styles gallery to preview it on your text, then click it to apply it.
- Inserting a table: click where the table should go.
- Open the Insert tab, select Table and choose the number of rows and columns.
- Click inside the new table. The table's contextual tabs appear at the right end of the ribbon with its design and layout commands.
Customizing the Ribbon for Your Workflow
You can add your own tabs and groups, hide tabs you never use, and reorder tabs. Built-in commands appear greyed out in the editor, because you cannot rename, re-icon or reorder them.
- Right-click an empty space on the ribbon and select Customize the Ribbon. The same page opens from File > Options > Customize Ribbon.
- To add a tab, select New Tab under the Customize the Ribbon list. To add a group, select a tab first and then select New Group.
- Select the new tab or group and choose Rename to give it a clear name.
- Select your custom group, pick a list in Choose commands from (for example Popular Commands or All Commands), select a command and select Add.
- To hide a tab, clear the check box next to its name.
- To change the order, select a tab or group and use the Move Up and Move Down arrows.
- Select OK to save the changes.
You cannot shrink the ribbon itself or change the size of its text and icons. Custom groups can use Hide Command Labels to show icons only.
How to turn on the Developer tab
Word hides the Developer tab by default. You need it for macros, the Visual Basic editor and form controls.
- Select File > Options.
- Select Customize Ribbon on the left.
- In the list on the right, make sure Main Tabs is selected.
- Select the Developer check box.
- Select OK. The Developer tab now appears on the ribbon.
Understanding the Contextual and Mini Toolbars
Not every command sits on the main tabs. Word shows some commands only when they apply, and keeps others close to the text.
| Tool | When it appears | What to use it for |
|---|---|---|
| Contextual tabs | Only when you select a particular object, such as a table or picture. They appear at the right end of the tab row. | Commands that only make sense for that object, such as Table Design for a selected table |
| Mini toolbar | Next to your text for in-place formatting, alongside the right-click menu | Quick formatting without travelling back up to the Home tab |
| Right-click (context) menu | When you right-click text or an object | The most common commands for whatever you clicked |
| Quick Access Toolbar | Always, above or below the ribbon | One-click access to commands you use constantly, whichever tab is open |
If you cannot find a picture or table command on the normal tabs, click the object first. Its contextual tab then appears.
Advanced Tips for Ribbon Mastery
Once the basics are comfortable, these tweaks make the ribbon fit how you actually work.
| Goal | Do this | Why it helps |
|---|---|---|
| Keep the same ribbon on a second PC | In Customize the Ribbon, select Import/Export > Export all customizations, then import the file on the other PC | Your custom tabs follow you |
| Build a tab for one project | Create a New Tab and fill its groups from All Commands | Commands from several tabs sit in one place |
| Save space on a custom group | Right-click the group in the editor and choose Hide Command Labels | Icons only, so more buttons fit |
| Declutter the tab row | Clear the check box of tabs you never use, such as Mailings | Fewer tabs to scan |
| Work without the mouse | Learn the KeyTips for your five most used commands | Commands run in two or three keystrokes |
| Find commands added by add-ins | Check the Add-ins tab or the tab the add-in names | Add-in buttons land on built-in or custom tabs |
How to reset the ribbon to its default layout
Resetting removes your custom tabs and groups and restores hidden built-in tabs. Export your customizations first if you might want them back.
- Right-click an empty space on the ribbon and select Customize the Ribbon.
- To reset one tab, select that built-in tab in the list, select Reset and choose Reset only selected Ribbon tab.
- To reset everything, select Reset and choose Reset all customizations.
- Select OK.
How to check the ribbon is set up correctly
- Close and reopen Word. The ribbon should open in the display option you chose.
- Click Insert, then Home. Each tab should open with its groups and buttons visible, not just the tab names.
- Confirm any custom tab you added appears in the tab row with its groups and commands.
- Insert a small table and click inside it. Contextual tabs should appear at the right end of the ribbon, then disappear when you click back into normal text.
Troubleshooting and Common Issues
Ribbon not visible at all (no tabs showing)
Word is set to Full-screen mode, which hides the whole ribbon.
- Select the … in the upper-right corner of the window, or press Alt.
- Select the Ribbon Display Options icon in the lower-right corner of the ribbon.
- Choose Always show Ribbon.
Only the tab names show and the buttons vanish
The ribbon is collapsed, or set to Show tabs only.
- Right-click any tab.
- Clear the check mark next to Collapse the ribbon.
- If the buttons still hide, open Ribbon Display Options and choose Always show Ribbon.
Commands missing or a whole tab is gone
The tab was hidden in Customize the Ribbon, the command lives on a contextual tab, or the window is too narrow to show every button.
- Click the table, picture or other object you are working on, then look for its contextual tab at the right end of the ribbon.
- Maximize the Word window so shrunken groups expand again.
- Right-click the ribbon, select Customize the Ribbon and tick any unchecked tab you need.
- If the layout is still wrong, select Reset > Reset all customizations and then OK.
Ribbon missing in Word on the web
The ribbon is set to hide until the pointer reaches it.
- Move the pointer to the top of the browser window to reveal the ribbon and its Ribbon Display Options icon.
- Select the icon and choose Always show ribbon.
- Choose Classic Ribbon if you prefer the full desktop-style layout.
Frequently Asked Questions
What is the ribbon in MS Word?
The ribbon is the set of tabs and toolbars at the top of the Word window. Each tab, such as Home or Insert, holds groups of related commands. It replaced the old menus and toolbars in Office 2007 and is how you reach almost every Word feature.
Where is the ribbon in Word?
The ribbon runs across the top of the Word window, directly under the title bar. It starts with the File tab on the left, followed by Home, Insert, Design, Layout, References, Mailings, Review and View. If you only see a thin bar or three dots, the ribbon is hidden.
How do I show the ribbon in Microsoft Word?
Select the Ribbon Display Options icon in the lower-right corner of the ribbon and choose Always show Ribbon. If no tabs are visible, first select the ellipsis (…) in the upper-right corner or press Alt so the ribbon appears long enough to change the setting.
How do I get the ribbon back in Word when only tabs show?
Right-click any ribbon tab and clear the check mark next to Collapse the ribbon. The buttons return under every tab. If they still hide after you click away, open Ribbon Display Options and switch from Show tabs only to Always show Ribbon.
How do I use the ribbon on Word?
Select the text or object you want to change, open the tab for that job, then click a command in one of its groups. Home handles formatting, Insert adds tables and pictures, and Layout sets margins. Press Alt to use KeyTips if you prefer the keyboard.
How do I make a ribbon in Word?
You cannot create a second ribbon, but you can add your own tab to it. Right-click the ribbon, select Customize the Ribbon, choose New Tab, rename it, add a New Group and then add commands from the Choose commands from list. Select OK to save.
How do I set the ribbon in Word to stay open?
Choose Always show Ribbon from the Ribbon Display Options menu at the lower-right corner of the ribbon. That keeps all tabs and commands visible and the setting stays in place the next time you open Word.
How do I add a tab to the ribbon in Microsoft Word?
Open File > Options > Customize Ribbon. Tick a built-in tab such as Developer to show it, or select New Tab to create your own. Select OK and the tab appears on the ribbon straight away.
What are the ribbon options in Word?
Desktop Word offers three ribbon display options: Full-screen mode, Show tabs only and Always show Ribbon. Word on the web adds Classic Ribbon, Single Line Ribbon and Adjust automatically. All of them live under the Ribbon Display Options icon on the ribbon.
Final Advice
Keep the ribbon on Always show Ribbon until the tabs feel familiar, and learn Home, Insert and Layout first. Those three tabs cover most everyday document work, a visible ribbon teaches you where commands live, and customizing only pays off once you know which buttons you actually use. If Word is not installed yet, start with downloading Microsoft Word for PC. Happy document creating.

![HDMI port not working in Windows 11 [Easy fixing]](https://techdows.com/wp-content/uploads/2026/10/HDMI-Port-Not-Working-in-Windows-11-Easy-Fixing-600x338.jpg)



How to display the ribbon on Microsoft Word 365: a step-by-step guide - Techdows
[…] The ribbon is the set of toolbars across the top of Word that holds every command, organized into tabs and groups. For a tour of what each tab holds, see these Word ribbon basics. […]
How to set up a mail merge in Word: step-by-step guide for beginners - Techdows
[…] Mailings tab holds every merge command. If the ribbon is new to you, a quick look at the Word ribbon tabs and groups makes the rest of this guide easier to […]
How to get Microsoft Word as a student - Techdows
[…] Word is open, the Word ribbon basics help you find formatting, layout and review tools […]