To make columns in Microsoft Word, open the Layout tab, select Columns and pick the number of columns you want.
This guide covers two and three column layouts, columns for only part of a document, custom widths, column breaks, a line between columns, and how to remove columns again.
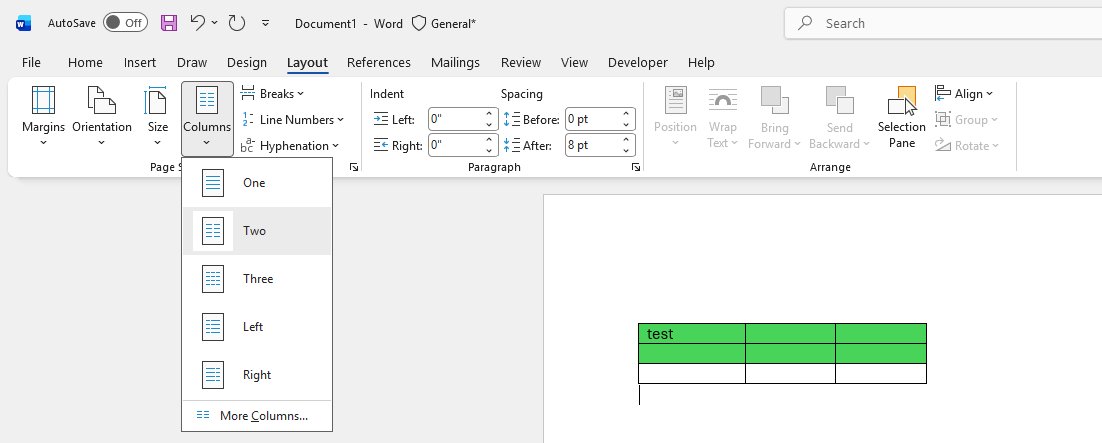
Step by step tutorial: Making columns in Microsoft Word
These steps lay out the whole document in newsletter-style columns. Text flows down the first column and continues at the top of the next one automatically.
In older versions of Word the tab is called Page Layout instead of Layout. Everything else works the same way.
- Open the document in Microsoft Word.
- Click anywhere in the text if you want the whole document in columns. To format only some paragraphs, select them first.
- Select the Layout tab on the ribbon (Page Layout in older versions).
- Select Columns.
- Choose the number of columns you want from the list.
- Choose More Columns at the bottom of the list instead if you want to set your own column format.
If the Layout tab is missing, the ribbon may be collapsed. You can show the ribbon in Word 365 and then return to step 3.
How to make two columns in Microsoft Word
Two columns is the most common layout for newsletters, brochures and handouts. Word sets the width of each column to fit the page.
- Click in the document, or select the paragraphs you want split into two columns.
- Select Layout > Columns.
- Choose the two-column option from the list.
- Scroll through the page to confirm the text now runs down the left column and continues in the right one.
To get two columns on one sheet with a short heading across the full width, select only the body paragraphs before you apply the layout. The heading stays in a single column.
How to make three columns in Microsoft Word
Three columns suit leaflets, menus, classroom worksheets and word lists, where each line of text is short. Columns get narrower as you add more, so check the margins first on a portrait page.
- Select the paragraphs you want in three columns, or click in the text for the whole document.
- Select Layout > Columns.
- Choose the three-column option from the list.
- For four or more columns, choose More Columns and enter the number you need in the Columns dialog box.
- Select OK to apply the layout.
Make part of your document into columns
You do not have to put the whole document in columns. Word applies the column layout only to the paragraphs you select, so a page can mix a single-column introduction with a two-column body.
- Select the paragraphs you want to lay out in columns.
- Select Layout > Columns.
- Choose the number of columns you want.
- Check that the text before and after your selection is still in a single column.
- Repeat with another selection to give a different part of the page a different number of columns.
If your document has more than one section, a column layout set from the Columns dialog box applies only to the current section.
Microsoft Word: make columns equal width or set custom widths
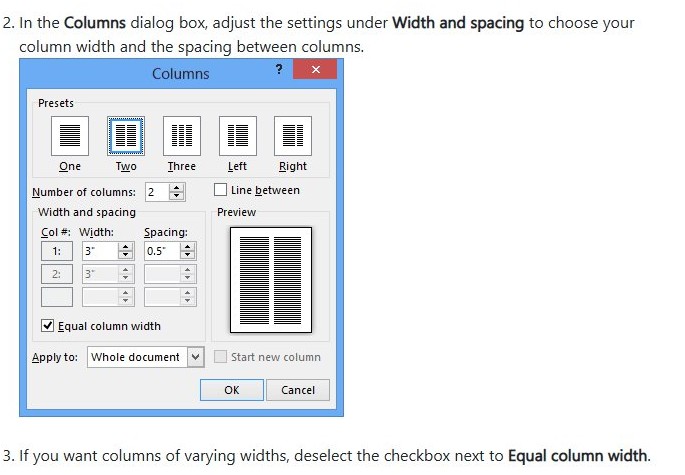
Word sets each column to an equal width by default. Use the Columns dialog box when you want a narrow sidebar column, wider gaps, or exact measurements.
- Click inside the text that is already in columns.
- Select Layout > Columns, then choose More Columns at the bottom of the list.
- Under Width and spacing, set the width of each column and the spacing between columns.
- Clear the Equal column width check box if you want columns of different widths.
- Select the Equal column width check box again if you want every column the same width.
- Select OK.
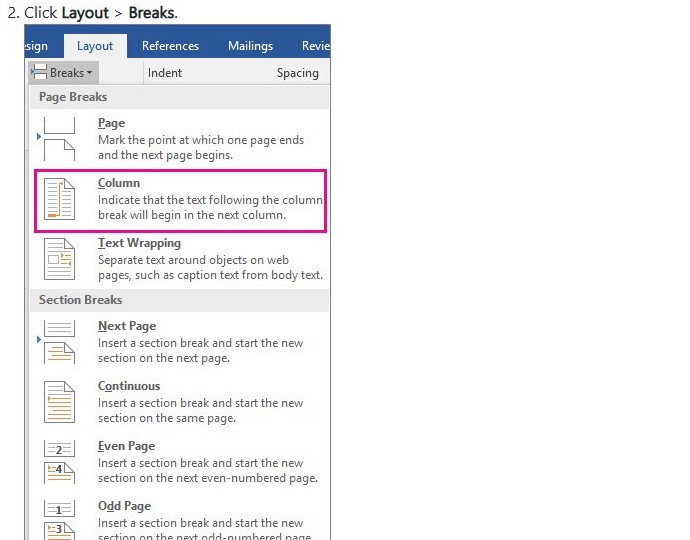
How to insert a column break in Word
Text flows from one column to the next on its own. A column break gives you control over that flow, for example to end a paragraph in one column and start the next paragraph at the top of the next column.
Microsoft documents these steps for Word for Windows in Print Layout view, including Word for Microsoft 365.
- Place your cursor where you want the column to break.
- Select Layout > Breaks.
- Select Column in the menu that opens.
- Press Ctrl + Shift + Enter instead if you prefer a keyboard shortcut; it inserts a column break at the cursor.
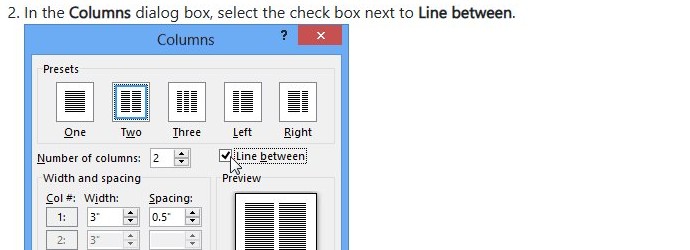
Add a line between columns in Word
A vertical line between columns makes dense newsletter text easier to follow. The setting lives in the same dialog box as the column widths.
- Click inside the text that is in columns.
- Select Layout > Columns.
- Choose More Columns at the bottom of the list.
- Select the check box next to Line between.
- Select OK.
If the document has more than one section, the line appears only in the current section. Repeat the steps in each section that needs it.
Show column breaks and check your column layout in Word
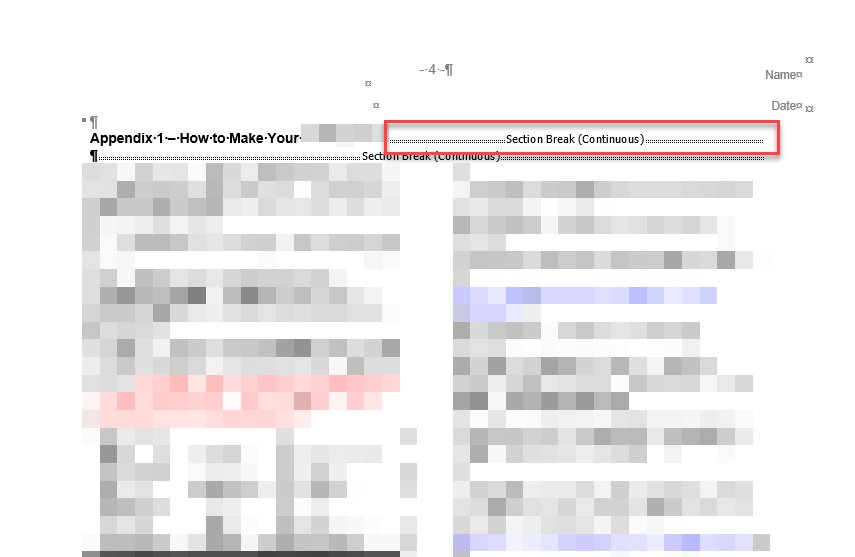
Column breaks and formatting marks are hidden by default. Turn them on to confirm where each column ends and why text jumps to the next column.
- Select the Home tab.
- Select Show/Hide to display formatting marks.
- Look for the column break mark where you placed your cursor earlier.
- Scroll through each page and confirm the text flows down one column before moving to the next.
- Select Show/Hide again to hide the marks when you finish.
How to remove columns in Microsoft Word
Removing columns returns the text to a normal single-column layout. The text itself is not changed.
- Press Ctrl + Z straight away if you only just applied the columns.
- Otherwise, select the text that is in columns, or click inside it.
- Select Layout > Columns.
- Choose the single-column option, One, at the top of the list.
- To remove a column break, select Home > Show/Hide, select the column break mark and press Delete.
Word columns not working: text, width and break fixes
Text fills the first column before anything appears in the next one
Word flows text down a column until the column is full, then continues at the top of the next one.
- Place your cursor where you want the next column to start.
- Press Ctrl + Shift + Enter to insert a column break.
- Repeat for each point where you want the text to jump.
Text jumps to the next column too early
An extra column break was inserted, often by pressing Ctrl + Shift + Enter by accident.
- Select Home > Show/Hide to display formatting marks.
- Find the column break mark at the end of the short column.
- Select the mark and press Delete.
Columns or the line between them only appear in one part of the document
The document has more than one section, and column settings apply to the current section only.
- Select all the text you want in columns.
- Select Layout > Columns > More Columns.
- Set the number of columns, widths and Line between again, then select OK.
Columns have different widths when they should match
The Equal column width check box was cleared in the Columns dialog box.
- Click inside the columns.
- Select Layout > Columns > More Columns.
- Select the Equal column width check box and select OK.
Tips for making columns in Microsoft Word
| Tip | Why it helps | Where to do it |
|---|---|---|
| Write and edit the text before you add columns | Text is easier to edit in one column, and the flow changes less once the layout is set | Apply Layout > Columns last |
| Select only the paragraphs you want in columns | Keeps titles and introductions across the full page width | Select text, then Layout > Columns |
| Use column breaks instead of blank lines | Blank lines move when you edit; a break stays where you put it | Layout > Breaks > Column or Ctrl + Shift + Enter |
| Keep column counts low on portrait pages | Narrow columns force very short lines and uneven word spacing | Choose two or three columns from Layout > Columns |
| Add a line between dense columns | Separates columns visually so readers do not skip across | More Columns > Line between |
| Check the layout with formatting marks on | Shows every column break, so stray ones are easy to delete | Home > Show/Hide |
New to the ribbon tabs used here? A quick look at the Word ribbon basics helps you find Layout and Home faster.
Columns in Microsoft Word: frequently asked questions
Can I make columns in Word?
Yes. Microsoft Word has built-in newsletter-style columns. Select Layout > Columns and choose how many columns you want, or choose More Columns to set your own widths and spacing.
How do I make 2 columns in Microsoft Word?
Click in the document or select the text, then select Layout > Columns and choose the two-column option. Word sets both columns to an equal width that fits the page, and text flows from the left column into the right one.
How do I make 3 columns in Microsoft Word?
Select the text, open Layout > Columns and choose the three-column option. For four or more columns, choose More Columns and enter the number you need in the Columns dialog box, then select OK.
How do I undo the column formatting if I change my mind?
Press Ctrl + Z right after applying columns. Later on, click inside the columns, select Layout > Columns and choose One. The text returns to a single column and none of it is deleted.
Can I add columns to only part of my document?
Yes. Select the paragraphs you want in columns before you select Layout > Columns. Word applies the layout only to that selection, so the rest of the document stays in a single column.
Is it possible to have different numbers of columns on the same page?
Yes. Select one block of paragraphs and apply, for example, two columns, then select another block and apply three. Each part keeps its own column count on the same page.
How can I ensure that my text stays within the columns I've created?
Use column breaks rather than blank lines to control where text moves. Place the cursor and press Ctrl + Shift + Enter, then turn on Home > Show/Hide to check every break is where you want it.
Can I add a line between the columns?
Yes. Click inside the columns, select Layout > Columns > More Columns, then select the Line between check box and select OK. Word draws a vertical line between each pair of columns.
How do I make columns equal width in Microsoft Word?
Open Layout > Columns > More Columns and select the Equal column width check box. Clear it instead when you want columns of different widths, then set each one under Width and spacing.
Where is the Columns button in Microsoft Word?
Columns is on the Layout tab of the ribbon. Older versions of Word call this tab Page Layout. If the ribbon is hidden, show it first, then select Layout > Columns.