To print an envelope in Word, open the Mailings tab, select Envelopes, type the delivery address, load the envelope the way the Feed box shows, and select Print.
This guide covers single envelopes on Windows and Mac, saving a return address, keeping an envelope with a letter, printing a batch from an Excel list with mail merge, and fixing envelopes that print wrong.
Step-by-step tutorial for printing envelopes in Word
These steps work in Word for Microsoft 365, Word 2024, Word 2021, Word 2019 and Word 2016 on Windows. You do not need a template or an add-in.
- Open Word and start a blank document.
- Select the Mailings tab, then select Envelopes in the Create group.
- Type the recipient's name and address in the Delivery address box.
- Type your own address in the Return address box, or tick Omit to leave it off.
- Select Options, pick your envelope in the Envelope size list, and select OK.
- Load a blank envelope into the printer exactly as the Feed picture shows.
- Select Print.
If the ribbon is collapsed or new to you, the Word ribbon basics explain how tabs like Mailings and their groups are laid out.
Which way to print envelopes in Word fits your job?
| Your situation | Use this | Why |
|---|---|---|
| One envelope, right now | Mailings > Envelopes > Print | Nothing is saved; fastest route |
| An envelope that goes out with a letter | Mailings > Envelopes > Add to Document | The envelope becomes page 1 of the letter file |
| Your address on every envelope | File > Options > Advanced > Mailing address | Word fills the return address for you each time |
| Dozens of addresses in Excel or Outlook | Mailings > Start Mail Merge > Envelopes | One envelope per row of your list |
| You use a Mac | Mailings > Start Mail Merge > Envelopes | The Mac Envelope dialog handles size through Page Setup |
| You only have Word on the web or a phone | Switch to desktop Word | Envelope printing is a desktop-only feature |
Before you start printing envelopes in Word
| What you need | Why it matters |
|---|---|
| Desktop Word on Windows or Mac | Word for the web, iPhone, iPad and Android cannot print envelopes |
| The envelope size printed on the box (for example a #10 or DL envelope) | You pick the matching entry in Envelope size, or enter Custom size dimensions |
| A printer that accepts envelopes | The printer driver tells Word which way the envelope must be loaded |
| A few spare envelopes or plain paper | One test print saves a box of misprinted envelopes |
| For a batch: an Excel sheet, Outlook contacts or a Word table of addresses | Mail merge reads names and addresses from that list |
Print one envelope in Word on Windows
Use this route when the envelope needs a specific size, font or position. It sets up the printer once so later envelopes come out right.
- On the Mailings tab, select Envelopes, then select Options.
- On the Envelope Options tab, choose your envelope in Envelope size. If it is not listed, scroll to the bottom, choose Custom size, and type the Width and Height.
- Under Delivery address and Return address, select Font to change the typeface, and adjust the left and top offsets if the text sits too close to an edge.
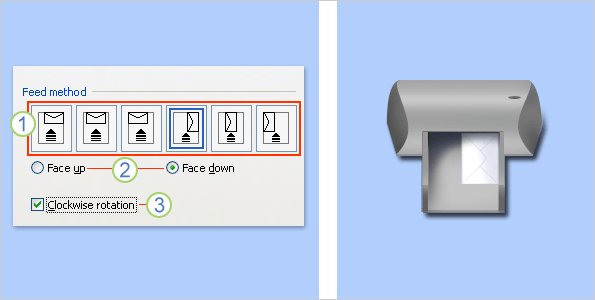
- Select the Printing Options tab and check the Feed method: left, middle or right, face up or face down, and whether the envelope is rotated.
- Select OK to return to the Envelopes dialog.
- Type the address in Delivery address. To pull it from your address book, select Insert Address.
- To change the font of just this address, select the text, right-click it, and select Font.
- Insert the envelope as the Feed box shows and select Print.
The Feed picture comes from your printer driver, not from Word. If it looks wrong for your printer, the driver is out of date or the wrong one is installed.
Save a return address in Word for Windows
Word stores one mailing address and reuses it on envelopes and labels. Set it once and the Return address box fills itself.
- Open Word and select the File tab.
- Select Options, then Advanced.
- Scroll down to the General section.
- Type your name and address in the Mailing address box.
- Select OK.
There is a second route: type your address in Return address on the envelope, select Print, and choose Yes when Word asks to save it as the default return address. To keep the saved address but skip it on one envelope, tick Omit.
Save the envelope with a letter
Add to Document puts the envelope at the top of the current file as page 1. Type the letter on the pages after it, and both print and save together.
- On the Mailings tab, select Envelopes.
- Fill in Delivery address and Return address.
- Select Add to Document.
- Type or paste your letter on page 2.
- Select File > Save As and give the document a name.
- When you are ready to print, load an envelope as shown on the Printing Options tab and select Print.
The envelope page also takes pictures, so this is the route for a company logo: select the envelope page, then use Insert > Pictures and drag the logo next to the return address.
Print an envelope in Word on a Mac
Word for Mac sets the envelope size through Page Setup instead of an Envelope size list. The same Envelope dialog handles one envelope or a merged batch.
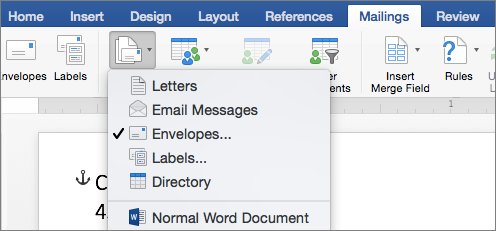
- Open a blank document and select Mailings > Start Mail Merge > Envelopes.
- In the Envelope dialog, under Return Address, choose whether to use your address.
- Under Printing Options, select Page Setup.
- Choose your envelope in the Paper Size list. If none matches, choose Landscape, then select OK.
- Select OK to close the Envelope dialog.
- Click the Drag fields into this box or type text box, delete the placeholder, and type the delivery address.
- Load the envelope and select File > Print.
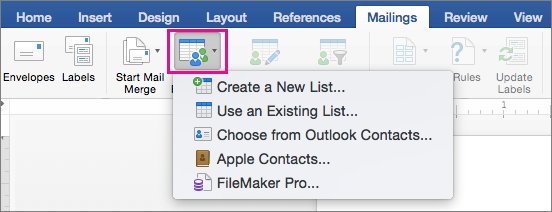
For a batch on a Mac, skip typing the address in step 6. Use Mailings > Select Recipients to pick your list, then Insert Merge Field to place name and address fields in that box.
Print many envelopes with mail merge
Mail merge prints one envelope per row of a list, such as an Excel sheet or your Outlook contacts. Test one envelope first, then merge.
In Excel, keep every address on the first sheet, give each column a clear header such as First Name or ZIP, and format the ZIP or postal code column as text so leading zeros survive.
- Select Mailings > Start Mail Merge > Envelopes.
- In Envelope Options, confirm the size and feed settings, then select OK. Add a return address or logo now if you want one.
- Select Mailings > Select Recipients and choose your Excel file, Outlook contacts or a new list.
- Click where the recipient's address should sit. Press Ctrl + Shift + 8 to show paragraph marks if the spot is hard to see.
- Select Address Block, pick a name format in Insert Address Block, and select OK.
- Use Next and Previous to step through a few records and check them.
- Select Finish & Merge > Print Documents.
- Select File > Save to keep the envelope linked to your list.
When you reopen the saved file, choose Yes to keep the connection to the list. The same mail merge steps in Word drive letters and labels too.
How to check a Word envelope will print correctly
Run this test before a full box of envelopes goes through the printer.
- On the Mailings tab, select Envelopes and type test text in Delivery address.
- Load one envelope, or a sheet of paper cut to envelope size, exactly as the Feed box shows.
- Select Print.
- Check that the address is the right way up, on the front, and centred where you expect it.
- Check that the return address sits in the top-left corner and is not cut off.
- If anything is off, change the Printing Options tab settings and print again until the result is right.
Tips for printing envelopes in Word
| Tip | Why it helps |
|---|---|
| Match Envelope size to the printed size on the box | A wrong size shifts the address off-centre or off the edge |
| Use Custom size for unusual envelopes | Word accepts any width and height the printer can feed |
| Print one test envelope before a batch | Feed direction and face up or down vary by printer |
| Use the printer's manual feed tray or slot for envelopes | Most jams come from feeding thick envelopes through the paper tray |
| Set font and colour with Font | Colour prints only if the printer has colour ink or toner |
| Add a logo with Add to Document, then Insert > Pictures | The Envelopes dialog itself takes text only |
| Save the merge document | It stays linked to your list for the next mailing |
| Format ZIP codes as text in Excel | Leading zeros otherwise disappear in the merge |
Word for the web and mobile limitations
| Word version | Print envelopes? | What to do instead |
|---|---|---|
| Word for Microsoft 365, 2024, 2021, 2019, 2016 (Windows) | Yes, through Mailings > Envelopes | Use the steps above |
| Word for Mac | Yes, through Mailings > Start Mail Merge > Envelopes | Use the Mac steps above |
| Word for the web (Word online) | No; it keeps merge settings but cannot run a merge or edit them | Open the file in desktop Word |
| Word on iPhone, iPad and Android | No | Print from Word on a computer |
Fix common envelope-printing problems
Why won't my envelopes print in Word?
The wrong printer, an outdated driver, or a feed setting the printer does not support.
- Check that the correct printer is selected in File > Print.
- Update the printer driver from the printer maker's own website or Windows Update.
- Open Mailings > Envelopes > Options > Printing Options and confirm the Feed method.
- Print one test envelope.
Address prints upside down or on the back
The envelope was loaded differently from the Feed picture.
- Open Options > Printing Options.
- Note whether it shows Face up or Face down and where the flap goes.
- Reload the envelope to match, or change the setting to match how your printer feeds.
- If the envelope goes in short edge first, try the rotate option so the text turns the right way.
Address is off-centre or cut off
The Envelope size does not match the real envelope, or the offsets are wrong.
- Measure the envelope.
- In Envelope Options, pick the matching size or enter it under Custom size.
- Adjust the left and top offsets for Delivery address.
- Print a test on plain paper and hold it against an envelope.
Envelopes jam in the printer
Thick or curled envelopes fed through a tray meant for paper.
- Check the printer manual for the envelope tray or slot and supported envelope weights.
- Flatten the envelopes and load a small stack.
- Load them exactly as the Feed box shows, flap direction included.
ZIP codes lose their leading zero in a mail merge
Excel stored the ZIP codes as numbers.
- Open the spreadsheet in Excel.
- Format the ZIP or postal code column as text and re-enter any shortened codes.
- Save and close the file, then reconnect it with Select Recipients.
Printing envelopes in Word: frequently asked questions (FAQ)
Can I print envelopes in Word?
Yes. Desktop Word on Windows prints envelopes from Mailings > Envelopes, and Word for Mac prints them through Mailings > Start Mail Merge > Envelopes. Type the delivery address, choose the size, load the envelope as Word shows, and print.
How do I print envelopes in Word 365?
In Word for Microsoft 365, open the Mailings tab, select Envelopes, type the delivery and return addresses, pick the size under Options, and select Print. The steps are the same in Word 2024, 2021, 2019 and 2016.
Is there a Word 2025 with a different envelope feature?
No. There is no Word 2025. The current versions are Word for Microsoft 365 and Word 2024, and both use the same Mailings > Envelopes dialog as Word 2016 onwards.
How do I print envelopes in Word from Excel?
Use mail merge. Select Mailings > Start Mail Merge > Envelopes, then Select Recipients and choose your Excel file. Insert an Address Block, preview a few records, and select Finish & Merge > Print Documents.
Can I print envelopes in Word online?
No. Word for the web cannot print envelopes or run a mail merge. It keeps merge settings in a file, but you must open the document in desktop Word to create or print envelopes.
Why can't I print envelopes from Word?
Usually you are in Word for the web or a mobile app, which lack envelope printing. In desktop Word, the cause is often the wrong printer, an outdated driver, or a Feed method that does not match how the envelope is loaded.
How do I print envelopes in Word with an address from my contacts?
Open Mailings > Envelopes and select Insert Address next to Delivery address. Word pulls the entry from the electronic address book on your computer, and the same button works for the Return address box.
Can I save an envelope for future use?
Yes. Select Add to Document in the Envelopes dialog, then save the file. The envelope stays as page 1. For batches, save the mail merge document, which stays linked to your address list.
Can I print envelopes in color using Word?
Yes, if your printer prints in colour. Select the address text, right-click it, choose Font, and set a font colour. A logo added on the envelope page also prints in colour.
What if I need a custom envelope size?
Open Mailings > Envelopes > Options. In Envelope size, scroll to the bottom, choose Custom size, and type the Width and Height. On a Mac, set the size in Page Setup instead.
The bottom line on printing envelopes in Word
Use Mailings > Envelopes for one envelope, Add to Document when it goes with a letter, and mail merge for anything from a list. All three use the same size and feed settings, so one test print on plain paper fixes the layout for every envelope after it.