To change scaling for a specific app in Windows 11, open the app's .exe Properties, go to the Compatibility tab, open the high DPI settings, turn on Override high DPI scaling behavior, and pick Application, System or System (Enhanced).
This guide explains what each option does, the other nine ways to fix an app that looks blurry, tiny or oversized, and which scale values suit different displays.
How to change scaling for specific apps in Windows 11
This override applies to one desktop app only. Every other app keeps the scale set in Settings > System > Display.
- Select Start, type the app's name, right-click it in the results and select Open file location.
- Right-click the app's shortcut or .exe file and select Properties.
- Select the Compatibility tab, then open the high DPI settings under Settings.
- Check Override high DPI scaling behavior.
- Under Scaling performed by, choose Application, System or System (Enhanced).
- Select OK, then Apply and OK in the Properties window.
- Close the app completely and open it again to see the new scaling.
If the shortcut opens a launcher that then starts the real program, as many games do, apply the change to the program's own .exe file instead.
Understanding scaling in Windows 11
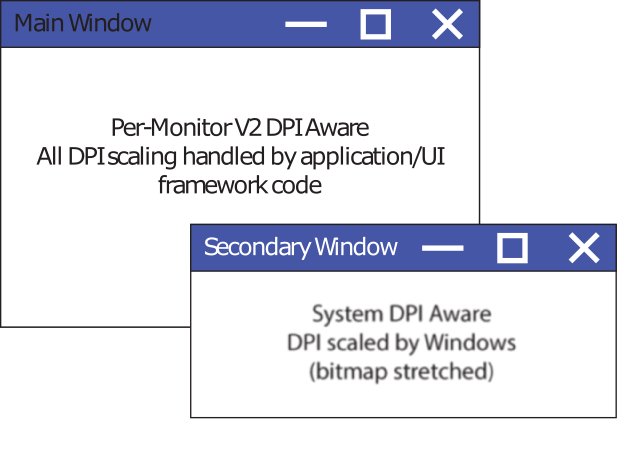
Windows measures scale against 96 dots per inch: 100% equals 96 DPI and 125% equals 120 DPI. How sharp an app looks depends on how it tells Windows it handles DPI.
| DPI awareness mode | How the app sizes itself | What you see |
|---|---|---|
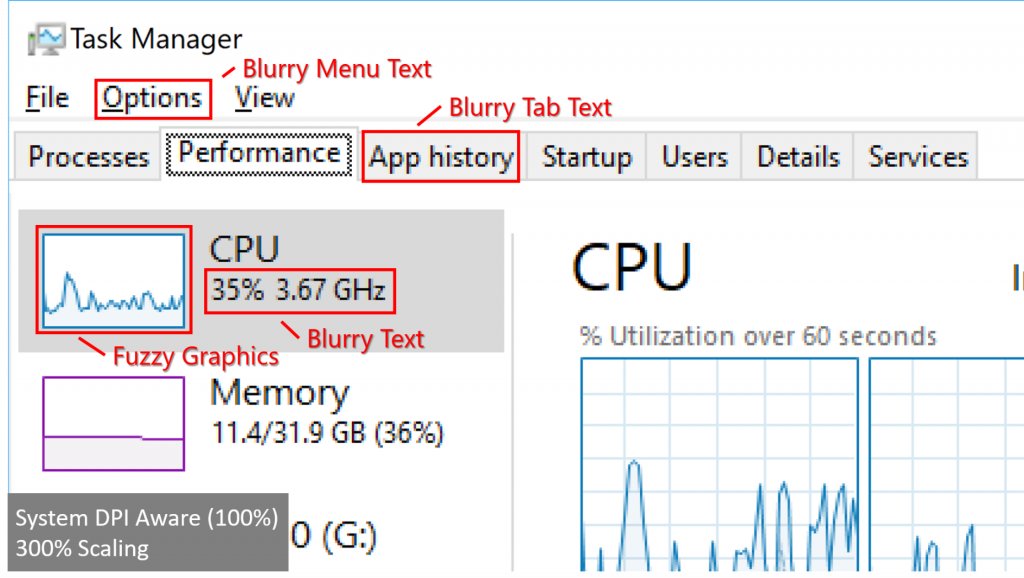
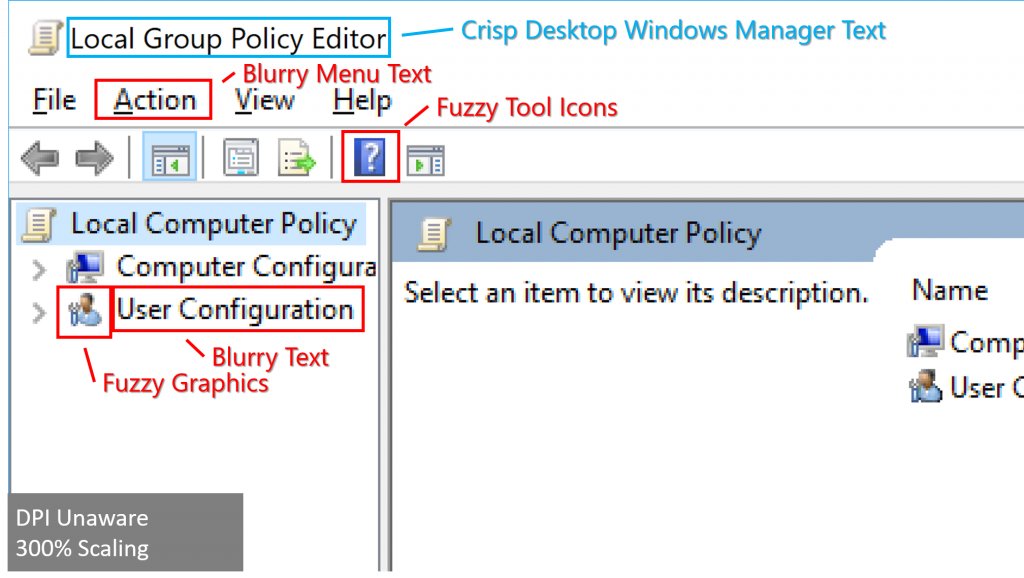
| DPI unaware | Always draws at 96 DPI (100%) | Windows stretches the window to the right size, so text looks blurry above 100% |
| System DPI aware | Uses the primary display's scale from when you signed in | Sharp on that display, blurry on a display with a different scale or after a scale change |
| Per-Monitor (V1) | Redraws for each display, with limited help from Windows (Windows 8.1 and later) | Sharp if the app handles every change itself |
| Per-Monitor V2 | Redraws for each display, never bitmap-stretched (Windows 10 version 1703 and later) | Sharp everywhere, but the app may look too small or large if it ignores the change |
Most desktop apps run as system DPI aware, which is why they turn blurry when you dock a laptop or move them to a second monitor.
Why you need per-app scaling
Fix the one misbehaving app instead of changing the scale for the whole PC. Microsoft's own workaround for apps that scale badly says to configure the specific app, because changing the global display scale affects every other desktop app and can make content too small to use. A per-app override leaves Windows, File Explorer and your well-behaved apps exactly as they were.
Method 1: Change compatibility settings (most effective method)
The three choices under Scaling performed by behave very differently. Pick the row that matches what is wrong with the app.
| Choose this | What Windows does | Use it when |
|---|---|---|
| Application | Forces the app to run per-monitor DPI aware, so Windows never stretches it. This option used to be called Disable display scaling on high-DPI settings | The app looks blurry and you would rather have it sharp, even if its text turns small |
| System | Uses the standard handling for system-DPI-aware apps and stretches the window when DPI changes | The app looks tiny or its layout breaks, and you accept softer text in exchange for the right size |
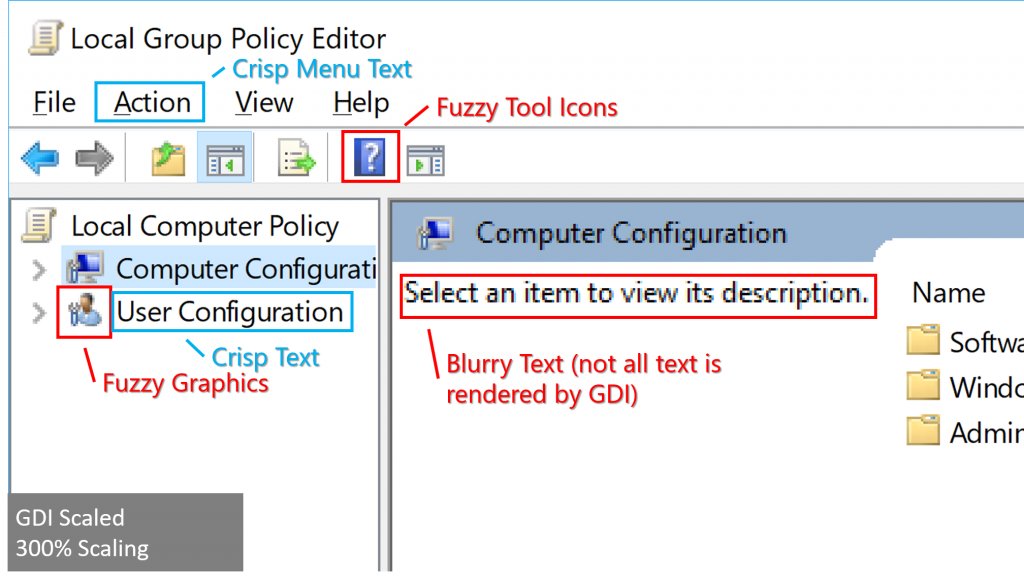
| System (Enhanced) | Turns on GDI scaling, which redraws text and basic shapes sharply at the current scale | An older GDI-based app is blurry. Images inside it stay soft, and it does not help DirectX or GDI+ content |
System (Enhanced) is not offered for apps that ship with Windows, and system apps have no Compatibility tab at all. Try Application first for a blurry app, then System (Enhanced) if the result is too small.
Method 2: Use Windows display settings (indirect control)
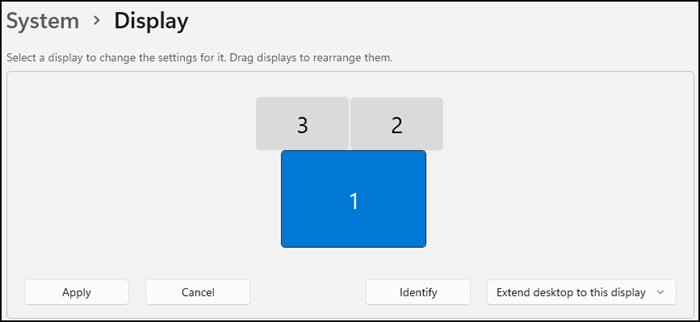
Windows 11 sets scale per display, not per app. With two monitors you can set a different scaling level for each monitor and keep a given app on the display that suits it.
- Select Start > Settings > System > Display.
- Select the display you want to change at the top of the page.
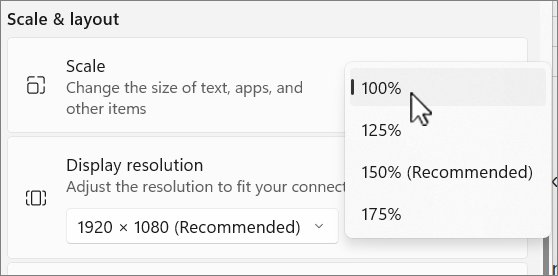
- Scroll to Scale & layout.
- Open the Scale list and choose a value. The one marked (Recommended) is usually best.
- Drag the app to the display whose scale suits it.
- Sign out and back in if the app still looks blurry after the change.
Method 3: Use custom scaling value
Custom scaling applies to the whole display, and Microsoft does not recommend it. Use it only when none of the preset display scale settings work for you.
- Open Settings > System > Display.
- Expand the Scale settings under Scale & layout.
- Enter a custom scaling size between 100 and 500 percent.
- Confirm the value, then sign out and back in so every app picks it up.
- To turn off custom scaling, return to the same page and pick a preset value from the Scale list.
Method 4: Adjust text size only
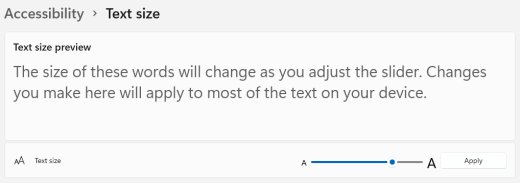
Changing the text size enlarges text in title bars, menus and icon labels, without enlarging images or app layouts.
- Press Windows logo key + U, or select Start > Settings > Accessibility.
- Select Text size.
- Drag the Text size slider to the right until the sample text is comfortable.
- Select Apply.
This is a system-wide setting, so it suits you when text is too small everywhere rather than in one app.
Method 5: Modify DPI awareness via registry (advanced)
Windows 11 Pro, Enterprise and Education have policies that switch GDI scaling or per-process system DPI on for named apps. The policies write to the registry key HKEY_LOCAL_MACHINE\Software\Policies\Microsoft\Windows\Display, so set them in Group Policy rather than by hand.
- Press Win + R, type
gpedit.mscand press Enter. - Go to Computer Configuration > Administrative Templates > System > Display.
- Open Turn on GdiDPIScaling for applications and select Enabled.
- Enter each app as a full path or a file name with extension, such as
app.exe. Separate several apps with a semicolon. - Select OK, restart the app, and check that its text is sharp.
- To stop an app from ever using GDI scaling, list it in Turn off GdiDPIScaling for applications instead. That policy wins over the System (Enhanced) setting and the app's manifest.
Configure Per-Process System DPI settings in the same folder lets a blurry app become sharp after a restart instead of a sign-out. It only helps apps on the primary display.
Method 6: Use compatibility troubleshooter
- Select Start > Settings > System > Troubleshoot > Other troubleshooters.
- Find Program Compatibility Troubleshooter and select Run.
- Pick the app that scales badly from the list.
- Follow the on-screen instructions and test the settings it suggests.
Microsoft suggests the troubleshooter for apps that have no updates and show glitches such as flickering windows.
Method 7: Change app-specific settings (if available)
Some apps have their own scaling options inside the app, and Microsoft points to them when the app has no Compatibility tab.
| App | Setting | What it does |
|---|---|---|
| Word, Excel, PowerPoint, Outlook | File > Options > General > User Interface Options > When using multiple displays > Optimize for compatibility | Stops Office from rescaling itself per display, which fixes blurry text on mixed-scale monitors |
| Visual Studio | Restart Visual Studio with 100% scaling on the yellow information bar, or run devenv /noScale |
Runs Visual Studio as DPI unaware at 100% so the Windows Forms Designer lays out correctly |
| Games and other apps with no Compatibility tab | Display, graphics or high-DPI options inside the app | Microsoft advises checking the app's own options for a way to turn off high-DPI scaling |
Method 8: Use graphics settings for scaling behavior
Settings > System > Display > Graphics holds per-app options, but none of them change DPI scaling. They control which GPU an app uses and how windowed games are presented.
- Select Start > Settings > System > Display > Graphics.
- Under Custom options for apps, select the app or game and select Options.
- Choose Let Windows decide (Power saving), Power saving or High performance if the PC has more than one GPU.
- Turn Optimizations for windowed games off for that app if it misbehaves in a window.
- Select Save and restart the app.
Use Method 1 for the size or sharpness of the app itself. GPU scaling is a separate setting in the graphics card's own control panel, not part of Windows DPI scaling.
Method 9: Disable fullscreen optimization
Full-screen games can bypass Windows output scaling, which leaves the pointer and the picture out of step. Turning off fullscreen optimizations for the game's .exe is a standard fix from Xbox Support.
- Open the folder that holds the game's .exe file, not the launcher.
- Right-click the .exe and select Properties.
- Select the Compatibility tab.
- Check Disable fullscreen optimizations.
- Select Apply, then OK, and start the game again.
Method 10: Update the app or use alternative versions
Microsoft recommends that desktop developers move their apps to per-monitor DPI awareness, so a newer release often fixes scaling outright.
- For a Microsoft Store app, open Microsoft Store and check for app updates there.
- For any other app, check the publisher's website for a newer version that lists Windows 11 support.
- Install the update and test the app at your normal scale.
- If the publisher offers a newer edition of the program, try it before you keep a compatibility override in place.
Common scaling problems and fixes
Apps appear small on high DPI displays
The app runs per-monitor aware or with the Application override but does not resize its own layout.
- Open the app's Properties > Compatibility tab and its high DPI settings.
- Change Scaling performed by to System or System (Enhanced).
- Restart the app.
An app is blurry after docking, undocking or changing scale
System-DPI-aware apps keep the scale from when you signed in, so Windows stretches them after the change.
- Sign out of Windows and sign back in.
- If the app is still blurry, apply the Application override from Method 1.
An app is blurry only on the second monitor
The two displays use different scale values.
- Set both displays to the same scale. If one recommends 150% and the other 100%, try 125% on both.
- Sign out and back in.
- For Office apps, also turn on Optimize for compatibility.
Mouse clicks land in the wrong place in a game
The game runs full screen or uses raw mouse input, so Windows scales only the input or only the picture.
- Open the game's own .exe Properties > Compatibility tab.
- Set the high DPI override to Application.
- Start the game again.
System (Enhanced) or the Compatibility tab is missing
Apps that ship with Windows do not offer System (Enhanced), and system apps have no Compatibility tab.
- Use the app's own zoom or display options instead.
- Adjust Text size or the display Scale for a system-wide fix.
Best scaling settings for different displays
| Display | Scale to use | Why |
|---|---|---|
| Any single display | The value marked (Recommended) | Microsoft says this is typically the best choice for scale and for resolution |
| Laptop plus an external monitor with different recommendations | The same value on both, such as 125% between 100% and 150% | Apps that are not per-monitor aware stay sharp on both displays |
| 4K or 8K display | Up to 500%, from the preset list | Windows supports scale factors of 100% to 500% for high-density panels |
| Text too small but layout fine | Leave Scale alone and raise Text size | Only text grows, so app layouts do not change |
| No preset fits | Custom scaling between 100% and 500% | Last resort only, since Microsoft does not recommend custom scale |
Keep the display resolution at the value marked (Recommended) as well. A lower resolution makes text less sharp before scaling is even applied.
Pro tips for better scaling experience
| Tip | Why it matters |
|---|---|
| Apply the override to the real program, not the launcher | Many games start a launcher first, and a setting on the launcher never reaches the game |
| Check for a Turn off GdiDPIScaling policy on work PCs | That policy disables GDI scaling for the listed apps regardless of the System (Enhanced) setting |
| Expect per-process system DPI to help on the primary display only | Apps on a secondary display with a different scale can still look blurry |
| Turn per-process system DPI off again if an app acts oddly | Microsoft notes some desktop apps behave unexpectedly with it, and says to disable it in that case |
| Run Visual Studio at 100% only while you design forms | Restarting it normally returns it to DPI aware, which keeps other designers sharp |
Changed resolution, now black screen on Windows 11
A resolution the monitor cannot show leaves the screen blank. These steps come from Microsoft's blank screen guidance and fix this one cause, while other black screen problems in Windows 11 need different fixes.
The screen went black right after you picked a new resolution
The display cannot show the resolution or refresh rate you selected.
- Press Windows + Ctrl + Shift + B to reset the graphics driver. A beep or flicker means it worked.
- Press Windows + P, then P again and Enter, to cycle through display modes.
- Once the picture is back, open Settings > System > Display and choose the resolution marked (Recommended).
The screen stays black after a restart
Windows keeps loading the unsupported mode, or the graphics driver fails with it.
- Hold the power button for 10 seconds to shut down, and repeat 2 to 3 times until Windows opens recovery.
- Go to Troubleshoot > Advanced Options > Startup Settings > Restart, then press F5 for Safe Mode with Networking.
- Set the display resolution back to (Recommended) in Settings.
- If the problem began after a driver update, open Device Manager, right-click the GPU under Display adapters and select Roll back driver.
How to tell if an app is DPI aware in Windows 11
- Set the display Scale above 100%, for example 150%.
- Open the app and look closely at its menu text next to a Windows menu such as File Explorer's.
- Fuzzy text that looks enlarged means Windows is stretching the app, so it is DPI unaware or system aware.
- Drag the app between two displays with different scales. Text that stays crisp on both means the app is per-monitor aware.
- After an override, repeat the same check to see whether the text is now sharp.
Per-app scaling in Windows 11 FAQ
How do I scale apps in Windows 11?
Select Start > Settings > System > Display and pick a value in the Scale list to resize every app. To change one app only, open its .exe Properties, go to the Compatibility tab and override high DPI scaling behavior.
Does Windows 11 fix scaling?
Partly. Windows stretches apps that are not DPI aware so they appear the right size, but stretched apps look blurry. Per-app overrides, GDI scaling and app updates fix the blur for many older programs.
How do I turn off custom scaling?
Open Settings > System > Display and choose a preset value from the Scale list, such as the one marked (Recommended). Sign out and back in so every app returns to the preset scale.
How do I change display scaling?
Open Settings > System > Display, select the display at the top, then open the Scale list under Scale & layout and choose a value. Some apps need a sign-out before they pick up the new scale.
How do I fix custom scaling?
Return to a preset Scale value, since Microsoft does not recommend custom scaling. If an app is still blurry afterwards, sign out and back in, then use the per-app high DPI override for that app.
How does scaling work in Windows?
Windows treats 96 DPI as 100% and enlarges text, apps and other items by the scale you choose. DPI-aware apps redraw themselves at that size, and other apps are bitmap-stretched, which can make them blurry.
How do I change scaling for specific apps in Windows 10?
The steps match Windows 11. Open the app's .exe Properties, select the Compatibility tab, open the high DPI settings and choose Application, System or System (Enhanced) under Override high DPI scaling behavior.
How do I change scaling in Excel?
Excel follows the Windows display scale. If it looks blurry on a second monitor, go to File > Options > General and set When using multiple displays to Optimize for compatibility, then restart Excel.