To screenshot on an iPad, quickly press and release the top button and either volume button at the same time; on an iPad with a round Home button, press the top button and the Home button together instead.
This guide shows which buttons every iPad model uses, plus Apple Pencil, keyboard and AssistiveTouch methods, full-page captures, editing, sharing and fixes.
The fastest way to screenshot on any iPad
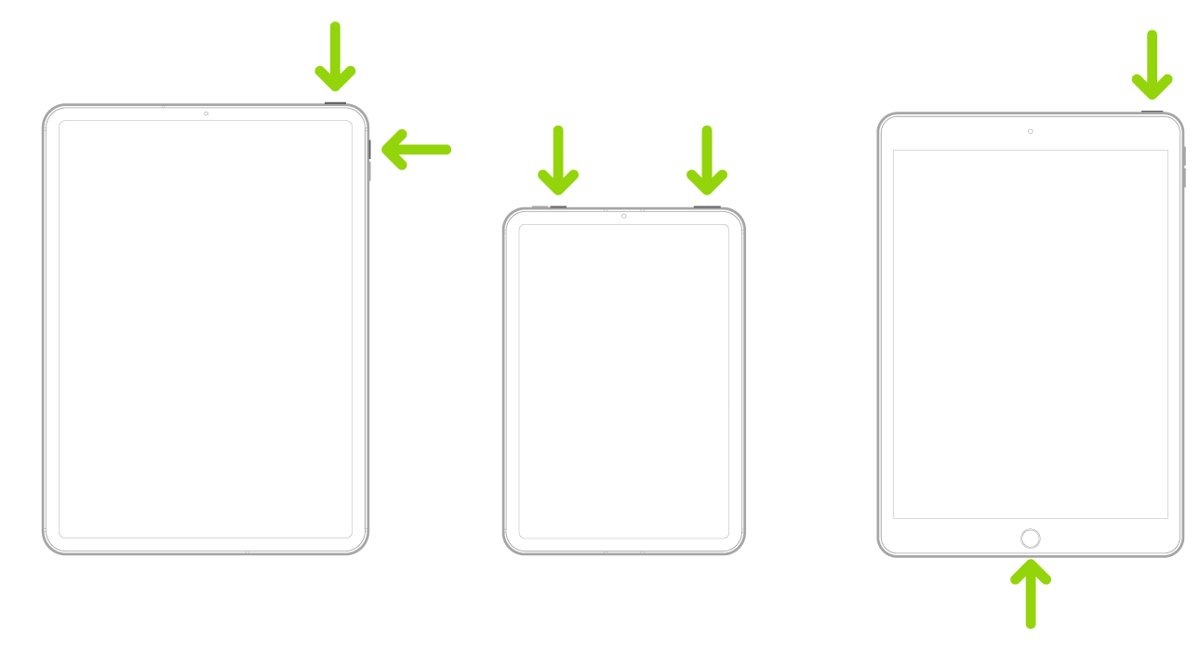
- Look below the screen: a round button there means your iPad has a Home button.
- No Home button: press the top button and either volume button at the same time.
- Home button: press the top button and the Home button at the same time.
- Release both buttons quickly.
- Swipe the preview left to save it, or tap it to edit.
Holding the buttons too long does something else, such as Siri or the power-off slider. A quick press and release is the trick.
Quick Reference: iPad Screenshot Methods
| Method | How | Best for |
|---|---|---|
| Buttons, no Home button | Top button + volume button | iPad Pro with Face ID, iPad Air 4th gen and later, iPad mini 6th gen and later, iPad 10th gen and A16 |
| Buttons, Home button | Top button + Home button | iPad 9th gen and earlier, iPad mini 5th gen and earlier, iPad Air 3rd gen and earlier |
| Apple Pencil | Swipe up diagonally from a lower corner | Drawing or note-taking without reaching for buttons |
| Keyboard | Command-Shift-3, or Command-Shift-4 to open Markup | iPad with a Magic Keyboard or any external keyboard |
| AssistiveTouch | On-screen menu with a Screenshot action | Broken buttons or one-handed use |
| Siri | Ask Siri to take a screenshot | Hands-free capture |
Which buttons does your iPad model use?
Apple's own model list shows where each iPad keeps Touch ID or Face ID. A Touch ID sensor in the Home button means the Home button method; anything else means top button plus volume.
| Model | Has a Home button? | Screenshot buttons |
|---|---|---|
| iPad (A16), iPad (10th generation) | No | Top + volume |
| iPad (5th to 9th generation) | Yes | Top + Home |
| iPad mini (A17 Pro), iPad mini (6th generation) | No | Top + volume |
| iPad mini (5th generation), mini 4, mini 3 | Yes | Top + Home |
| iPad Air 11-inch and 13-inch (M2, M3, M4), Air 5th and 4th generation | No | Top + volume |
| iPad Air (3rd generation), iPad Air 2 | Yes | Top + Home |
| iPad Pro 11-inch and 13-inch (M4, M5), Pro 12.9-inch 3rd gen and later, Pro 11-inch all generations | No | Top + volume |
| iPad Pro 12.9-inch 1st and 2nd gen, Pro 10.5-inch, Pro 9.7-inch | Yes | Top + Home |
How to Screenshot on an iPad Without a Home Button
- Open the screen you want to capture.
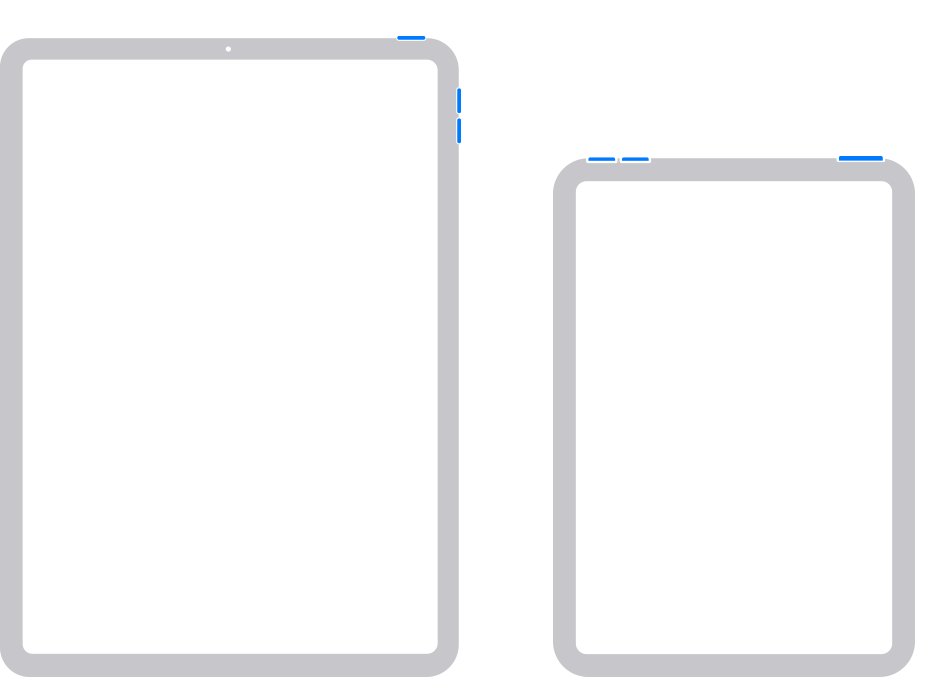
- Press the top button and either volume button at the same time.
- Release both buttons quickly.
- Look for the screenshot preview; it is saved to Photos when you dismiss it.
How to Screenshot on an iPad With a Home Button
- Open the screen you want to capture.
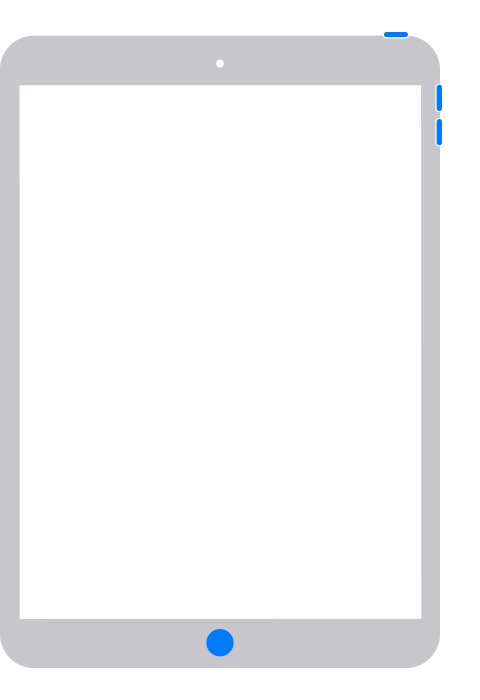
- Press the top button and the Home button at the same time.
- Release both buttons quickly.
- Tap the thumbnail in the lower-left corner to open it, or swipe it left to dismiss and save.
How to Screenshot Using Apple Pencil
This works on iPad models that support Apple Pencil, without touching any buttons.
- Pair your Apple Pencil with the iPad.
- Place the Pencil tip near the bottom-left or bottom-right corner of the screen.
- Swipe up diagonally toward the middle of the screen.
- Tap the preview to edit it, or swipe it away to save it to Photos.
How to Screenshot Using AssistiveTouch
AssistiveTouch puts a floating button on screen that can replace hardware buttons, including for screenshots.
- Open Settings > Accessibility > Touch > AssistiveTouch and turn on AssistiveTouch.
- Tap Customize Top Level Menu.
- Tap an icon and assign the screenshot action to it.
- Tap the floating AssistiveTouch button, then tap the screenshot action.
You can also open AssistiveTouch from the Accessibility Shortcut, or say "Turn on AssistiveTouch" to Siri.
How to Screenshot on iPad With a Keyboard
- Connect a Magic Keyboard, Smart Keyboard or any Bluetooth keyboard.
- Press Command-Shift-3 to take a screenshot of the whole screen.
- Press Command-Shift-4 to take a screenshot and open it in Markup immediately.
- Find the screenshot in Photos, or edit it from the preview.
How to Take a Full-Page Screenshot on iPad
Full Page captures content beyond the edge of the screen, such as an entire Safari webpage.
- Open the long page, for example in Safari.
- Take a screenshot with the buttons, Pencil or keyboard.
- Tap the screenshot preview.
- Tap Full Page.
- Drag your finger or Apple Pencil on the preview on the right to scroll through the capture.
- Crop to a smaller portion if you need one, then tap the save button.
How to Edit a Screenshot on iPad
- Tap the screenshot preview right after you take it.
- Drag the corner handles to crop.
- Tap the Markup button and draw, highlight or add text and shapes.
- Tap the delete button if you want to discard it instead.
- Tap the save button to keep the edited version in Photos.
To edit an older screenshot, open it in Photos and use the editing tools there.
Where iPad Screenshots Are Saved
Screenshots save automatically to your photo library.
- Open the Photos app.
- Tap Collections.
- Scroll down to Media Types and tap Screenshots.
- Confirm your newest screenshot is at the end of the album.
How to Share a Screenshot
- Tap the screenshot preview straight after taking it.
- Tap the Share button.
- Choose Messages, Mail, AirDrop or another app.
- Send it, then save or delete the screenshot.
For older screenshots, open the Screenshots album in Photos, select the image and use the Share button there.
How to Copy and Paste a Screenshot Without Saving It
Send the capture straight into the app that needs it, then throw away the original so it never clutters Photos.
- Take the screenshot and tap the preview.
- Tap the Share button and pick the app where you want it, such as Notes or Mail.
- Finish placing it in that app.
- Back in the screenshot editor, tap the delete button and confirm so it is not saved to Photos.
How to Take Multiple Screenshots Quickly
By default each screenshot opens a full-screen preview. Switching to thumbnails keeps you in the app so you can capture again straight away.
- Open Settings > General > Screen Capture.
- Turn off Full-Screen Previews.
- Take screenshots one after another with the buttons or Command-Shift-3.
- Swipe thumbnails left, or ignore them; every capture saves to Photos.
How to Screenshot Apps, Videos, and Protected Content
| What you capture | What to expect |
|---|---|
| Any app or the Home Screen | The button, Pencil and keyboard methods work the same everywhere |
| A long page in Safari | Use Full Page to capture beyond the screen |
| A moving video or game | Press the buttons at the frame you want; a screen recording suits motion better |
| Objects and places in a shot | Turn on Automatic Visual Look Up in Settings > General > Screen Capture on supported models |
Troubleshooting: Why Your iPad Screenshot Is Not Working
Siri or the power-off slider appears instead
You held the buttons too long; holding the top button activates Siri or power options.
- Press both buttons at exactly the same moment.
- Release them immediately.
Pressing the buttons does nothing
A button may be faulty, or you are using the wrong combination for your model.
- Check the model table above for your iPad's combination.
- Use AssistiveTouch, Apple Pencil or Command-Shift-3 instead.
- If a button no longer works at all, set up a repair with Apple.
You can't find the screenshot
It saved to the photo library, not the Files app.
- Open Photos > Collections > Media Types > Screenshots.
A full-screen preview interrupts every capture
Full-Screen Previews is on by default.
- Go to Settings > General > Screen Capture and turn off Full-Screen Previews.
Tips for Better iPad Screenshots
| Tip | Why |
|---|---|
| Crop before saving | Removes the status bar and anything private |
| Mark up personal details | Cover names, addresses or codes before sharing |
| Use Full Page for receipts and articles | One image instead of several |
| Use Command-Shift-4 for instant notes | Opens Markup straight away |
| Delete screenshots you have shared | Keeps Photos and iCloud storage tidy |
| On a Windows PC | See how to take a screenshot on Windows 11 |
Frequently Asked Questions
How do I screenshot on iPad Pro?
Every iPad Pro with Face ID has no Home button, so press the top button and either volume button at the same time. Older iPad Pro models with a Home button, such as the 10.5-inch and 9.7-inch, use the top and Home buttons.
How do I screenshot on iPad mini?
On iPad mini (6th generation) and iPad mini (A17 Pro), press the top button and a volume button. On iPad mini (5th generation) and earlier, press the top button and the Home button.
How do I screenshot on iPad 9th generation?
The iPad (9th generation) has a Home button. Press the top button and the Home button at the same time, then release them quickly.
How do I screenshot on iPad 10th generation?
The iPad (10th generation) has no Home button. Press the top button and either volume button at the same time, then release both.
How do I screenshot on iPad 5th generation?
The iPad (5th generation) has a Home button, so press the top button and the Home button together and release them quickly.
How do I screenshot on a 13-inch iPad?
The 13-inch iPad Pro and iPad Air models have no Home button. Press the top button and either volume button at the same time.
Can I take a screenshot on iPad without buttons?
Yes. Swipe up diagonally from a lower corner with Apple Pencil, press Command-Shift-3 on a keyboard, use the Screenshot action in AssistiveTouch, or ask Siri.
Where do screenshots go on iPad?
They save to the Photos app. Open Photos, tap Collections, scroll to Media Types and tap Screenshots to see them all in one album.