CSM support is the firmware option that lets a UEFI PC boot in legacy BIOS mode through a Compatibility Support Module, and you enable or disable it from the BIOS menus.
Below are the exact steps, how to choose the right setting, how to avoid an unbootable PC when you turn CSM off, and fixes for the Secure Boot and BIOS update errors that often follow.
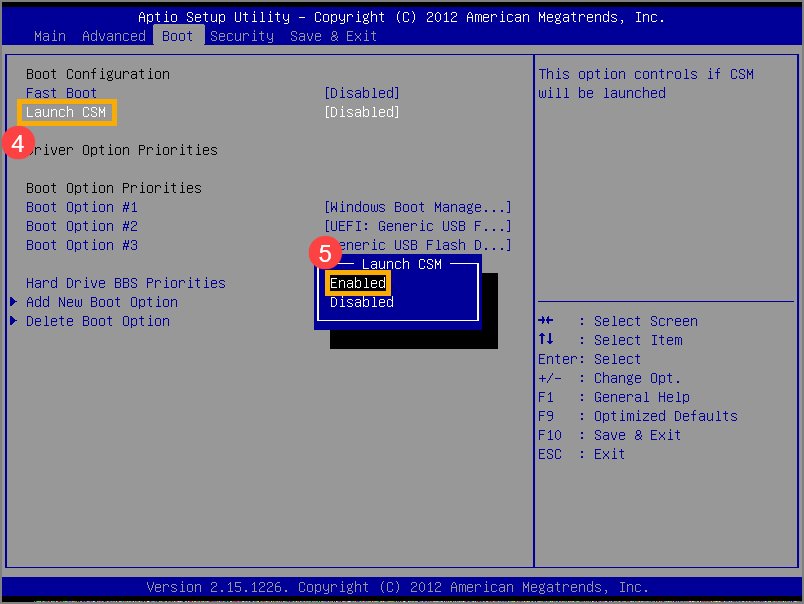
Disable or enable CSM support in BIOS in Windows 11/10
The setting lives in the firmware, so Windows has no switch for it. Check how Windows was installed before you turn CSM off, because a legacy install on an MBR disk stops starting without it.
- Select Start > Power, then hold Shift while you select Restart.
- Select Troubleshoot > Advanced options > UEFI Firmware Settings, then select Restart.
- Find the compatibility option. ASUS laptops show Launch CSM on the Boot screen, Dell PCs use a Boot List option set to UEFI or Legacy, and other firmware may list CSM Support or Legacy/CSM.
- Set it to Enabled to allow legacy booting, or Disabled to boot in UEFI mode only.
- Save your changes and exit. On ASUS firmware, press F10 and confirm.
- Let the PC restart, and check that Windows starts normally.
If that entry is not on your recovery menu, you can fix the missing UEFI Firmware Settings option or press the maker's key during startup. Microsoft lists Esc, Delete, F1, F2, F10, F11 and F12 as the common keys.
What is CSM support? Should I enable or disable it?
Many PCs are ready for UEFI but include a CSM that runs the legacy version of BIOS for older equipment and network setups. Keep CSM disabled unless something you use needs legacy booting.
| Your situation | CSM setting | Why |
|---|---|---|
| You run Windows 11 or plan to upgrade | Disabled | Windows 11 requires UEFI firmware that is Secure Boot capable |
| Windows already boots in UEFI mode from a GPT disk | Disabled | Nothing on the PC needs the legacy path |
| Windows is installed on an MBR disk in legacy mode | Enabled, until you convert the disk | Turning CSM off first stops Windows from starting |
| You need an operating system that requires legacy BIOS | Enabled | Microsoft notes a CSM may be required, along with an MBR-formatted drive |
| You boot from a network that only supports BIOS | Enabled | That network can only start the PC in legacy BIOS mode |
| You want Secure Boot or Credential Guard | Disabled | Both features require UEFI firmware |
What is CSM mode in BIOS?
Microsoft describes legacy BIOS mode as also known as CSM mode. The table shows what changes when a PC runs that way instead of native UEFI, and the wider differences between legacy BIOS and UEFI go beyond CSM itself.
| Item | UEFI mode (CSM off) | Legacy mode (CSM on) |
|---|---|---|
| Drive format | GPT | MBR |
| Security features | Supports Secure Boot and Credential Guard | Secure Boot does not work |
| Drive size and partitions | Drives larger than 4 TB and as many partitions as you need | Difficult to set up more than four partitions |
| Boot and shutdown | Can be faster | Without that speed benefit |
| Boot menu entry | UEFI USB Drive | BIOS USB Drive |
| BIOS Mode in System Information | UEFI | Legacy |
Legacy or CSM boot support in Windows 11
Windows 11 lists UEFI as its firmware requirement, so a PC left in legacy mode has to switch before it qualifies. Microsoft's answer for a PC that offers both modes is to put UEFI first.
| Question | Answer for Windows 11 |
|---|---|
| Firmware requirement | UEFI, Secure Boot capable |
| Upgrading from Windows 10 | The PC must be Secure Boot capable, which means UEFI has to be enabled |
| Firmware offers both UEFI and Legacy/CSM | Set UEFI as the first or only option |
| Secure Boot itself on an upgrade | Capability is the requirement, and Microsoft recommends turning it on for better security |
Where to find CSM in BIOS
There is no single location, because each manufacturer builds its own firmware menus. These are the paths the manufacturers document.
| PC | How to open the firmware | Where the setting is |
|---|---|---|
| ASUS laptop or all-in-one | Hold F2, then press the power button | Press F7 for Advanced Mode, then Boot > Launch CSM |
| ASUS desktop or motherboard | Hold F2 or Del, then press the power button | Press F7 for Advanced Mode, then Boot. ASUS names no CSM option here, but Boot Configuration holds Fast Boot and Secure Boot > OS Type controls Secure Boot |
| Dell | Tap F2 when the Dell logo appears | Boot Sequence or Boot Configuration, then Boot List set to UEFI or Legacy |
| Any other brand | Hold Shift while selecting Restart, then UEFI Firmware Settings | Look on the Boot, Security or Authentication tabs, then check the maker's manual |
While you are in the firmware, the same menus hold other BIOS settings for boot and security.
How to enable CSM in BIOS
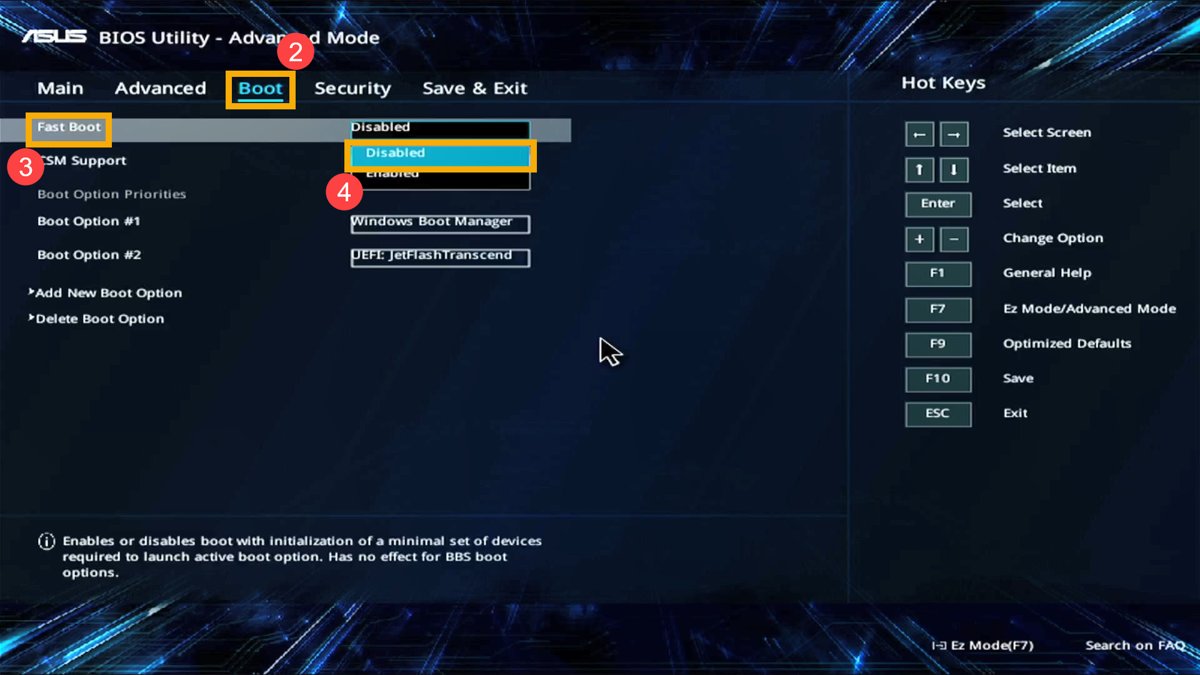
Some firmware allows legacy booting only after you turn off the UEFI security features. These steps use the ASUS laptop labels, and other firmware uses similar options in a different place.
- Hold F2, press the power button, and release F2 when the BIOS screen appears.
- Press F7 to open Advanced Mode.
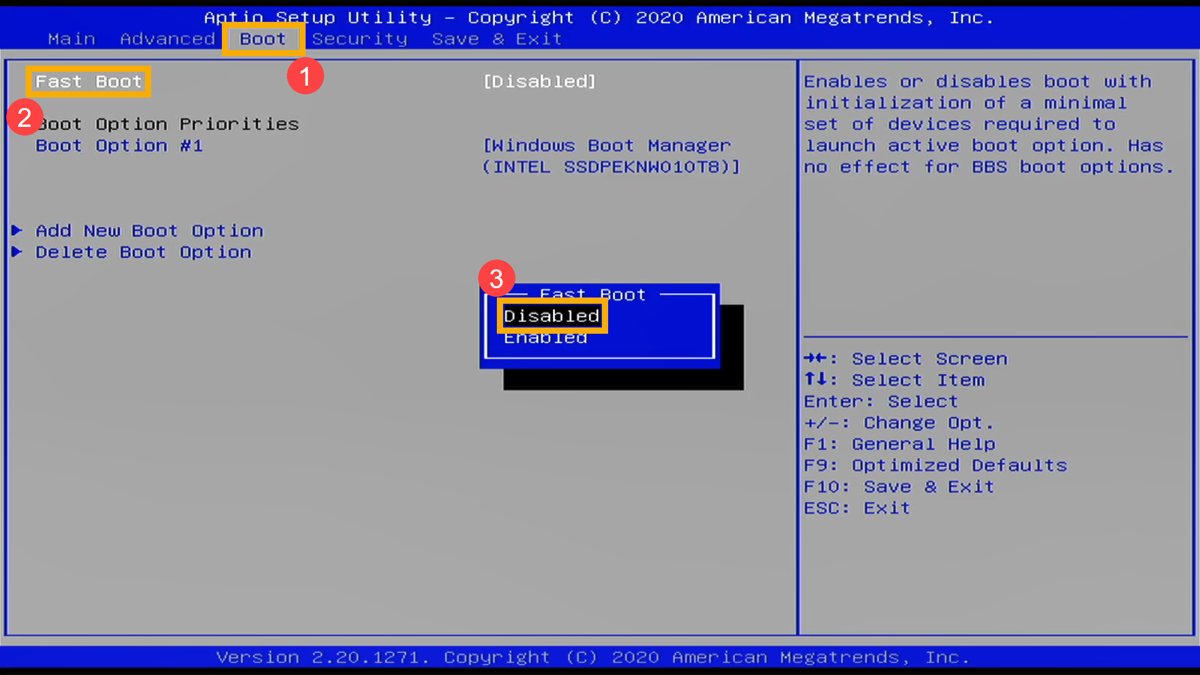
- Open the Boot screen, select Fast Boot and choose Disabled.
- Select Launch CSM and choose Enabled.
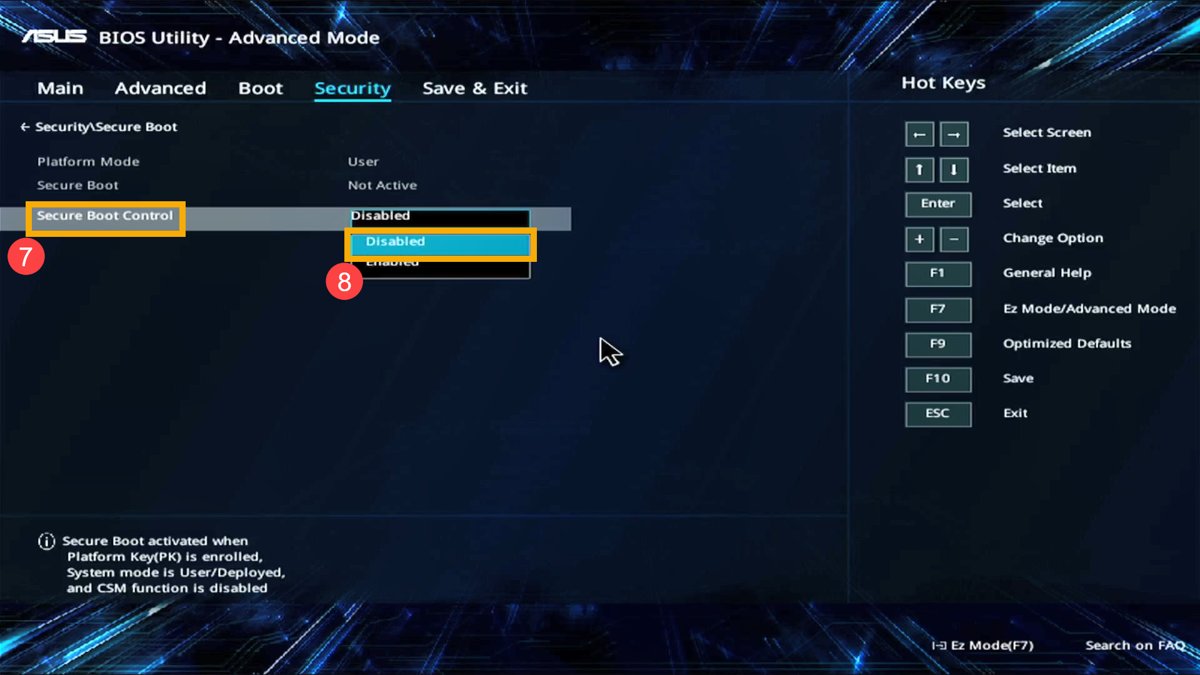
- Open Security > Secure Boot, select Secure Boot Control and choose Disabled.
- Press F10, confirm, and let the PC restart.
- Open the boot menu and select the BIOS entry for your drive or USB media.
To use a CSM you may also need to reformat the drive as MBR and reinstall Windows. After the job that needed legacy mode is finished, reverse these settings.
How to disable CSM in BIOS
Do this only when Windows already boots in UEFI mode from a GPT disk. If System Information shows Legacy, convert the disk first using the MBR2GPT steps below.
- Open the firmware from Advanced options > UEFI Firmware Settings.
- Go to the Boot screen or Boot Configuration page.
- Set Launch CSM or CSM Support to Disabled, or change Boot List from Legacy to UEFI.
- If the firmware offers both UEFI and Legacy/CSM, make UEFI the first or only option.
- Save your changes and exit.
- Sign in to Windows, then turn on Secure Boot if it is off.
Convert MBR to GPT before disabling CSM in BIOS
MBR2GPT lets you convert the system disk from MBR to GPT without reinstalling Windows. Confirm that the PC supports UEFI first, because the firmware has to boot in UEFI mode afterwards.
- Back up your personal files.
- Suspend BitLocker protection if the disk is encrypted.
- Open Command Prompt as administrator.
- Run
mbr2gpt /validate /allowFullOSand continue only if the validation completes successfully. - Run
mbr2gpt /convert /allowFullOSto convert the system disk. - Restart, open the firmware, and set the boot mode to UEFI by turning CSM off.
- Delete and recreate the BitLocker protectors before you resume BitLocker.
Validation fails if the disk has more than three primary partitions, or an extended or logical partition. Earlier versions such as Windows 7, 8 and 8.1 are not officially supported, so upgrade them first.
How to tell if CSM is enabled in Windows
Windows reports the mode it started in, which tells you whether the PC is using the legacy path.
- Press the Windows key, type
msinfo32and press Enter. - Stay on System Summary in System Information.
- Read BIOS Mode on the right. Legacy means the PC booted through the legacy path, and UEFI means it did not.
- Read Secure Boot State on the same list. Unsupported goes with Legacy mode, while On or Off appears in UEFI mode.
What happens if I disable CSM support?
The result depends on how Windows and your boot media were set up, because a device keeps booting in the mode Windows was installed with.
| What you have | After CSM is disabled | What to do |
|---|---|---|
| Windows on GPT in UEFI mode | Windows keeps starting as before | Nothing, and you can turn on Secure Boot |
| Windows on MBR in legacy mode | Windows no longer starts | Turn CSM back on, then convert the disk |
| USB media with an efi folder | It starts through its UEFI entry | Pick the UEFI entry in the boot menu |
| USB media without an efi folder | It cannot start in UEFI mode | Rebuild the media, or use legacy mode for that job |
| A network that only supports BIOS | Network boot needs legacy mode | Enable CSM for that task only |
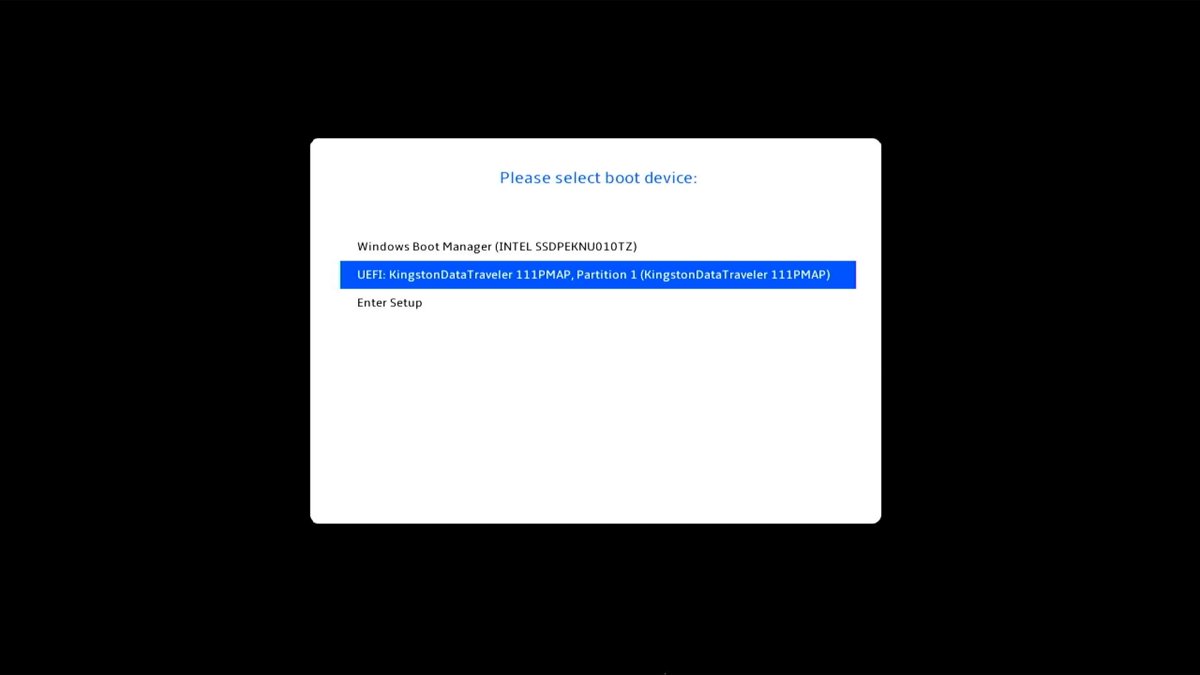
Why can't I boot if I disable CSM?
Legacy BIOS needs an MBR drive and UEFI needs a GPT drive, so changing the firmware without changing the disk leaves nothing the PC can start.
Windows will not start after you turn CSM off
Windows is installed on an MBR disk, which UEFI mode cannot boot.
- Press the maker's key during startup to open the firmware.
- Set the CSM or Legacy option back to its previous value.
- Save your changes and exit, then confirm Windows starts.
- Convert the disk with MBR2GPT, then turn CSM off again.
- If conversion is not possible, back up your files and reinstall Windows in UEFI mode.
Windows cannot be installed to this disk. The selected disk is not of the GPT partition style
The PC booted the installer in UEFI mode, but the drive is still set up as MBR.
- To keep the current partition style, restart the installer in legacy BIOS-compatibility mode.
- To use UEFI and keep your data, convert the drive with MBR2GPT.
- To use UEFI on a drive you can erase, select Custom in Windows Setup and delete each partition on that drive.
- Select the unallocated space and select Next, and Setup formats the drive as GPT.
CSM option in BIOS missing or greyed out
The BIOS has no CSM or Legacy option
Some devices support only one firmware mode, so a UEFI-only PC has nothing to switch.
- Press F7 or open Advanced Mode if the firmware opens in a simple view.
- Check the Boot, Security and Authentication tabs.
- Check the manual on the manufacturer's site for your exact model.
- Use UEFI boot media if the model has no legacy mode.
The CSM or Legacy option is greyed out or has no effect
Some devices allow BIOS mode only after the UEFI security features are turned off.
- Open Security > Secure Boot and disable the feature for this task.
- Set Fast Boot to Disabled if your firmware has that option.
- Save your changes, restart, and open the firmware again.
- Turn Secure Boot back on when you no longer need legacy mode.
Secure Boot state off in System Information, but on in BIOS
An Enabled switch in the firmware does not always mean Secure Boot is active. CSM or missing Secure Boot keys can leave Windows reporting a different state.
BIOS Mode shows Legacy and Secure Boot State shows Unsupported
The PC is still booting in legacy mode, and Secure Boot does not work there.
- Convert the system disk with MBR2GPT if it is still MBR.
- Turn CSM off or set the boot mode to UEFI.
- Set Secure Boot to Enabled, then save and exit.
- Open
msinfo32and check that Secure Boot State shows On.
ASUS laptop: Secure Boot Control is Enabled but the status is Not Active
The Secure Boot keys need restoring, and the status cannot be changed by hand.
- Check the maker's site and install the latest firmware first.
- Open Security > Secure Boot and leave Secure Boot Control on Enabled.
- Select Key Management > Reset To Setup Mode > Yes.
- Select Restore Factory Keys > Yes.
- Press F10 to save, then check Secure Boot State in Windows.
ASUS desktop: OS Type is set but Secure Boot stays off
Other OS keeps Secure Boot off, and cleared keys also keep it off.
- Go to Boot > Secure Boot and set OS Type to Windows UEFI mode.
- If the state stays Not Active, set Secure Boot Mode to Custom.
- Select Key Management > Clear Secure Boot Keys > Yes.
- Select Install Default Secure Boot Keys > Yes.
- Press F10 to save, then check Secure Boot State in Windows.
Microsoft warns that resetting Secure Boot to firmware defaults can remove trust for the boot manager signed with the 2023 certificate. Update the firmware before you reset keys, and keep your recovery options ready.
Windows Boot Manager has been blocked by the current security policy
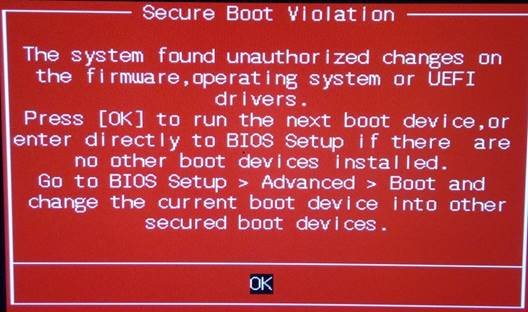
This kind of message means the firmware rejected the boot manager during Secure Boot checks. The wording varies by PC, and ASUS firmware shows Secure Boot Violation.
Blocked right after a Windows Secure Boot update
Some firmware overwrites the Secure Boot database instead of adding to it, so the boot manager loses trust.
- Open the firmware and try resetting the Secure Boot settings.
- Check the PC maker's site for a firmware update.
- Install any update you find before you turn Secure Boot back on.
- Contact the PC maker if the reset does not restore booting.
Blocked after you reset Secure Boot to defaults
The reset cleared the database entry that trusts the 2023-signed boot manager.
- On a second Windows PC with the July 2024 update or newer, copy
SecureBootRecovery.efifromC:\Windows\Boot\EFI\. - Put it on a FAT32 USB drive in
\EFI\BOOT\and rename itbootx64.efi. - Boot the affected PC from that USB drive and let the utility finish.
- Install the latest firmware and Windows updates once the PC starts.
Secure Boot Violation after reinstalling Windows on an ASUS desktop
Installing a different or reinstalled OS can leave OS loader keys that no longer match.
- Hold F2 or Del, press the power button, and wait for the BIOS screen.
- Go to Boot > Secure Boot > OS Type and choose Other OS, or Security > Secure Boot > Secure Boot Control and choose Disabled.
- Press F10 and select Ok so the PC can start Windows.
- Install current firmware and Windows updates, then turn Secure Boot back on.
Microsoft treats turning Secure Boot off as a temporary step for fixing a problem. Turn it back on as soon as the PC starts reliably.
Accidentally turned off PC during BIOS update on Windows 11
An interrupted update can leave the PC showing a black screen or failing to start. Do not assume the board is dead, because several makers provide a recovery path.
ASUS laptop or all-in-one powers on to a black screen
The BIOS update stopped before it finished, and it can resume after a hard reset.
- Unplug the AC adapter and remove the battery if it is removable.
- Hold the power button for 40 seconds.
- Reconnect the adapter and battery, then power on.
- Keep the adapter connected and let the resumed update finish.
- Load the BIOS default settings after the PC restarts.
Dell PC fails to boot or POST after the interruption
The firmware needs a recovery image, stored on the hard drive or supplied on USB.
- Remove any USB drives, then press and hold Ctrl + Esc while you turn on a desktop. On a laptop, charge to at least 25%, unplug the power, hold the keys, and plug the power back in.
- Release the keys at the recovery screen.
- Select Recover BIOS, then Continue, and do not turn the PC off during restarts.
- If no recovery image is found, use a working PC to get the latest BIOS from Dell, rename it
BIOS_IMG.rcv, and copy it to the root of a FAT32 USB drive. - Connect the drive and repeat the Ctrl + Esc steps.
A PC from another manufacturer will not start after the interruption
Recovery tools differ by model, so the maker's support page is the reliable route.
- Note the exact model or serial number.
- Open the maker's support site from a working device, and search for BIOS recovery for that model.
- Contact the manufacturer if the model has no self-service recovery.
BIOS settings return to defaults after a recovery. Check the boot order and the CSM setting afterwards, because a mismatch with the way Windows was installed stops it from starting.
Does changing CSM in BIOS trigger BitLocker recovery?
Have your BitLocker recovery key ready before you change CSM or Secure Boot settings. ASUS warns that changing BIOS settings can prompt for the key when BitLocker or Device Encryption is active. Microsoft also says the BIOS menu is built for advanced users and a wrong change can stop the PC from starting, so change one setting at a time.
CSM support in BIOS FAQ
What is CSM support in BIOS?
CSM support is a firmware option that uses a Compatibility Support Module to run the legacy version of BIOS on a UEFI PC. It exists for older operating systems, equipment and network setups, and it needs a drive in the MBR format.
What is CSM support in Gigabyte BIOS?
It is the same compatibility feature found on other boards, controlling whether the board can boot in legacy mode. The location varies by board and BIOS version, so check the manual for your exact model on Gigabyte's support site before changing it.
What is CSM in BIOS?
CSM stands for Compatibility Support Module. It lets UEFI firmware act like a traditional legacy BIOS, so software that cannot boot through UEFI can still start. Microsoft recommends installing Windows in UEFI mode because it includes more security features.
How to enable CSM in BIOS?
Open the firmware, go to the Boot screen, and set Launch CSM or CSM Support to Enabled. Some PCs also need Fast Boot and Secure Boot turned off first. Save your changes and exit, then pick the BIOS entry in the boot menu.
How to disable CSM in BIOS?
Open the firmware, go to the Boot screen, and set the CSM option to Disabled or the boot mode to UEFI. Save your changes and exit. Convert the system disk from MBR to GPT first if System Information shows Legacy.
How to find CSM in BIOS?
Look on the Boot tab first, then the Security and Authentication tabs. On ASUS laptops the option is Launch CSM on the Boot screen in Advanced Mode, while Dell PCs use a Boot List option. Some UEFI-only models have no option at all.
Where to find CSM in BIOS on a PC that opens in a simple view?
Switch to the advanced view first. ASUS firmware opens it with the F7 key, which reveals the Boot screen holding Launch CSM. If you still cannot find it, the manual for your exact model lists the setting and its tab.
What is CSM mode in BIOS?
CSM mode is the legacy BIOS mode of a UEFI PC, and Microsoft uses the two names for the same thing. In this mode, System Information shows BIOS Mode as Legacy and Secure Boot State as Unsupported, so Secure Boot cannot run.
What is CSM support used for today?
It is used to boot an operating system that requires legacy BIOS, or to start from a network that only supports BIOS. Windows 11 requires UEFI, so a current Windows PC normally runs with CSM disabled and UEFI as the only boot option.
Is it OK to have CSM disabled in BIOS?
Yes, as long as Windows boots in UEFI mode from a GPT disk. That setup supports Secure Boot and meets the Windows 11 firmware requirement. Disabling CSM causes a problem only when Windows or your boot media depends on legacy mode.