To enable Secure Boot on Windows 11, open Settings > System > Recovery, select Restart now next to Advanced startup, choose Troubleshoot > Advanced options > UEFI Firmware Settings, then set Secure Boot to Enabled and save.
This guide covers the pre-checks that stop a failed boot (UEFI mode, GPT disk, BitLocker key), brand pointers, how to confirm the change, and fixes for a greyed-out option, boot errors and the 2023 certificate update status.
How to Enable Secure Boot in Windows 11 (Step-by-Step)
Secure Boot is a firmware setting, so Windows can only restart you into the firmware menu; the switch itself lives there. Save open work first, because the PC restarts.
- Open Settings, select System, then select Recovery.
- Next to Advanced startup, select Restart now, and confirm with Restart now if a save prompt appears.
- On the blue screen, select Troubleshoot, then Advanced options.
- Select UEFI Firmware Settings, then Restart. The PC opens its firmware (UEFI/BIOS) menu.
- Make sure the boot mode is UEFI, not Legacy or CSM. If both are offered, make UEFI the first or only option.
- Open the Security, Boot or Authentication tab and find Secure Boot.
- Set Secure Boot to Enabled. On some PCs you must first choose Custom and load the Secure Boot keys built into the PC.
- Save changes and exit. Windows starts with Secure Boot on.
If Windows fails to start afterwards, go back into the firmware, set Secure Boot to Disabled again, and read the boot fixes further down before retrying.
Quick Summary
Use this as a quick checklist before and after the change. Each row links to the section with the full steps.
| Check | What you want to see | Where to look |
|---|---|---|
| Secure Boot State | On | System Information (msinfo32) > System Summary |
| BIOS Mode | UEFI (not Legacy) | System Information > System Summary |
| System disk partition style | GPT | Get-Disk in PowerShell or Disk Management > disk Properties > Volumes |
| BitLocker recovery key | Saved somewhere you can reach from another device | https://aka.ms/myrecoverykey |
| Firmware setting | Secure Boot: Enabled, CSM/Legacy off | Security, Boot or Authentication tab |
| Result in Windows | Confirm-SecureBootUEFI returns True |
PowerShell run as administrator |
Which Method Should You Use?
Every route ends in the same firmware menu. The difference is how you get there, and whether Windows still starts.
| Your situation | Use this route | Why |
|---|---|---|
| Windows 11 starts normally | Settings > System > Recovery > Advanced startup | No key timing needed; works on every brand |
| You are at the sign-in screen or Start menu | Hold Shift while selecting Power > Restart, then Troubleshoot > Advanced options > UEFI Firmware Settings | Same result without opening Settings |
| Windows does not start, or the PC is off | Press the manufacturer's firmware key at power-on (commonly Esc, Delete, F1, F2, F10, F11 or F12) | Needs no working Windows; the key is often shown briefly at startup |
| Microsoft Surface | Hold Volume Up, press and release Power, keep holding Volume Up until the UEFI screen appears | Surface has no keyboard firmware key; Secure Boot is on the Security page |
| Disk is MBR or BIOS Mode reads Legacy | Convert the disk with MBR2GPT first, then switch to UEFI and enable Secure Boot | Enabling Secure Boot on a Legacy install leaves Windows unbootable |
What Secure Boot Actually Does (And Why Windows 11 Demands It)
Secure Boot lets only trusted, digitally signed software run while the PC starts. That blocks rootkits, which load before Windows and can hide from it.
| Question | Answer |
|---|---|
| What does it check? | The signature of every piece of boot software: UEFI firmware drivers (Option ROMs), EFI applications and the operating system loader |
| What happens to unsigned code? | The firmware refuses to run it, so the PC will not start that software |
| Where are the trusted keys kept? | In firmware databases: db (allowed), dbx (revoked) and KEK (keys that may update db and dbx), locked by the manufacturer's Platform Key |
| What does Windows 11 require? | UEFI firmware that is Secure Boot capable, plus TPM 2.0. Turning Secure Boot on is recommended rather than required for the upgrade |
| Why is it in the news in 2026? | Microsoft's Secure Boot certificates from 2011 begin expiring in June 2026; the 2023 replacements arrive through Windows Update |
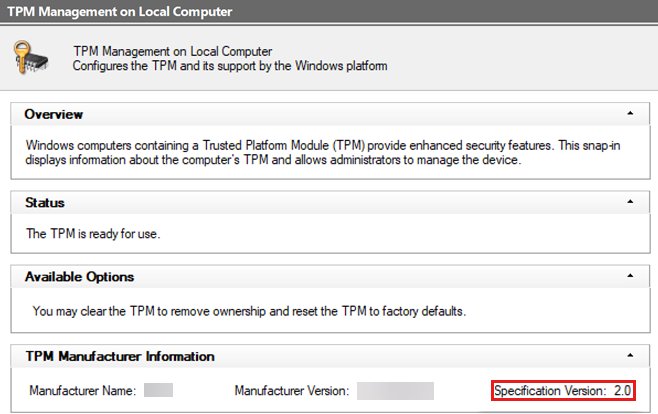
| Does it need TPM? | They are separate features; Windows 11 requires both a TPM 2.0 chip and Secure Boot capable firmware |
For how the TPM and Secure Boot work together, see TPM 2.0 and Secure Boot Explained.
Before You Start: Important Things To Check
Two checks decide whether the switch is a two-minute job or a boot failure: the firmware mode and the disk's partition style. The rest protects you if something goes wrong.
| Check | Why it matters | If it fails |
|---|---|---|
| BIOS Mode is UEFI | Secure Boot only works in UEFI mode; Windows keeps booting in the mode it was installed with | Convert the disk to GPT, then switch the firmware to UEFI |
| System disk is GPT | UEFI boots Windows from a GPT disk; an MBR system disk will not start in UEFI-only mode | Run mbr2gpt /validate, then /convert |
| BitLocker recovery key is saved | Firmware and boot changes can trigger the BitLocker recovery screen | Sign in at https://aka.ms/myrecoverykey from another device and note the key |
| Windows Update is current | Your manufacturer may update the list of trusted hardware and drivers | Install pending updates and restart |
| Old graphics card, Linux or older Windows installed | Unsigned hardware and loaders can stop the PC starting with Secure Boot on | Check the maker's support site before you enable it |
First, Check Whether Secure Boot Is Already On
Many PCs ship with Secure Boot already enabled. Check whether Secure Boot is already enabled before you touch the firmware.
- Press Win + R, type
msinfo32and press Enter to open System Information. - Select System Summary in the left pane.
- Read Secure Boot State: On means you are done; Off means it is supported but disabled; Unsupported usually means the PC is running in Legacy mode.
- Read BIOS Mode on the same page: it must say UEFI before Secure Boot can be turned on.
- For a one-line check, open PowerShell as administrator and run
Confirm-SecureBootUEFI. True means on, False means off, and "Cmdlet not supported on this platform" means a BIOS (non-UEFI) boot.
Check Whether Your System Disk Uses GPT Or MBR
Run this in PowerShell or Terminal. The disk that holds Windows is usually disk 0.
Get-Disk | ft -AutoLists every disk with its number, size and Partition Style column. Without a terminal, right-click Start, open Disk Management, right-click the disk number, choose Properties, and read Partition style on the Volumes tab. In DiskPart, list disk marks GPT disks with an asterisk in the Gpt column.
You should see: The Windows disk shows GPT. If it shows MBR, convert it before you switch the firmware to UEFI.
If Needed: Convert MBR To GPT Safely
Microsoft's MBR2GPT tool converts the system disk without deleting data. It refuses to run if the disk has more than three primary partitions, an extended partition, or no room for the GPT tables.
If the drive is BitLocker-encrypted, suspend protection first; the tool will not convert an encrypted volume while protection is active. Validate first, then convert.
mbr2gpt /validate /disk:0 /allowFullOS
mbr2gpt /convert /disk:0 /allowFullOS
Run both from an elevated Command Prompt. /validate only checks whether disk 0 can be converted; /convert checks again and converts. /allowFullOS lets the tool run inside Windows instead of Windows PE, where it creates a new EFI system partition by shrinking the Windows partition.
You should see: "Validation completed successfully" after the first line, and a successful conversion message after the second. Then restart into the firmware, switch the boot mode to UEFI, and enable Secure Boot; the converted disk will not boot in Legacy mode.
Return code 6 means an encrypted volume blocked the conversion, and 7 means the disk layout does not meet the requirements. Logs are written to %windir% as setupact.log and setuperr.log.
How To Enter UEFI Firmware Settings From Windows 11
This is the route to use when you cannot catch the startup key. It works on every brand of PC that boots in UEFI mode.
- Select Start, then the Power button.
- Hold Shift and select Restart. Keep holding until the blue Choose an option screen appears.
- Select Troubleshoot.
- Select Advanced options.
- Select UEFI Firmware Settings, then Restart.
If UEFI Firmware Settings is missing from Advanced options, Windows is running in Legacy BIOS mode. Use the manufacturer's startup key instead, and convert the disk before switching to UEFI.
Brand-Specific Pointers
Menu names differ by manufacturer, and Microsoft links to each maker's own instructions. Where the table lists only the link, follow the maker's page for the exact menu.
| Brand | How to open the firmware | Where Secure Boot is |
|---|---|---|
| ASUS motherboards | Press Delete at power-on, then switch to Advanced Mode | Boot > Secure Boot: set OS Type to Windows UEFI mode (the default Other OS leaves Secure Boot off) |
| Microsoft Surface | Hold Volume Up, press and release Power | Security page > Secure Boot (Surface UEFI guide) |
| Dell | Settings route above, or the startup key | Dell: enable Secure Boot |
| HP | Settings route above, or the startup key | HP: Secure Boot |
| Lenovo | Settings route above, or the startup key | Lenovo: Secure Boot |
| GIGABYTE motherboards | Settings route above, or the startup key | GIGABYTE FAQ 3918 |
| MSI, Acer and others | Settings route above, or the key shown at startup | Usually the Security, Boot or Authentication tab; check the maker's support site |
On ASUS boards, Secure Boot State is greyed out by design: it simply reports whether keys are installed. User means keys are present; Setup means no keys, so Secure Boot stays off until you restore the default keys.
Confirm Secure Boot Is Enabled In Windows 11
Check from inside Windows after the restart. The firmware menu saying Enabled is not proof on its own, because missing keys can keep it inactive.
- Open System Information (
msinfo32) and confirm Secure Boot State reads On and BIOS Mode reads UEFI. - Open an elevated PowerShell and run
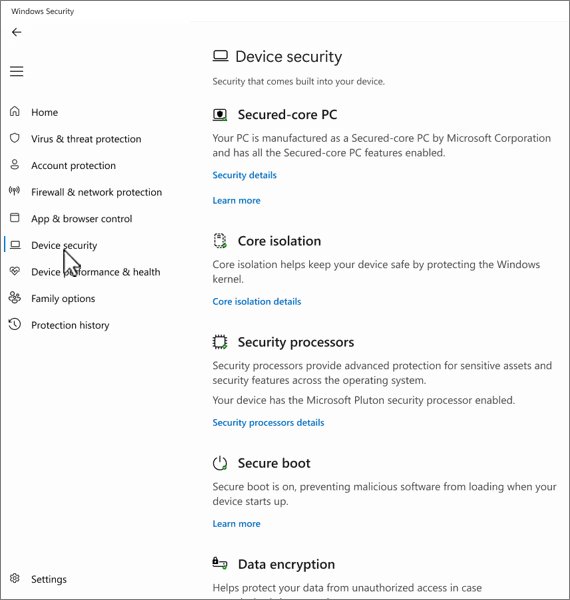
Confirm-SecureBootUEFI; it should return True. - Open Windows Security, select Device security, and look for the Secure Boot section.
- Read the text next to the badge. Green with "Secure Boot is on and all required certificate updates have been applied" means fully updated; yellow or red means an action is recommended or needed.
A green checkmark alone does not confirm the 2023 certificates are installed; the text beside it does.
Secure Boot And Gaming Anti-Cheat Requirements
Some kernel-level anti-cheat systems check Secure Boot before a game will launch. The fix is the same firmware change described above.
| Game or system | What you see | What it means |
|---|---|---|
| Valorant (Riot Vanguard) | Error VAN 9003 | Riot states that Secure Boot is not enabled and Vanguard requires it |
| Riot Vanguard, other errors | VAN 9001 or VAN: STATUS_SB_POLICY | Look up the exact code on Riot's Vanguard error page before changing firmware |
| Any game that reports Secure Boot is off | A launch error naming Secure Boot | Check msinfo32 first; if Secure Boot State is Off, enable it in the firmware |
Secure Boot And Dual-Boot Systems
Microsoft notes that Linux, earlier versions of Windows and some graphics cards may need Secure Boot turned off. Plan the boot order before you flip the switch.
| Setup | What to expect with Secure Boot on | What to do |
|---|---|---|
| Windows 11 plus a Linux distribution with a signed boot loader | Both can start | Check your distribution's documentation for Secure Boot support |
| Windows 11 plus Linux with an unsigned loader | Linux fails to start | Keep Secure Boot off only while you need that system, or switch to a signed loader |
| Windows 11 plus Windows 7 or another Legacy/MBR install | The Legacy install will not start in UEFI mode | Choose one mode; Secure Boot requires UEFI |
| Windows 11 virtual machine in Hyper-V | Windows 11 VMs need Secure Boot and TPM enabled in the VM settings | Enable both on the VM, not on the host firmware |
More on the VM side: Windows 11 virtual machines now require TPM 2.0 and Secure Boot.
How to disable Secure Boot in Windows 11
Turn it off only for a specific reason, such as installing hardware or an operating system that is not compatible, and turn it back on afterwards.
- Check Windows Update and your manufacturer's site first; updated trust lists may make disabling unnecessary.
- Hold Shift and select Restart, then go to Troubleshoot > Advanced options > UEFI Firmware Settings.
- Find Secure Boot on the Security, Boot or Authentication tab.
- Set it to Disabled.
- Save changes and exit. The PC restarts.
Microsoft warns that after disabling Secure Boot and installing other software or hardware, you may need to restore the PC to its factory state before Secure Boot can be turned on again.
Things to Do Before Touching BIOS
The firmware menu is built for advanced users, and one wrong setting can stop the PC starting. These habits make every change reversible.
- Save your BitLocker recovery key and confirm you can open https://aka.ms/myrecoverykey from a phone or another PC.
- Photograph the current Boot and Security pages so you can put every value back.
- Change one setting at a time, save, and test that Windows starts before changing the next.
- Note the firmware key for your PC, so you can get back in if Windows will not start.
- Follow your manufacturer's instructions exactly for anything beyond the Secure Boot and boot-mode switches.
What to Do When Secure Boot Is Greyed Out
The Secure Boot option cannot be selected
The firmware is in Legacy or CSM mode, which cannot use Secure Boot.
- Confirm the Windows disk is GPT; convert it with
mbr2gptif it is MBR. - In the firmware, set boot mode to UEFI and disable CSM (Compatibility Support Module).
- Save, re-enter the firmware, and set Secure Boot to Enabled.
Secure Boot State is grey and shows Setup
No Secure Boot keys are installed, so the firmware is in setup mode.
- On the Secure Boot page, choose Custom (or key management) and load the factory default keys.
- On ASUS boards, set OS Type to Windows UEFI mode; the grey Secure Boot State then changes to User.
- If no key option exists, reset the firmware to factory settings and try again.
Fix: Windows Will Not Boot After Enabling Secure Boot
The PC loops, shows a boot error or stops at the firmware logo
A boot loader, graphics card or driver is not signed with a trusted key.
- Open the firmware menu with the startup key.
- Set Secure Boot to Disabled, save, and confirm Windows starts.
- Remove or update the incompatible hardware or operating system.
- Re-enable Secure Boot and test again.
Windows asks for a BitLocker recovery key
BitLocker saw the boot configuration change.
- Note the first 8 digits of the recovery key ID on the screen.
- On another device, open https://aka.ms/myrecoverykey and sign in with the Microsoft account used on the PC.
- Type the 48-digit key that matches the ID. Work devices store it with the organization's IT team.
No bootable devices found in Windows 11
"No bootable device" right after switching to UEFI or enabling Secure Boot
Windows was installed in Legacy mode on an MBR disk, and a UEFI-only firmware cannot start it.
- Enter the firmware and switch back to Legacy/CSM so Windows starts again.
- In Windows, run
mbr2gpt /validate /disk:0 /allowFullOSfrom an elevated Command Prompt. - If validation passes, run
mbr2gpt /convert /disk:0 /allowFullOS. - Restart into the firmware, set boot mode to UEFI, then enable Secure Boot.
Acer Security Boot Fail error in Windows 11
A Secure Boot failure or violation message at power-on
The firmware blocked a boot loader or device that is not signed with a trusted key, or the key databases were changed.
- Disconnect USB drives and recently added hardware, then restart.
- Open the firmware with the startup key and confirm the boot mode is UEFI.
- If another operating system caused it, set Secure Boot to Disabled, start the system, and remove or update that loader.
- Load the factory default Secure Boot keys or reset the firmware to defaults, then enable Secure Boot again.
- If the error remains, contact Acer support; the firmware may need an update.
UEFI2023Status stuck at In Progress or Not Started
This value tracks Microsoft's 2023 Secure Boot certificate update. It lives under HKEY_LOCAL_MACHINE\SYSTEM\CurrentControlSet\Control\SecureBoot\Servicing as UEFICA2023Status, with the values NotStarted, InProgress and Updated.
UEFICA2023Status stays NotStarted
The device is not eligible yet: Secure Boot is off, updates are missing, or the update task is not running.
- Confirm Secure Boot is on with
Confirm-SecureBootUEFI. - Install all pending updates from Windows Update and restart.
- In an elevated PowerShell, run
schtasks.exe /Query /TN "\Microsoft\Windows\PI\Secure-Boot-Update" /FO LIST /Vand confirm Status reads Ready. - Leave the PC on; the task runs at startup and every 12 hours.
UEFICA2023Status stays InProgress
A step failed and is being retried, or the boot manager update is waiting for a restart.
- Restart the PC; the boot manager step may not finish until after a restart.
- Check UEFICA2023Error in the same key. A non-zero value means a step failed.
- In Event Viewer, check the System log for Secure Boot events. Events 1032, 1795, 1796 and 1802 point to firmware limits; 1803 means the manufacturer's signed key is missing.
- Install the latest firmware (BIOS/UEFI) update from your PC maker, then let the task retry.
- Check Windows Security > Device security > Secure Boot for a paused or hardware-limitation message.
Still Not Working?
Why can't I enable Secure Boot on Windows 11?
The firmware refuses the setting, often because of old firmware, cleared keys or a changed configuration.
- Reset the firmware to factory settings and try again.
- Update the firmware from your PC maker's support site.
- As a last resort, Microsoft suggests a refresh or Remove everything reset to return the PC to its original state.
- If none of that works, contact the manufacturer.
Frequently Asked Questions
How do I enable Secure Boot on Windows 10?
The process matches Windows 11. Hold Shift while selecting Restart, go to Troubleshoot > Advanced options > UEFI Firmware Settings, and set Secure Boot to Enabled on the firmware's Security, Boot or Authentication tab. The PC must boot in UEFI mode from a GPT disk.
Is enabling Secure Boot different on Windows 11 Pro?
No. Secure Boot is a firmware setting, so the steps are identical on Windows 11 Home and Pro. Windows only restarts you into the firmware menu through Advanced startup; the switch itself belongs to the PC's UEFI firmware on either edition.
How do I enable Secure Boot on an ASUS motherboard?
Press Delete at power-on, switch to Advanced Mode, and open Boot > Secure Boot. Change OS Type from Other OS to Windows UEFI mode, then save and exit. The greyed-out Secure Boot State line only reports status and cannot be changed directly.
How do I enable Secure Boot on Gigabyte, MSI, HP or Lenovo PCs?
Use Settings > System > Recovery > Advanced startup > Restart now, then Troubleshoot > Advanced options > UEFI Firmware Settings. Look for Secure Boot on the Security, Boot or Authentication tab. Menu names vary, so follow the maker's own support page for the exact labels.
How do I enable Secure Boot for Valorant?
Riot's error VAN 9003 means Secure Boot is not enabled, and Vanguard requires it. Confirm the PC boots in UEFI mode from a GPT disk, enable Secure Boot in the firmware, restart, and check that msinfo32 shows Secure Boot State: On before launching the game.
A game like Fortnite says Secure Boot is off. What do I do?
Open msinfo32 and read Secure Boot State. If it says Off, enable it in the firmware with the steps in this guide. If it says Unsupported, the PC is in Legacy mode, so convert the disk to GPT and switch to UEFI first.
Why can't I enable Secure Boot on Windows 11?
The usual causes are Legacy/CSM boot mode, an MBR system disk, or missing Secure Boot keys. Switch the firmware to UEFI, convert the disk with MBR2GPT, and load the factory default keys. If the option stays locked, reset the firmware to defaults or update it.
Can I enable Secure Boot without entering the BIOS?
No. Secure Boot is switched on only in the UEFI firmware menu. Windows can restart you straight into that menu through Advanced startup, and PowerShell's Confirm-SecureBootUEFI can check the state, but neither turns it on for you.
Can I disable Secure Boot in Windows 11?
Yes. Open UEFI Firmware Settings through Advanced startup, set Secure Boot to Disabled, and save. Microsoft recommends turning it back on once the issue is solved, and warns that turning it back on later may require a factory reset.
Will enabling Secure Boot delete my files?
No. Turning Secure Boot on changes a firmware setting and does not touch your files. Converting the disk with MBR2GPT also keeps data, but back up first and save your BitLocker recovery key in case the change triggers the recovery screen.
Do I need TPM 2.0 as well as Secure Boot for Windows 11?
Yes. Windows 11 requires TPM 2.0 and UEFI firmware that is Secure Boot capable. Secure Boot capability is the hard requirement for the upgrade; turning it on is recommended for protection against boot-level malware.
Should You Leave Secure Boot Enabled?
Yes. Leave Secure Boot on permanently unless a specific piece of hardware or another operating system needs it off, and switch it back on when that need ends. Secure Boot blocks rootkits that load before Windows, and Microsoft's own guidance says disabling it leaves a device less secure than keeping it on, even when the 2023 certificate update cannot be installed.





Download PC Health Check App for Windows 10 & Windows 11 - Techdows
[…] can turn on Secure Boot from the UEFI firmware settings: go to Settings > System > Recovery (Update & Security […]