To set up multiple monitors on Windows 11, connect each monitor to its own video port, press Win + P and choose Extend, then drag the numbered screens in Settings > System > Display to match your desk.
This guide covers hardware limits, detection, the main display, resolution and refresh rate, the taskbar, moving windows, laptops with the lid closed, three-screen and daisy-chained setups, and fixes for the problems people hit most.
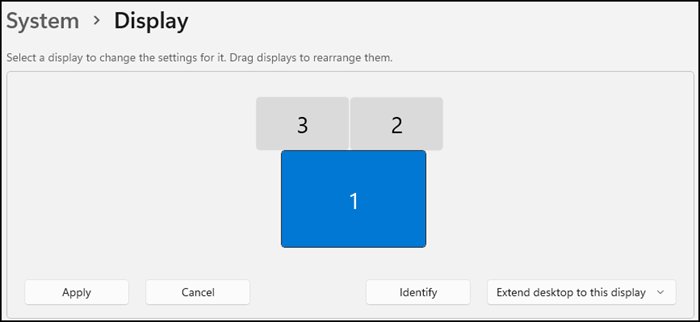
The fastest way to set up a second monitor on Windows 11
These five steps get a standard two-screen desk working. Everything later on this page is refinement.
- Plug the monitor into a free video port on the PC or dock, and switch the monitor on.
- Press Win + P and select Extend so each screen shows its own part of the desktop.
- Open Start > Settings > System > Display.
- Select Identify to see which number belongs to which screen.
- Drag the numbered boxes so they sit where the monitors sit on your desk, then select Apply.
Move the mouse pointer across the gap between the screens. If it crosses where you expect, the setup is done.
Before You Start: Check What Your PC Supports
The number of screens you can run is set by the graphics adapter and its ports, not by Windows. Check these points before buying cables or a dock.
| Check | How to find out | What it means |
|---|---|---|
| Which graphics adapter you have | Type device manager in taskbar search, open it and expand Display adapters |
The manufacturer and model are listed there; that maker states how many monitors the adapter drives |
| How many video ports the PC has | Look at the ports on the PC: HDMI, DisplayPort, DVI, VGA or USB-C | One video output port supports one external monitor by default |
| Whether your laptop can add ports | Ask the PC manufacturer about a compatible docking station | A dock or a USB-C video adapter can add extra outputs |
| Whether Windows is current | Start > Settings > Windows Update > Check for updates | Microsoft lists this as the first step before changing external display settings |
| Whether you own a splitter | Check the box: a splitter has one input and several outputs | A splitter duplicates one signal, so it cannot extend the desktop across screens |
Connect the Monitors
- Unplug any docks, dongles and adapters you do not need for this setup, since extra hardware can cause conflicts.
- Connect the first monitor straight to a video port on the PC with a cable you know works.
- Connect the next monitor to a different video output port, dock or USB-C adapter.
- Plug in power for each monitor and switch it on.
- For a TV with a wireless display adapter, plug the adapter into an HDMI port on the TV, then press Win + K on the PC and select the adapter.
If a screen stays dark, work through the next two sections before moving on to troubleshooting.
Open Windows 11 Display Settings
- Right-click an empty area of the desktop and select Display settings.
- Or press Win + I and select System > Display.
- Look at the top of the page: each connected monitor appears as a numbered box.
- Select a box before changing any setting below it, because resolution, scale and orientation apply to the selected monitor only.
Every multi-monitor setting in this guide lives on this page or one of its subpages, such as Advanced display and Multiple displays.
Detect a Monitor That Does Not Appear
When a connected screen has no numbered box in Settings, ask Windows to look for it again.
- Open Start > Settings > System > Display.
- Select Multiple displays to expand the section.
- Select Detect for a wired monitor.
- Select Connect instead for a wireless display.
- If nothing appears, press Win + Ctrl + Shift + B to reset the graphics driver, then select Detect again.
Still missing? Swap the cable, try another port, and test the monitor on a different computer. The troubleshooting section below covers the remaining causes.
Choose Extend, Duplicate, or Show Only One Display
Press Win + P to open the display mode panel, then pick the row that matches what you want to see.
| What you want | Choose | Result |
|---|---|---|
| A bigger workspace with different windows on each screen | Extend | The desktop spreads across all screens and you can drag items between them |
| The same picture on every screen, such as for a presentation | Duplicate | Every display mirrors the same content |
| The laptop screen alone, with the monitor ignored | PC screen only | Only one display shows anything |
| The external monitor alone, with the laptop screen dark | Second screen only | Everything shows on the second display only |
On Windows 10 the same choice also sits in Settings > System > Display as a drop-down that shows Duplicate these displays or Extend these displays.
Arrange Your Monitors Correctly
The arrangement decides where the mouse pointer leaves one screen and enters the next. A layout that does not match the desk makes the pointer jump the wrong way.
- Open Settings > System > Display and select Identify. A large number appears on each screen.
- Drag each numbered box so its position matches the physical monitor, left to right and above or below.
- Line up the edges of the boxes the same way the real screens line up, so the pointer crosses at the height you expect.
- Select Apply.
- Move the pointer across every shared edge to test the layout, and adjust again if it jumps.
The Rearrange your displays area only appears when Windows detects more than one display.
Set Your Main Display
The main display is the screen Windows treats as primary. Choose the monitor you look at most.
- Open Settings > System > Display.
- Select the numbered box for the monitor you want as the main screen. Use Identify if unsure.
- Select Multiple displays to expand it.
- Select the Make this my main display check box.
- Check the new main screen: it is the one you chose, and the others become secondary.
The main display option only matters in Extend mode, because the other modes show a single desktop.
Adjust Resolution, Scaling, and Orientation
Each monitor keeps its own values, so select the right numbered box first. Mixed setups, such as a laptop panel next to a 4K monitor, usually need a different scale on each.
- In Settings > System > Display, select the monitor you want to change.
- Under Scale & layout, open Display resolution and pick the value marked (Recommended).
- Open Scale and pick an option; the one marked (Recommended) is usually best.
- To use a monitor in portrait, choose a value from the drop-down next to Display orientation.
- Physically rotate that monitor to match the orientation you chose.
A resolution below the monitor's native one works, but text looks softer and the picture can shrink, stretch or gain black edges.
Set Refresh Rate and Advanced Display Options
- Open Settings > System > Display > Advanced display.
- If more than one monitor is connected, select the one you want to change.
- Read the Display information panel: it shows the current resolution, refresh rate and whether the display supports variable refresh rate (VRR).
- Select a rate next to Choose a refresh rate.
- Turn Dynamic refresh rate on or off if the toggle is available.
An asterisk marks a rate that does not work at the current resolution; choosing it changes the resolution too.
Dynamic refresh rate needs a display that supports VRR and at least 120 Hz. If a game runs slower than expected with it on, turn it off.
Customize the Taskbar Across Multiple Monitors
By choice, Windows 11 can show the taskbar on every screen or only on the main one.
- Right-click an empty area of the taskbar and select Taskbar settings.
- Select Taskbar behaviors to expand it.
- Turn on Show my taskbar on all displays to put a taskbar on every monitor.
- Turn it off to keep a single taskbar on the main display.
Windows 10 adds a Combine taskbar buttons on other taskbars list under Multiple Displays, with Always, hide labels, When taskbar is full and Never. Windows 11 changed the clock and Start menu on multiple monitors instead.
Move Windows Efficiently Between Monitors
Dragging a title bar across screens works, but these keyboard shortcuts are faster and land windows precisely.
| You want to | Press | What happens |
|---|---|---|
| Send a window to the screen on the left | Win + Shift + Left arrow | The active window moves to the monitor on the left |
| Send a window to the screen on the right | Win + Shift + Right arrow | The active window moves to the monitor on the right |
| Fill half of the current screen | Win + Left arrow or Win + Right arrow | The window snaps to that side of the screen |
| Pick a snap layout on the current screen | Win + Z | The snap layouts open for the active window |
| Fill the current screen | Win + Up arrow | The active window maximizes |
| Cycle through apps on every screen's taskbar | Win + T, repeatedly | Focus moves through taskbar apps across all displays |
Keep windows where you left them after undocking
When you undock a laptop, windows on the external monitor are minimized. When you dock again, Windows puts them back where they were. Two check boxes control this.
- Open Start > Settings > System > Display.
- Scroll down and select Multiple displays to expand it.
- Select or clear Remember window locations based on monitor connection.
- Select or clear Minimize windows when a monitor is disconnected.
Use a Laptop With the Lid Closed
Closing the lid puts most laptops to sleep. Change the plugged-in lid action to keep working on the external monitors alone.
- Select Search on the taskbar, type
control paneland open it. - Select System and Security.
- Under Power Options, select Choose what the power buttons do.
- Select Change settings that are currently unavailable.
- Open the When I close the lid list in the Plugged in column and select Do nothing.
- Select Save changes.
Leave the On battery column on Sleep, so a closed laptop in a bag does not keep running. Keep the laptop on power and connected to its monitor, keyboard and mouse before closing the lid.
Set Up Three or More Monitors
Confirm that one external monitor works before adding the next. Problems that start at the second or third screen usually mean the graphics adapter or ports have reached their limit.
- Connect and test one external monitor on its own.
- Find your graphics adapter under Display adapters in Device Manager, and check with its manufacturer how many monitors it supports.
- Give each extra monitor its own output: a separate port, a docking station, a USB-C video adapter, or a DisplayPort daisy chain.
- Press Win + P and select Extend.
- In Settings > System > Display, select Identify, drag all the boxes into place and select Apply.
- Set the centre or most-used screen as the main display.
Do not use an HDMI splitter for extra screens. It copies one signal to several monitors, so every screen shows the same image.
Daisy Chain Monitors With DisplayPort or Thunderbolt
A daisy chain runs one cable from the PC to the first monitor, then from that monitor to the next. Windows 10 and Windows 11 support DisplayPort daisy-chaining and multi-stream topology (MST) on supported hardware.
| Requirement | Where to confirm it |
|---|---|
| A PC output that supports DisplayPort MST, over DisplayPort or USB-C | The PC or graphics adapter manufacturer's specifications |
| A DisplayPort output on every monitor except the last one in the chain | The monitor's manual or support page |
| MST or daisy-chain mode turned on in the monitor's on-screen menu, where the monitor requires it | The monitor's manual |
| A Thunderbolt dock or monitor that passes video through to the next screen | The dock or monitor maker's documentation |
Once the chain is connected, Windows lists each monitor as a separate numbered box. Arrange them and set the main display as for any other setup. For a Mac-based desk, connecting two monitors to a MacBook Pro through a docking station is covered separately.
Optimize Color, HDR, and Night Light
Colour settings apply per monitor, so select the right numbered box first in Settings > System > Display.
| Setting | Where it is | What to know |
|---|---|---|
| HDR | Settings > System > Display, choose the HDR-capable monitor at the top, then turn on HDR | Display capabilities next to the HDR option shows whether the selected monitor supports it |
| Night light | Settings > System > Display > Night light | Turn on Schedule night light and pick Sunset to sunrise or Set hours |
| Night light on a USB display adapter | Not available | Night light does not work on displays driven by DisplayLink or the Microsoft Basic Display driver |
| Brightness and colour | Change display brightness and color link in the Microsoft multi-monitor guide | External monitors also keep their own picture controls in the monitor's on-screen menu |
How to check your multi-monitor setup works
- Select Identify in Settings > System > Display. Each screen should show a different number.
- Move the pointer across each shared edge. It should enter the neighbouring screen at the same height, without jumping.
- Press Win + Shift + Right arrow on an open window. It should move to the monitor on the right.
- Open Advanced display for each monitor and confirm the Display information panel lists the resolution and refresh rate you chose.
- Undock or unplug one monitor, reconnect it, and confirm windows return to where they were.
Troubleshoot Common Multi-Monitor Problems
Before anything else, press Win + P and confirm Extend is selected. Then find your symptom below.
Monitor detected but screen is black
The monitor is off, on the wrong mode, or the graphics driver has stalled.
- Make sure the monitor is plugged in, powered on and its cable is secure.
- Press Win + P and select Extend.
- Press Win + Ctrl + Shift + B to reset the graphics driver.
- Restart the PC with Start > Power > Restart.
Second monitor not detected
A faulty cable or port, a conflicting accessory, or an adapter that cannot drive another screen.
- Select Settings > System > Display > Multiple displays > Detect.
- Disconnect docks, dongles and adapters you do not need.
- Swap the cable, then try a different video port.
- Test the monitor on another computer to rule out the monitor itself.
- If one external monitor works but a second does not, check with the graphics adapter maker how many monitors it supports.
Wrong monitor is the main display
Windows chose the primary screen when the monitors were first connected.
- Open Settings > System > Display and select the monitor you want as main.
- Expand Multiple displays.
- Select Make this my main display.
Text is blurry on one monitor
That monitor is below its native resolution or on an unsuitable scale.
- Select the blurry monitor in Settings > System > Display.
- Set Display resolution to the value marked (Recommended).
- Set Scale to the value marked (Recommended).
- If the resolution keeps changing on its own, check Settings > Windows Update for a graphics driver update.
Monitor flickers or disconnects
A loose or faulty cable, a dock conflict, or a recent driver update.
- Reseat the cable at both ends, then try a different cable.
- Connect the monitor straight to the PC instead of through a dock or adapter.
- Open Device Manager, expand Display adapters, right-click the adapter and select Properties.
- On the Driver tab, select Roll Back Driver if the problem began after an update.
Refresh rate option is missing
The display, or the current resolution, does not support the higher rate.
- Open Settings > System > Display > Advanced display and select the right monitor.
- Check Display information for the current rate and VRR support.
- Open Choose a refresh rate; a rate with an asterisk changes the resolution when selected.
- Update the graphics driver through Windows Update if expected rates are absent.
Windows opens apps on the wrong monitor
The main display or saved window positions do not match how you work.
- Make the monitor you want apps on the main display.
- Expand Multiple displays and turn on Remember window locations based on monitor connection.
- Move a misplaced window with Win + Shift + Left arrow or Win + Shift + Right arrow.
Practical Layout Ideas for Different Uses
Pick a layout by task, then apply it with the settings covered above.
| Use | Layout | Settings to use |
|---|---|---|
| Office work and research | Two screens side by side, main display in front of you | Extend, Make this my main display, taskbar on all displays |
| Coding, long documents or chat | One landscape screen plus one monitor rotated to portrait | Display orientation set to portrait on the rotated monitor |
| Presenting to a room | Laptop plus projector or TV showing the same picture | Duplicate, or Win + K for a wireless display |
| Laptop on a desk with a large monitor | External monitor only, lid closed | Second screen only, lid action Do nothing when plugged in |
| Gaming plus a side screen | High-refresh monitor in the centre as main display | Highest supported rate under Choose a refresh rate; turn off Dynamic refresh rate if a game is capped |
| Three-screen desk | Centre main screen with one monitor on each side | Extend, boxes arranged left-centre-right, centre as main display |
Keep Drivers and Firmware Updated
Many multi-monitor faults, including resolution changes you did not make, trace back to the graphics driver.
- Select Start > Settings > Windows Update > Check for updates.
- Select Advanced options > Optional updates > Driver updates, then install any display driver listed.
- If a problem started after an update, open Device Manager, expand Display adapters, open the adapter's Properties, and select Roll Back Driver on the Driver tab.
- If there is no roll back option, right-click the adapter, select Uninstall device, tick Attempt to remove the driver for this device, and select Uninstall.
- Restart, then right-click the adapter, select Update driver and choose Search automatically for updated driver software.
- Get firmware for docks and monitors from the manufacturer's own support site.
Frequently Asked Questions
How do I set up multiple monitors in Windows 11?
Connect each monitor to its own video output and turn it on. Press Win + P and choose Extend. Then open Settings > System > Display, select Identify, drag the numbered boxes to match your desk and select Apply.
How do I set up multiple monitors on Windows 10?
The steps match Windows 11. Open Settings > System > Display, choose Extend these displays from the multiple displays drop-down, arrange the numbered boxes and select Apply. Win + P offers the same Extend and Duplicate choices on both versions.
How do I set up multiple computer monitors on a desktop PC?
Plug each monitor into a separate video port on the PC, such as HDMI or DisplayPort, then extend the desktop with Win + P. Check with the graphics adapter maker how many monitors it supports before adding a third screen.
Can my computer support three monitors?
It depends on the graphics adapter and the number of video outputs. Find the adapter under Display adapters in Device Manager, then check its maker's specifications. A PC with a single video port needs a dock, a USB-C adapter or a DisplayPort daisy chain.
Can I use an HDMI splitter to extend my display to two monitors?
No. A splitter duplicates the same signal on every monitor instead of creating independent signals, so it cannot extend the desktop. Use separate video ports, a docking station, a USB-C video adapter or DisplayPort daisy-chaining instead.
Why does Windows 11 not detect my second monitor?
The usual causes are a faulty cable, the wrong port, a conflicting dock, or a graphics adapter at its limit. Select Detect under Settings > System > Display > Multiple displays, swap the cable, then press Win + Ctrl + Shift + B to reset the graphics driver.
How do I change which monitor is my main display?
Open Settings > System > Display and select the monitor you want as main. Expand Multiple displays and select Make this my main display. Use Identify first if you are not sure which number belongs to which screen.
How do I move a window to my other monitor with the keyboard?
Press Win + Shift + Left arrow to send the active window to the monitor on the left, or Win + Shift + Right arrow to send it to the monitor on the right.
Can I use a wireless display as a second monitor?
Yes. Connect a wireless display adapter to an HDMI port on the TV, then press Win + K on the PC and select the adapter. If it does not show in Settings, select Connect under Settings > System > Display > Multiple displays.

How to Enable HDMI Port on Windows 10 - Techdows
[…] a numbered box on the Display page, the HDMI port is working. To set up more than one screen, see how to set up multiple monitors on Windows 11; the Windows 10 steps are nearly […]
How to Download Anime Wallpapers for Your Desktop - Techdows
[…] Two limits are documented and catch people out. Windows lets you use different backgrounds on different virtual desktops, but that per-desktop choice does not extend to per-monitor configuration, and slideshow backgrounds are not supported with multiple desktops. If you need the hardware side of a dual setup first, see our guide to setting up multiple monitors on Windows 11. […]
How to Enable and Use Wireless Display in Windows 11 - Techdows
[…] wireless display is managed like any other monitor once it is connected. All three controls are on Settings > System > […]