To split screen on Windows 11, open a window, press Windows key + Left arrow, then pick a second window from the thumbnails that Snap Assist shows on the other half.
This guide covers dragging, keyboard shortcuts, Snap layouts, Snap groups, touchscreens, multiple monitors, virtual desktops, Microsoft Edge split screen and PowerToys FancyZones, plus fixes when Snap stops working.
How to split screen on Windows 11
The keyboard route is the fastest way to put two apps side by side. It works on Windows 11 Home and Pro, on desktops and laptops alike.
- Open the two apps you want to see side by side.
- Select the first app's window so it is active.
- Press Windows key + Left arrow to snap it to the left half of the screen.
- Look at the right half, where Snap Assist shows thumbnails of your other open windows.
- Select the second app's thumbnail to fill the right half.
- Drag the divider between the two windows if you want one side wider than the other.
Press Windows key + Right arrow instead in step 3 if you want the first app on the right side.
Which Windows 11 split screen method should you use?
| Your situation | Use this | Why |
|---|---|---|
| Two apps side by side, hands on the keyboard | Windows key + Left or Right arrow | One key press, then Snap Assist fills the other half |
| Mouse or touchpad user | Drag the title bar to a screen edge | No shortcut to remember |
| Three or four windows in a grid | Snap layouts (Windows key + Z or hover over Maximize) | Shows every layout your display supports |
| Returning to the same set of windows | Snap groups on the taskbar | Restores the whole arrangement at once |
| Tablet or 2-in-1 without a keyboard | Drag with your finger | Snap responds to touch the same way as to a mouse |
| Two or more monitors | Windows key + Shift + Left or Right arrow | Moves a window to the next monitor, then snap it there |
| Two websites in one browser window | Microsoft Edge Split screen | Splits a single tab instead of two windows |
| Custom grids beyond the built-in layouts | PowerToys FancyZones | Lets you draw your own zones |
Before you start: make sure Snap is turned on
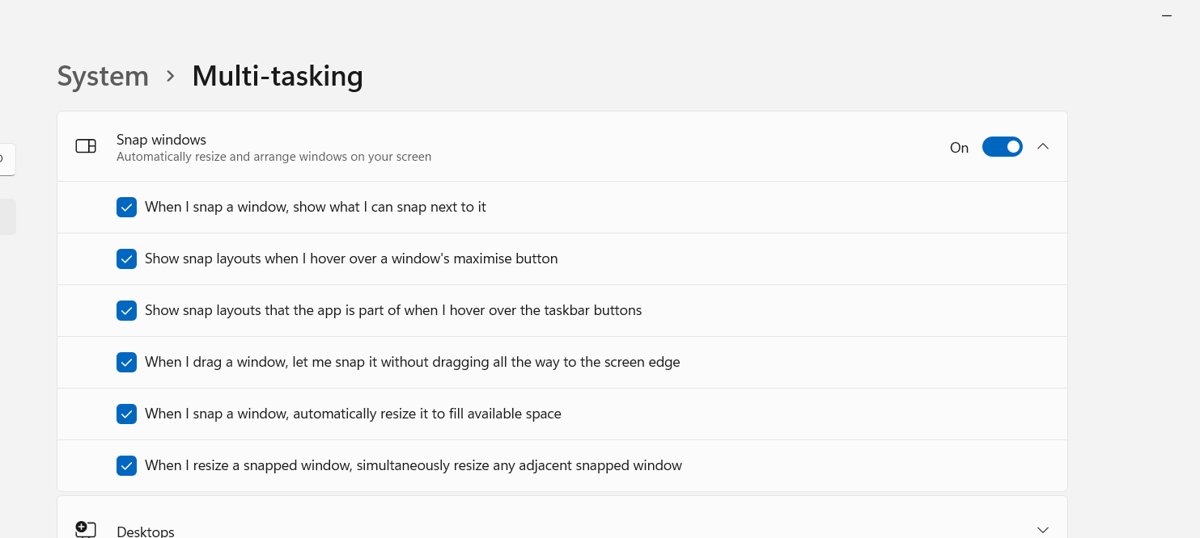
Every split screen method except FancyZones relies on the Snap windows setting. If it is off, windows will not snap no matter which shortcut you use.
- Open Settings with Windows key + I.
- Select System, then Multitasking.
- Turn the Snap windows toggle On.
- Expand Snap windows to see the individual Snap options and their checkboxes.
Windows 10 uses the same path, Settings > System > Multitasking, although it lacks Snap layouts and Snap groups.
Method 1: Split screen by dragging windows
Dragging suits a mouse or touchpad. Drag to a side for halves, or to a corner for quarters.
- Select and hold the title bar of the first window.
- Drag it to the left or right edge of the screen until a translucent outline appears.
- Release the mouse button to snap the window to that half.
- Select another window from the Snap Assist thumbnails on the opposite half.
- To make quarters instead, drag a window into a corner of the screen so it fills that quarter.
- Drag a window to the top edge if you want it to fill the full height while keeping its width.
Method 2: Use keyboard shortcuts for split screen
Holding the Windows key and pressing arrows moves the active window through snap positions. Keep the Windows key down until the window sits where you want it.
- Select the window you want to snap.
- Hold the Windows key and press Left arrow or Right arrow to snap it to that half.
- While still holding the Windows key, press Up arrow or Down arrow to move it to the upper or lower part of that side.
- Release the Windows key once the window is in position.
- Choose a window from Snap Assist to fill the remaining space.
- Press Windows key + Z at any time to open Snap layouts from the keyboard.
Method 3: Use Snap layouts in Windows 11
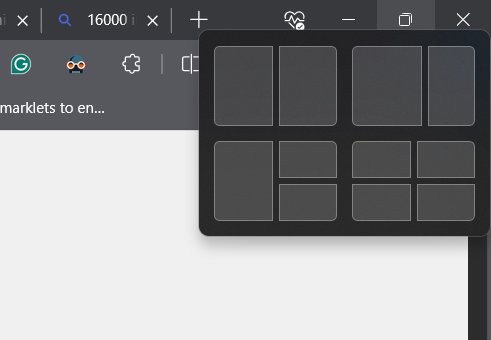
Snap layouts are preset arrangements such as two columns, three columns or a four-window grid. Larger displays show more layout options than smaller laptop screens.
You can open them three ways: hover over the Maximize button, press Windows key + Z, or drag a window to the top of the screen to reveal the Snap bar.
- Hover the pointer over the Maximize button of a window, or press Windows key + Z.
- Select the zone in a layout where you want this window to go.
- Pick a window from the Snap Assist thumbnails for each remaining zone.
- Alternatively, drag a window toward the top of the screen until the Snap bar drops down.
- Drop the window onto a zone in the Snap bar, then fill the rest with Snap Assist.
Method 4: Split screen on a touchscreen Windows device
Snap works with touch on tablets and 2-in-1 laptops. Your finger takes the place of the mouse pointer.
- Press and hold the title bar of the window with one finger.
- Drag it to the left or right edge of the screen.
- Lift your finger when the outline appears to snap the window.
- Tap a thumbnail in Snap Assist to fill the other half.
- Tap the divider between the windows and drag it to resize them.
Method 5: Split screen across multiple monitors
Each monitor has its own snap edges, so you can split every screen independently. Move a window to the monitor first, then snap it there. If the second display is not connected yet, set up multiple monitors before you start.
- Select the window you want on another monitor.
- Press Windows key + Shift + Left arrow or Windows key + Shift + Right arrow to move it to the monitor on that side.
- Press Windows key + Left arrow or Windows key + Right arrow to snap it to half of that monitor.
- Fill the other half from the Snap Assist thumbnails.
- Repeat on each monitor, or use Windows key + Z to pick a layout per screen.
How to use Snap groups in Windows 11
Windows 11 creates a Snap group automatically whenever you snap two or more windows together. You do not save it manually.
- Snap at least two windows together with any method above.
- Open or switch to a different app as normal.
- Hover over the taskbar icon of any app in the group.
- Select the group thumbnail to restore the whole arrangement, or the single window to open just that app.
- Press Alt + Tab or Windows key + Tab to see Snap groups listed alongside your other windows.
How to split screen with virtual desktops
Virtual desktops give you extra workspaces, each with its own split screen arrangement. Use them to keep a work layout and a personal layout apart.
- Press Windows key + Ctrl + D to create a new desktop.
- Open the apps you need on it and snap them side by side.
- Press Windows key + Ctrl + Left arrow or Right arrow to switch between desktops.
- Press Windows key + Tab, then select a desktop name to rename it.
- Press Windows key + Ctrl + F4 to close the desktop you are using.
How to split screen in Microsoft Edge
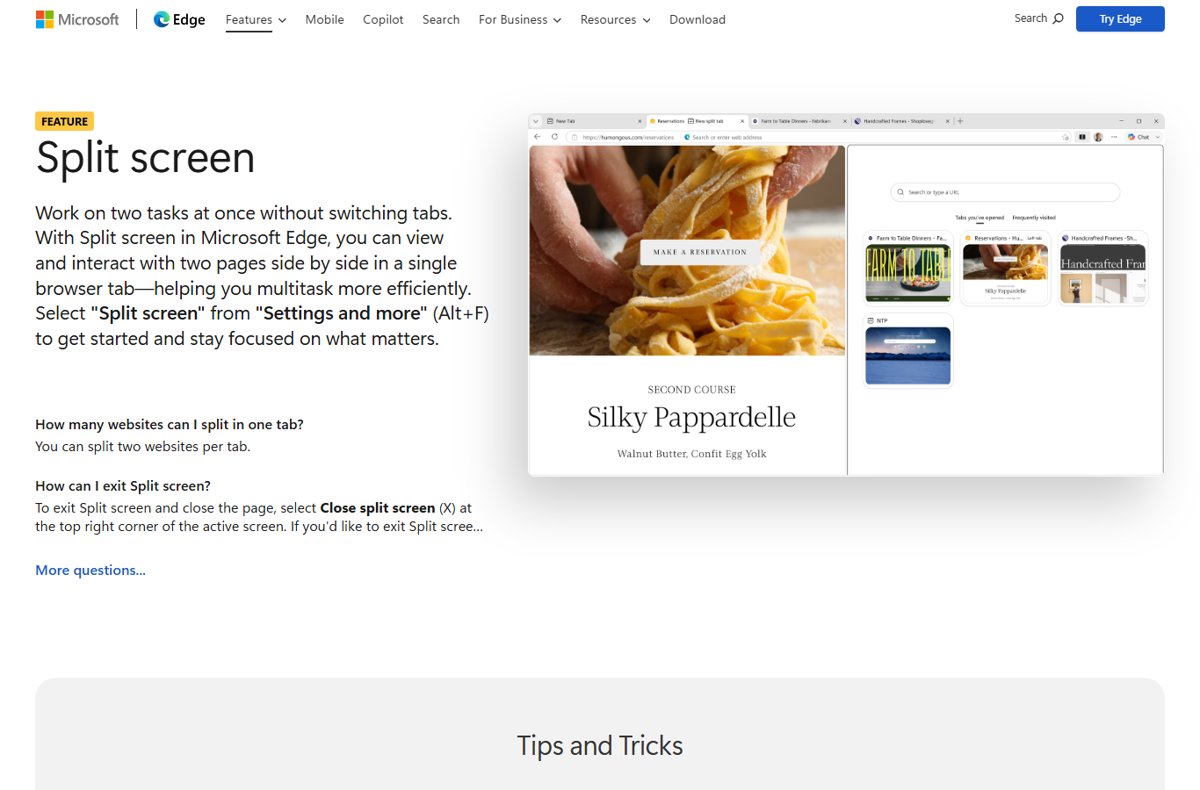
Edge can show two websites side by side inside one tab. This is separate from Windows Snap and works even when Snap is off.
- Open Microsoft Edge on the first website.
- Select Settings and more (the three dots), or press Alt + F.
- Select Split screen.
- Open the second website in the new pane.
- To close one side, select Close split screen (X) at the top right of that pane.
- To keep both pages as normal tabs, select More options (…) and choose Separate two tabs.
Advanced option: use PowerToys FancyZones
FancyZones is part of Microsoft PowerToys, a free set of utilities for Windows 11 and Windows 10 version 2004 or later. It lets you design zones that the built-in Snap layouts do not offer, such as an uneven three-column grid.
- Install PowerToys from the Microsoft Store or with
winget install --id Microsoft.PowerToys --source winget. - Open PowerToys, select FancyZones, and make sure it is enabled.
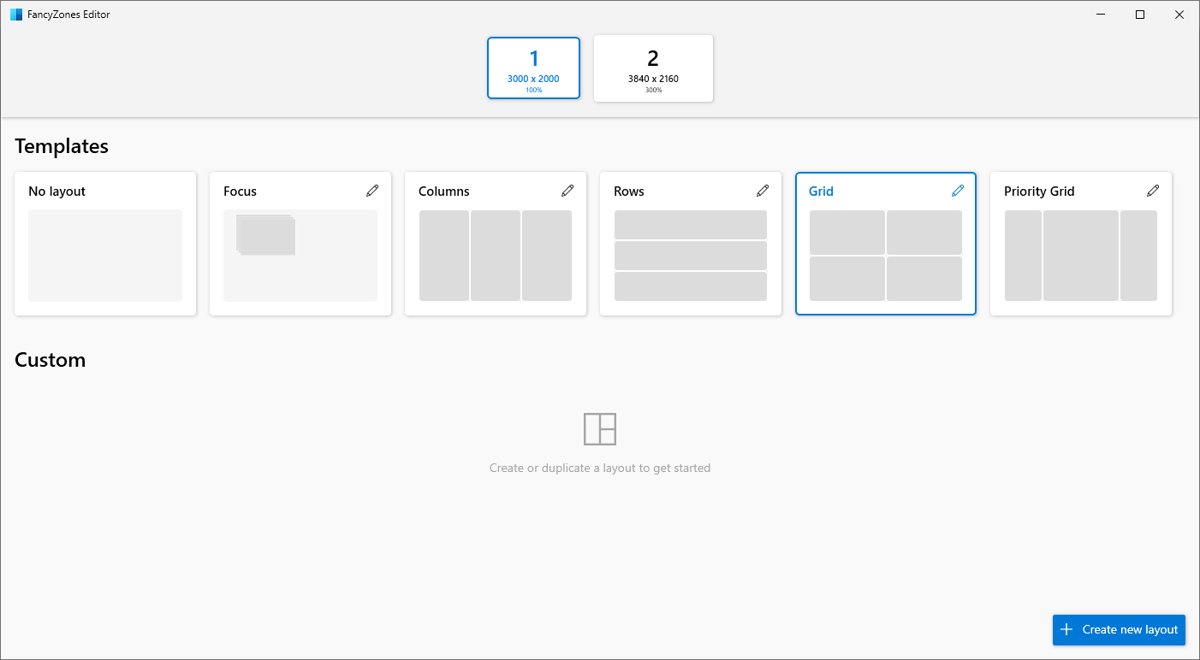
- Press Windows key + Shift + ` (back-tick), or select Open layout editor.
- Choose a template layout, or select Create new layout and pick Grid or Canvas.
- Close the editor; the selected layout applies automatically.
- Hold Shift while dragging a window, then drop it on a highlighted zone.
- Hold Ctrl while dragging over zones to snap one window across several of them.
To snap with Windows key + arrow into your zones, turn on Override Windows Snap in the FancyZones settings. Elevated apps such as Task Manager only snap into zones when PowerToys runs as administrator.
Windows 11 split screen keyboard shortcuts
| Shortcut | What it does |
|---|---|
| Windows key + Left arrow | Snap the active window to the left half |
| Windows key + Right arrow | Snap the active window to the right half |
| Windows key + Alt + Up arrow | Snap the active window to the top half |
| Windows key + Alt + Down arrow | Snap the active window to the bottom half |
| Windows key + Z | Open Snap layouts |
| Windows key + Up arrow | Maximize the active window |
| Windows key + Shift + Down arrow | Restore a snapped or maximized window |
| Windows key + Shift + Left or Right arrow | Move the active window to the monitor on that side |
| Windows key + Tab | Open Task View, which also lists Snap groups |
| Windows key + Ctrl + D | Create a new virtual desktop |
Best split-screen layouts for common tasks
| Task | Suggested layout | How to get it |
|---|---|---|
| Writing while reading a source | Two equal halves | Windows key + Left arrow, then pick the source in Snap Assist |
| Video call while taking notes | Wide main window plus narrow side window | Snap two halves, then drag the divider |
| Comparing two documents | Two equal halves | Snap layouts, two-column option |
| Monitoring chat, email and a browser | Four quarters | Drag windows into each corner, or a grid in Snap layouts |
| Coding with a preview and terminal | Three columns on a wide monitor | Windows key + Z, three-column layout |
| Researching two websites | Edge split screen | Settings and more > Split screen |
How to check Windows 11 split screen worked
- Look for the two windows filling the screen edge to edge with no gap between them.
- Hover over the line between them; a bar should appear and a mouse pointer turns into a double arrow.
- Drag that bar and confirm both windows resize together.
- Hover over the taskbar icon of one snapped app and confirm a Snap group thumbnail appears.
How to enable Windows Snap Assist
Snap Assist is the thumbnail picker that appears after you snap the first window. It, and the other Snap extras, are checkboxes under the main Snap toggle.
- Open Settings > System > Multitasking.
- Expand Snap windows.
- Check When I snap a window, show what I can snap next to it to turn on Snap Assist.
- Check Show snap layouts when I hover over a window's maximize button to turn on the Snap flyout.
- Check Show snap layouts when I drag a window to the top of my screen to turn on the Snap bar.
- Check Show my snapped windows when I hover over the taskbar apps, in Task View, and when I press Alt + Tab to turn on Snap groups.
- Check When I drag a window, let me snap it without dragging all the way to the screen edge if edge drags feel too fiddly.
Clear any of these checkboxes to turn that single feature off while keeping Snap itself on.
How to turn off split screen or unsnap windows
Unsnapping one window is a single shortcut. Turning Snap off stops windows snapping when you drag them near an edge. To fill the display with one app afterwards, you can go full screen instead.
- Select the snapped window and press Windows key + Shift + Down arrow to restore its previous size.
- Or press Windows key + Up arrow to maximize it over the whole screen.
- Or drag its title bar away from the edge to free it.
- To stop snapping entirely, open Settings > System > Multitasking.
- Turn the Snap windows toggle Off.
Troubleshooting: split screen not working on Windows 11
Windows do not snap at all
The Snap windows toggle is off.
- Open Settings > System > Multitasking.
- Turn Snap windows On.
- Try Windows key + Left arrow on an open window.
No thumbnails appear after snapping the first window
Snap Assist is turned off.
- Expand Snap windows in Multitasking settings.
- Check When I snap a window, show what I can snap next to it.
- Make sure at least one other app window is open and not minimized to the system tray.
Snap layouts do not show when hovering over Maximize
The Snap flyout checkbox is cleared.
- Expand Snap windows in Multitasking settings.
- Check Show snap layouts when I hover over a window's maximize button.
- Use Windows key + Z as a keyboard alternative.
Only a few layouts are offered
Windows shows layouts based on the size of your display.
- Move the window to your largest monitor and open Windows key + Z again.
- Use PowerToys FancyZones if you need a layout Windows does not offer.
Snap groups do not appear on the taskbar
The Snap groups checkbox is cleared.
- Expand Snap windows in Multitasking settings.
- Check Show my snapped windows when I hover over the taskbar apps, in Task View, and when I press Alt + Tab.
- Snap two windows again to create a new group.
Task Manager or another admin app will not snap into FancyZones
FancyZones cannot move elevated windows unless PowerToys is elevated too.
- Close PowerToys from its system tray icon.
- Right-click the PowerToys shortcut and select Run as administrator.
- Drag the elevated app into a zone again.
Tips for splitting screen on Windows 11
| Tip | What to do |
|---|---|
| Resize both windows at once | Drag the divider between snapped windows; the neighbouring window adjusts so no space is wasted |
| Snap without precise dragging | Check the option to snap without dragging all the way to the screen edge |
| Get quarters fast | Drag a window straight into a corner of the screen |
| Keep layouts apart | Put each task's split screen on its own virtual desktop |
| Return after an interruption | Hover a grouped app's taskbar icon and pick the Snap group |
| Split one browser window | Use Microsoft Edge Split screen instead of two browser windows |
| Present a split screen | Snap your windows first, then project to a second display |
When you project your screen to a TV or projector in Duplicate mode, viewers see the same split arrangement you see.
Windows 11 split screen FAQ
Can I split screen on Windows 11?
Yes. Split screen is built into Windows 11 through the Snap feature, so no extra software is needed. Press Windows key + Left or Right arrow on any window, or drag it to a screen edge, and Snap Assist offers your other windows for the remaining space.
How do I split screen on Windows 11 using the keyboard?
Select a window and press Windows key + Left arrow or Windows key + Right arrow. Then select the second window from the Snap Assist thumbnails. Press Windows key + Z to open Snap layouts for three- or four-window arrangements.
What is the split screen shortcut on Windows 11?
The main shortcut is Windows key + Left arrow or Right arrow, which snaps the active window to that half. Windows key + Z opens Snap layouts, and Windows key + Shift + Left or Right arrow moves a window to another monitor before you snap it.
How do I split screen on Windows 11 Pro?
Windows 11 Pro splits the screen exactly like Windows 11 Home. Snap, Snap Assist, Snap layouts and Snap groups are part of every edition. Turn on Snap windows in Settings > System > Multitasking, then use Windows key + arrow or drag windows to the edges.
How do I split screen on a Windows 11 laptop?
A laptop uses the same methods as a desktop. Press Windows key + Left or Right arrow, or drag a window to a screen edge with the touchpad. Smaller laptop displays show fewer Snap layouts, so a four-way grid may not appear on a compact screen.
How do I split screen in Microsoft Edge on Windows 11?
Open Edge, select Settings and more (the three dots) or press Alt + F, then select Split screen. A second pane opens in the same tab for another website. Close it with the X at the top right of that pane, or choose Separate two tabs.
How do I split my screen into two on Windows 11?
Snap one window to the left half with Windows key + Left arrow, then pick the second window from the Snap Assist thumbnails on the right. You can also hover over the Maximize button and choose the two-column layout.
Can I split the screen into more than two sections?
Yes. Drag windows into the four corners for quarters, or press Windows key + Z and choose a three-column or grid layout. Available layouts depend on display size. PowerToys FancyZones lets you build custom layouts with as many zones as you need.
Will snapping windows affect my open applications?
No. Snapping only changes a window's size and position. The app keeps running with all its content intact, and Windows key + Shift + Down arrow returns the window to its previous size.
How do I turn off Snap Assist?
Open Settings > System > Multitasking, expand Snap windows and clear When I snap a window, show what I can snap next to it. Snapping still works, but Windows no longer offers thumbnails for the other half. Turn the Snap windows toggle off to disable snapping entirely.
Bottom line: the best way to split screen on Windows 11
Use Windows key + Left or Right arrow for two windows and Windows key + Z for three or four. Both are built into every edition of Windows 11, need no setup beyond the Snap windows toggle, and create Snap groups you can restore later. Add PowerToys FancyZones only when you need a layout the built-in options do not offer.