Connect the microphone, go to Start > Settings > System > Sound, select it under Input, then select Start test in its properties and speak normally.
The sections below cover the default device, privacy permissions, setup in Zoom, Teams, Discord and Chrome, Bluetooth mics, sound quality, and what to do when Windows cannot hear or detect the mic.
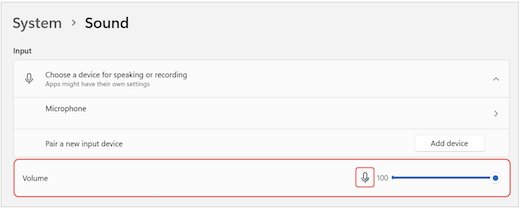
Set up and test a microphone on Windows 11
Windows usually recognizes a new microphone as soon as you connect it, so setup is mostly a matter of confirming it is selected and hearing the result.
- Connect the microphone to your PC.
- Select Start > Settings > System > Sound.
- Under Input, check that your microphone appears. For a Bluetooth mic, select Add device and follow the prompts.
- Select the microphone, then select the arrow beside it to open its properties page.
- Under Input settings, select Start test and speak normally.
- Select Stop test, then Play to hear your recording.
- Move the Input volume slider if your voice is too quiet or too loud, then test again.
Before you start: connect the microphone correctly
The right connection depends on the type of mic you have. A full headset has a few extra settings, so you may also want to set up a headset on Windows 11.
| Microphone type | How to connect it | What to watch for |
|---|---|---|
| USB microphone or USB headset | Plug it into a USB port on the PC | It should appear under Input as soon as it is connected |
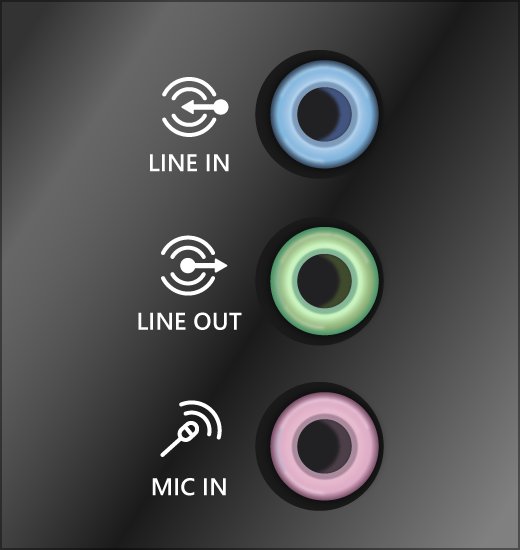
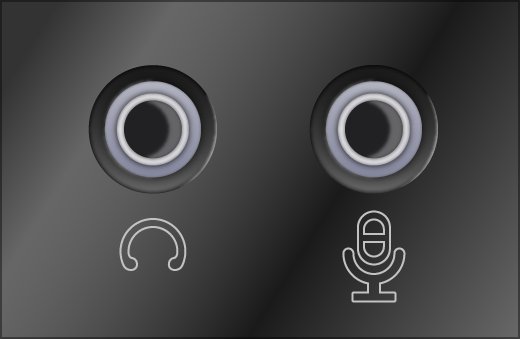
| 3.5 mm analog microphone | Plug it into the mic jack, not the headphone jack | Some PCs use a pink jack for mic input and a green jack for output, while others label them headphone and microphone |
| Bluetooth microphone or headset | Put it in pairing mode and pair it from Settings | Keep it charged and within range |
| Webcam with a built-in microphone | Plug the webcam into a USB port | Check camera permissions as well as microphone permissions |
| Laptop's built-in microphone | Nothing to connect | It is often listed as Microphone Array under Input |
Check your microphone connection and hardware
Physical problems are the quickest to rule out, and no Windows setting can fix them. Do this first when the test shows no sound.
- Check whether the headset or microphone has a mute button or switch, and make sure it is not muted.
- Unplug the microphone and plug it back in firmly.
- Try a different USB port, or try each audio jack one at a time if you are unsure which is the mic input.
- Move the microphone closer to your mouth and speak normally.
- Check that a Bluetooth mic is paired, connected and charged.
- Go to Settings > System > Sound and see whether the mic now appears under Input.
Set your microphone as the default input device
Apps that do not choose a mic of their own use the Windows default, so a webcam mic can end up in use when you meant to use your headset.
- Select Start > Settings > System > Sound.
- Under Input, select the device you want from the list. Selecting it also makes it the default.
- To set the device that calling apps use, scroll down and select More sound settings.
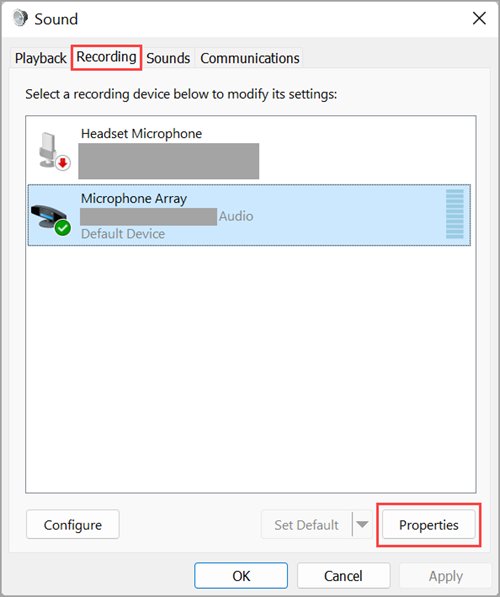
- On the Recording tab, select your mic and select Set Default Communication Device.
- Select OK.
A different mic can also be used for one app only, if you choose a preferred microphone for each app.
Adjust microphone volume and input settings
Set the level with your normal speaking voice at your normal distance from the mic. Change one thing at a time so you can tell what helped.
- Go to Settings > System > Sound.
- Under Input, select your microphone's arrow to open its properties.
- Under Input settings, select Start test and speak as you normally would.
- Select Stop test and Play to judge the recording.
- Raise Input volume if you sound faint, or lower it if your voice distorts.
- Test again and repeat until your voice is clear.
Use the classic Sound Control Panel for advanced settings
The classic panel holds settings that the main Settings page does not show. Go to Settings > System > Sound > More sound settings, or run mmsys.cpl, then open the Recording tab, select your mic and select Properties.
| Tab | Setting | What it does |
|---|---|---|
| General | Device usage: Use this device (enable) | Turns the mic on if it was disabled |
| Levels | Microphone and Microphone Boost | Sets the mic volume and strengthens the signal; Microphone Boost is not available on every device |
| Listen | Listen to this device | Plays the mic through your speakers or headphones |
| Enhancements | Disable all enhancements or Disable all sound effects | Turns off driver effects; this tab appears only on some devices |
| Advanced | Default Format | Changes the audio format the device uses |
| Advanced | Allow applications to take exclusive control of this device | Lets one app take over the mic; when cleared, the mic works in shared mode only |
| Advanced | Enable audio enhancements | Appears on some devices in place of the Enhancements tab |
Allow microphone access in Windows privacy settings
If these switches are off, no app can use the mic, whatever the per-app settings say. This is a common reason a mic works in the Windows test but not in an app.
- Select Start > Settings > Privacy & security.
- Under App permissions, select Microphone.
- Turn on Microphone access.
- Turn on Let apps access your microphone.
Allow apps to use the microphone
Microsoft Store apps and desktop apps are controlled separately. Zoom and other desktop apps need the desktop switch on, even when every Store app is allowed.
- Stay on Settings > Privacy & security > Microphone.
- Under Choose which apps can access your microphone, turn on each app you want to use.
- Scroll down and turn on Let desktop apps access your microphone.
- Close and reopen the app so it picks up the change.
Set the microphone inside your app
Many apps keep their own microphone choice, which can differ from the Windows default. A mic that passes the Windows test can still be silent in a call for this reason.
- Open the app's settings and find its audio or voice section.
- Choose your microphone by the same name it has under Input in Windows.
- Use the app's own test, if it has one, and speak normally.
- Check that the app itself has not muted you.
- Change the mic again whenever you connect a different device, because the app's choice may not follow Windows.
Set up the microphone in apps like Zoom, Teams, Discord, and Chrome
Use this table for the exact place to pick and test your mic in each app. Chrome works differently because the permission is set per website.
| App | Where to choose the mic | How to test it |
|---|---|---|
| Zoom desktop app | Profile picture > Settings > Audio > Microphone drop-down | Select Test microphone; the Input volume bar moves and your recording plays back |
| Microsoft Teams | Settings and more > Settings > Devices > Audio settings > Microphone | Select Make a test call and follow the prompts; not available in Teams for the web |
| Discord | User Settings > Voice & Video > Input Device | Select Let's Check and speak |
| Google Chrome | More > Settings > Privacy and security > Site settings > Microphone, then the down arrow | Open the site and select Allow while visiting the site or Allow this time when asked |
During a Teams meeting, select the arrow next to Mic, then More audio settings, to switch mics without leaving the call.
Pair and test a Bluetooth microphone
Pair the device first, then test it like any other mic. Once paired, it reconnects on its own when Bluetooth is on and it is in range.
- Go to Start > Settings > Bluetooth & devices and turn Bluetooth on.
- Turn on the audio device and put it in pairing mode, using the steps in its manual.
- On the taskbar, select the Network, Sound or Battery icon.
- Select the chevron next to Bluetooth to open Manage Bluetooth devices.
- Under New devices, select your audio device, follow any instructions and select Done.
- Go to Settings > System > Sound, select it under Input, and run Start test in its properties.
Test your microphone in Windows 11 and Windows 10
A good test proves that Windows hears the mic. Hearing your own recording played back is stronger proof than a moving meter, because you can also judge the quality.
- On Windows 11, open your mic's properties under Settings > System > Sound > Input.
- Select Start test, speak normally for a few seconds, then select Stop test.
- Select Play. A clear recording of your voice means Windows is hearing the mic.
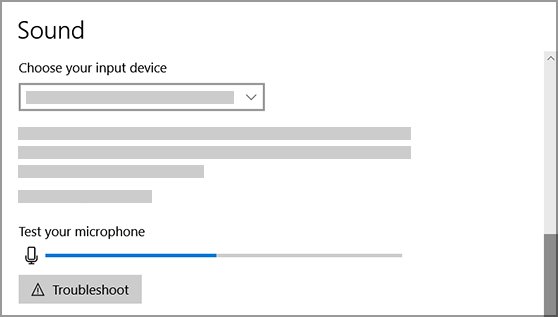
- On Windows 10, go to Settings > System > Sound and speak while you watch Test your microphone under Input.
- If the line moves from left to right on Windows 10, the mic is working. If it stays still, Windows is not picking up sound.
- If the Windows test passes but an app stays silent, recheck the privacy switches and the app's own mic choice.
Record a test clip
A longer clip reveals problems that a short test misses, such as background hum, or a level that drifts while you talk. The built-in Sound Recorder app does this without any download.
- Select Start, search for Sound Recorder and open it.
- Select Start recording, or press Ctrl + R.
- Speak for 30 seconds at your normal distance and volume.
- Select Stop recording, or press Esc.
- Select the recording in your list and play it back.
- If the app cannot record, go to Settings > Privacy & security > Microphone and turn on access for Sound Recorder.
Improve microphone sound quality
Start with the mic's position and the level, since those affect every app. Software filters come after that.
| What you hear | What to change | Where |
|---|---|---|
| Voice too quiet | Move the mic closer, then raise Input volume | Settings > System > Sound > your mic's properties |
| Still too quiet | Raise Microphone Boost; Microsoft suggests Microphone at 50 and boost at +24.0 dB as a starting point for Surface mics | Levels tab in the classic panel |
| Voice distorted or harsh | Lower Microphone Boost and Input volume | Levels tab and your mic's properties |
| Background noise in calls | Turn on Noise suppression | Teams Settings > Devices |
| No signal, or an odd processed sound | Turn off audio enhancements | Enhancements or Advanced tab in the classic panel |
| Other people hear an echo | Use headphones and lower your speaker volume | Your speakers and headset |
Set up and test a microphone on Windows 10
The route starts in the same place, though some labels differ. Windows 10 reached end of support on October 14, 2025, so Microsoft recommends moving to Windows 11.
- Connect the microphone to your PC.
- Go to Start > Settings > System > Sound.
- Under Input, select your mic under Choose your input device.
- Speak and watch the line under Test your microphone.
- Select Device Properties, then adjust the Microphone and Microphone Boost sliders on the Levels tab.
- Go to Settings > Privacy > Microphone and turn on Microphone access for this device.
- Turn on Allow apps to access your microphone and Allow desktop apps to access your microphone.
How to stop hearing yourself on mic on Windows 11
Hearing your own voice in your headset usually means Windows is playing the mic back to your output device, or the headset's own monitoring is on.
- Go to Settings > System > Sound > More sound settings.
- Select the Recording tab, select your mic and select Properties.
- Open the Listen tab and clear Listen to this device.
- Select OK, then repeat for any other input on the Recording tab.
- Open your headset maker's app and turn off mic monitoring or sidetone, if it has that option.
If other people are the ones hearing the echo, the cause is sound leaking from speakers into a mic, so fix mic echo on Windows from that side.
How to stop microphone from auto-adjusting in Windows 11
Apps with automatic level control are the usual reason an input level moves by itself, so start with the app you were using. Driver effects can also apply automatic gain control to the mic.
- In Zoom, go to Settings > Audio and turn off Automatically adjust microphone volume.
- In Teams, go to Settings > Devices > Audio settings and turn off Automatically adjust mic sensitivity.
- In other apps, turn off any automatic mic volume or sensitivity option in their audio settings.
- In the classic panel, open your mic's Properties and select Disable all enhancements on the Enhancements tab, if your device has it.
- On the Advanced tab, clear Allow applications to take exclusive control of this device and select OK.
- Set Input volume by hand and test again.
Clicking sound or popping noise from microphone on PC
The mic clicks, pops or crackles in Windows
Audio enhancements, the audio format, the driver or a stalled audio service.
- In your mic's Properties, select Disable all enhancements on the Enhancements tab, or clear Enable audio enhancements on the Advanced tab.
- On the Advanced tab, choose a different option under Default Format and test again.
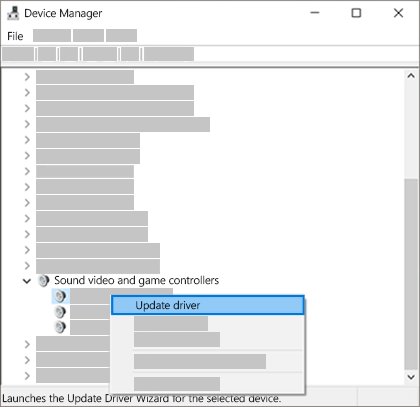
- Open Device Manager, expand Sound, video and game controllers, right-click your audio device and select Update driver.
- Select Start, type
services.mscand press Enter. - Right-click Windows Audio and select Restart, then do the same for Windows Audio Endpoint Builder.
Clicks happen when the mic or cable moves
A loose or damaged connection.
- Unplug the mic and plug it back in firmly.
- Try a different port.
- Try the mic on another PC, or another mic on this PC, to find which one has the fault.
Fix common microphone problems and driver issues
Other people cannot hear you
The mic is muted, not the default device, or not connected properly.
- Check the mute button on the headset and the mute control in the app.
- Set the mic as the default under Settings > System > Sound > Input and run Start test.
- Scroll to Advanced on the Sound page and, under Troubleshoot common sound problems, select Input devices.
- Follow the prompts, then try the call again.
The mic works in Windows but not in an app
A privacy setting is off or the app is using another device.
- Go to Settings > Privacy & security > Microphone and turn on the switches for apps and desktop apps.
- Open the app's audio settings and select the correct mic.
- Restart the app.
The mic stopped working after a driver change
The audio driver is out of date or was installed incorrectly.
- Go to Settings > Windows Update, select Check for updates, and install any audio driver offered.
- In Device Manager, expand Sound, video and game controllers, right-click your audio device and select Update driver.
- Select Search automatically for drivers, then restart.
- If the problem continues, install the latest driver from your PC or audio device maker's support site.
What to do if Windows still does not detect the microphone
Reinstalling the device makes Windows set it up from scratch. Before you start, confirm the mic works on another PC if you can, so you do not chase a hardware fault in software.
- Go to More sound settings > Recording, open your mic's Properties if it is listed, and set Device usage to Use this device (enable).
- Select Start, search for Device Manager and open it.
- Expand Sound, video and game controllers, right-click your audio device and select Uninstall device.
- Select Attempt to remove the driver for this device, then select Uninstall.
- Restart the PC so Windows reinstalls it, or right-click Sound, video and game controllers and select Scan for hardware changes.
- Return to Settings > System > Sound and look for the mic under Input.
If it is still missing, work through more fixes for an undetected microphone, starting with the port and the device maker's driver.
Windows 11 microphone setup FAQ
How do I set up a microphone on Windows 11?
Connect the mic, then go to Start > Settings > System > Sound and select it under Input. For Bluetooth, select Add device first. Open its properties with the arrow beside it, run Start test, and adjust Input volume if needed.
How do I get my computer to recognize a new microphone?
Connect it firmly and check Settings > System > Sound > Input. If it is missing, right-click Sound, video and game controllers in Device Manager and select Scan for hardware changes. If that fails, uninstall the audio device and restart so Windows reinstalls it.
How do I test my microphone on Windows 11?
Go to Settings > System > Sound, select your mic under Input and open its properties. Select Start test and speak normally, then Stop test and Play to hear the recording. A clear recording means Windows is hearing the mic.
Why is my mic not working in apps when the Windows test passes?
Windows privacy settings or the app's own mic choice are the usual causes. Turn on Microphone access, Let apps access your microphone and Let desktop apps access your microphone. Then open the app's audio settings and select the correct device.
Which jack is the microphone jack on a PC?
Some systems use a pink jack for mic input and a green jack for output, while others label them headphone and microphone. If you cannot tell, check the manufacturer's documentation or try each jack one at a time while running the Windows test.
How do I make my microphone louder on Windows 11?
Move the mic closer, then raise Input volume in its properties under Settings > System > Sound. If that is not enough, open More sound settings > Recording > Properties > Levels and raise Microphone Boost, which is not available on every device.
How do I test a microphone in Zoom or Teams?
In Zoom, go to your profile picture, Settings, Audio and select Test microphone. In Teams, go to Settings and more, Settings, Devices and select Make a test call. Both play your own voice back, so you can judge the sound.
Do I need to install a driver for a microphone?
Usually not, because Windows reinstalls the audio driver after a restart when the device is removed in Device Manager. Check Windows Update for audio driver updates first. If the problem continues, install the latest driver from your PC or audio device maker's support site.