To run a Disk Cleanup in Windows, type Disk Cleanup in the taskbar search, pick drive C:, tick the file types you want gone, and select OK and then Delete Files.
This guide walks through every screen on Windows 11 and Windows 10, the system-files pass that frees the most space, the cleanmgr command, and Storage Sense for automatic cleanups.
How to run Disk Cleanup on Windows 10 and Windows 11
The steps are identical on Windows 11 and Windows 10, and on any brand of PC or laptop, including HP, Dell and Lenovo models.
- Select Start or the search box on the taskbar and type
Disk Cleanup. - Select Disk Cleanup in the results.
- Choose the drive to clean, usually C:, and select OK.
- Tick the check boxes next to the file types you want to remove.
- Select OK, then select Delete Files in the confirmation box.
- Wait for the progress bar to finish. The freed space is available straight away.
For a bigger cleanup that includes old Windows Update files, repeat the run with Clean up system files, covered in Step 7 below.
Which way to run Disk Cleanup fits your situation
| Your situation | Use this | Why |
|---|---|---|
| You want to free space once, right now | Search Disk Cleanup from the taskbar | Shows each file type with its size before anything is deleted |
| You prefer the keyboard | Press Windows logo key + R, type cleanmgr, press Enter |
Opens the same tool from the Run dialog box without the Start menu |
| Drive C: is almost full after a Windows update | Disk Cleanup with Clean up system files | Only this pass lists Windows Update files and previous Windows installations |
| You are on Windows 11 and want suggestions | Settings > System > Storage > Cleanup recommendations | Adds large or unused files, cloud-synced files and unused apps |
| You never want to think about it again | Turn on Storage Sense | Deletes temporary files and old Recycle Bin items on a schedule |
| You manage several PCs or want a scripted run | cleanmgr /sageset:1, then cleanmgr /sagerun:1 |
Saves one set of choices and reruns it on every drive |
Understanding Disk Cleanup
Disk Cleanup is the built-in Windows tool cleanmgr.exe. It clears files Windows and your apps no longer need, and it never touches documents, photos or installed programs unless you tick the Recycle Bin.
| Question | Answer |
|---|---|
| What is it? | A Windows utility that lists removable file types on a drive with the space each one uses |
| Which Windows versions have it? | Windows 11 and Windows 10; Microsoft's cleanmgr reference applies to both |
| What does a normal run remove? | Temporary files, temporary internet files, downloaded program files, thumbnails, the Recycle Bin and similar leftovers |
| What does the system files pass add? | Windows Update leftovers, Delivery Optimization files and, within 10 days of an upgrade, the previous Windows installation |
| Which drives get the full list? | Only the drive Windows is installed on. Other drives show just the Recycle Bin and catalog files for the content indexer |
| What replaced it? | Storage Sense and Cleanup recommendations in Settings work alongside it; Disk Cleanup still opens from search on both versions |
Importance of Disk Cleanup
Windows needs free space on drive C: to download and apply updates, and it keeps extra update files for about 10 days so an update can be removed. Disk Cleanup reclaims that space once you no longer need it.
| Reason to run it | What actually happens |
|---|---|
| A Windows update fails for lack of space | Removing temporary and old update files gives the update room to download and install |
| Drive C: shows red in File Explorer | Temporary files, the Recycle Bin and update leftovers often add up to several gigabytes; on Windows 11, check disk space by category to see what else fills the drive |
| You recently upgraded Windows | The previous installation sits in Windows.old until you remove it or Windows does |
| The PC feels slower | Microsoft lists Disk Cleanup among its PC performance tips, because a nearly full system drive slows Windows down; it does not speed up a PC with plenty of free space |
Step 1: Open Disk Cleanup utility
Use whichever route is quickest for you. Both open the same window.
- From search: select Start, type
Disk Cleanup, and select Disk Cleanup in the results. - From the Run box: press Windows logo key + R, type
cleanmgr, and press Enter or select OK. - From Command Prompt or PowerShell: type
cleanmgrand press Enter. - If you plan to clean system files, you can start with search and still switch to system mode later from inside the tool.
Steps 2 and 3: Select drive and wait for the initial scanning
- In the drive selection box, open the drop-down list of drives.
- Pick the drive Windows is installed on, usually C:. Only that drive offers the full list of file types.
- Select OK.
- Wait while Disk Cleanup scans the drive and calculates how much space each file type uses. On a large or slow drive this can take a minute or more.
- Let the scan finish before clicking anything else; the Disk Cleanup tab with the file list appears when it is done.
Skipping the drive box is possible from the command line: cleanmgr /d C opens Disk Cleanup straight on drive C:.
Step 4: Review file types
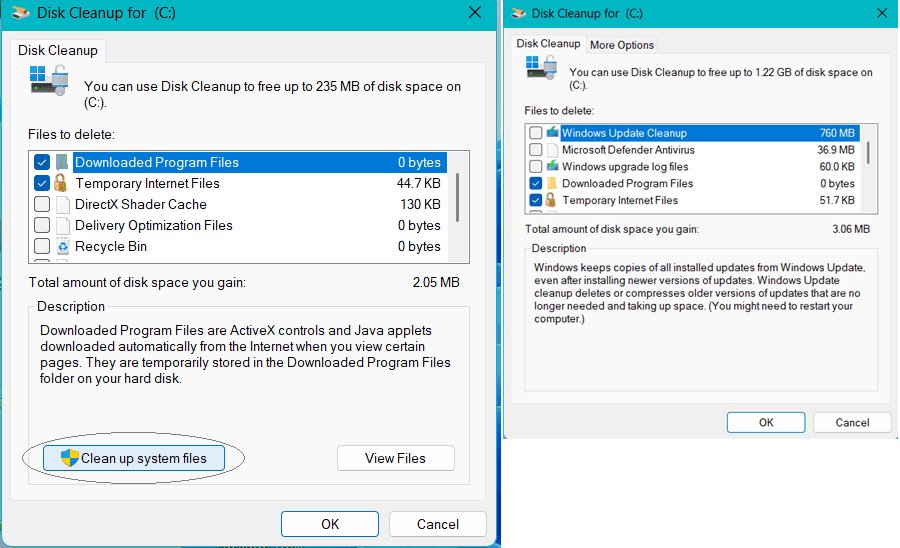
The Disk Cleanup tab lists each file type with its size. Select a name to read its description, and use View Files where it appears to see exactly what will go.
| File type | What it is | Safe to delete? |
|---|---|---|
| Downloaded Program Files | ActiveX controls and Java programs some web pages downloaded | Yes; ticked by default |
| Temporary Internet Files | Web pages stored for quick viewing; your web settings stay intact | Yes; ticked by default |
| Thumbnails | Cached preview images of pictures, videos and documents | Yes; ticked by default. Windows rebuilds them when you open a folder, so the first view is slower |
| Temporary Files | Data apps left in Temp folders; only files not modified in the last week are removed | Yes |
| Temporary Setup Files | Files created by a setup program that is no longer running | Yes |
| Old Chkdsk Files | Lost file fragments Chkdsk saved in the root of the drive | Yes |
| Recycle Bin | Files you deleted but have not yet removed for good | Only after you check with View Files that nothing inside is needed |
| Offline Files and Temporary Offline Files | Local copies of network files kept for offline use | Only if you no longer work with those network files offline |
Steps 5 and 6: Select files to delete and view the space you will be saving
- Tick the check box next to each file type you want removed.
- Clear any box you want to keep, for example Recycle Bin if it holds files you may restore.
- Select a file type's name, not its box, to read its description in the Description area.
- Read the total amount of space you gain shown on the tab. It covers only the ticked items and changes as you tick or clear boxes.
- If the total is small, go to Step 7 before deleting, because system files usually hold the largest amounts.
Step 7: Clean up system files (optional, advanced)
This pass needs administrator rights. It restarts the scan and adds Windows Update files, Delivery Optimization files and any previous Windows installation to the list.
- In the Disk Cleanup window, select Clean up system files.
- Select Yes at the User Account Control prompt, or enter an administrator password.
- Choose drive C: again and select OK, then wait for the second scan.
- Tick Windows Update Cleanup to remove superseded update files. This reduces the WinSxS component store safely.
- Tick Delivery Optimization Files to clear update files cached for sharing. Windows also clears this cache on its own.
- Tick Previous Windows installation(s) only if you are sure you will not roll back. It appears for 10 days after an upgrade, and deleting it removes
Windows.oldfor good. - Continue with Step 8 to delete the selected files.
If the scan hangs on Windows Update Cleanup, get Disk Cleanup unstuck before you try the system files pass again.
Steps 8 to 10: Confirm deletion, close Disk Cleanup and restart Windows (optional)
- Select OK at the bottom of the Disk Cleanup tab.
- Select Delete Files in the box that asks if you are sure. This is the point of no return.
- Wait for the progress bar. Cleaning update files can take several minutes, so leave the PC plugged in.
- Close Disk Cleanup once the progress bar is gone. If you change your mind before deleting, select Cancel to close it without removing anything.
- Restart Windows only if you want a fresh start after a large cleanup or Windows asks you to. A restart is not needed for the space to be freed.
Run Disk Cleanup from Run, Command Prompt or PowerShell with cleanmgr
cleanmgr works the same way in the Run box, Command Prompt and PowerShell. For system files, run PowerShell as administrator or use an elevated Command Prompt.
cleanmgr /sageset:1
cleanmgr /sagerun:1
/sageset:1 opens the Disk Cleanup Settings dialog so you can tick file types, then saves your choices in the registry under the number 1 (any number from 0 to 9999 works). /sagerun:1 runs those saved choices against every drive without asking again. Other switches: /d C picks a drive; /tuneup:1 runs sageset and sagerun for the same number; /lowdisk runs with the default settings; /verylowdisk runs with the default settings and no prompts; /autoclean deletes files left behind after a Windows upgrade; cleanmgr /? shows help. The /d switch is not used with /sagerun.
You should see: /sageset:1 shows the settings dialog and closes when you select OK. /sagerun:1 shows a progress window for each drive and closes when finished. Check the free space afterwards as described below.
Microsoft's cleanmgr reference notes you can schedule a saved /sagerun set with Task Scheduler for regular unattended cleanups.
How to check how much space Disk Cleanup freed
- Before cleaning, open File Explorer, select This PC, and note the free space shown under drive C: in Devices and drives.
- Run Disk Cleanup as above.
- Return to This PC and press F5 to refresh. The free space should have grown by roughly the total Disk Cleanup showed.
- For a breakdown, open Start > Settings > System > Storage and look at the disk usage categories.
- If you removed the previous Windows installation, confirm the
Windows.oldfolder is gone from the root of drive C:.
How to run Disk Cleanup automatically with Storage Sense
Storage Sense is off by default and only cleans the system drive. It runs while you are signed in and online, and it leaves Downloads and cloud files alone unless you tell it otherwise.
- Select Start > Settings > System > Storage.
- Turn Storage Sense to On.
- Select Storage Sense to open its options.
- Under Run Storage Sense, choose how often it runs.
- Set how long files may stay in the Recycle Bin and the Downloads folder before they are deleted.
- On Windows 11, select Run Storage Sense now for an immediate cleanup. On Windows 10, select Configure Storage Sense or run it now, then Clean now.
Windows 11 moved several Disk Cleanup jobs into Storage settings, but the classic tool still opens from search.
Additional cleanup options in Windows 11 and 10
When Disk Cleanup has done all it can, these built-in tools find more space.
| Option | Where to find it | What it removes |
|---|---|---|
| Cleanup recommendations (Windows 11) | Settings > System > Storage > Cleanup recommendations | Temporary files, large or unused files, files synced to the cloud and unused apps, each with a Clean up button |
| Temporary files | Settings > System > Storage > Temporary files | The same categories as Disk Cleanup, including Previous Windows Installation(s), removed with Remove files |
| Storage Sense | Settings > System > Storage > Storage Sense | Temporary files and old Recycle Bin and Downloads items on a schedule |
| Component store cleanup | Administrator Command Prompt: Dism.exe /online /Cleanup-Image /StartComponentCleanup |
Superseded versions of updated components in WinSxS, immediately rather than after 30 days |
| StartComponentCleanup task | Task Scheduler > Task Scheduler Library\Microsoft\Windows\Servicing > StartComponentCleanup > Run | Old component versions; Windows runs it automatically when the PC is idle |
Tips for running Disk Cleanup on Windows 10
These tips apply equally to Windows 11. Most of them prevent the one thing Disk Cleanup cannot undo: deleting something you needed.
| Tip | Why it matters |
|---|---|
| Open View Files on the Recycle Bin before ticking it | Emptied files do not come back from Disk Cleanup |
| Keep Previous Windows installation(s) for the first 10 days after an upgrade if anything feels wrong | Deleting it removes Windows.old and the option to go back |
| Never delete files from the WinSxS folder by hand | Microsoft warns it can leave the PC unable to boot or update; use Windows Update Cleanup instead |
Think twice before DISM /StartComponentCleanup /ResetBase |
Existing updates can no longer be uninstalled afterwards |
| Run the system files pass after big feature updates | Windows keeps extra update files for about 10 days so the update can be removed; after that the space can be reclaimed |
| Stick to the built-in tools | Disk Cleanup, Storage Sense and Cleanup recommendations cover the same ground as third-party cleaners without the risk |
| Plug in a laptop before a large cleanup | Update cleanup can run for several minutes and should not be interrupted |
Disk Cleanup in Windows: frequently asked questions
How do I run a disk cleanup on Windows 11?
Select Start, type Disk Cleanup, and open it. Pick drive C:, select OK, tick the file types to remove, then select OK and Delete Files. Windows 11 also offers Settings > System > Storage > Cleanup recommendations for large files and unused apps.
How do I run a disk cleanup on an HP laptop?
The same way as on any Windows PC, because Disk Cleanup is part of Windows, not HP software. Type Disk Cleanup in the taskbar search, choose drive C:, tick the file types, and select OK and then Delete Files.
How do I open Disk Cleanup from Run?
Press Windows logo key + R to open the Run box, type cleanmgr, and press Enter. Disk Cleanup opens at the drive selection box. Add a drive letter, as in cleanmgr /d C, to go straight to that drive.
Can I run Disk Cleanup from PowerShell?
Yes. Type cleanmgr in PowerShell and press Enter, exactly as in Command Prompt. The same switches work, so cleanmgr /sageset:1 saves a set of choices and cleanmgr /sagerun:1 runs them. Use an administrator PowerShell window to include system files.
What happens in Disk Cleanup?
Disk Cleanup scans a drive, lists removable file types with their sizes, and deletes only the types you tick. Temporary files, cached web files, thumbnails and the Recycle Bin are typical. Your documents, photos and installed apps are not touched unless they sit in the Recycle Bin.
How does Disk Cleanup work?
It checks known locations such as Temp folders, the internet cache, the Recycle Bin and, in system mode, Windows Update leftovers. It adds up what each holds, shows the total you will gain, and deletes the ticked types permanently when you select Delete Files.
Is it good to run Disk Cleanup?
Yes. It only lists files Windows considers safe to remove, and Microsoft recommends it to free space for updates and better performance. Check the Recycle Bin first, and keep the previous Windows installation if you may still want to roll back an upgrade.
Do I need to run Disk Cleanup as administrator?
Not for the basic run. You need administrator rights for Clean up system files, which lists Windows Update files and previous installations. Select that button and approve the User Account Control prompt, or run cleanmgr from an administrator Command Prompt.
How do I run Disk Cleanup automatically on Windows 11?
Turn on Storage Sense in Settings > System > Storage and choose a schedule under Run Storage Sense. For the classic tool, save choices with cleanmgr /sageset:1 and schedule cleanmgr /sagerun:1 in Task Scheduler.
How do I get to Disk Cleanup if search does not find it?
Press Windows logo key + R, type cleanmgr, and press Enter. The command also works in Command Prompt and PowerShell. On Windows 11, Settings > System > Storage > Temporary files offers the same cleanup categories.