To compare two Word documents and highlight differences, open Word, select Review > Compare > Compare, pick the original and the revised file, and select OK.
Word opens a third document that marks every insertion, deletion and formatting change as a tracked change, and this guide also covers merging versions, side-by-side viewing, Copilot comparisons and common errors.
Compare two Word documents
Microsoft calls this option the legal blackline, and it works in Word for Microsoft 365 and the desktop versions of Word for Windows.
Your two source files stay unchanged, because Word writes the result into a new document by default.
- Open Word and go to the Review tab.
- In the Compare group, select Compare.
- Select Compare two versions of a document (legal blackline).
- Under Original document, browse to and select the earlier version.
- Under Revised document, browse to and select the newer version.
- Select OK.
- If Word warns that either file contains tracked changes, select Yes to accept those changes and continue.
The new document shows every difference as a tracked change, with added text underlined and deleted text struck through.
Compare vs Combine vs View Side by Side in Word
| Your situation | Use this | Why |
|---|---|---|
| You have an old and a new version and want every change highlighted | Review > Compare > Compare | Produces a redline document with each difference marked as a tracked change |
| Several reviewers edited separate copies of one file | Review > Compare > Combine | Merges each reviewer's edits into one document and labels who made them |
| You only want to read both files next to each other | View > View Side by Side | Shows both windows together without creating a third file |
| The files sit in OneDrive and you want a written summary of differences | Copilot in OneDrive > Compare files | Summarises differences and similarities across up to five files |
| You only have Word for the web | Open the files in the Word desktop app | Compare and merge is a desktop-only feature |
How to compare two Word documents for differences with custom settings
The More button in the Compare dialog controls what Word flags and where it puts the result.
Change these settings when the default redline shows too much noise, such as formatting changes you do not care about.
- Go to Review > Compare > Compare.
- Choose the Original document and the Revised document.
- Select More to expand the dialog.
- Clear the boxes for anything you do not want flagged, such as comments or formatting.
- Under Show changes, choose the character level or the word level.
- Under Show changes in, keep New document to leave both files untouched.
- Select OK to run the comparison.
Choosing Original document or Revised document under Show changes in writes the marks into that file and modifies it, so make a copy of the document first if you need a clean version.
How to compare two Word documents and merge changes
Use Combine when several people edited their own copy and you need all of their edits in one file.
The label you enter lets you tell each reviewer's unmarked changes apart.
- Go to Review > Compare > Combine.
- Under Original document, choose the file you sent out for review.
- Under Revised document, choose the reviewer's copy.
- In Label unmarked changes with, type the reviewer's name.
- Select More, and under Show changes in, choose New document.
- Select OK, then review the combined document and save it.
- To add another reviewer's copy, run Combine again with the saved combined file as the Original document, and choose Original document under Show changes in.
To reduce clutter while you review, select Review > Compare > Show Source Documents > Hide Source Documents.
Compare two Word documents side by side
Side-by-side view does not highlight differences, but it is the quickest way to read two files together.
- Open both documents in Word.
- In either document, go to the View tab.
- In the Window group, select View Side by Side.
- Select Synchronous Scrolling in the same group so both documents scroll together.
- Select View Side by Side again when you want to return to a single window.
If the Window group is collapsed on a narrow screen, select Window on the View tab first to reach both buttons.
How to compare two Word documents on Mac
Word for Mac uses the same Compare and Combine commands, with slightly different menu names.
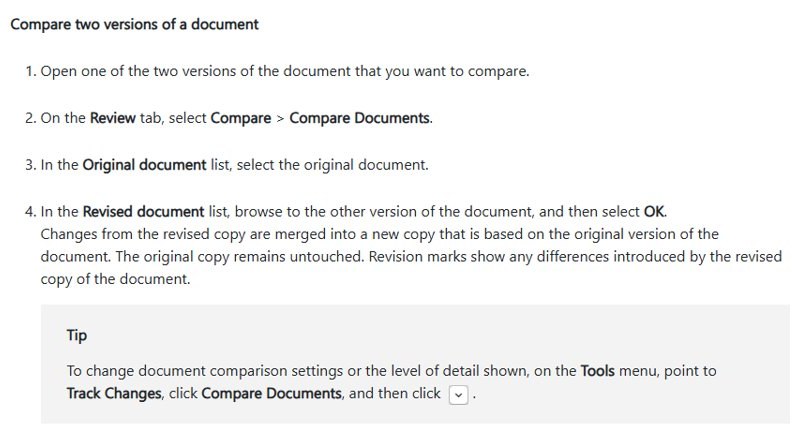
- Open one of the two versions in Word for Mac.
- On the Review tab, choose Compare > Compare Documents.
- In the Original document list, select the original.
- In the Revised document list, browse to the other version.
- Select the more-options button to change the comparison settings if needed.
- Click OK to open a new copy with the differences shown as revision marks.
To merge versions on a Mac instead, choose Review > Compare > Combine Documents and pick the two files the same way.
How to compare two Word documents in Copilot
Copilot in OneDrive compares up to five files and describes differences in text, rather than marking them up inside the document.
It applies to OneDrive for Business and Microsoft 365 Personal, Family and business plans, and it does not support images or videos.
- Sign in at onedrive.com with your Microsoft 365 account.
- Select the two Word documents you want to compare.
- Select the Copilot button in the command bar.
- Choose Compare files.
- Read the summary in the Copilot panel, then ask a follow-up question such as which sections changed.
From File Explorer, select the files, right-click, choose OneDrive, then Compare files to open the same Copilot panel.

How to use Readability Statistics in Word
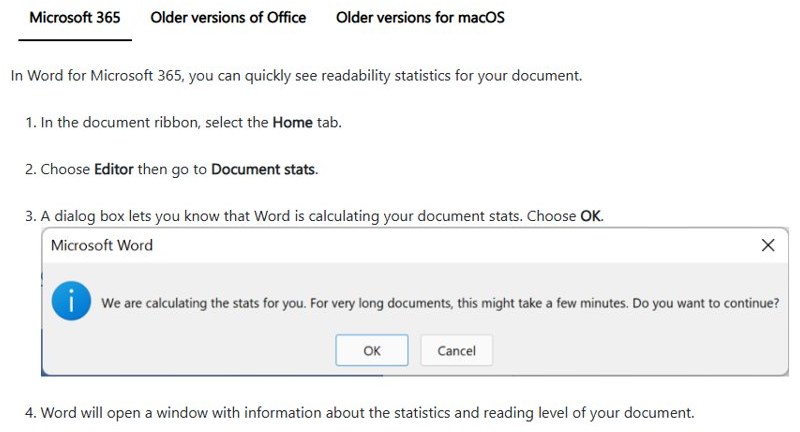
Readability Statistics give each version a reading-level score, which shows whether a revision made the text easier or harder to read.
In Word for Microsoft 365 on the Current Channel, select Home > Editor > Document stats and select OK. In older versions, go to File > Options > Proofing, check Check grammar with spelling and Show readability statistics, then run Review > Spelling & Grammar.
| Score | What it measures | Target for most documents |
|---|---|---|
| Flesch Reading Ease | A 100-point scale; higher scores mean easier reading | 60 to 70 |
| Flesch-Kincaid Grade Level | The US school grade needed to understand the text | About 7.0 to 8.0 |
| Basis of both scores | Average sentence length and average syllables per word | Shorter sentences and words raise ease |
Run the statistics on the original and the revised file and compare the two scores. On a Mac, turn the option on under Word > Preferences > Spelling & Grammar.
How to see the differences after comparing two Word documents
- Check that a new, untitled document opened with the differences marked as tracked changes.
- Select Review > Reviewing Pane to list every change in order.
- Select Review > Next to jump from one highlighted change to the next.
- Select Accept or Reject on each change to build the final version.
- Save the compared document under a new name so the redline stays available.
Why is Word unable to compare two documents?
Compare is missing in Word online
Compare and merge is supported only in the Word desktop app, not in Word for the web.
- Open the file from the browser in the desktop app with the Open in Desktop command.
- Run Review > Compare > Compare in the desktop app.
- Use Copilot in OneDrive if you do not have the desktop app and only need a summary.
Word asks to accept tracked changes before comparing
One or both files still contain tracked changes, which Word must accept to compare cleanly.
- Select Yes in the message box to accept the changes and continue.
- Make a copy of each file first if you need to keep the unaccepted revisions.
Word cannot open or edit one of the documents
The file is restricted to read-only or protected with a password.
- Open the file and remove the restriction, or make the document editable again.
- Enter the password if the file is encrypted, then save it and run the comparison.
The comparison flags too many differences
Formatting and character-level changes are included by default.
- Run Review > Compare > Compare again and select More.
- Clear the formatting option and any other categories you do not need.
- Set Show changes to the word level and select OK.
Several reviewers' edits do not appear in one file
The legal blackline compares only two versions at a time.
- Use Review > Compare > Combine instead.
- Repeat Combine for each additional reviewer copy, using the saved combined file as the original.
Compare two Word documents FAQ
Can I compare two Word documents?
Yes. Word desktop has a built-in Compare command on the Review tab. It compares an original and a revised file and creates a third document that shows every difference as a tracked change, leaving both source files unchanged by default.
How do I compare two Word documents in Word?
Select Review, then Compare, then Compare two versions of a document (legal blackline). Pick the original and the revised file, and select OK. Word opens a new document with insertions, deletions and formatting changes highlighted as tracked changes.
How do I compare two Word documents redline?
The Word Compare command produces the redline. Microsoft names it the legal blackline option, and the resulting document marks inserted text with underlines and deleted text with strikethrough, the format lawyers and editors call a redline.
How do I compare two Word documents and merge them?
Use Review, Compare, Combine. Choose the original file and a revised copy, type a label for the reviewer, and select OK. Word merges the edits into one document, and you can repeat Combine for every extra reviewer copy.
How do I compare two Word documents online?
Word for the web cannot compare or merge documents; that feature is desktop-only. With a Microsoft 365 account, Copilot in OneDrive can compare up to five selected files and summarise their differences, but it does not create a marked-up document.
How do I compare two Word documents in Copilot?
Sign in to OneDrive, select the documents, select the Copilot button in the command bar and choose Compare files. Copilot lists differences and similarities in a side panel, and you can ask follow-up questions about specific changes.
How do I compare two Word documents for changes?
Run Review, Compare, Compare, then open the Reviewing Pane to list every change. Use Next to move through the highlighted edits and Accept or Reject each one to finish the final version.
Can I compare two Word document versions saved in OneDrive?
Yes. Download or open both versions in the Word desktop app, then run Review, Compare, Compare with the older file as the original. Copilot in OneDrive can also summarise differences between up to five saved files.
Does comparing documents change the original files?
No, not with the default setting. Word writes the result into a new document. Only if you choose Original document or Revised document under Show changes in does Word write the marks into that existing file.
Best way to compare two Word documents and highlight differences
Use Review > Compare > Compare in the Word desktop app whenever you need differences highlighted. It is free with Word, keeps both originals untouched and produces a redline you can accept or reject change by change; switch to Combine only when merging several reviewers' copies.