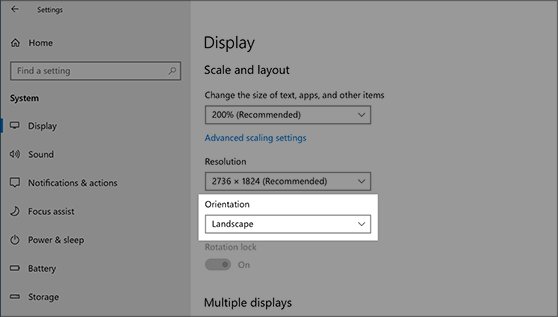
Open Start > Settings > System > Display to change display settings in Windows 10, then pick a new value under Scale and layout.
This guide covers resolution, scale, orientation, brightness, Night light, refresh rate, HDR, multiple monitors, text clarity, colour calibration, and fixes for the problems that follow a change. Windows 11 uses different labels and has its own guide.
The fastest way to open and change Windows 10 display settings
Resolution and scale are the two changes most people come for, and both sit on the first screen of the Display page.
- Right-click an empty area of the desktop and select Display settings. Pressing Win + I and selecting System > Display opens the same page.
- If two screens are connected, select the screen you want to change at the top of the page.
- Scroll to Scale and layout.
- Open the Display resolution list and choose the entry marked (Recommended).
- Open the list under Change the size of text, apps, and other items and choose a percentage.
- Open the Orientation list if the monitor is turned on its side, and choose the matching option.
Run ms-settings:display from the Win + R box to land on the same page without the desktop.
Resolution or scale: decide which one to change
Both settings change how big things look, but only one keeps the picture sharp. Match your problem to a row.
| Your situation | Change this | Why |
|---|---|---|
| Text and icons are too small to read | Scale: raise Change the size of text, apps, and other items | Everything grows while the panel keeps its native resolution, so text stays sharp |
| The screen looks soft, stretched, or blurry | Resolution: set Display resolution back to (Recommended) | Any value other than the panel's native one is stretched to fit |
| Everything looks too zoomed in | Resolution first, then scale | A low resolution makes items huge; fix that before touching scale |
| Only text is too small, the layout is fine | Ease of Access > Display > Make text bigger | Enlarges text alone and leaves apps and icons unchanged |
| Apps are different sizes on two monitors | Scale on each monitor, set to the same value | Each display keeps its own scale, so mismatched values produce mismatched windows |
| No preset percentage fits | Custom scaling in Advanced scaling settings | Accepts 100 to 500 percent, but Microsoft does not recommend it |
Where each display setting lives in Windows 10
Windows 10 spreads display controls across Settings, Ease of Access, and Control Panel. Use this table to go straight to the right place.
| Setting | Windows 10 path | Direct command |
|---|---|---|
| Resolution, scale, orientation | Settings > System > Display > Scale and layout | ms-settings:display |
| Brightness | Settings > System > Display > Change brightness, or the Brightness slider in action center | ms-settings:display |
| Night light | Settings > System > Display > Night light settings | ms-settings:nightlight |
| Refresh rate | Settings > System > Display > Advanced display settings > Refresh rate | ms-settings:display-advanced |
| HDR and WCG (wide colour gamut) | Settings > System > Display > Windows HD Color settings | None documented |
| Multiple monitors | Settings > System > Display > Multiple displays, or Win + P | ms-settings:display |
| Blurry app fix and custom scaling | Search advanced scaling settings, then select Fix apps that are blurry |
None documented |
| Graphics settings for apps and games | Settings > System > Display > Graphics settings | ms-settings:display-advancedgraphics |
| Text size and high contrast | Settings > Ease of Access > Display | ms-settings:easeofaccess-display |
| Taskbar behavior on multiple displays | Right-click the taskbar > Taskbar settings > Multiple displays | ms-settings:taskbar |
| ClearType text | Search ClearType, then Adjust ClearType text |
None documented |
| Colour calibration and profiles | Search calibrate display color; profiles in Control Panel Color Management |
None documented |
GPU apps from NVIDIA, AMD, or Intel add their own control panel on top of these. Use them only for options Windows does not offer, and keep Windows Settings as the reference for everything above.
Change screen brightness and turn Night light on or off
Brightness works on laptops and tablets with a built-in screen. On a desktop PC with an external monitor, use the buttons on the monitor instead, because Windows may not show the slider.
- Select action center at the right end of the taskbar and drag the Brightness slider.
- For finer control, open Settings > System > Display and move the Change brightness slider.
- Select Change brightness automatically when lighting changes if you want Windows to follow room light.
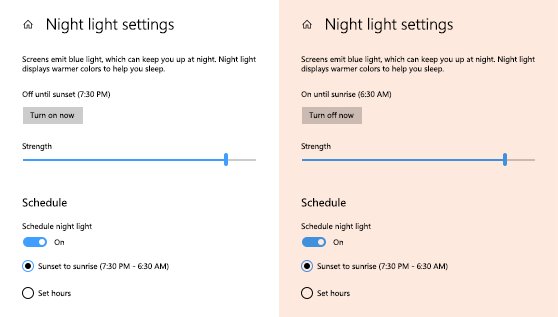
- Turn the Night light switch on or off on the same page.
- Select Night light settings, then turn on Schedule night light.
- Choose Sunset to sunrise, or choose Set hours and enter your own times.
A greyed-out Night light switch usually means the display driver needs an update. Night light is not available on DisplayLink or Basic Display drivers.
Set up multiple monitors and the taskbar on each one
Connect the second monitor and turn it on before you start.
- Press Win + P and choose Extend to spread the desktop, or Duplicate to mirror it. PC screen only and Second screen only use one display.
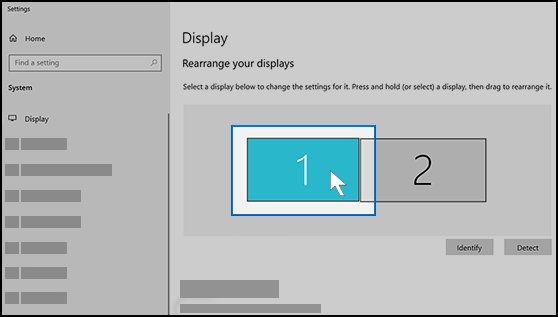
- Open Settings > System > Display. If a screen is missing, select Detect under Multiple displays.
- Select Identify to show a number on each screen.
- Drag the display thumbnails to match how the monitors sit on your desk, then select Apply.
- Select each thumbnail in turn and set its resolution and scale under Scale and layout.
- Right-click the taskbar, select Taskbar settings, and turn Show my taskbar on all displays on or off.
- Under Multiple displays, pick an option in Combine taskbar buttons on other taskbars: Always, hide labels, When taskbar is full, or Never.
Change the refresh rate and turn on HDR
The refresh rates on offer depend on your monitor, cable, and graphics card. Windows 10 has no Dynamic refresh rate option; that feature is Windows 11 only.
- Open Settings > System > Display and select Advanced display settings.
- With several monitors, choose the screen under Choose display.
- Under Refresh rate, select the rate you want.
- Go back to Display and select Windows HD Color settings.
- Check Display capabilities to confirm the screen supports HDR.
- Turn on Use HDR. Turn on Stream HDR video as well if you want HDR in streaming apps.
HDR steps need Windows 10 version 2004 or later. External HDR monitors must support HDR10 and connect over DisplayPort 1.4, HDMI 2.0 or higher, USB-C, or Thunderbolt.
Make text easier to read and calibrate colour
Use these when scale is right but text still looks thin, fuzzy, or off-colour.
- Open Settings > Ease of Access > Display and drag the Make text bigger slider.
- Use Make everything bigger on the same page to change the size of text and apps together.
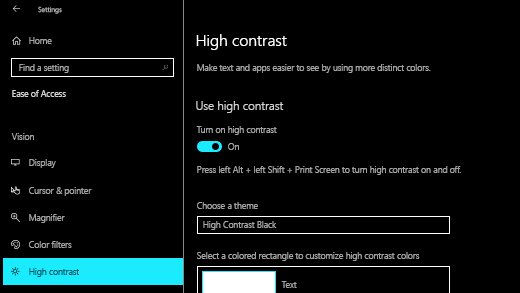
- Turn on High contrast under Ease of Access if you need stronger separation between text and background.
- Type
ClearTypeinto taskbar search, select Adjust ClearType text, check Turn on ClearType, and pick the clearest sample on each screen. - Type
calibrate display colorinto search and follow the on-screen calibration steps. Windows saves the result as a new colour profile. - To remove a colour profile, type
color managementinto search, open Color Management, select the All Profiles tab, select the profile, then Remove.
Fix blurry apps and scaling problems
Older desktop apps render at one size and Windows stretches them to fit, which makes them blurry after a scale change, a new monitor, or docking a laptop.
- Sign out of Windows and sign back in. This redraws apps at the current scale.
- Type
advanced scaling settingsinto taskbar search and select Fix apps that are blurry. - Under Fix scaling for apps, turn on Let Windows try to fix apps so they're not blurry. This needs Windows 10 version 1803 or later.
- Close the blurry app and open it again.
- If sizes still differ between monitors, set each monitor to the same value under Change the size of text, apps, and other items.
- Use custom scaling on the Advanced scaling settings page only when no preset works, since Microsoft does not recommend custom values between 100 and 500 percent.
Change graphics settings for apps and games
On a PC with two graphics processors, Windows 10 can assign a game or app to the power-saving or high-performance GPU. The page appears only on devices that support advanced graphics options.
ms-settings:display-advancedgraphicsPress Win + R, paste the string, and press Enter to open Graphics settings. You can also select Graphics settings on the System > Display page. Add the app or game, select it, select Options, and choose High performance to run it on the discrete GPU.
You should see: The app appears in the list with your chosen graphics preference under its name, and it uses that GPU the next time it starts.
How to check the new display settings took effect
- Open Settings > System > Display and confirm Display resolution shows the value you chose.
- Select Advanced display settings and read the resolution and refresh rate listed for the selected display.
- Select Identify with two monitors connected and confirm each number matches the thumbnail you arranged.
- Open Windows HD Color settings and check that Use HDR stays on after a restart.
- Sign out and back in, then open a previously blurry app to confirm its text is now sharp.
Quick recommended settings for most users
These defaults suit most Windows 10 PCs. Change a row only when the reason in the last column applies to you.
| Setting | Start with | Change it when |
|---|---|---|
| Display resolution | The value marked (Recommended) | Almost never; other values look stretched on flat panels |
| Scale | The value marked (Recommended) | Text is still too small or too large at normal viewing distance |
| Refresh rate | The highest rate listed for your monitor | The screen flickers or goes blank at that rate |
| Night light | Schedule night light with Sunset to sunrise | Colour-accurate work needs the warm tint off |
| HDR | Off unless Display capabilities confirms support | You watch HDR video or play HDR games on a supported screen |
| Multiple displays | Extend with matching scale on each monitor | You present, and want the same picture on both |
| Blurry app fix | Let Windows try to fix apps so they're not blurry on | An older app renders at the wrong size with it on |
| ClearType | On, tuned once per monitor | Text looks coloured at the edges after tuning |
Troubleshoot common display settings problems
Find your symptom and run the fix under it.
You can't change display settings, or the options are greyed out
Windows is using a basic display driver, or a work policy blocks the Display page.
- Type
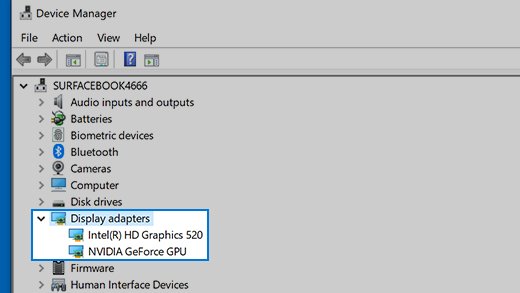
device managerinto taskbar search and open Device Manager. - Expand Display adapters. An adapter named with Basic Display means the real driver is missing.
- Right-click the adapter, select Update driver, then Search automatically for updated driver software.
- Open Settings > Update & Security > Windows Update and install any available updates.
- On a work or school PC, ask the administrator whether a policy hides the Display page.
Windows changed your display settings on its own
Microsoft links unexpected resolution changes to the graphics driver. Connecting or disconnecting a monitor or dock also resets the layout.
- Open Settings > Update & Security > Windows Update and install pending updates, including driver updates.
- Open Settings > System > Display and set Display resolution and scale back to (Recommended).
- If the change followed a driver update, open Device Manager > Display adapters, right-click the adapter, select Properties > Driver, then Roll Back Driver.
The screen is too zoomed in
Resolution is set below the panel's native value, or scale is set too high.
- Open Settings > System > Display.
- Set Display resolution to the entry marked (Recommended).
- Set Change the size of text, apps, and other items to the recommended percentage.
- Press Win + Esc in case Magnifier is zooming the screen.
A second monitor is not detected or shows no signal
The wrong projection mode, a loose cable, or a stalled graphics driver.
- Press Win + P and select Extend.
- Open Settings > System > Display and select Detect.
- Reseat the cable at both ends, then try a different cable or port.
- Remove docks, dongles, and adapters and connect the monitor directly.
- Press Win + Ctrl + Shift + B to reset the graphics driver, then restart the PC.
The display goes black after changing settings
The monitor cannot show the new resolution or refresh rate.
- Press Win + Ctrl + Shift + B to reset the graphics driver.
- Press Win + P and choose PC screen only if the black screen is an external monitor.
- Once you can see the desktop, open Advanced display settings and pick a lower Refresh rate.
Colours look washed out after turning on HDR
Standard content is shown inside an HDR signal, and on built-in screens its brightness is set separately.
- Open Settings > System > Display > Windows HD Color settings.
- On a laptop screen, drag the HDR/SDR brightness balance slider until everyday apps look right.
- On an external monitor, turn off Use HDR for desktop work and turn it on again for HDR video or games.
Frequently asked questions
How do I change display settings in Windows 10?
Right-click the desktop and select Display settings, or open Start > Settings > System > Display. Resolution, scale, and orientation sit under Scale and layout. Refresh rate is under Advanced display settings, and HDR is under Windows HD Color settings.
How do I change display settings on my PC?
On Windows 10, open Settings with Win + I, then select System > Display. Select the screen at the top if more than one is connected, then change resolution, scale, brightness, or Night light on that page. Changes apply immediately.
How is changing display settings different in Windows 11?
Windows 11 keeps the same System > Display page but renames several controls. Scale sits under Scale & layout, refresh rate is under Advanced display, and HDR is an HDR switch on the Display page. Windows 11 also adds Dynamic refresh rate, which Windows 10 lacks.
Why can't I change my display settings in Windows 10?
The usual cause is a missing graphics driver, shown as a Basic Display adapter in Device Manager. Update the driver through Update driver or Windows Update. On a work PC, an administrator policy can also hide or lock the Display page.
Why did Windows change my display settings?
Microsoft says unexpected resolution changes usually point to a graphics driver that needs updating. Connecting a new monitor, docking a laptop, or a driver update can also reset resolution and scale. Install updates from Windows Update, then set values back to (Recommended).
How do I change display settings on a desktop computer with an external monitor?
Use Settings > System > Display for resolution, scale, and refresh rate. Windows may hide the brightness slider for external monitors, so change brightness and contrast with the buttons on the monitor itself.
How do I change my Windows display back to normal?
Open Settings > System > Display and set Display resolution and Change the size of text, apps, and other items to the values marked (Recommended). Turn off Night light and HDR if you turned them on, then sign out and back in.
How do I adjust display settings for two monitors in Windows 10?
Open Settings > System > Display, select Identify, and drag the thumbnails to match your desk. Select each thumbnail to set its own resolution and scale, then select Apply. Press Win + P to switch between Extend and Duplicate.
How do I change the size of a window's text in Windows 10?
Open Settings > Ease of Access > Display and drag the Make text bigger slider. This enlarges text across Windows and apps without changing icons. To enlarge everything, change the scale under System > Display instead.