To turn a read receipt on in Outlook, open the Options tab while you write the message and select the Request a Read Receipt check box; clear it to turn the receipt off.
This guide covers one-off and default receipts in classic and new Outlook, Outlook on the web and Mac, how to control the receipts you send back, and why some never arrive.
The fastest way to turn on a read receipt in Outlook
These steps work in classic Outlook for Windows and new Outlook for Windows. They apply to the message you are writing only.
- Start a new message or reply.
- Select the Options tab on the message ribbon.
- In the Tracking group, select the Request a Read Receipt check box. In new Outlook, select More Options first if the box is not shown.
- Write the message and select Send.
To turn the receipt off before sending, clear the same check box. The setting resets for the next new message unless you change the default.
What Outlook Read Receipts Do and When to Use Them
Outlook offers two kinds of receipt. They prove different things, and you can request both on the same message.
| Receipt | What it confirms | What it does not confirm | Can the recipient block it? |
|---|---|---|---|
| Read receipt | The recipient opened the message | That they read or understood it | Yes, they can decline, and some email programs do not support it |
| Delivery receipt | The message reached the recipient's mailbox or email server | That anyone opened it | Not by a prompt, but the receiving server must support it |
Use a read receipt for a handful of messages where proof of opening matters, such as a contract or a deadline notice.
Avoid it on everyday mail. Recipients see a prompt each time, and a missing receipt proves nothing because sending one is optional.
Which Outlook app are you using?
The option sits in a different place in each Outlook app, and one app cannot request receipts at all.
| Your situation | Where the read receipt option is | Notes |
|---|---|---|
| Classic Outlook for Windows | Options > Tracking in a message; File > Options > Mail > Tracking for all messages | The only app with an all-messages default and a Tracking view |
| New Outlook for Windows | Options > Tracking in a message, or More Options | Response settings live in Settings > Mail > Message handling |
| Outlook on the web (work or school) | Message > More options > Request a read receipt | Per message only |
| Outlook.com personal account in a browser | Not available | Send from Outlook for Windows to request one for an Outlook.com message |
| New Outlook for Mac | Receipts > Read Receipt | Microsoft 365 work or school and Exchange accounts only |
| Legacy Outlook for Mac | Options > Request Receipts > Request a Read Receipt | Same account limits as new Outlook for Mac |
How to Request a Read Receipt for One Email in Outlook Desktop
A per-message receipt is the right choice for most people. It leaves every other message untouched.
- In classic or new Outlook for Windows, open a new message.
- Select the Options tab.
- Under Tracking, select Request a Read Receipt. Select Request a Delivery Receipt as well if you also want proof of delivery.
- In new Outlook for Mac, select Receipts > Read Receipt in the message window instead.
- In legacy Outlook for Mac, select Options > Request Receipts > Request a Read Receipt.
- Select Send.
If the Receipts button is missing on a Mac, customise the message toolbar to add it.
How to Turn Read Receipts On or Off for All Outlook Desktop Emails
Classic Outlook for Windows can request a read receipt on every message you send. Clearing the same box turns the default off again.
- In classic Outlook, select File > Options.
- Select Mail in the left pane.
- Scroll to the Tracking section.
- To turn the default on, select Read receipt confirming the recipient viewed the message.
- To turn the default off, clear that check box.
- Optionally select or clear Delivery receipt confirming the message was delivered to the recipient's e-mail server.
- Select OK.
The default can still be overridden per message from the Options tab while you write.
New Outlook, Outlook on the web and Outlook for Mac have no all-messages switch, so receipts there are requested one message at a time.
How to Manage Read Receipt Requests in Outlook on the Web
Outlook on the web for work or school accounts can request a receipt per message, and every web account can choose how to answer incoming requests.
- To request a receipt, start a new message and select Message at the top of the compose pane.
- Select More options on the ribbon, then select Request a read receipt, Request a delivery receipt or both.
- Send the message.
- To control requests you receive, select Settings > Mail > Message handling.
- Under Read receipts, choose Always send a response, Never send a response or Ask me before sending a response.
- Select Save.
Outlook.com personal accounts can set the Read receipts response here, but cannot request a receipt from the browser.
How to stop or allow sending read receipts to others
This controls what happens when someone else asks you for a receipt. It is separate from requesting your own.
- In classic Outlook, select File > Options > Mail and scroll to Tracking.
- Under the read receipt response options, choose Always send a read receipt, Never send a read receipt or Ask each time whether to send a read receipt.
- Select OK.
- In new Outlook, select Settings > Mail > Message handling.
- Under Read receipts, choose the response you want, then select Save.
Choose Never send to stop the prompt appearing on every request. Senders then simply get no receipt.
What to Know About Outlook Mobile and Read Receipts
Microsoft documents read receipts for Outlook on Windows, Mac and the web. Outlook for iOS and Android has no documented option to request one.
| Task | Outlook for iOS and Android | Workaround |
|---|---|---|
| Request a read receipt | No documented option | Send the message from Outlook for Windows, Mac or the web |
| Choose how to answer requests | No documented setting in the app | Set Read receipts under Settings > Mail > Message handling on the web or in new Outlook |
| See receipts that arrived | Receipts land in the Inbox like any message | Open the original in classic Outlook and select Tracking for a full list |
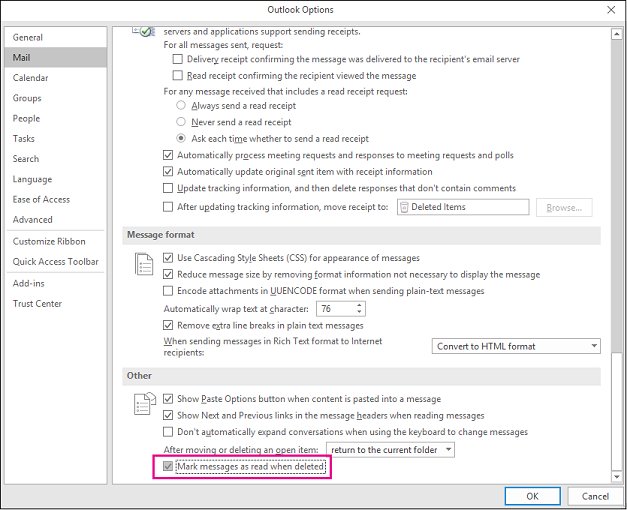
How to stop Outlook marking emails as read automatically
A message marked read is not the same as a read receipt, but the two are often confused. This setting decides when Outlook flips a message from unread to read on your side.
- In new Outlook, select Settings > Mail > Message handling.
- Under Mark as read, select the option you want, such as not marking items as read automatically, then select Save.
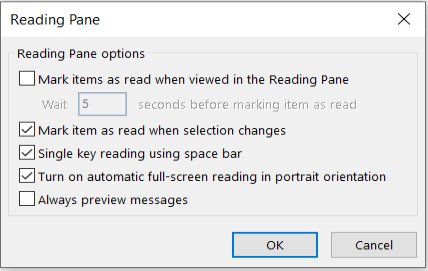
- In classic Outlook, select the View tab, then Reading Pane > Options in the Layout group.
- Clear Mark items as read when viewed in the Reading Pane to stop automatic marking.
- Or keep it selected and enter a delay in Wait n seconds before marking item as read.
- Select OK.
To change a message by hand, right-click it and select Mark as Read or Mark as Unread. In classic Outlook, Ctrl + Q marks as read and Ctrl + U marks as unread.
How to check a read receipt came back
Receipts arrive as messages in your Inbox, marked with a receipt icon. Classic Outlook can also collect them in one view.
- Check your Inbox for a message from the recipient's system with a receipt icon and the original subject line.
- In classic Outlook, open the original message from Sent Items.
- On the Message tab, in the Show group, select Tracking. The button appears only after at least one receipt has arrived.
- Read the delivery and read status for each recipient in the list.
To keep receipts out of the Inbox, select File > Options > Mail > Tracking and turn on Automatically update original sent item with receipt information.
Why Read Receipts May Not Work or Confirm Delivery
You turned on a read receipt but never received one
The recipient declined it, has their client set to never send receipts, or uses an email program that does not support them.
- Request a Delivery Receipt as well next time, which confirms arrival without the recipient's consent prompt.
- Check Sent Items > Tracking in classic Outlook in case the receipt was filed there.
- Search the Inbox for the original subject line.
- Ask the recipient for a reply when confirmation matters.
There is no read receipt option in Outlook.com
Outlook.com in a browser cannot request read receipts.
- Add the Outlook.com account to Outlook for Windows.
- Write the message there and select Options > Request a Read Receipt.
- Send it from the Outlook.com account.
Read Receipt is missing or greyed out in Outlook for Mac
Mac receipts work only with Microsoft 365 work or school and Exchange accounts, not Outlook.com, Gmail, Yahoo, iCloud, IMAP or POP.
- Check the From account on the message is a work or school account.
- Switch the From account if you have one.
- If the Receipts button is missing, customise the toolbar to add it.
Outlook keeps asking whether to send a read receipt
The response setting is on ask each time.
- In classic Outlook, select File > Options > Mail > Tracking.
- Choose Always send a read receipt or Never send a read receipt, then select OK.
- In new Outlook or on the web, change Read receipts under Settings > Mail > Message handling and select Save.
Every email you send asks for a read receipt
The all-messages default is turned on in classic Outlook.
- Select File > Options > Mail.
- Under Tracking, clear Read receipt confirming the recipient viewed the message.
- Select OK.
Emails turn to read as soon as you click them
The Reading Pane marks items as read on selection.
- In classic Outlook, select View > Reading Pane > Options.
- Clear Mark items as read when viewed in the Reading Pane, or set a longer wait in seconds.
- In new Outlook, change Mark as read under Settings > Mail > Message handling.
Frequently Asked Questions
How do I turn on read receipts in Outlook email?
While writing the message, select the Options tab and then Request a Read Receipt in the Tracking group. To request one on every message in classic Outlook, select File > Options > Mail and turn it on under Tracking.
Can I turn on a read receipt for only one Outlook email?
Yes. The Request a Read Receipt check box on the Options tab applies only to the message you are writing. The next new message starts without it unless the classic Outlook default is turned on.
How do I stop Outlook from asking for read receipts on every email?
Select File > Options > Mail in classic Outlook, then clear Read receipt confirming the recipient viewed the message under Tracking. Select OK, and new messages stop requesting receipts.
Can the recipient refuse to send a read receipt?
Yes. The recipient can decline each request or set Outlook to never send receipts, and some email programs do not support them at all. A missing receipt does not mean the message was unread.
Does Outlook on mobile let me request read receipts?
Outlook for iOS and Android has no documented option for it. Request the receipt from Outlook for Windows, Outlook for Mac with a work or school account, or Outlook on the web.
Why didn't I receive a read receipt even though I turned it on?
The recipient most likely declined it, set their client never to respond, or uses a program without read receipt support. Request a delivery receipt too, which confirms the message reached their mailbox.
How do I turn off automatic read email in Outlook?
In new Outlook, change Mark as read under Settings > Mail > Message handling. In classic Outlook, select View > Reading Pane > Options and clear Mark items as read when viewed in the Reading Pane.
How do I change Outlook read email settings?
Read receipt responses and mark-as-read behaviour share one page in new Outlook and on the web: Settings > Mail > Message handling. In classic Outlook they sit under File > Options > Mail > Tracking and View > Reading Pane > Options.
How do I make emails read in Outlook?
Right-click a message and select Mark as Read, or press Ctrl + Q in classic Outlook. To mark a whole folder, select it, press Ctrl + A, right-click and select Mark as Read.
Is a delivery receipt the same as a read receipt?
No. A delivery receipt confirms the message reached the recipient's mailbox or server. A read receipt confirms the message was opened, and only if the recipient agrees to send it.
Bottom Line
Request read receipts one message at a time from the Options tab, and pair them with a delivery receipt when proof matters. Recipients can decline a read receipt, so it is never proof on its own, while a delivery receipt confirms arrival without asking them.
For time-sensitive mail, combine a receipt with scheduling the email in Outlook so it lands when the reader is at their desk.
No Outlook.com address yet? Start by creating an Outlook email account.