You can split the screen on a Mac by placing two app windows side by side using Split View or macOS window tiling. For a traditional full-screen Split View, hover over the green button in the upper-left corner of a window, choose Full Screen > Left of Screen or Right of Screen, then select the second app. On newer versions of macOS, you can also tile windows without entering full screen, which keeps the menu bar and Dock accessible.
The same methods work on MacBook Air, MacBook Pro, iMac, Mac mini, Mac Studio, and other Macs running a compatible version of macOS. You can split two apps evenly, resize each side, arrange up to four windows with newer tiling controls, and use Mission Control when the window you need is hidden.
The best method depends on whether you want two apps isolated in a full-screen workspace or simply want several windows arranged on the normal Mac desktop. The steps below cover both options, along with keyboard shortcuts and fixes for Split View when it does not work.
How to Split Screen on Mac Using Split View
Split View is Apple’s built-in two-window full-screen mode. It places two compatible apps next to each other in their own desktop Space, removing most other windows from view while you work.
1. Open the two apps you want to use
Open both apps before starting. For example, you can place Safari beside Notes, Pages beside Preview, or Finder beside another app.
2. Hover over the green window button
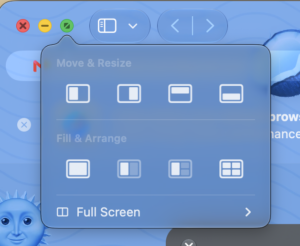
Move the pointer over the green button in the upper-left corner of the first app window. You do not need to click it immediately.
From the menu that appears, choose:
- Full Screen > Left of Screen, or
- Full Screen > Right of Screen.
The wording can vary slightly with the version of macOS, but look for the full-screen tiling controls rather than the standard Move & Resize options.
3. Choose the second window
macOS places the first app on the side you selected and displays the available windows on the other side. Click the window you want to use alongside it.
The two apps now share the screen in Split View.
How to Split Screen on Mac Without Full Screen
Recent versions of macOS include window tiling, which is often more convenient than classic Split View. Tiled windows remain on your normal desktop, so you can keep the menu bar and Dock visible and switch to other windows more easily.
Use the green button
- Open the first window.
- Hover over the green button.
- Look under Move & Resize.
- Select the left-half or right-half layout.
- Move the second window to the opposite half.
You can also choose one of the layouts under Fill & Arrange to arrange multiple open windows at once.
Drag a window to the edge of the screen
On supported macOS versions, you can tile a window without opening a menu:
- Grab the window by its title bar.
- Drag it toward the left or right edge of the display.
- Wait for the tiling outline to appear.
- Release the window.
The window fills that section of the desktop. You can then position another window beside it.
If edge dragging does nothing, open System Settings > Desktop & Dock and check the window tiling options. macOS provides settings for dragging windows to screen edges, using the Option key while dragging, and displaying margins around tiled windows.
How to Use Split Screen on Mac with a Keyboard Shortcut
Current macOS versions provide keyboard shortcuts for window tiling. With the window active, you can use the Fn + Control combination with the arrow keys to move it around the screen.
| Shortcut | Action |
|---|---|
Fn + Control + Left Arrow |
Tile the active window to the left |
Fn + Control + Right Arrow |
Tile the active window to the right |
Fn + Control + Up Arrow |
Tile the active window to the top |
Fn + Control + Down Arrow |
Tile the active window to the bottom |
Fn + Control + F |
Fill the desktop with the active window |
Control + Up Arrow |
Open Mission Control |
The tiling shortcuts depend on the macOS version installed on the Mac. If a shortcut does not work, use Window > Move & Resize from the menu bar to see the commands available on your system.
How to Split Screen on Mac into 3 or 4 Windows
Classic Split View supports two windows. The newer window tiling system supports more flexible layouts, including quarters, so you can arrange three or four windows on one desktop.
Use the green button
- Hover over the green button of an active window.
- Look under Fill & Arrange.
- Choose a layout containing the number and arrangement of windows you want.
- Select additional open windows when macOS asks for them.
You can press and hold Option while viewing the green-button menu to reveal additional layouts.
Use the Window menu
With an app active, select Window > Move & Resize from the menu bar. Under Halves, Quarters, or Arrange, choose the layout you want.
A four-window layout works best on a large Mac display or external monitor. On a smaller MacBook screen, two windows usually leave more usable room for toolbars and document content.
How to Resize Split Screen on Mac
You do not have to keep two Split View windows at exactly the same width.
- Move the pointer to the divider between the two apps.
- Wait for the resize pointer to appear.
- Drag the divider left or right.
- Release it when both windows are the size you want.
Double-clicking the separator returns the windows to their original proportions.
With desktop window tiling, resize a tiled window by dragging its edge. macOS can align adjacent windows automatically as their edges approach one another.
How to Switch Sides in Split View
You can move the left app to the right side without leaving Split View. Click the app you want to move, reveal its title bar by moving the pointer toward the top of the screen, then drag the window across to the other side.
The other app switches positions automatically.
How to Replace One App in Split Screen
You can replace one side of an existing Split View without rebuilding the workspace.
- Click the app you want to replace.
- Move the pointer over its green button.
- Select Replace Tiled Window.
- Choose another available window.
The new app takes the previous app’s position while the other side remains unchanged.
How to Exit Split Screen on Mac
To leave full-screen Split View, move the pointer to the top of the display until the window controls appear. Hover over the green button of the app you want to remove and choose Move Window to Desktop.
The removed app returns to the normal desktop. The remaining app stays full screen in its own Space.
To find that app again, press Control + Up Arrow to open Mission Control and select its thumbnail from the Spaces bar at the top.
If you used normal window tiling instead of full-screen Split View, simply resize or drag the windows away from their tiled positions.
How to Split Screen on Mac Using Mission Control
Mission Control provides another way to create Split View, especially when one of the apps is already running full screen.
- Press Control + Up Arrow or the Mission Control/F3 key.
- Find the full-screen app in the Spaces bar at the top.
- Drag another open window onto the full-screen app’s thumbnail.
- Wait for macOS to combine them.
- Click the new Split View Space.
On a trackpad, you can also swipe up with three or four fingers to open Mission Control, depending on your trackpad settings.
How to Split Screen on Mac with Two Monitors
Split View also works with external displays. If you cannot create Split View on the second monitor, check the Spaces setting first.
- Open the Apple menu > System Settings.
- Select Desktop & Dock.
- Scroll to the Mission Control section.
- Turn on Displays have separate Spaces.
Apple requires this option for Split View on additional displays. Changing it can require you to log out and back in before the new behavior takes effect.
Once enabled, you can create a separate Split View workspace on an external monitor while keeping other apps available on the Mac’s built-in display.
Split View vs Window Tiling on Mac
| Feature | Split View | Window Tiling |
|---|---|---|
| Number of windows | Two | Two, three, four, or custom arrangement |
| Full-screen workspace | Yes | No |
| Menu bar and Dock | Can be hidden | Remain available |
| Separate Space | Yes | No |
| Best for | Focused work with two apps | Managing several windows on one desktop |
Use Split View when you want two apps separated from everything else. Use window tiling when you regularly move between several windows or want three and four-window layouts.
Fix Split Screen Not Working on Mac
Check whether the app supports Split View
Some windows cannot enter Split View or cannot shrink enough to fit beside another app. Test with standard apps such as Safari, Finder, Notes, or Mail to determine whether the problem is specific to one application.
Check the green button menu
Hover over the green button instead of clicking it. A normal click can maximize or enter full screen depending on your macOS settings, while hovering displays the available window arrangement options.
Enable Displays Have Separate Spaces
Open System Settings > Desktop & Dock, scroll to Mission Control, and enable Displays have separate Spaces. This setting is particularly important when using Split View with more than one display.
Check window tiling settings
If dragging windows to an edge does not tile them, go to System Settings > Desktop & Dock and review the tiling options. macOS lets you control whether windows tile when dragged to screen edges and whether holding Option accelerates tiling.
Exit full screen before trying desktop tiling
A full-screen app occupies its own Space. Exit full screen first if you want to use normal desktop tiling rather than Split View.
Restart the affected apps
Quit and reopen an app if its green-button menu stops responding or its window refuses to resize. If several apps have the same problem, restart the Mac and test the window controls again.
FAQs
How do I split my Mac screen into two?
Hover over the green button in the upper-left corner of an app and choose Full Screen > Left of Screen or Right of Screen. Select a second window for the other half. You can also use Move & Resize to tile two windows without entering full screen.
What is the shortcut for split screen on Mac?
On current versions of macOS, Fn + Control + Left Arrow and Fn + Control + Right Arrow can tile the active window to either side. Available shortcuts vary by macOS version, so check Window > Move & Resize if these commands are unavailable.
How do I split screen on a MacBook Air?
The process is the same as on other Macs. Hover over the green window button and choose a left or right Split View option, then select the second app. MacBook Air models running newer macOS versions can also use desktop window tiling.
How do I split screen on a MacBook Pro?
Open both apps, hover over the green button on the first window, place it on the left or right side, and select the second window. The procedure does not depend on whether the MacBook Pro uses an Intel processor or Apple silicon.
Can I split a Mac screen into three?
Yes, using window tiling on supported macOS versions. Use the green button’s Fill & Arrange layouts or Window > Move & Resize. Classic full-screen Split View itself remains a two-window feature.
Can I split a Mac screen into four?
Yes. Current window tiling controls include quarter-screen layouts that can arrange four windows on one desktop. Hold Option while viewing the tiling controls to see additional arrangements when available.
Can I split screen between two Safari windows?
Yes. Open two separate Safari windows and place them side by side just as you would two different apps. You can use either full-screen Split View or desktop window tiling.
Why can’t I split screen on my Mac?
The app may not support the required window size, a Mission Control setting may be disabled, or you may be trying to use a newer tiling feature on an older version of macOS. Check the green-button menu and System Settings > Desktop & Dock.
Can I use split screen with an external monitor?
Yes. Turn on Displays have separate Spaces under System Settings > Desktop & Dock > Mission Control. You can then use Split View on compatible external displays.
How do I get out of split screen without closing an app?
Move the pointer to the top of the screen, hover over the green button, and choose Move Window to Desktop. The app returns to the normal desktop without closing.
Does Mac have window snapping like Windows?
Yes. Current macOS versions include native window tiling that lets you drag windows toward screen edges or use the green-button and Window menus to arrange them into halves and quarters.
Do I need an app to split screen on Mac?
No. macOS includes Split View and native window tiling. Third-party window managers can provide additional layouts and shortcuts, but they are not required for normal split-screen use.