Hold Ctrl or Shift while you click items in File Explorer to select several at once, then press Ctrl + C and Ctrl + V to copy them, Delete to remove them, or use PowerRename to rename the whole group.
This guide covers every bulk action in Windows 11, plus folder merging, permission prompts, DMP files and making a video from several clips.
How to select multiple files and folders in Windows 11
Files and folders use the same selection rules, so you can mix both in one selection.
- Press Windows key + E to open File Explorer, then open the folder that holds your items.
- To select a block of neighbouring items, click the first one, hold Shift, then click the last one.
- To select scattered items, hold Ctrl and click each one. Ctrl-clicking a selected item removes only that item.
- To select everything in the folder, press Ctrl + A.
- To draw a selection, press the left mouse button on an empty area and drag across the items.
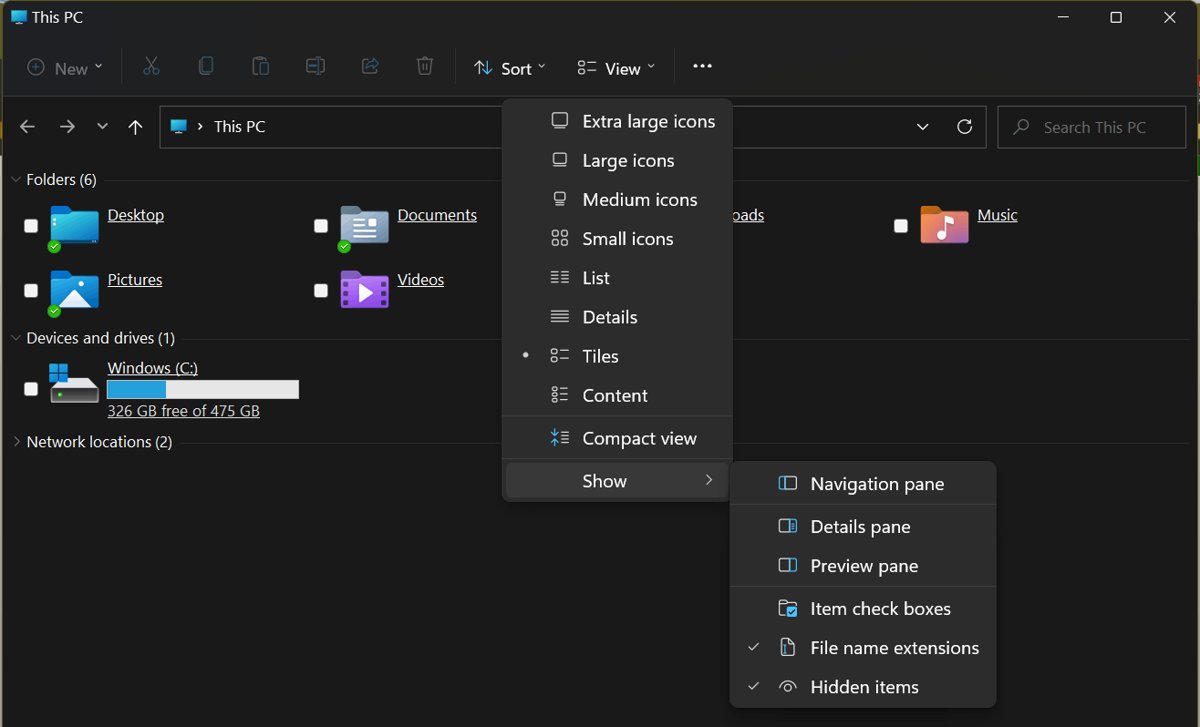
Prefer clicking boxes? Select View > Show > Item check boxes, and a check box appears next to each file and folder. Touch screens and Open dialogs have their own ways to select multiple files in Windows.
Select all, copy and paste shortcut keys in Windows 11
| What you want to do | Press this | Result |
|---|---|---|
| Select every item in the folder | Ctrl + A | All items in the window are selected |
| Extend a selection from the keyboard | Shift + Arrow keys | Neighbouring items join the selection |
| Pick separate items from the keyboard | Ctrl + Arrow key, then Spacebar | Each highlighted item is selected on its own |
| Copy the selection | Ctrl + C | Originals stay where they are |
| Cut the selection | Ctrl + X | Items move when you paste them |
| Paste in the current folder | Ctrl + V | The last clipboard item lands here |
| Send the selection to the Recycle Bin | Delete or Ctrl + D | You can restore the items later |
| Delete the selection permanently | Shift + Delete | The Recycle Bin is skipped |
| Rename one selected item | F2 | The name becomes editable |
| Undo the last action | Ctrl + Z | The previous action is reversed |
How to copy and paste multiple files/folders in Windows 11
- Select the files and folders using Ctrl, Shift or Ctrl + A.
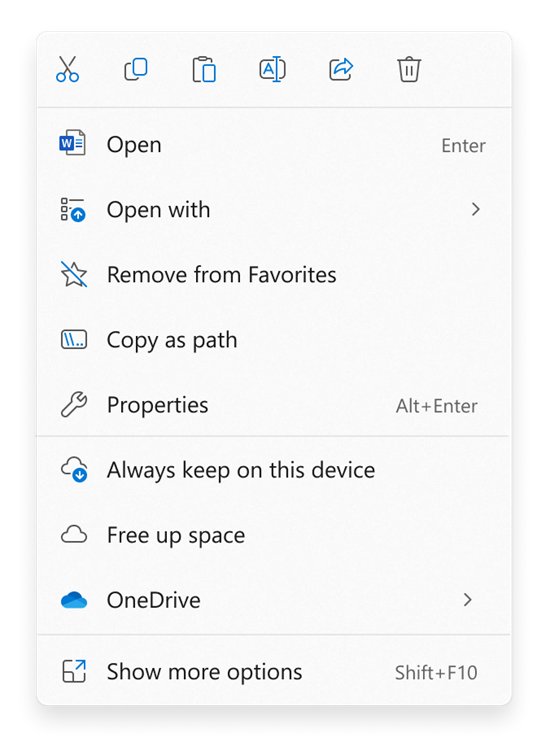
- Press Ctrl + C, or right-click the selection and select the Copy icon at the top of the menu.
- Open the destination folder or drive in File Explorer.
- Press Ctrl + V, or right-click an empty area and select the Paste icon.
- To move the items instead of duplicating them, use Ctrl + X in step 2.
Items pinned under Quick access behave differently. Right-click the item and select Open first, then cut and paste from the folder that opens.
How to drag and drop multiple files at once in Windows 11
| Key held while you drop | What happens | Use it when |
|---|---|---|
| Ctrl | A copy is created in the new location | The originals must stay put |
| Shift | The selection moves to the new location | You are reorganising folders |
| Alt | A shortcut to the original is created | You only need a quick way to open it |
Select the items first, press the mouse button on any selected item, and drag the group to the target folder. Open a second File Explorer tab with Ctrl + T or a new window with Ctrl + N if the destination is not visible.
How to select copy and paste on keyboard or laptop
These steps need no mouse or touchpad, so they suit a laptop on your knees.
- Press Windows key + E, then press F6 until focus reaches the content pane.
- Use the Up and Down arrow keys to reach the first file or folder.
- Hold Shift and press the arrow keys to extend the selection.
- For separate items, hold Ctrl, move with the arrow keys, and press Spacebar on each one you want.
- Press Ctrl + C to copy or Ctrl + X to cut.
- Press Alt + D, type the destination path, and press Enter.
- Press F6 until focus returns to the content pane, then press Ctrl + V.
How to delete multiple files/folders in Windows 11
- Select the files and folders you want to remove.
- Press Delete or Ctrl + D to move them to the Recycle Bin. The Delete icon in the right-click menu does the same job.
- To skip the Recycle Bin, press Shift + Delete instead.
- To reclaim the disk space after a normal delete, empty the Recycle Bin.
Files in the Recycle Bin still use drive space until you empty it. You can also delete files and folders with del and rmdir from the command line.
How to delete all files of one type with PowerShell
PowerShell suits jobs that span many subfolders, such as removing every CSV file under a folder. Open PowerShell in the parent folder before you run this.
Get-ChildItem -Path * -Include *.csv -Recurse | Remove-Item -WhatIfGet-ChildItem finds every .csv file in the current folder and its subfolders, then passes them to Remove-Item. The -WhatIf switch only lists what would be removed.
You should see: PowerShell prints one line per matching file and deletes nothing. Remove -WhatIf and run the command again to delete them.
How to rename multiple files/folders in Windows 11
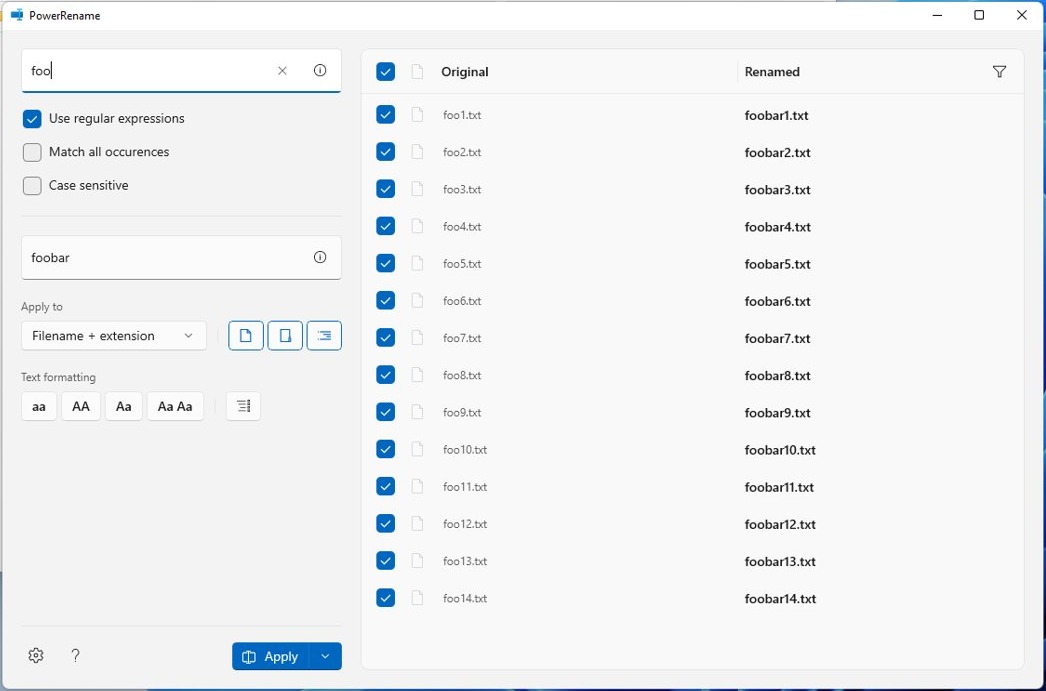
PowerRename is Microsoft's bulk renaming tool, and it gives each item its own name instead of one shared name. It is part of PowerToys, which you can get from the Microsoft Store or GitHub.
- Install PowerToys, open it, and make sure PowerRename is turned on.
- In File Explorer, select the files and folders you want to rename.
- Right-click the selection and select Rename with PowerRename.
- Type the text to find in Search for.
- Type the new text in Replace with.
- Turn on Match all occurrences if the text appears more than once in a name.
- Use Include files, Include folders and Include subfolders to control what changes.
- Check the Preview pane, clear any item you want to leave alone, then apply the rename.
For example, searching for power and replacing it with super turns powertoys-powerrename.txt into supertoys-superrename.txt when Match all occurrences is on.
To rename a single item instead, select it in File Explorer and press F2. Avoid these characters in file names: , # " * : < > ? / \ |.
PowerRename patterns for numbering and dating renamed files
Turn on Enumerate items to use the counter patterns below in Replace with. The date patterns read each file's creation date.
| Pattern in Replace with | What it adds | Example result |
|---|---|---|
${} |
A counter that starts from zero | 0, 1, 2 |
${start=10} |
A counter with a chosen first number | 10, 11, 12 |
${increment=2} |
A counter with a chosen step | 0, 2, 4 |
${padding=4} |
A counter with leading zeroes | 0000, 0001, 0002 |
$YYYY-$MM-$DD |
Creation year, month and day as digits | 2020-11-02 |
$MMM-$DD-$YY-powertoys |
Short month, day, two-digit year and your text | Nov-02-20-powertoys |
$CAMERA_MODEL |
The camera model from photo metadata, after you pick the EXIF option | Your camera's model name |
Counters can be combined. With a search for a, the pattern Image_${padding=4;increment=2;start=10}_ renames a.jpg, ab.jpg and abc.jpg to Image_0010_.jpg, Image_0012_b.jpg and Image_0014_bc.jpg.
How to rename multiple files with the ren command in Command Prompt
Use ren for a simple change, such as a new file extension. Open Command Prompt in the folder first, because ren cannot move files or work across drives.
ren *.txt *.docThe asterisks match every name, so each .txt file in the current folder keeps its name and gets a .doc extension.
You should see: Listing the folder with dir shows the same file names ending in .doc.
How to rename multiple files with PowerShell Rename-Item
Rename-Item does not accept wildcards in its new name, so pipe the files in and use the -replace operator.
Get-ChildItem *.txt | Rename-Item -NewName { $_.Name -replace '.txt','.log' }Get-ChildItem finds the .txt files in the current folder. For each file, the script block builds a new name that replaces .txt with .log. The match is not case sensitive.
You should see: Running Get-ChildItem *.log lists the renamed files.
How to create a video with multiple files in Windows 11
Clipchamp is the video editor that comes preinstalled on Windows 11. It accepts video files, images and audio in one project.
- Select Start > All apps > Clipchamp, or search for Clipchamp on the taskbar.
- Select the create a new video button.
- Select your clips in File Explorer and drag them into My media, or use the import media button.
- Highlight all the assets in My media and drag them onto the timeline.
- Drag the clips on the timeline into the order you want.
- Select export at the top right, then choose a video quality.
Keep the original files on your PC. Clipchamp processes media locally and may ask you to relink them later unless content backup is on.

Excessive DMP files in Windows 11 System32 folder
A DMP file is a memory dump: debugging information written when Windows or an app stops unexpectedly. A growing pile usually points to a repeating crash, so the location tells you what to investigate.
| Dump type | Where it is written | What creates it |
|---|---|---|
| Complete or kernel dump | %SystemRoot%\Memory.dmp |
A Stop error (blue screen). A new dump can overwrite the old one |
| Small memory dump | %SystemRoot%\Minidump |
Each Stop error adds a new dated file, such as Mini022900-01.dmp |
| System service crash dump | A profile under %WINDIR%\System32\Config\SystemProfile |
A crashing service when local dump collection is turned on |
| Network or Local Service crash dump | A profile under %WINDIR%\ServiceProfiles |
The same local dump collection, for those service accounts |
| App crash dump | %LOCALAPPDATA%\CrashDumps |
A crashing app when local dump collection is turned on |
Once you no longer need a dump for troubleshooting, select only the .dmp files and press Delete, approving the administrator prompt if one appears. Leave every other System32 file alone.
For routine space recovery, use Settings > System > Storage > Cleanup recommendations, or clear temporary files in Windows 11.
To review the system dump setting, open Control Panel > System and Security > System > Advanced system settings > Advanced, then select Settings under Startup and Recovery. The choice sits under Writing Debugging Information.
Local app and service dumps are a separate feature that an administrator turns on under the Windows Error Reporting\LocalDumps registry key. Its DumpCount value caps the folder at 10 files by default.
You'll need to provide administrator permission to delete this folder
Windows shows this when the folder is protected and your current session needs approval. Work through these cases in order. Never take ownership of Windows system folders such as System32.
The prompt appears and you have an administrator account
User Account Control asks administrators for consent before a protected change.
- Confirm the folder is the one you meant to delete.
- Approve the prompt to give consent.
- If you use a standard account, enter administrator credentials when Windows asks.
The folder still will not delete because a file is in use
A running process has a file in the folder open.
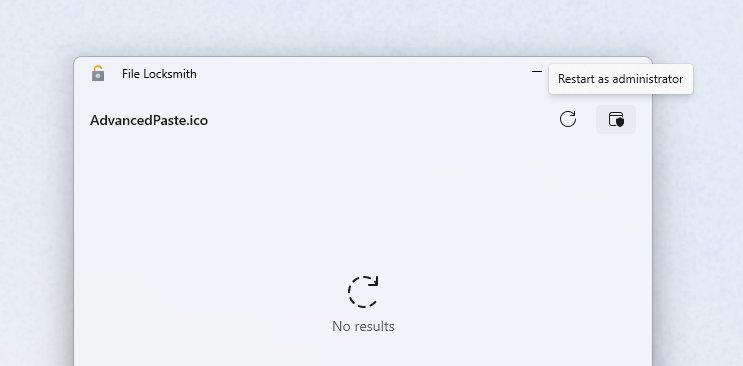
- Open PowerToys and turn on Enable File Locksmith.
- Select the folder, right-click it, and select Show more options.
- Select Unlock with File Locksmith to list the processes using it.
- Select Restart as administrator if you need to scan every process.
- Save your work in that app, select End task, then delete the folder.
Access stays denied on your own old data folder
The folder belongs to a previous account or Windows installation.
- Open Command Prompt as an administrator.
- Run
takeown /f "D:\Old Folder" /r /d Yto make your account the owner of the folder and its contents. - Run
icacls "D:\Old Folder" /grant %USERNAME%:F /tto give yourself full access. - Delete the folder in File Explorer.
How to merge folders in Windows 11
To merge two folders in File Explorer, move the contents of one into the other, then remove the empty folder.
- Open the folder you want to empty and press Ctrl + A.
- Press Ctrl + X to cut everything.
- Open the folder you want to keep and press Ctrl + V.
- If Windows reports files with the same name, decide for each one whether to replace or keep it.
- Check that the first folder is empty, then delete it.
How to merge two folders with Robocopy without overwriting files
Robocopy is the safer route for large folders, because it can leave existing files in the destination untouched. It copies rather than moves, so the source folder stays intact.
robocopy "C:\Folder A" "C:\Folder B" /E /XC /XN /XO/E copies subfolders, including empty ones. /XC, /XN and /XO skip any file that already exists in the destination, whether it is newer, older or changed.
You should see: Robocopy prints a summary table. An exit code of 8 or higher means at least one copy failed.
Do not add /MIR or /PURGE when merging, because both delete destination items that are missing from the source.
How to tell if multiple files copied correctly in Windows 11
- Open the source folder and press Ctrl + A.
- Press Alt + Enter to open the properties of the selection, then note the size.
- Repeat both steps in the destination folder.
- Compare the two sizes before you delete the originals.
After a delete, look in the Recycle Bin to confirm the items arrived there. If its icon is missing, go to Settings > Personalization > Themes > Desktop icon settings and check Recycle Bin.
How to undo a copy, delete or rename of multiple files
- Press Ctrl + Z straight after the action to undo it, including a PowerRename bulk rename.
- For deleted items, open the Recycle Bin and select the files or folders you want back.
- Right-click the selection and select Restore to return it to the original location.
Items removed with Shift + Delete skip the Recycle Bin. For those, try the other ways to find deleted files on Windows 11.
Can't select multiple files in Windows 11 File Explorer
Holding Shift or Ctrl does not select more than one item
Microsoft lists this as a known File Explorer problem, and its diagnostic tool is being retired.
- Select View > Show > Item check boxes in File Explorer.
- Click the check box beside each item you want.
- Restart your PC if the keys still do not work, then test again.
Rename with PowerRename is missing from the right-click menu
The utility is off, or it is set to appear only in the extended menu.
- Open PowerToys and turn on PowerRename.
- Check the Show PowerRename in setting.
- Right-click the selection and select Show more options if the entry is not in the first menu.
Cut and paste does not work on items in Quick access
Quick access needs the item opened before you can cut and paste.
- Right-click the item in Quick access.
- Select Open.
- Cut or copy the items from the folder that opens.
Select, copy and paste multiple files in Windows 11 FAQ
How do I select all files in a folder in Windows 11?
Open the folder in File Explorer and press Ctrl + A. Every file and subfolder in that window is selected. To leave some out, hold Ctrl and click each item you want to remove from the selection.
How to select copy and paste?
Click the first item, hold Shift or Ctrl to add more, and press Ctrl + C to copy. Open the destination and press Ctrl + V to paste. The same pattern works for files in File Explorer and for selected text.
How to select copy and paste on laptop?
Use the same keys as a desktop PC: Ctrl + A selects all, Ctrl + C copies and Ctrl + V pastes. In File Explorer, Shift and the arrow keys extend a selection, so you never need to touch the touchpad.
How to select copy and paste on windows?
Select the items in File Explorer, press Ctrl + C, go to the new location and press Ctrl + V. You can also right-click the selection and use the Copy and Paste icons at the top of the Windows 11 menu.
How to select all copy and paste?
Press Ctrl + A to select everything in the window, Ctrl + C to copy it, then switch to the destination and press Ctrl + V. In a document or text box, Ctrl + A selects all of the text instead.
How to select copy and paste on mac?
Press Command-A to select all items, Command-C to copy and Command-V to paste; all of these also work for files in Finder. Command-Delete moves a selection to the Trash. You can also select multiple files on a Mac with the trackpad.
How to paste after copying?
Go to where you want the items and press Ctrl + V, or right-click and select Paste. Ctrl + V pastes the last clipboard item. Press Windows key + V to open clipboard history, which you must turn on first.
How to control copy and paste?
The Ctrl key drives most of it: Ctrl + C copies, Ctrl + X cuts and Ctrl + V pastes. Holding Ctrl while you drag a file also creates a copy, and Ctrl + Z reverses the last action if you make a mistake.