You can record audio on a Mac using built-in apps such as QuickTime Player and Voice Memos, so you do not need to install extra software for basic voice or microphone recordings. QuickTime is better when you want control over the microphone and recording quality, while Voice Memos is faster for meetings, notes, interviews, and spoken recordings.
Recording the Mac’s internal or system audio is different. QuickTime’s built-in recording options can capture a microphone, but they do not provide a system-audio input for recording the sound coming directly from apps, games, or a browser. For that, you need software that supports macOS system-audio capture.
This guide covers microphone recording, Voice Memos, QuickTime, external microphones, system audio, screen recording with sound, file formats, and fixes for the most common recording problems on a MacBook Air, MacBook Pro, iMac, Mac mini, and Mac Studio.
How to Record Audio on Mac with QuickTime Player
QuickTime Player is the simplest built-in option when you want an audio-only recording and would like to choose the microphone or recording quality before you begin.
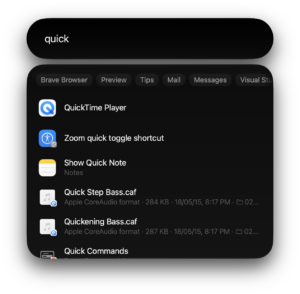
- Open QuickTime Player from the Applications folder or Spotlight.
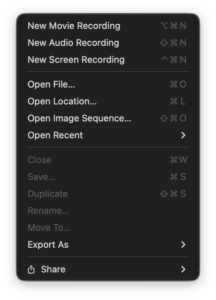
- Click File > New Audio Recording.
- Click the options button beside the recording controls.
- Select the microphone you want to use.
- Choose the recording quality.
- Click the red Record button.
- Click Stop when you are finished.
- Select File > Save, give the recording a name, and choose where to save it.
You can use the Mac’s built-in microphone, a USB microphone, a headset microphone, or an audio interface connected to the Mac.
Choose High or Maximum audio quality in QuickTime
QuickTime currently offers two audio-quality options:
| QuickTime setting | Recording format | Best for |
|---|---|---|
| High | 44.1 kHz AAC | Voice recordings, meetings, interviews, and smaller files |
| Maximum | 44.1 kHz, 24-bit uncompressed Linear PCM | Music, editing, archiving, and recordings where quality matters more than file size |
High is sufficient for most spoken recordings. Maximum quality creates substantially larger files because the audio is stored without AAC compression.
Pause a QuickTime audio recording
QuickTime does not show a normal Pause button during an audio recording, but you can pause by holding Option while clicking the recording control. Click it again to resume.
How to Record Voice on Mac with Voice Memos
Voice Memos is faster than QuickTime when you simply want to start talking and save the recording. It is useful for lectures, interviews, reminders, meetings, song ideas, and spoken notes.
- Open the Voice Memos app.
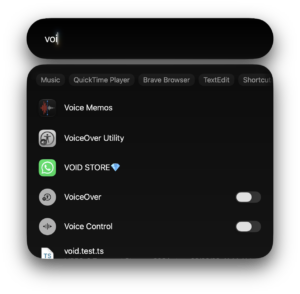
- Click the red Record button.
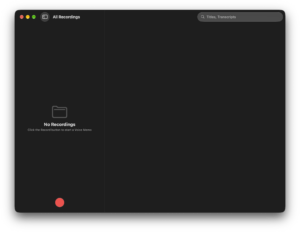
- Speak into the Mac’s microphone or your connected external microphone.
- Click Pause if you need to stop temporarily.
- Click Resume to continue.
- Click Done when the recording is complete.
Voice Memos saves the recording automatically. You can rename it, trim unwanted sections, replace part of the recording, or continue recording from the end.
Sync Voice Memos between Mac, iPhone and iPad
If Voice Memos is enabled in iCloud and your devices use the same Apple Account, recordings can appear automatically across your Mac, iPhone, and iPad.
This is useful when you record an interview or meeting on your Mac and want to listen to it later on your phone without transferring the file manually.
Transcribe Voice Memos on Mac
Voice Memos can transcribe spoken recordings on supported Apple silicon Macs running macOS 15 or later. You can view the transcript while recording or after the recording has finished.
Transcription availability depends on the language, Mac model, macOS version, and region.
How to Record Audio on Mac with an External Microphone
You can improve recording quality by connecting a USB microphone, headset, audio interface, or another supported input device.
After connecting the microphone:
- Open System Settings.
- Select Sound.
- Scroll to Input.
- Select the microphone you want to use.
- Speak into it and check that the input-level meter responds.
- Open QuickTime, Voice Memos, GarageBand, or your preferred recording app.
- Select the same microphone inside the app if it provides an input selector.
If you use an XLR microphone, you normally need a USB audio interface because most modern Macs do not provide a direct analog microphone input suitable for studio microphones.
Record stereo audio on Mac
The built-in Mac microphone is suitable for speech, but you can connect a supported stereo microphone or stereo audio interface when you need separate left and right channels.
This is more useful for music, instruments, field recording, and other situations where positioning and stereo separation matter.
How to Record Internal Audio on Mac
If by audio recording you mean the sound produced by the Mac itself, such as audio from a browser, game, music app, meeting, or another program, QuickTime’s normal audio recorder is not enough. Its audio input menu is designed for microphones and other input devices.
To record internal or system audio, use an application that supports macOS system-audio capture. Current versions of macOS include privacy controls that let approved apps record system audio.
After installing a compatible recording app:
- Open System Settings.
- Select Privacy & Security.
- Open Screen & System Audio Recording.
- Allow the recording app to capture system audio.
- Quit and reopen the app if macOS asks you to do so.
- Select system or desktop audio as the recording source inside the app.
Only give this permission to software you trust because an app with system-audio access can capture sound generated by other applications.
Can QuickTime record internal Mac audio?
Not directly through its built-in audio recording controls. QuickTime lets you select a microphone or audio input device, but it does not provide a native “Mac system audio” source.
Some third-party audio-routing tools can create a virtual input that QuickTime can record, but you do not need that setup if your recording application already supports direct system-audio capture.
How to Screen Record on Mac with Audio
macOS includes a built-in screen recorder that can capture the screen and your microphone at the same time.
- Press Shift + Command + 5.
- Select Record Entire Screen or one of the other recording-area options available on your macOS version.
- Click Options.
- Under Microphone, choose the microphone you want to record.
- Click Record.
- Click the Stop button in the menu bar when finished, or press Command + Control + Escape.
The microphone option records your voice or sound entering the selected microphone. It does not automatically mean that audio playing from apps on the Mac will be captured.
Record a Mac screen with system audio
If you need the screen recording to include application or system sound, use a screen recorder that supports system-audio capture and give it permission under System Settings > Privacy & Security > Screen & System Audio Recording.
This is commonly required for recording game audio, browser audio, software demonstrations, or other content where the sound needs to come directly from the application rather than through the microphone.
How to Record Audio on Mac with GarageBand
GarageBand is a better choice when you plan to edit the recording, add music, record instruments, use multiple tracks, or apply audio effects.
- Open GarageBand.
- Create a new empty project.
- Select an Audio track.
- Choose your microphone or audio interface as the input.
- Check the input level.
- Click Record.
- Press the Space bar or Stop button when finished.
GarageBand also lets you cut sections, arrange clips, change levels, apply effects, and combine several recordings before exporting the finished audio.
For a quick voice memo, this is more work than necessary. For podcasts, music, instruments, or edited recordings, the extra controls are useful.
QuickTime vs Voice Memos vs GarageBand
| App | Best use | Main advantage |
|---|---|---|
| QuickTime Player | Audio-only microphone recording | Simple quality and microphone selection |
| Voice Memos | Meetings, interviews, notes and speech | Fast recording, editing, syncing and transcription |
| GarageBand | Music, podcasts and edited recordings | Multitrack recording and audio editing |
| Third-party recorder | Internal or system audio | Can capture sound produced by Mac apps when supported |
Where Are Audio Recordings Saved on Mac?
QuickTime asks you where to save the file when you finish recording, so you can choose Desktop, Documents, an external drive, or another folder.
Voice Memos manages its recordings inside the Voice Memos app and can synchronize them through iCloud. You can drag a recording from Voice Memos to Finder when you need a standalone copy.
GarageBand saves the editable project separately. Export the final recording when you want a standard audio file that can be shared or opened in another application.
How to Fix Audio Recording Not Working on Mac
Allow microphone access
If QuickTime, Voice Memos, GarageBand, or another app cannot hear your microphone:
- Close the recording app.
- Open System Settings > Privacy & Security.
- Select Microphone.
- Turn on permission for the app.
- Reopen the app and try again.
Check the selected microphone
Open System Settings > Sound > Input and make sure the correct device is selected. Speak into the microphone and watch the input meter.
If the meter does not move, reconnect the microphone, try another USB port, or check the audio interface’s input and gain controls.
QuickTime recording has no sound
Open File > New Audio Recording and check the microphone selected in the recording options. QuickTime may still be using a disconnected headset, display microphone, audio interface, or another input device.
Microphone permission does not appear
Quit the app completely and reopen it. macOS normally asks for permission when an application first attempts to access the microphone.
If the app is already listed under Privacy & Security > Microphone, turn its permission on and restart the app.
Recording volume is too low
Move closer to the microphone or increase the input level under System Settings > Sound > Input when that control is available for the selected device.
With a USB audio interface, adjust the physical gain control on the interface rather than relying only on macOS volume settings.
Recording has echo or feedback
Use headphones while monitoring the recording. Playing the monitored microphone through speakers can cause the sound to return to the microphone and create feedback or echo.
FAQs
How do I record audio on a Mac for free?
Use QuickTime Player or Voice Memos. Both are included with macOS and can record using the Mac’s built-in microphone or a compatible external microphone.
Can I audio record on a MacBook Air or MacBook Pro?
Yes. MacBook Air and MacBook Pro models include built-in microphones and work with QuickTime Player and Voice Memos without additional hardware.
What is the easiest way to record voice on a Mac?
Open Voice Memos and click Record. It is the quickest built-in option when you do not need advanced quality settings or multitrack editing.
Can QuickTime record audio only?
Yes. Open QuickTime Player > File > New Audio Recording. You do not need to create a video or screen recording.
What format does QuickTime use for audio recordings?
QuickTime’s High quality setting uses 44.1 kHz AAC audio. Maximum quality uses 44.1 kHz, 24-bit uncompressed Linear PCM audio.
How do I record internal audio on a Mac?
Use a recording app that supports macOS system-audio capture and grant it access under Privacy & Security > Screen & System Audio Recording. QuickTime does not expose system audio as a built-in recording source.
Can I record Mac audio without installing software?
Yes for microphone, voice, and external-input recordings. QuickTime Player and Voice Memos are built into macOS. Direct system-audio recording generally requires an app or audio-routing tool that supports it.
Can I record my screen and voice at the same time?
Yes. Press Shift + Command + 5, choose a screen-recording mode, open Options, and select your microphone before starting the recording.
Can I record a podcast on a Mac?
Yes. QuickTime works for a basic single-microphone recording, while GarageBand is more suitable when you need multiple tracks, editing, music, effects, or separate microphone recordings.
Why can my recording app not access the microphone?
Open System Settings > Privacy & Security > Microphone and allow access for the application. Quit and reopen the app after changing the permission.
Can I use a USB microphone to record on Mac?
Yes. Connect the USB microphone, select it under System Settings > Sound > Input, and then choose it inside QuickTime, GarageBand, or your recording application.