To print on a Mac, open the document, photo, webpage, or PDF you want to print, press Command + P, select your printer, adjust the print settings, and click Print. If your printer does not appear, add it first from System Settings > Printers & Scanners.
The same basic process works on a MacBook Air, MacBook Pro, iMac, Mac mini, and Mac Studio. macOS supports wireless AirPrint printers, USB printers, shared printers, and network printers connected by IP address.
This guide covers printing from a Mac, connecting a wireless or USB printer, printing PDFs and photos, double-sided and black-and-white printing, and fixing the most common problems when a Mac cannot find or use a printer.
How to Print on a Mac
If the printer is already connected to your Mac, printing takes only a few steps:
- Open the document, image, PDF, webpage, or other file you want to print.
- Choose File > Print, or press Command + P.
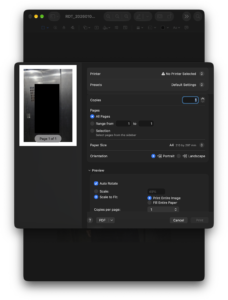
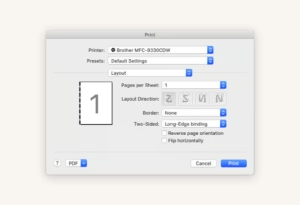
- Select your printer from the Printer menu.
- Choose the number of copies and pages you want to print.
- Adjust options such as paper size, orientation, color, double-sided printing, or scaling when needed.
- Check the preview.
- Click Print.
The exact options shown in the Print dialog depend on the app and printer. A basic home printer may show only a few controls, while a photo or office printer can offer additional settings for paper trays, print quality, color management, finishing, and media type.
How to Add a Printer to a Mac
If your printer does not appear in the Print dialog, add it through macOS before trying to print.
- Click the Apple menu.
- Open System Settings.
- Select Printers & Scanners.
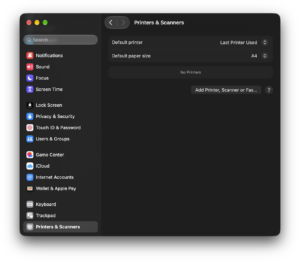
- Click Add Printer, Scanner or Fax.
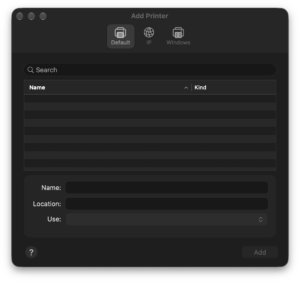
- Select your printer.
- Click Add.
macOS normally tries to use AirPrint when the printer supports it. AirPrint does not require a separate printer driver or utility.
How to Connect a Wireless Printer to a Mac
For most modern Wi-Fi printers, connect the printer and Mac to the same network first.
- Turn on the printer.
- Connect the printer to your Wi-Fi network using its screen, buttons, or manufacturer setup process.
- Make sure the Mac is connected to the same Wi-Fi network.
- Open System Settings > Printers & Scanners.
- Click Add Printer, Scanner or Fax.
- Wait for the printer to appear.
- Select it and click Add.
If the printer supports AirPrint, macOS can usually configure it automatically. You do not need to install software from HP, Canon, Brother, Epson, or another manufacturer unless the printer requires additional features or does not support AirPrint.
How to Add an AirPrint Printer to a Mac
AirPrint is Apple’s driverless printing system. When an AirPrint-compatible printer is connected to the same network as your Mac, it should appear automatically in the printer list.
- Open System Settings > Printers & Scanners.
- Click Add Printer, Scanner or Fax.
- Select the printer.
- Check that AirPrint is selected in the Use menu when that option appears.
- Click Add.
If an AirPrint printer does not appear, confirm that both devices are on the same network and restart the printer, router, and Mac before changing drivers or installing additional software.
How to Connect a USB Printer to a Mac
You can also print through a direct USB connection.
- Turn on the printer.
- Connect it to the Mac with the appropriate USB cable.
- Open System Settings > Printers & Scanners.
- Select the USB printer if macOS asks you to add it.
- Click Add.
Many recent MacBook Air and MacBook Pro models have USB-C or Thunderbolt ports rather than the older rectangular USB-A connector. If the printer uses USB-A, you will need a compatible USB-C adapter, hub, or cable.
How to Add a Printer to a Mac by IP Address
A network printer that does not appear automatically can sometimes be added using its IP address.
- Open System Settings > Printers & Scanners.
- Click Add Printer, Scanner or Fax.
- Select the IP tab.
- Enter the printer’s IP address or hostname.
- Select the protocol supported by the printer.
- Choose the appropriate printer software or AirPrint when available.
- Click Add.
macOS supports network printing protocols including AirPrint, IPP, LPD, and HP Jetdirect. If this is an office printer, your network administrator can provide the correct IP address, protocol, and queue information.
How to Print from a MacBook Air or MacBook Pro
Printing from a MacBook Air or MacBook Pro works the same way as printing from any other Mac.
- Connect the MacBook and printer to the same Wi-Fi network, or connect the printer by USB.
- Open the file you want to print.
- Press Command + P.
- Select the printer.
- Choose your print settings.
- Click Print.
You do not need an Apple-branded printer. Macs can print to many models from Brother, Canon, Epson, HP, Xerox, and other manufacturers, particularly when the printer supports AirPrint.
How to Print a PDF on Mac
You can print a PDF directly from Preview, Safari, Adobe Acrobat, or another PDF-compatible app.
- Open the PDF.
- Press Command + P.
- Select your printer.
- Choose which pages you want to print.
- Adjust orientation, paper size, scaling, or double-sided printing if necessary.
- Click Print.
For example, to print only pages 3 through 8 rather than an entire PDF, select the page-range option in the Print dialog and enter the required pages.
How to Print a Webpage on Mac
Safari, Chrome, Firefox, Edge, and most other Mac browsers support the standard Command + P shortcut.
- Open the webpage.
- Press Command + P.
- Select your printer.
- Review the page preview.
- Adjust the scale or page range if the content does not fit correctly.
- Click Print.
Webpages can contain navigation menus, advertisements, sidebars, and other elements you may not want on paper. When a website provides a Print or Print article button, using it can produce a cleaner result than printing the full webpage directly.
How to Print Photos on a Mac
You can print images from the Photos app, Preview, or another image editor.
Print a Photo from the Photos App
- Open Photos.
- Select the photo or photos you want to print.
- Choose File > Print.
- Select your printer.
- Choose the paper size, layout, and other available options.
- Load the correct photo paper into the printer.
- Click Print.
For better photo output, make sure the paper type selected in the Print dialog matches the paper loaded into the printer. Using a glossy-photo setting with plain office paper, or the reverse, can produce poor results.
How to Print Double-Sided on a Mac
If your printer supports automatic duplex printing, macOS can print on both sides of each sheet.
- Open the document.
- Press Command + P.
- Find the Double-sided option.
- Turn it On.
- Select the edge or binding option when required.
- Click Print.
Choose the standard long-edge option for most documents that turn like a book. Short Edge is useful when pages need to flip from the top, such as some calendars and landscape documents.
What if the Double-Sided Option Is Missing?
The option appears only when the printer and its current configuration support duplex printing. If your printer can print on both sides but the setting is missing, remove and add the printer again, check that macOS selected the correct printer model, and install updated manufacturer software if AirPrint does not expose the feature.
You can also print manually on both sides using Paper Handling. Print only the odd pages first, reload the printed sheets in the correct direction, and then print the even pages.
How to Print in Black and White on a Mac
Many printers let you choose black-and-white, grayscale, or monochrome output from the Print dialog.
- Open the file and press Command + P.
- Select your printer.
- Look for Black & White, Grayscale, Color, or Media & Quality.
- Select the black-and-white or grayscale option.
- Click Print.
The exact wording depends on the printer driver. Some printers hide color controls inside sections such as Printer Options, Quality & Media, or Printer Features.
If no monochrome option appears, check the printer manufacturer’s settings or software. Not every app and printer combination exposes the same controls in macOS.
How to Print Multiple Pages on One Sheet on Mac
macOS can place several document pages onto one physical sheet of paper, which is useful for handouts, drafts, and saving paper.
- Press Command + P.
- Scroll to Layout.
- Open Pages per Sheet.
- Select the number of pages you want on each sheet.
- Choose a layout direction if needed.
- Click Print.
Supported printers may also show a Print as Booklet option for creating folded booklet layouts.
How to Save as PDF Instead of Printing on a Mac
macOS has a built-in PDF printer, so you can convert many printable documents and webpages into PDF files without installing a PDF utility.
- Open the document.
- Choose File > Print or press Command + P.
- Open the PDF menu at the bottom of the Print dialog.
- Select Save as PDF.
- Enter a filename.
- Choose where to save it.
- Click Save.
You can also use the PDF menu to open the document in Preview before printing or to send the generated PDF through supported sharing options.
How to Change the Default Printer on Mac
If you regularly use more than one printer, you can control which one macOS selects automatically.
- Open System Settings.
- Select Printers & Scanners.
- Find the Default printer setting.
- Select the printer you want to use by default.
You can also let macOS use the last printer you used. That is convenient if you frequently move between a home, office, and other printing locations.
Mac Can’t Find Printer: What to Do
If your printer does not appear on your Mac, check the connection before reinstalling software.
Make Sure the Printer Is Online
Check that the printer is switched on, has paper and ink or toner, and is not displaying an error. For a wireless printer, confirm that it is connected to Wi-Fi rather than waiting in setup mode.
Check the Wi-Fi Network
Your Mac and wireless printer generally need to be reachable on the same local network for automatic discovery. Guest Wi-Fi networks and networks with device isolation can prevent the Mac from seeing the printer.
Restart the Printer and Mac
Turn the printer off, wait a few seconds, and turn it back on. Restart the Mac as well. This can restore network discovery without changing any printer settings.
Remove and Add the Printer Again
- Open System Settings > Printers & Scanners.
- Select the problem printer.
- Remove it.
- Click Add Printer, Scanner or Fax.
- Select the printer when it reappears.
- Choose AirPrint or the appropriate printer software.
- Click Add.
Update the Printer Software
AirPrint printers normally do not require separate drivers. If the printer does not support AirPrint or important functions are missing, check the manufacturer’s website for software compatible with your current macOS version.
Avoid installing old printer drivers from third-party download sites. An outdated driver can cause more problems after a macOS update.
Printer Says Offline on Mac
If a previously working printer appears offline, confirm that it is powered on and connected to the network or USB port it normally uses.
For a Wi-Fi printer, check whether its network address changed after a router restart. Removing and adding the printer again often allows macOS to rediscover the correct connection automatically.
You should also open the printer queue and check for a paused or failed print job. One stuck document can prevent later jobs from printing.
How to Cancel a Print Job on Mac
If you accidentally send the wrong document or a print job becomes stuck:
- Open Print Centre from Spotlight, or open the printer queue from Printers & Scanners.
- Find the document in the queue.
- Click the cancel button beside the job.
If the job refuses to disappear, cancel it, restart the printer, and reopen the queue before sending the document again.
Frequently Asked Questions
What is the keyboard shortcut to print on a Mac?
Press Command + P. The shortcut opens the Print dialog in most Mac apps that support printing.
How do I print from a MacBook to a wireless printer?
Connect the MacBook and printer to the same Wi-Fi network, add the printer from System Settings > Printers & Scanners, open the document, press Command + P, and select the printer.
Do I need printer drivers on a Mac?
Not usually when the printer supports AirPrint. macOS can use AirPrint without installing a separate driver. Non-AirPrint printers may require software supplied by the manufacturer.
How do I print from a Mac without AirPrint?
You can connect a compatible printer by USB, add a network printer by IP address, or install the manufacturer’s macOS printer software when required.
Why is my printer not showing up on my Mac?
Make sure the printer is turned on and connected to the same Wi-Fi network as the Mac. Restart both devices, then check System Settings > Printers & Scanners > Add Printer, Scanner or Fax.
How do I print a PDF from a Mac?
Open the PDF, press Command + P, choose your printer and settings, then click Print.
How do I print only certain pages on a Mac?
Open the Print dialog and change the page setting from all pages to a range. Enter the first and last pages you want to print.
How do I print double-sided on a Mac?
Press Command + P and turn on Double-sided. The option appears when the selected printer supports duplex printing.
Why can’t I print double-sided on my Mac?
Your printer may not support automatic duplex printing, macOS may be using the wrong printer configuration, or the selected app may not expose the option. Check the printer specifications and try adding the printer again.
How do I print in black and white on a Mac?
Open the Print dialog and select Black & White, Grayscale, or the equivalent option offered by your printer.
Can I print from a MacBook using USB?
Yes. Connect the printer to the MacBook using a compatible cable or USB-C adapter, add it from Printers & Scanners if necessary, and print normally.
How do I save something as a PDF on Mac instead of printing it?
Press Command + P, open the PDF menu in the Print dialog, select Save as PDF, choose a filename and location, and save the file.