You can format an SD card on a Mac with the built-in Disk Utility app, so you do not need additional software. Insert the SD card, open Disk Utility, select the physical card, click Erase, and choose FAT32, exFAT, or another file system based on where you plan to use the card.
For most SD cards used with cameras, Windows PCs, Macs, gaming devices, or other electronics, exFAT is the better choice for cards larger than 32GB, while MS-DOS (FAT) is the usual choice for FAT32-compatible cards of 32GB or less. A Mac-only card can use APFS, although many cameras and other devices will not recognize it.
Formatting completely erases the SD card, so copy any photos, videos, documents, or other files you want to keep before continuing.
How to Format an SD Card on Mac Using Disk Utility
Disk Utility is the simplest way to format an SD card on a MacBook, iMac, Mac mini, Mac Studio, or Mac Pro. The steps are essentially the same on current versions of macOS.
- Insert the SD card into your Mac’s SD card slot or connect it through a USB card reader.
- Open Disk Utility. You can press Command + Space, type Disk Utility, and press Enter.
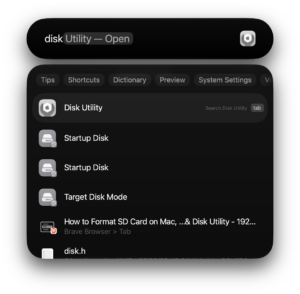
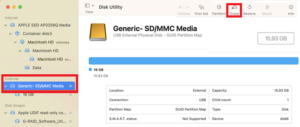
- Click View > Show All Devices.
- Find the SD card in the left sidebar.
- Select the physical SD card rather than only the volume beneath it.
- Click Erase in the toolbar.
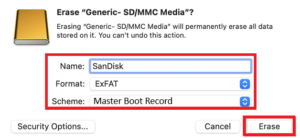
- Enter a name for the card.
- Select the required file system under Format.
- Select a partition scheme if the option appears.
- Click Erase.
- Wait for Disk Utility to finish, then click Done.
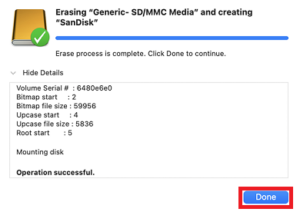
The SD card should remount automatically and appear in Finder after the format completes.
Be careful when selecting the disk. Disk Utility also displays internal drives, USB drives, SSDs, and other connected storage. Confirm the SD card’s name and capacity before clicking Erase.
Which Format Should You Use for an SD Card on Mac?
The correct file system depends on the card’s capacity and the devices that need to read it.
| Format | Best use | Windows compatible | Mac compatible |
|---|---|---|---|
| MS-DOS (FAT) | 32GB or smaller cards, older cameras and devices | Yes | Yes |
| exFAT | 64GB, 128GB, 256GB, 512GB and larger SD cards | Yes | Yes |
| APFS | Storage used only with modern Macs | No native support | Yes |
| Mac OS Extended | Older Mac-only workflows | No native support | Yes |
Apple recommends MS-DOS (FAT) for Windows-compatible storage of 32GB or less and exFAT for storage larger than 32GB.
If the SD card is going back into a camera, dashcam, drone, audio recorder, Nintendo console, or another dedicated device, check that device’s documentation as well. Some hardware expects a particular file system or card capacity.
How to Format SD Card to FAT32 on Mac
macOS labels the FAT option in Disk Utility as MS-DOS (FAT). For a card of 32GB or less, this is the option to use when you need FAT32 compatibility.
- Insert the SD card.
- Open Disk Utility.
- Select View > Show All Devices.
- Select the physical SD card.
- Click Erase.
- Enter a name.
- Choose MS-DOS (FAT) under Format.
- Choose Master Boot Record under Scheme when broad device compatibility is required.
- Click Erase.
FAT32 works with a wide range of cameras, PCs, Macs, TVs, game consoles, and older electronics, but it has an important limitation: a single file cannot exceed 4GB.
That 4GB limit makes FAT32 inconvenient for long 4K videos, disk images, backups, and other large files. Use exFAT when both the device and card support it.
How to Format a 64GB, 128GB or 256GB SD Card on Mac
Use exFAT for most SD cards larger than 32GB when you want compatibility with both macOS and Windows.
- Open Disk Utility.
- Select View > Show All Devices.
- Select the SD card itself.
- Click Erase.
- Select exFAT as the format.
- Select Master Boot Record when the card needs broad compatibility with cameras and other non-Mac hardware.
- Click Erase.
exFAT supports files larger than 4GB and works natively with current versions of macOS and Windows, which makes it a practical format for large photos, 4K video, project files, and transferring data between computers.
How to Format SD Card to exFAT on Mac
If the card is already using FAT32, APFS, NTFS, or another format, you can convert it to exFAT by erasing it in Disk Utility.
- Back up anything you need from the card.
- Open Disk Utility.
- Select the physical SD card.
- Click Erase.
- Choose exFAT.
- Choose the required partition scheme.
- Click Erase.
Formatting is destructive. Disk Utility does not convert the existing file system while keeping your files in place.
Master Boot Record or GUID Partition Map for an SD Card?
The Scheme setting controls the partition table, while FAT32 and exFAT control the file system stored inside that partition.
For an SD card that needs to work with cameras, Windows computers, TVs, car stereos, consoles, and similar devices, Master Boot Record is generally the safer compatibility choice.
GUID Partition Map works well for storage primarily used with modern computers and is Apple’s standard partition scheme for Mac storage. Some older electronics do not understand GUID-partitioned removable media even when the card itself uses FAT32 or exFAT.
If Disk Utility does not display the Scheme menu, select View > Show All Devices and choose the physical SD card at the top of its hierarchy instead of the volume listed beneath it.
How to Format an SD Card on Mac Using Terminal
Terminal provides another way to format an SD card when you prefer command-line tools or Disk Utility is having trouble. You need to identify the correct disk number first because selecting the wrong disk will erase the wrong drive.
Step 1: Find the SD card disk number
Open Terminal and run:
diskutil listFind the SD card by checking its capacity and name. It will have an identifier similar to /dev/disk4.
Step 2: Format the SD card as exFAT
For an exFAT card using Master Boot Record:
diskutil eraseDisk ExFAT SDCARD MBRFormat /dev/disk4Replace /dev/disk4 with the actual identifier shown on your Mac.
Format an SD card as FAT32 using Terminal
For MS-DOS FAT with a Master Boot Record:
diskutil eraseDisk FAT32 SDCARD MBRFormat /dev/disk4The word SDCARD is the new volume name and can be replaced with another name.
Run
diskutil listimmediately before the erase command and verify the disk identifier. Disk numbers can change when drives are disconnected or connected.
How to Format an SD Card for Mac and Windows
Use exFAT when you regularly move an SD card between a Mac and Windows PC, especially when the card is larger than 32GB or needs to hold files larger than 4GB.
For cards of 32GB or less, MS-DOS (FAT) also works on both systems and offers good compatibility with older electronics.
Avoid APFS and Mac OS Extended when Windows compatibility is required. Windows does not provide native read and write support for those Mac file systems.
NTFS is also a poor choice for a card that you need to edit from macOS because macOS generally reads NTFS volumes but does not provide normal native write support for them.
How to Format an SD Card for a Camera on Mac
You can prepare a camera SD card on your Mac, although formatting it inside the camera is generally preferable once the camera recognizes the card. A camera can create the exact folder structure and file-system settings expected by its firmware.
If you need to format it on the Mac first, choose the file system supported by the camera. Many devices use FAT32 for SDHC cards and exFAT for higher-capacity SDXC cards.
A practical process is:
- Copy any photos or videos you want to keep.
- Format the card on the Mac using the required FAT or exFAT format.
- Eject it properly from macOS.
- Insert it into the camera.
- Use the camera’s own Format Card option once more if available.
This gives the camera a clean card while allowing it to create its own required directories and metadata.
SD Card Not Showing in Disk Utility on Mac
If the SD card does not appear in Disk Utility, formatting cannot begin until macOS detects the physical card.
Check the following:
- Remove the SD card and insert it again firmly.
- Try another SD card reader or USB port.
- Connect the reader directly instead of through a USB hub.
- Restart the Mac with the card connected.
- Open Disk Utility and select View > Show All Devices.
- Test the card in another computer, camera, or reader.
- Test a different SD card in the same reader.
If multiple cards fail in one reader, the reader or adapter is the likely problem. If one card fails in several computers and devices, the SD card itself may have failed.
Can’t Format or Erase SD Card on Mac
Check the SD card lock switch
Full-size SD cards have a small physical lock slider on the side. If it is in the locked position, the card becomes write-protected and Disk Utility cannot erase it.
Eject the card, move the switch to the unlocked position, insert it again, and retry the format.
MicroSD cards do not normally have their own lock switch, but the full-size SD adapter holding the microSD card often does.
Select the physical device instead of the volume
Open View > Show All Devices in Disk Utility and select the top-level SD card. Formatting only the volume can fail when the card has a damaged partition table.
Run First Aid
Disk Utility’s First Aid tool can check the card’s file-system structure before you erase it.
- Select the SD card in Disk Utility.
- Click First Aid.
- Click Run.
- After the check finishes, attempt the erase again.
Try Terminal
If Disk Utility displays an erase-process error, use diskutil list to identify the card and then run the appropriate diskutil eraseDisk command.
Check whether the SD card has failed
Flash memory has a limited lifespan, and failing SD cards sometimes become permanently read-only to protect existing data. If the card remains write-protected in multiple readers and computers, copy any files you can still access and replace the card.
Why Is the Erase Button Greyed Out in Disk Utility?
The Erase button can be unavailable when Disk Utility has selected an item that cannot currently be modified, the device is write-protected, or macOS has not mounted the card correctly.
Start with View > Show All Devices and select the physical SD card. Then check the card’s lock switch and reconnect the reader.
If Disk Utility still cannot modify it, restart the Mac and test the SD card with another reader.
How to Check an SD Card’s Current Format on Mac
You do not need Disk Utility if you only want to find out whether a card is FAT32, exFAT, APFS, or another format.
- Open Finder.
- Select the SD card in the sidebar.
- Press Command + I.
- Look for Format under General.
You can also select the card in Disk Utility. The current file system appears with the volume information.
How to Safely Eject an SD Card After Formatting
Wait until Disk Utility reports that the erase has completed before removing the card. Then open Finder and click the Eject icon beside the SD card, or right-click the card and choose Eject.
Remove the card only after it disappears from Finder. Pulling removable storage while macOS is still writing data can corrupt the file system.
Frequently Asked Questions
What is the best format for an SD card on Mac?
Use exFAT for most cards larger than 32GB, especially when the SD card also needs to work with Windows. Use MS-DOS (FAT) for 32GB or smaller cards when FAT32 compatibility is required.
How do I format an SD card to FAT32 on a Mac?
Open Disk Utility, select the physical SD card, click Erase, and choose MS-DOS (FAT). For cards of 32GB or less, this is the normal FAT32-compatible option in macOS.
How do I format a 128GB SD card to FAT32 on Mac?
Disk Utility generally steers storage larger than 32GB toward exFAT rather than FAT32. Use exFAT unless the device specifically requires a large FAT32 volume. Some devices that advertise FAT32 support also impose their own maximum card capacity.
Should I format a 64GB SD card as FAT32 or exFAT?
Use exFAT unless the device using the card specifically requires FAT32. exFAT supports files larger than 4GB and is the normal choice for Windows-compatible storage over 32GB.
Will formatting an SD card delete everything?
Yes. Formatting through Disk Utility erases the files and recreates the card’s file system. Back up anything important before starting.
Can I format an SD card on a Mac without Disk Utility?
Yes. The built-in diskutil command in Terminal can erase and format SD cards as FAT32, exFAT, and other supported file systems.
Why can’t I format my SD card on Mac?
Common causes include a locked SD card, a faulty reader, a damaged partition table, an incorrect disk selection in Disk Utility, or a failing card that has become read-only.
Why doesn’t my SD card show a Scheme option?
Select View > Show All Devices in Disk Utility and click the physical SD card rather than the volume beneath it. The Scheme menu normally appears when the whole device is selected.
Can Mac format an SD card for Windows?
Yes. Use exFAT for cards larger than 32GB or MS-DOS (FAT) for cards of 32GB or less. Both formats work with macOS and Windows.
Can Mac format an SD card for Android?
Yes, but check the Android device’s supported card capacity and file systems first. Many modern devices support exFAT on larger microSD cards, while older devices often expect FAT32.
Should I use APFS for an SD card?
Use APFS only when the card will remain in the Mac ecosystem and the software using it supports APFS. Cameras, Windows PCs, Android devices, TVs, and other electronics often cannot read APFS.
What format should I use for a camera SD card?
Use the format recommended by the camera manufacturer. FAT32 is common for smaller SDHC cards, while exFAT is commonly used for larger SDXC cards. After preparing the card on your Mac, format it again inside the camera when the camera provides that option.
Can I recover files after formatting an SD card?
Formatting removes the card’s existing file-system information, although recovery can sometimes be possible if new data has not overwritten the old files. Stop using the card immediately if you formatted it accidentally because writing new files reduces the chance of recovery.


How to open SD card on Windows 10: a step-by-step user guide - Techdows
[…] card formatted as exFAT moves between Windows and macOS. If you also use a Mac, you can format the SD card on a Mac in a format Windows […]