Most Lenovo keyboards that stop working come back after a full restart, turning off Filter keys, toggling Fn Lock with Fn + Esc, or reinstalling the keyboard driver in Device Manager.
This guide covers seven fixes in order, how to type while the keyboard is dead, how to tell a software fault from a hardware fault in BIOS, and when to hand the laptop to Lenovo.
How to fix the Lenovo keyboard?
Work through these in order. Each one takes under five minutes, and together they clear most software causes.
- Shut the laptop down fully, unplug any USB hubs and external keyboards, then turn it back on.
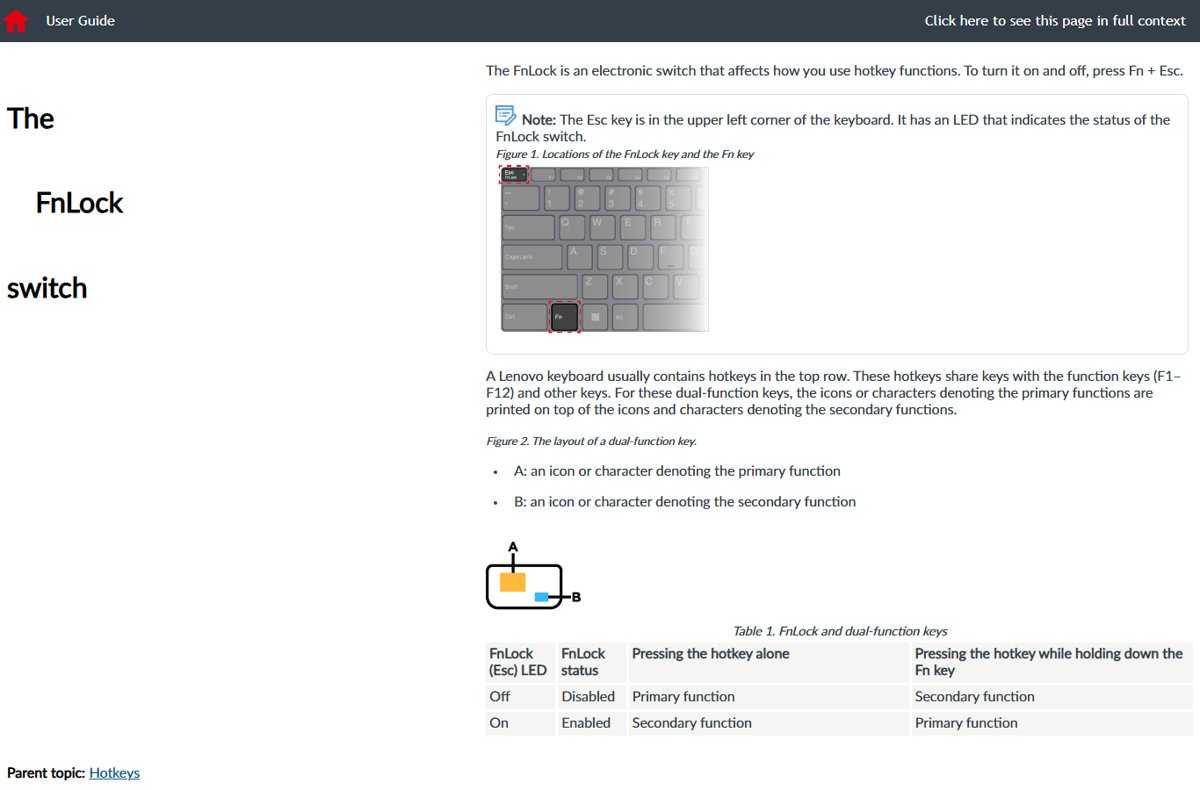
- Press Fn + Esc to toggle Fn Lock and watch the LED on the Esc key.
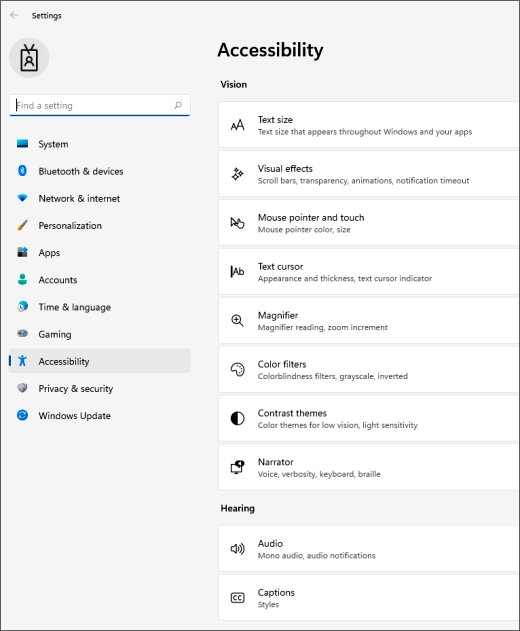
- Select Start > Settings > Accessibility > Keyboard and turn off Filter keys and Sticky keys.
- Open Device Manager, expand Keyboards, right-click the keyboard and select Uninstall device.
- Restart the laptop so Windows reinstalls the keyboard driver.
- Open Notepad and type a line using every row of keys.
If nothing types even after this, restart into BIOS (Fix 4). That one test tells you whether Windows or the hardware is at fault.
Spilled liquid on a Lenovo keyboard? Stop here
Liquid changes the order of everything. Software fixes cannot help, and running the laptop while it is wet risks the board underneath the keyboard.
- Shut the laptop down straight away and unplug the power adapter.
- Disconnect USB devices and any external keyboard.
- Do not turn it back on to test the keys.
- Find a Lenovo-authorised repair facility through the partner locator at support.lenovo.com/partnerlocator, or call Lenovo support.
- Check whether your warranty or an accidental damage plan covers the repair before you pay for one.
What exactly is failing?
Start with the symptom, not the driver. A driver reinstall does nothing for a key that is stuck or a laptop set to the wrong layout.
| What you see | Most likely cause | Start with |
|---|---|---|
| No key works, not even in BIOS | Hardware fault or a loose keyboard cable inside | Fix 4, then Fix 7 |
| No key works in Windows, but keys work in BIOS | Driver, startup software or a Windows setting | Fix 5 and Fix 6 |
| Keys only register when held down | Filter keys is on | Fix 2 |
| F1 to F12 change volume or brightness instead | Fn Lock or Hotkey Mode is set the other way | Fix 2 |
| Letters type numbers or wrong symbols | Num Lock or a different keyboard layout | Fix 2 |
| One key or one cluster of keys is dead | Debris under the key or physical damage | Fix 3 |
| External Lenovo keyboard is dead | Cable, receiver, Bluetooth pairing or batteries | Fix 3 and the external keyboard section |
Why is my Lenovo keyboard not working?
| Cause | How it shows up | Where to fix it |
|---|---|---|
| Filter keys turned on, often by holding the right Shift key for eight seconds | Short presses are ignored | Settings > Accessibility > Keyboard |
| Fn Lock or BIOS Hotkey Mode | Top-row keys do the wrong job | Fn + Esc, or Configuration > Hotkey Mode in BIOS |
| Wrong input layout | Symbols such as @ and " swap places | Windows logo key + Spacebar, or Language options |
| Damaged or outdated keyboard driver | Keyboard dead in Windows, fine in BIOS | Device Manager or Lenovo Vantage |
| Startup app or remapping tool intercepting keys | Keys work in Safe Mode or a clean boot | System Configuration (msconfig) |
| Dirt, crumbs or liquid | Single keys stick or fail | Cleaning, or a Lenovo repair |
| Failed keyboard or internal cable | Dead in BIOS as well as Windows | Lenovo service |
How can you type when the Lenovo keyboard does not work?
You need a way to type passwords and search boxes while you fix the keyboard. Windows has a built-in On-Screen Keyboard that works with the touchpad or a mouse.
- At the Windows sign-in screen, select the Accessibility button in the lower-right corner, then select On-Screen Keyboard.
- Click the keys of your PIN or password with the touchpad or a mouse.
- After signing in, select Start > Settings > Accessibility > Keyboard and turn on On-Screen Keyboard.
- Select Options on the On-Screen Keyboard to turn on the numeric keypad or text prediction.
- Plug in any USB keyboard if you have one. Windows installs a basic driver for it automatically.
If the touchpad has stopped too, plug in a USB mouse or fix the touchpad first. A laptop with a fingerprint reader can also sign in with Windows Hello without typing a password.
What should you check before changing Windows settings?
Two minutes of observation saves you from reinstalling drivers for a problem that lives in a key combination.
| Check | What it tells you |
|---|---|
| Is the Esc key LED on or off? | Shows whether Fn Lock is on, so you know which job the top row is doing |
| Does Caps Lock or Num Lock light up when pressed? | A lit indicator means the keyboard is sending signals and the fault is in software |
| Did it stop after a Windows update, a driver or a new app? | Points to rollback or System Restore (Fix 6) |
| Did anything spill or drop on it? | Stop and arrange a repair; software fixes will not help |
| Is the battery nearly empty? | Charge the laptop before testing so power saving is not a factor |
| Is a USB hub, dock or external keyboard plugged in? | Remove it to rule out a conflict |
1. Restart and isolate the keyboard
A full restart reloads the keyboard driver. Removing everything else plugged in proves whether the built-in keyboard fails on its own.
- Save your work and select Start > Power > Shut down.
- Unplug USB hubs, docks, external keyboards and the USB receiver of any wireless keyboard.
- Wait about 10 seconds, then press the power button.
- Sign in using the On-Screen Keyboard if the built-in keys still fail.
- Open Notepad and type with the built-in keyboard only.
- Reconnect your accessories one at a time, testing the keyboard after each.
If the keyboard dies again when one accessory goes back in, that accessory or its software is the conflict.
2. Check Fn Lock, NumLock, accessibility settings, and keyboard layout
Several Windows settings can make a Lenovo keyboard appear broken when the hardware is fine. These four account for most "wrong key" and "keys ignored" reports.
- Press Fn + Esc to switch Fn Lock. On ThinkPad models, press Fn with the FnLock symbol on Esc. When the Esc LED is on, the top row sends F1 to F12 by default.
- If your model has a numeric keypad, press Num Lock once and test the number keys again.
- Select Start > Settings > Accessibility > Keyboard and turn off Filter keys, which makes Windows ignore brief or repeated keystrokes.
- Turn off Sticky keys on the same page if Ctrl, Shift or Alt behave as if held down.
- Hold the Windows logo key and press Spacebar to cycle through installed layouts until the right one is active.
- Remove a layout you do not use under Settings > Time & language > Language & region > Language options > Keyboards.
- Quit any key-remapping or macro utility you have installed, then test again.
On many IdeaPad, Yoga and Legion models, BIOS also has a Hotkey Mode setting that decides whether the top row acts as hotkeys or F1 to F12 by default. It is under Configuration > Hotkey Mode; select Exit > Exit Saving Changes afterwards.
3. Clean the keyboard and check its physical or wireless connection
Crumbs and dust under a key stop it registering. Lenovo's own keyboard checklist includes cleaning for keys that stick or fail.
- Shut the laptop down and unplug the power adapter.
- Tilt the laptop and blow compressed air between the keys.
- Wipe sticky keys with a cotton swab dampened, not soaked, with rubbing alcohol.
- Let the keyboard dry fully before you turn the laptop on.
- For an external wired keyboard, plug it directly into a USB port on the laptop, not a hub, and try a different port.
- For a wireless keyboard, fit fresh batteries, check the power switch and reseat the USB receiver for about 10 seconds.
4. Test the keyboard before Windows starts
BIOS runs before Windows loads any keyboard driver. If you can move around its menus with the arrow keys, the keyboard hardware works.
- Restart the laptop.
- On a ThinkPad, press F1 repeatedly when the Lenovo logo appears.
- On an IdeaPad, Yoga or Legion, press F2 repeatedly at the Lenovo logo, or use the Novo Button menu and select UEFI/BIOS Setup.
- Use the arrow keys, Enter and Esc to move through a few menus without changing anything.
- Exit without saving changes to return to Windows.
If the entry key itself does nothing, the keyboard is not sending input at startup either. Treat that as a hardware fault and go to Fix 7.
Does the keyboard work in BIOS or UEFI?
| Result of the BIOS test | What it means | Next step |
|---|---|---|
| Works in BIOS, fails in Windows | The hardware is fine; a driver, setting or startup app is the cause | Fixes 2, 5 and 6 |
| Works in BIOS and in Safe Mode, fails in normal Windows | A third-party app or service is intercepting keys | Clean boot in Fix 6 |
| Fails in BIOS as well | Keyboard, its cable or the board is faulty | Fix 7: repair or replace |
| Only some keys fail in BIOS | Physical damage or debris under those keys | Fix 3, then Fix 7 |
5. Update or reinstall the correct drivers and Lenovo software
Reinstalling the keyboard driver from Device Manager is the quickest driver fix. Lenovo's support site and Vantage add the model-specific drivers that Windows may not supply.
- In the search box on the taskbar, type device manager and select Device Manager.
- Expand Keyboards and double-click the keyboard to check its status.
- Select the Driver tab, then Update Driver, and follow the instructions.
- If that does not help, select Uninstall device, then restart so Windows reinstalls it.
- Select Start > Settings > Windows Update > Check for updates and install what it offers.
- Open Lenovo Vantage and select Device > System Update > CHECK FOR UPDATES.
- Or go to pcsupport.lenovo.com, find your product, select Drivers & Software and choose drivers under the Manual Update tab.
The Lenovo Vantage app is free from the Microsoft Store. Lenovo advises checking that a driver matches your exact model and Windows version before you install it.
When should you update Lenovo BIOS or hotkey software?
Update the BIOS or Lenovo's hotkey and Vantage software when the top-row keys misbehave, when Lenovo lists a keyboard fix for your model, or when the keyboard fails only after a Windows upgrade. Do not flash BIOS as a first resort for a dead key.
- Plug the laptop into a working power outlet and keep it connected throughout.
- Open Lenovo Vantage and select Device > System Update > CHECK FOR UPDATES, or use Drivers & Software > Select Drivers on the Lenovo support site and pick BIOS/UEFI.
- Install only packages from the Lenovo support site or Vantage.
- Expect a blank screen for a while during memory retraining, and do not press the power button.
- After the restart, open Vantage and check keyboard settings under Device > Input & Accessories on models that offer it.
Why the common "update your drivers" advice is incomplete
| Problem | Does a driver update fix it? |
|---|---|
| Filter keys or Sticky keys turned on | No. Turn the setting off in Accessibility. |
| Fn Lock or Hotkey Mode reversed | No. Toggle Fn + Esc or change Hotkey Mode in BIOS. |
| Wrong layout active | No. Switch layouts with Windows logo key + Spacebar. |
| Debris or liquid under keys | No. Clean it or arrange a repair. |
| Keyboard dead in BIOS too | No. The hardware has failed. |
| Driver corrupted after an update | Yes. Reinstall it, or roll it back in Fix 6. |
6. Use Safe Mode, Clean Boot, rollback, or System Restore
If the keyboard stopped after a change, undo the change. Start with the driver rollback, then use a clean boot to catch an app that intercepts keys.
- In Device Manager, double-click the keyboard under Keyboards, select the Driver tab and choose Roll Back Driver if it is available.
- Select Search, type msconfig and select System Configuration.
- On the Services tab, select Hide all Microsoft services, then Disable all, then Apply.
- On the Startup tab, select Open Task Manager and disable each enabled item on the Startup apps tab, noting what you turn off.
- Close Task Manager, select OK and restart.
- If the keyboard works in this clean boot, turn services and startup apps back on in small groups to find the one that breaks it.
- Return to normal startup by turning everything back on in System Configuration and Task Manager.
What can Safe Mode and Command Prompt tell you?
Safe Mode starts Windows with a limited set of files and drivers. Command Prompt in the recovery environment runs outside your normal desktop entirely.
| Test | How to open it | What the result means |
|---|---|---|
| Safe Mode | Settings > System > Recovery > Advanced startup > Restart now, then Troubleshoot > Advanced options > Startup Settings > Restart and press 4 | Keyboard works here: basic drivers are fine, so a startup app, service or extra driver is the cause |
| Safe Mode with Command Prompt | Same route, then press 6 | Type a command such as dir. Typing works: the keys and basic driver work |
| Command Prompt in recovery | Troubleshoot > Advanced options > Command Prompt | Keys type here but not on the desktop: the fault is in your normal Windows startup |
| None of these accept keys | – | Run the BIOS test (Fix 4); a hardware fault is likely |
Startup Settings takes number keys or F1 to F9. If the built-in keys are dead, plug in a USB keyboard to choose an option.
When is System Restore appropriate?
Use System Restore when the keyboard worked until a specific install, driver update or settings change, and a restore point from before that date exists. It reverts system files, registry settings and installed programs, and leaves personal files alone.
- Press Windows logo key + R with the On-Screen Keyboard, type rstrui.exe and press Enter. You can also open Control Panel > Recovery > Open System Restore.
- In Restore system files and settings, select Next.
- Pick a restore point dated before the keyboard stopped. Select Show more restore points if you need older ones.
- Select Scan for affected programs to see what will be removed.
- Select Next, then Finish. Windows restarts automatically.
If Windows will not start, open System Restore from the recovery environment under Troubleshoot > Advanced options > System Restore. An encrypted drive asks for its BitLocker recovery key.
7. Repair, replace, or work around the keyboard
Contact Lenovo or arrange a repair when the keyboard fails in BIOS, after liquid damage, or when keys are physically broken. On many thin models the keyboard is not a customer-replaceable part; the ThinkPad X1 Carbon Gen 13, for example, lists it for qualified technicians only. Check your Lenovo warranty status before you pay for a repair.
- Find your serial number on the sticker under the laptop or in BIOS.
- Check your warranty with the Warranty Lookup on lenovo.com.
- Look up your model's user guide and check its CRU list to see if the keyboard is user-replaceable.
- Find a Lenovo-authorised repair facility at support.lenovo.com/partnerlocator, or call the number for your country at pcsupport.lenovo.com/supportphonelist.
- Back up your files before the laptop goes in for repair.
- Use an external USB or Bluetooth keyboard until the repair is done.
When to stop troubleshooting
| Situation | Stop and do this |
|---|---|
| Liquid spilled on the keyboard | Shut down, unplug and arrange a repair |
| Keyboard dead in BIOS after cleaning | Contact Lenovo; the hardware or cable has failed |
| Keys physically broken or missing | Arrange a keyboard repair or replacement |
| Laptop is under warranty | Contact Lenovo before opening the case |
| Works in Safe Mode but you cannot find the conflicting app | Use System Restore, or keep the clean boot results and remove recently added apps |
How do you troubleshoot an external keyboard?
An external Lenovo keyboard depends on its cable, receiver or Bluetooth pairing as much as on Windows.
Wired USB keyboard does nothing
A loose cable, an unpowered hub or a faulty port.
- Unplug the cable, wait a little while, then plug it back in.
- Plug it directly into a USB port on the laptop instead of a hub.
- Try a different USB port.
- Check the cable for damage.
- Test it on another PC; if it fails there too, replace it.
Wireless keyboard with a USB receiver stops responding
Flat batteries or a dropped receiver connection.
- Fit fresh batteries or charge the keyboard.
- Press the Reset button on the bottom of the keyboard or on the receiver if it has one.
- Unplug the receiver, wait about 10 seconds and plug it back in.
- If it still drops out, work through the remaining wireless keyboard fixes.
Bluetooth keyboard shows as connected but will not type
A stale pairing.
- Select Start > Settings > Bluetooth & devices and check Bluetooth is on.
- Select the keyboard's More options (…) > Remove device.
- Put the keyboard into pairing mode and select Add device > Bluetooth to pair it again.
Lenovo keyboard keys not working: fixes by symptom
One letter or key not working on a Lenovo keyboard
Debris under the key, or physical damage to the key or its contact.
- Test that key in Notepad and in BIOS.
- Shut down and blow compressed air around the key.
- Wipe it with a cotton swab dampened with rubbing alcohol and let it dry.
- If it still fails in BIOS, arrange a keyboard repair through Lenovo.
Lenovo keys type the wrong characters
Num Lock is on, or a different input layout is active.
- Press Num Lock once if your model has a numeric keypad.
- Hold the Windows logo key and press Spacebar to switch to the right layout.
- Remove extra layouts under Language options > Keyboards.
Function keys change volume instead of sending F1 to F12
Fn Lock or BIOS Hotkey Mode is set to hotkeys.
- Press Fn + Esc and check the Esc LED.
- Or hold Fn while pressing the function key.
- To change the default, set Configuration > Hotkey Mode in BIOS.
Lenovo keyboard stops working after a while or after an update
A driver changed, or a startup app grabs the keyboard.
- Roll back the keyboard driver in Device Manager.
- Run Windows Update and Lenovo Vantage System Update.
- Do a clean boot to find the app, or use System Restore.
How do you test a Lenovo keyboard in Notepad?
Notepad shows exactly what each key sends, with no autocorrect or shortcuts in the way. Use it after every fix.
- Select Start, type notepad with the On-Screen Keyboard if needed, and open Notepad.
- Type every row of keys from left to right, including numbers and symbols.
- Hold Shift and type the number row to check the symbols match the keycaps.
- Press Caps Lock and check the indicator lights and letters change case.
- Test a shortcut such as Ctrl + A to confirm modifier keys work.
- Restart the laptop and confirm the keyboard works at the sign-in screen.
Lenovo keyboard troubleshooting: final checklist
| Step | Done when |
|---|---|
| No liquid damage | Confirmed, or the laptop is with Lenovo |
| Full shutdown with accessories removed | Built-in keyboard tested alone |
| Fn Lock, Num Lock, Filter keys, Sticky keys and layout | All checked |
| Keyboard cleaned | Dry and debris-free |
| BIOS test | You know whether it is hardware or software |
| Driver reinstalled, Windows Update and Vantage run | No pending keyboard or BIOS updates |
| Rollback, clean boot or System Restore | Recent changes ruled out |
| Repair arranged | Only if it still fails in BIOS |
Lenovo keyboard not working: frequently asked questions
How do I fix a Lenovo keyboard key that is not working?
Test the key in Notepad and in BIOS first. If it fails in both, shut down, blow compressed air around it and wipe it with a swab dampened in rubbing alcohol. A key that still fails after cleaning needs a keyboard repair through Lenovo.
How do I fix a Lenovo laptop keyboard that stopped working completely?
Shut down fully, remove accessories and restart. Then turn off Filter keys, toggle Fn Lock with Fn + Esc, and reinstall the keyboard in Device Manager. If it still fails in BIOS, the hardware is at fault and Lenovo should repair it.
How do I fix ThinkPad keyboard keys?
Press Fn with the FnLock key (Esc) if the top row acts wrongly, and turn off Filter keys and Sticky keys. Enter BIOS with F1 at the logo to test the keys. Keys that fail there need cleaning or a repair.
How do I sign in to a Lenovo laptop if the keyboard is not working?
Select the Accessibility button in the lower-right corner of the sign-in screen, then On-Screen Keyboard, and click your PIN or password with the touchpad. A USB keyboard or Windows Hello fingerprint sign-in also works.
Why do some Lenovo keys type the wrong symbols?
A different input layout is active or Num Lock is on. Hold the Windows logo key and press Spacebar to switch layouts, remove layouts you do not use in Language options, and press Num Lock once if your model has a keypad.
How do I fix a Lenovo keyboard driver?
Open Device Manager, expand Keyboards, select Uninstall device and restart so Windows reinstalls it. Then run Windows Update and Lenovo Vantage System Update, or download your model's drivers from the Lenovo support site.
Should I update the BIOS to fix a Lenovo keyboard that is not working?
Only when the keyboard works in BIOS but misbehaves in Windows, the top-row keys act wrongly, or Lenovo lists a keyboard fix for your model. Install it from Vantage or the Lenovo support site, on mains power, and never interrupt it.
How do I replace a Lenovo laptop keyboard?
Check your model's user guide for its CRU list first. On many thin models the keyboard is not user-replaceable, so Lenovo recommends a qualified technician. Use the Lenovo partner locator or call Lenovo support, and check your warranty before paying.
Why does my Lenovo keyboard keep stopping working?
A recently changed driver, a startup app that intercepts keys, or Filter keys switching on are the usual causes. Roll back the keyboard driver, run a clean boot to find the app, and make sure you are not holding the right Shift key for eight seconds.
Is an external keyboard a permanent fix for a broken Lenovo laptop keyboard?
It works indefinitely, but it does not fix the built-in keyboard. If the laptop is under warranty or the keyboard fails in BIOS, arrange a repair. After a spill, have a technician check the laptop rather than relying on an external keyboard.
The bottom line on a Lenovo keyboard that stops working
Run the BIOS test early: if the keyboard works there, fix Windows settings, the driver or a startup app; if it fails there, stop and arrange a Lenovo repair. That single test separates software causes, which you can fix in minutes, from hardware faults that no driver or setting will cure.