To add the FastCGI module to IIS, turn on the CGI feature under Internet Information Services > World Wide Web Services > Application Development Features in Windows features, or the CGI role service in Server Manager; that one checkbox installs FastCGI.
This guide covers the install on Windows 11, Windows 10 and Windows Server, registering a FastCGI application, mapping PHP to it, testing it, and fixing a missing or broken FastCgiModule.
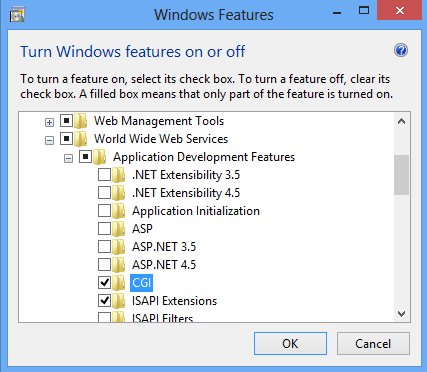
Install or enable FastCGI in IIS on Windows 11 and Windows 10
Microsoft ships FastCGI inside the CGI feature of IIS 7.0 and later. Installing CGI registers the FastCGI module in IIS, and no other install step is needed.
- Open Control Panel, then select Programs > Programs and Features.
- Select Turn Windows features on or off on the left side of the window.
- Expand Internet Information Services, then World Wide Web Services, then Application Development Features.
- Tick CGI. If IIS is not installed yet, also tick Web Management Tools > IIS Management Console so you get IIS Manager.
- Select OK and wait for Windows to apply the change.
- Select Close when Windows reports that the changes are complete.
FastCGI is now available as FastCgiModule in IIS Manager. It does nothing until you map a file extension to it, which the handler mapping section below covers.
Understanding FastCGI and IIS
FastCGI keeps a pool of worker processes alive and reuses them, instead of starting a new process for every request the way classic CGI does. IIS uses it to run PHP and other frameworks that ship a FastCGI executable.
| Piece | What it is | Where you see it |
|---|---|---|
| CGI feature (role service) | The Windows feature that installs both CGI and FastCGI support | Windows features, or Server Manager > Web Server > Application Development |
| FastCgiModule | The IIS module that passes requests to a FastCGI process | The Module list in Add Module Mapping |
| FastCGI application | A process pool definition: the executable path plus limits such as max instances and timeouts | FastCGI Settings in IIS Manager, or the fastCgi section of ApplicationHost.config |
| Handler mapping | The rule that sends a file extension such as *.php to FastCgiModule and the executable | Handler Mappings at server or site level |
| Script engine | The program FastCGI runs, for example php-cgi.exe | The Executable and Full Path boxes |
A FastCGI application and a handler mapping are separate settings. Adding one does not create the other, unless you accept the prompt IIS shows when you save a module mapping.
Prerequisites for adding FastCGI module to IIS
| Requirement | What to check | Why it matters |
|---|---|---|
| Verify IIS installation | Internet Information Services is ticked in Windows features, or the Web Server (IIS) role is installed on Windows Server | FastCGI is part of IIS, so the CGI feature sits inside the IIS tree |
| Windows version compatibility | Windows Vista, 7, 8, 8.1, 10, 11, or Windows Server 2008 and later | These run IIS 7.0 or later, which include FastCGI; IIS 6.0 does not |
| Install the FastCGI module | The CGI feature, not a separate download | The CGI install registers FastCgiModule automatically |
| Proper permissions | An administrator account for the install; read access for the application pool identity on the site folder | Feature installs and DISM need admin rights; the worker process needs to read your scripts |
| Prepare your application | The framework's FastCGI executable on disk, for PHP the Non-Thread Safe build and its php-cgi.exe | IIS needs a real executable path before a FastCGI application or handler mapping will work |
IIS 7.0 users also need the Microsoft Administration Pack for IIS 7.0 to get the FastCGI Settings page in IIS Manager. IIS 7.5 and later include it.
Install the FastCGI module on Windows Server with Server Manager
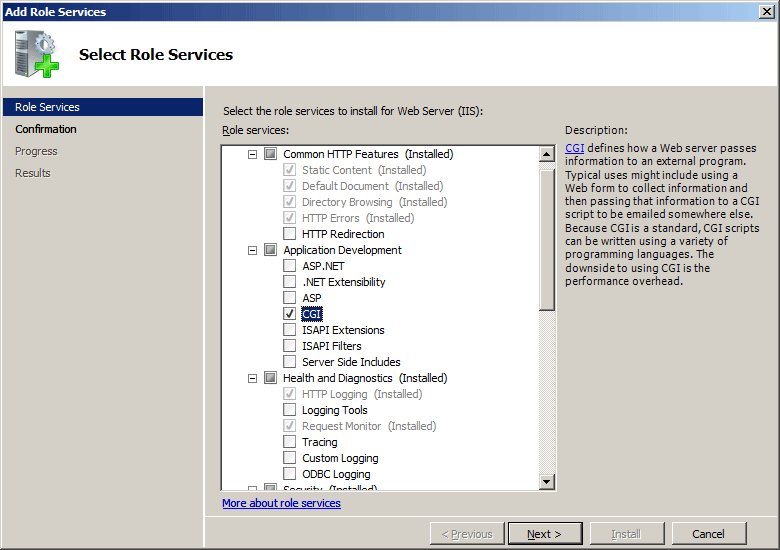
On Windows Server, CGI is a role service under the Web Server (IIS) role. The same wizard installs IIS and CGI together if IIS is not there yet.
- Open Server Manager from the taskbar.
- Select the Manage menu, then Add Roles and Features.
- Select Next, choose the installation type, select Next, choose the destination server, and select Next again.
- On the Server Roles page, expand Web Server (IIS), then Web Server, then Application Development.
- Tick CGI and select Next.
- Select Next on the Features page, then Install on the confirmation page.
- Select Close on the Results page.
Install the FastCGI module with DISM or PowerShell
The CGI feature is called IIS-CGI in DISM and Web-CGI in the Server Manager PowerShell module. Run either from an elevated prompt.
DISM.EXE /enable-feature /online /featureName:IIS-CGITurns on the CGI feature, which installs FastCGI. If IIS is not installed yet, include its required features (for example /featureName:IIS-WebServerRole /featureName:IIS-WebServer /featureName:IIS-ApplicationDevelopment) in the same command, because DISM can fail silently when a dependency is left out. On Windows Server, the PowerShell equivalent is: Import-Module ServerManager, then Add-WindowsFeature Web-CGI.
You should see: DISM reports that the operation completed successfully, and FastCgiModule appears in the Module list of Add Module Mapping in IIS Manager.
Download the FastCGI module for IIS: is a separate download needed?
Do not download a FastCGI module for IIS 7.0 or later; install the built-in CGI feature instead. Microsoft's FastCGI documentation states that IIS 7.0 and later include the FastCGI component, and that installing the CGI role service is the only step needed. A FastCGI installer offered by a download site for IIS 10 is not a Microsoft component. The only thing you download is the framework itself, for example PHP from php.net.
This also answers the "downloading and installing the FastCGI module" step older guides describe: on any current Windows version, downloading is replaced by ticking CGI.
Check your IIS version for FastCGI support
| IIS version | FastCGI status | What changed |
|---|---|---|
| IIS 10.0 | Built in, through the CGI feature | No change to the fastCgi settings |
| IIS 8.5 | Built in | No change to the fastCgi settings |
| IIS 8.0 | Built in | Default maxInstances changed from 4 to 0 |
| IIS 7.5 | Built in | Added monitorChangesTo, stderrMode and signalBeforeTerminateSeconds |
| IIS 7.0 | Built in; FastCGI Settings page needs the Administration Pack | The fastCgi section was introduced |
| IIS 6.0 | Not part of IIS | No fastCgi configuration section |
If Internet Information Services appears under Turn Windows features on or off, or Web Server (IIS) appears in Server Manager, you are on IIS 7.0 or later and FastCGI is available.
Configuring FastCGI settings in IIS Manager
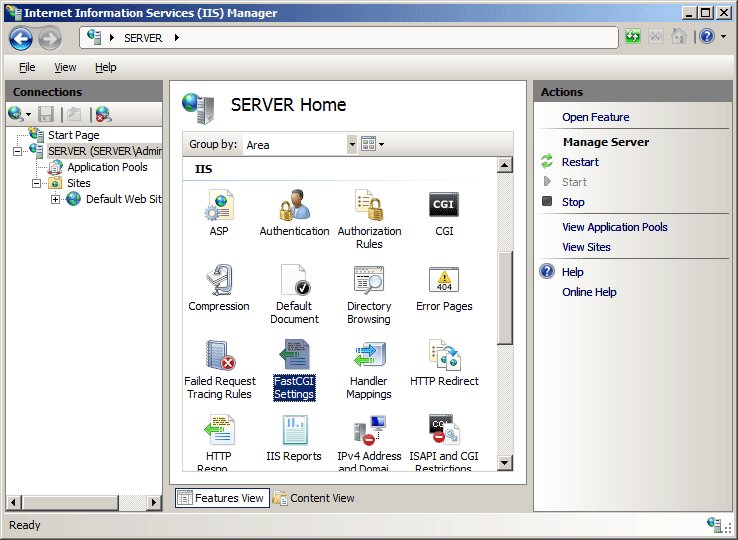
This step registers the FastCGI application, which tells IIS which executable to run and how many processes to keep. Do it at server level, where the FastCGI Settings page lives.
- Access IIS Manager: press Win + R, type
inetmgr, and press Enter. - In the Connections pane, select the server name.
- In the Home pane, double-click FastCGI Settings.
- In the Actions pane, select Add Application.
- In Full Path, enter the path to the script engine, for example
C:\PHP\php-cgi.exe. - Set the maximum number of requests for the application, for example 10000.
- Select OK to save the FastCGI application.
For PHP, map php-cgi.exe, not php.exe. The php.exe file is the command-line interpreter and does not speak FastCGI.
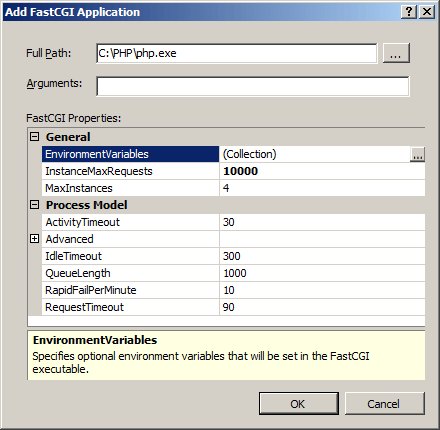
Configure FastCGI application parameters: defaults and ranges
Every FastCGI application has these settings, visible when you select it under FastCGI Settings and choose Edit. These are the IIS defaults for IIS 7.5 and later.
| Setting | Default | Allowed range | What it controls |
|---|---|---|---|
| maxInstances | 0 (IIS 8.0 and later) | 0 to 10000 | Maximum worker processes in the pool |
| instanceMaxRequests | 200 | 1 to 10000000 | Requests a process handles before IIS recycles it |
| activityTimeout | 70 seconds | 10 to 3600 | How long a process may run without activity |
| requestTimeout | 90 seconds | 10 to 604800 | Longest time one request may take |
| idleTimeout | 300 seconds | 10 to 604800 | How long an idle process lives before shutdown |
| queueLength | 1000 | 1 to 10000000 | Requests that may wait for a free process |
| protocol | NamedPipe | NamedPipe or Tcp | How IIS talks to the FastCGI process |
| stderrMode | ReturnStdErrIn500 | ReturnStdErrIn500, ReturnGeneric500, IgnoreAndReturn200, TerminateProcess | What IIS does with error output from the process |
| monitorChangesTo | None | A file path | Restarts the FastCGI processes when that file changes, for example php.ini |
Set environment variables for a FastCGI application in IIS
Environment variables are passed to the FastCGI process each time IIS starts it. PHP reads PHP_FCGI_MAX_REQUESTS, and that value must be equal to or lower than the application's instanceMaxRequests.
- In IIS Manager, select the server name and double-click FastCGI Settings.
- Select the application, then select Edit in the Actions pane.
- Select the ellipsis (…) next to EnvironmentVariables.
- In the EnvironmentVariables Collection Editor, select Add.
- Enter
PHP_FCGI_MAX_REQUESTSas the Name and10000as the Value, then select OK. - Select OK to close the Edit FastCGI Application dialog box.
The PHP manual's IIS example also sets PHPRC to the full path of php.ini, so PHP loads the configuration file you expect.
Associate FastCGI with your site using a handler mapping
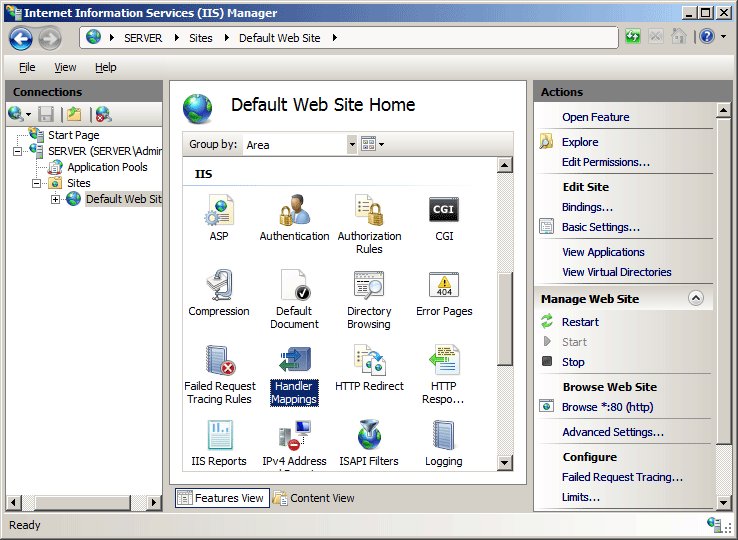
The handler mapping is what routes requests to FastCGI. Select the server name to map every site, or select one site in Connections to map only that site.
- In IIS Manager, select the server name or a site in the Connections pane.
- Double-click Handler Mappings, then select Add Module Mapping in the Actions pane.
- In Request path, enter
*.php. - In the Module list, select FastCgiModule.
- In Executable, enter the script engine path, for example
C:\PHP\php-cgi.exe. - In Name, enter a unique name such as
PHP-FastCGI. - Select Request Restrictions, tick Invoke handler only if request is mapped to, choose File or Folder, and select OK.
- Select OK, then select Yes when IIS offers to create a FastCGI application for this mapping.
To give each site its own FastCGI pool, register applications that share the executable but use different arguments. The handler's executable then becomes the path, a pipe character, and the arguments, for example C:\PHP\php-cgi.exe|-d open_basedir=C:\Websites\Website1.
Register a FastCGI application and handler with appcmd
These appcmd.exe commands do the same as the two IIS Manager sections above, in one script. Run them from an elevated prompt in %windir%\system32\inetsrv.
appcmd.exe set config -section:system.webServer/fastCgi /+"[fullPath='C:\PHP\php-cgi.exe',instanceMaxRequests='10000']" /commit:apphost
appcmd.exe set config -section:system.webServer/fastCgi /+"[fullPath='C:\PHP\php-cgi.exe'].environmentVariables.[name='PHP_FCGI_MAX_REQUESTS',value='10000']" /commit:apphost
appcmd.exe set config -section:system.webServer/handlers /+"[name='PHP-FastCGI',path='*.php',verb='GET,HEAD,POST',modules='FastCgiModule',scriptProcessor='C:\PHP\php-cgi.exe',resourceType='Either',requireAccess='Script']" /commit:apphost
The first line registers the FastCGI application, the second adds the PHP_FCGI_MAX_REQUESTS environment variable, and the third maps *.php to FastCgiModule for every site. Keep /commit:apphost so the settings land in ApplicationHost.config.
You should see: Each command reports that it applied configuration changes, and the new entries show under FastCGI Settings and Handler Mappings in IIS Manager.
Verify FastCGI installation and test it with a PHP script
Testing FastCGI integration end to end proves three things at once: the module is installed, the application is registered, and the handler routes requests to it.
- Confirm the install: in Registry Editor, the value
CGIunderHKEY_LOCAL_MACHINE\Software\Microsoft\InetStp\Componentsexists and is set to 1. - Create a test PHP script: make a text file named
info.phpthat contains<?php phpinfo(); ?>. - Place the script in the web root of your site, which is the
inetpub\wwwrootfolder for the Default Web Site. - Access the script via a browser on the server at
http://localhost/info.php. - Check the result: a PHP information page means FastCGI works; raw source code or a download prompt means the handler mapping is missing.
- Check the IIS logs in
%SystemDrive%\inetpub\logs\LogFilesfor the request and its status code, and review the FastCGI process's error output shown in any 500 response. - Delete
info.phponce the test passes, because it exposes server details.
If the page fails, troubleshoot only as far as necessary: take the status code from the log and match it to a cause in the troubleshooting section below.
Creating and managing FastCGI applications in IIS
Once the first application works, most later changes happen in the same three places. This table maps each job to the right one.
| Task | Where to do it | Note |
|---|---|---|
| Register a new FastCGI application | FastCGI Settings > Add Application | Server level only |
| Change limits or timeouts | FastCGI Settings > select application > Edit | Applies to every site using that executable and arguments |
| Add or change environment variables | Edit > EnvironmentVariables ellipsis | Keep PHP_FCGI_MAX_REQUESTS at or below instanceMaxRequests |
| Map a site or app to FastCGI | Handler Mappings > Add Module Mapping | Server level for all sites, site level for one |
| Monitor running requests | Worker Processes at server level | Shows each application pool's worker process and current requests |
| Restart FastCGI after a php.ini change | Set monitorChangesTo to the php.ini path | IIS restarts the FastCGI processes when the file changes |
Troubleshooting common issues when adding the FastCGI module to IIS
FastCGI module not visible or missing ("FastCgiModule is not a recognized module")
The CGI feature is not installed, so FastCgiModule was never registered in the IIS module lists.
- Open Turn Windows features on or off, or Server Manager on Windows Server.
- Expand Internet Information Services > World Wide Web Services > Application Development Features and confirm CGI is ticked.
- Tick it if it is clear, select OK, and wait for the install to finish.
- Close and reopen IIS Manager, then check the Module list in Add Module Mapping again.
"FastCGI feature must be enabled" when installing a web application
The application's installer checks for the CGI feature, which is off by default in IIS.
- Install the CGI feature with Windows features, Server Manager or
DISM.EXE /enable-feature /online /featureName:IIS-CGI. - Confirm the
CGIvalue underHKEY_LOCAL_MACHINE\Software\Microsoft\InetStp\Componentsis 1. - Run the application's installer again.
Errors in FastCGI application configuration (HTTP 500.0 or 500.21)
The handler points at a module or executable IIS cannot use: a "bad module" message, a mistyped executable path, or a handler with no matching FastCGI application.
- Open Handler Mappings for the site and select your FastCGI mapping, then Edit.
- Confirm Module is FastCgiModule and Executable is the exact path to php-cgi.exe or your framework's FastCGI executable.
- Open FastCGI Settings at server level and confirm an application exists with the same Full Path and arguments.
- If the error says FastCgiModule is a bad module, install the CGI feature as in the first fix.
- Reload the page and check the new status code in the IIS log.
Permissions issues (HTTP 401.3 or access denied on scripts)
The application pool identity cannot read the site folder or the script engine folder.
- Right-click the site folder in File Explorer and select Properties > Security > Edit > Add.
- Select Locations and choose the local computer.
- Enter
IIS AppPool\DefaultAppPool, or your pool's name after the backslash, and select Check Names. - Select OK, grant Read & execute, and apply the change.
- Repeat for the folder that holds the script engine, such as the PHP folder.
High CPU usage or slow response (HTTP 503.4 FastCGI queue full)
More requests arrive than the FastCGI pool can serve, or long-running scripts hold every process.
- Open FastCGI Settings, select the application and choose Edit.
- Check maxInstances: 0 is the default from IIS 8.0 on, while a low fixed number such as 4 makes requests queue.
- Lower instanceMaxRequests if memory grows over time, so processes recycle sooner, keeping PHP_FCGI_MAX_REQUESTS at or below it.
- Raise requestTimeout only for scripts that legitimately run long; otherwise fix the slow script.
- Open Worker Processes to see which requests are running long.
PHP source code shows or downloads instead of running
No handler mapping sends *.php to FastCgiModule for that site.
- Open Handler Mappings for the site and look for a mapping with path
*.php. - If none exists, add one with Add Module Mapping as described above.
- Reload the test page.
Best practices for using FastCGI with IIS
| Practice | How to apply it |
|---|---|
| Keep IIS and FastCGI modules updated | IIS and FastCGI are Windows components, so keep Windows updated; update the PHP or framework build separately from its vendor |
| Optimize FastCGI settings | Start with defaults, set instanceMaxRequests and PHP_FCGI_MAX_REQUESTS together, and change one value at a time |
| Use isolated application pools | Run each site in its own application pool so each gets its own IIS AppPool identity and permissions |
| Monitor and log performance | Watch Worker Processes and the logs in inetpub\logs\LogFiles for 500, 502 and 503.4 codes |
| Ensure security measures | Grant the pool identity read access only, use Request Restrictions so only real files run, set stderrMode to ReturnGeneric500 on public sites, and delete test scripts |
| Test configuration changes | Apply changes on a test site first, then reload a known page and check the log before moving to production |
Remove the FastCGI module from IIS
Remove the handler mappings first, then the feature. Removing the CGI feature while a site still maps *.php to FastCgiModule leaves that site returning errors.
- In IIS Manager, open Handler Mappings, select your FastCGI mapping, and select Remove in the Actions pane.
- Open FastCGI Settings at server level, select the application, and select Remove.
- Open Turn Windows features on or off, or Remove Roles and Features in Server Manager.
- Clear CGI under Application Development Features (or Application Development on Windows Server).
- Select OK and restart if Windows asks.
IIS FastCGI module FAQ
How do I enable the FastCGI module in IIS?
Turn on the CGI feature. On Windows 10 and 11 it is under Internet Information Services > World Wide Web Services > Application Development Features in Turn Windows features on or off; on Windows Server it is a role service under Web Server > Application Development.
How do I install FastCGI on IIS in Windows 11?
Open Control Panel > Programs > Programs and Features > Turn Windows features on or off, expand Internet Information Services, World Wide Web Services and Application Development Features, tick CGI, and select OK. FastCGI installs with it.
Where can I download FastCGI for IIS?
There is no separate download for IIS 7.0 or later. FastCGI is part of IIS and installs with the CGI feature. You only download the framework that runs through it, such as the Non-Thread Safe build of PHP from php.net.
What does "FastCgiModule is not a recognized module" mean?
It means a handler mapping refers to FastCgiModule, but the module is not registered because the CGI feature is not installed. Install CGI from Windows features or Server Manager, then reopen IIS Manager.
Why is the FastCGI module missing in IIS Manager?
FastCgiModule only appears in the Add Module Mapping list after the CGI feature is installed, because that install is what registers the module. Tick CGI in Windows features or Server Manager, then open Add Module Mapping again.
How do I set up a FastCGI handler with IIS?
In IIS Manager, open Handler Mappings, select Add Module Mapping, enter *.php as the request path, choose FastCgiModule, enter the path to php-cgi.exe as the executable, name it, and accept the prompt to create the FastCGI application.
Is FastCGI the same as the CGI feature in IIS?
No, but they install together. CGI starts a new process for every request, while FastCGI reuses a pool of processes. Windows lists only CGI in its feature list, and that one checkbox installs both.
Which PHP build should I use with IIS FastCGI?
Use the Non-Thread Safe (NTS) build of PHP for Windows, and map requests to php-cgi.exe rather than php.exe. The PHP manual recommends NTS whenever PHP runs through the FastCGI handler in IIS.
Bottom line: adding FastCGI to IIS
Tick CGI in Windows features or Server Manager, then add a *.php module mapping to FastCgiModule and accept the prompt to create the FastCGI application. Those two steps are the whole job on IIS 7.0 and later. Everything else, such as environment variables, limits and per-site pools, is tuning you can do after a phpinfo test page loads.