To set up OpenSSH Server on Windows 11 or Windows 10, install the OpenSSH Server optional feature, start the sshd service, and confirm the firewall allows inbound TCP port 22.
This guide covers the Settings and PowerShell installs, the first test connection, key-based sign-in, turning off password logins, and fixes for the errors people hit most.
How to enable SSH server on Windows 11 and Windows 10
These five steps take a PC from nothing installed to accepting SSH connections. Run them on the PC you want to control remotely.
- Right-click Start and select Terminal (Admin) or Windows PowerShell (Admin).
- Run
Add-WindowsCapability -Online -Name OpenSSH.Server~~~~0.0.1.0and wait forOnline : Truein the output. - Run
Start-Service sshdto start the server. - Run
Set-Service -Name sshd -StartupType 'Automatic'so it starts with Windows. - From another computer, run
ssh username@servernameand enter the Windows account password when asked.
Setup creates and enables a firewall rule named OpenSSH-Server-In-TCP for port 22, so most PCs need nothing else. The sections below confirm each step and harden the setup.
Prerequisites and compatibility
OpenSSH has shipped as a Feature on Demand since Windows 10 build 1809. It is not installed by default on Windows 10 or Windows 11.
| Requirement | Minimum | How to check |
|---|---|---|
| Windows version | Windows 10 build 1809 or any Windows 11 release | Press Win + R, type winver and press Enter |
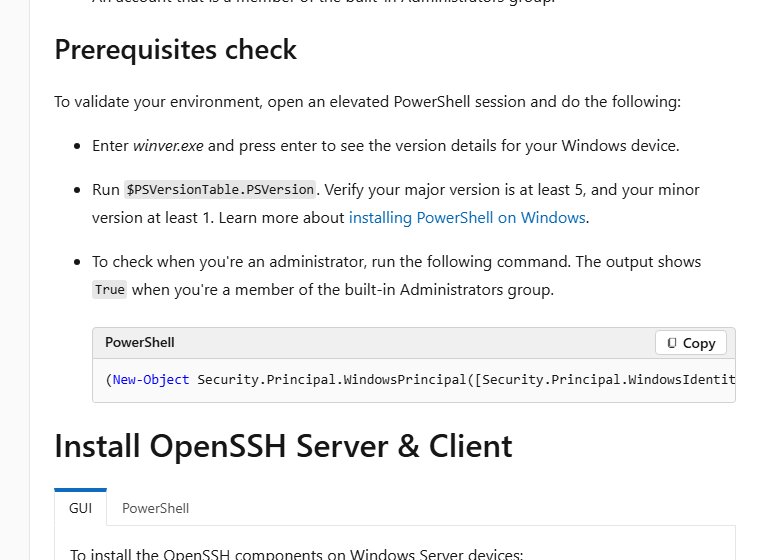
| PowerShell | Windows PowerShell 5.1 or later | Run $PSVersionTable.PSVersion; major 5, minor 1 or higher |
| Account | Member of the built-in Administrators group | Run the IsInRole check below; it prints True for an admin |
| Network | Client and server can reach each other on TCP port 22 | Both on the same network, or a route through your router or VPN |
| Install source | Access to Windows Update, or a matching Features on Demand ISO | Managed PCs may need the IT admin to allow optional feature downloads |
To confirm admin rights, run (New-Object Security.Principal.WindowsPrincipal([Security.Principal.WindowsIdentity]::GetCurrent())).IsInRole([Security.Principal.WindowsBuiltInRole]::Administrator) in PowerShell. Windows Server 2025 is different: OpenSSH is already installed there and only needs enabling.
Primary procedure
The full setup is nine steps. Some run on the server (the PC you connect to) and some on the client (the device you type on).
| Step | What it does | Run it on |
|---|---|---|
| 1. Check the install state | Shows whether OpenSSH Server is already present | Server |
| 2. Install OpenSSH Server | Adds the sshd service and its firewall rule |
Server |
| 3. Start the service | Starts sshd now and at every boot |
Server |
| 4. Verify the firewall rule | Makes sure inbound TCP port 22 is open | Server |
| 5. Find the name and IP | Gives you the address and user name to type | Server |
| 6. Test SSH | Proves the connection and password sign-in work | Client |
| 7. Create an SSH key | Generates a private and public key pair | Client |
| 8. Add the public key | Lets the server accept that key | Client, writing to the server |
| 9. Disable passwords | Leaves key sign-in as the only route | Server |
1. Check whether OpenSSH Server is already installed
Some PCs already have the OpenSSH Client, and a few have the server from an earlier setup. Check before installing anything.
Get-WindowsCapability -Online | Where-Object Name -like 'OpenSSH*'Lists the two OpenSSH optional features, OpenSSH.Client~~~~0.0.1.0 and OpenSSH.Server~~~~0.0.1.0, with their state. Run it in an elevated PowerShell window.
You should see: State : Installed next to OpenSSH.Server means you can skip to step 3. State : NotPresent means install it in step 2.
2. Install OpenSSH Server
All three routes install the same Microsoft-serviced feature, which Windows Update keeps patched. Pick the one that matches your PC.
| Your situation | Use this | Why |
|---|---|---|
| Windows 11 and you prefer clicking | Windows 11 Settings method | Uses Optional features > View features |
| Windows 10 and you prefer clicking | Windows 10 Settings method | Uses Optional features > Add a feature |
| Any version, several PCs, or a script | PowerShell method | One command, same on Windows 10 and 11 |
| PC managed by WSUS or offline | DISM with a Features on Demand ISO | Windows Update downloads fail on these PCs; see the install fix below |
Windows 11 Settings method
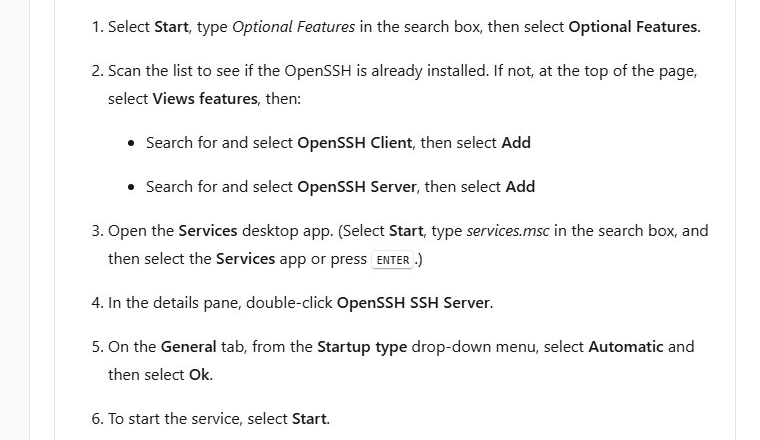
- Select Start, type
Optional features, and select Optional features. - Scan the installed list for OpenSSH Server. If it is there, skip to step 3 of the procedure.
- Select View features at the top of the page.
- Search for OpenSSH Server, select it, and select Add.
- Wait for the install to finish in the progress list on the same page.
Windows 10 Settings method
- Select Start, type
Optional features, and select Optional features (also shown as Manage optional features). - Check the list for OpenSSH Server. If it is listed, it is already installed.
- Select Add a feature at the top of the page.
- Search for OpenSSH Server and select Install.
- Return to the Optional features page and wait until OpenSSH Server shows as installed.
PowerShell method for Windows 10 or Windows 11
Open PowerShell as administrator first. If you need help with that, run PowerShell as administrator from the Start menu or the Win + X menu.
Add-WindowsCapability -Online -Name OpenSSH.Server~~~~0.0.1.0Downloads and installs the OpenSSH Server feature from Windows Update. Add Add-WindowsCapability -Online -Name OpenSSH.Client~~~~0.0.1.0 if the PC also needs the ssh client.
You should see: The output shows Online : True and RestartNeeded : False. No restart is required.
3. Start OpenSSH Server and make it start automatically
The sshd service does not start on its own after install. Its startup type is manual, so it also stays off after a reboot until you change it.
Start-Service sshd
Set-Service -Name sshd -StartupType 'Automatic'
Get-Service sshd
The first line starts the server, the second makes it start at every boot, and the third shows its state. The first start also generates the host keys in C:\ProgramData\ssh.
You should see: Get-Service sshd shows Running in the Status column.
Prefer the GUI? Open services.msc, double-click OpenSSH SSH Server, set Startup type to Automatic, select Start, then select OK. The Services console works the same way for any Windows service.
4. Verify the firewall rule for SSH
Installing OpenSSH Server creates and enables an inbound rule named OpenSSH-Server-In-TCP for port 22. If the rule is missing or disabled, connections are refused or reset.
if (!(Get-NetFirewallRule -Name "OpenSSH-Server-In-TCP" -ErrorAction SilentlyContinue)) {
    New-NetFirewallRule -Name 'OpenSSH-Server-In-TCP' -DisplayName 'OpenSSH Server (sshd)' -Enabled True -Direction Inbound -Protocol TCP -Action Allow -LocalPort 22
} else {
    Write-Output "Firewall rule 'OpenSSH-Server-In-TCP' exists."
}
Looks for the rule by name and creates it only when it is missing. Run it in an elevated PowerShell window on the server.
You should see: The message Firewall rule 'OpenSSH-Server-In-TCP' exists., or a new rule listing with Enabled : True.
Leave Windows Firewall on. If a third-party firewall protects the PC, it needs its own allow rule for TCP port 22.
5. Find the server’s name and local IP address
The client needs three things: the server's name or IP address, the user name, and that user's password.
hostname
ipconfig
whoami
hostname prints the computer name. ipconfig lists each adapter; use the IPv4 Address of the adapter on your local network. whoami prints the account as computername\username.
You should see: You have a name such as DESKTOP-ABC123, an address such as 192.168.1.25, and the user name after the backslash.
You can also find your IP address and computer name in Settings. A Microsoft account signs in over SSH with its local account name, which is the name whoami prints.
6. Test SSH from another device
Windows 10 and 11, macOS and Linux all include an ssh command. On Windows, install the OpenSSH Client feature first if ssh is not recognised.
- Open Terminal or PowerShell on the client device.
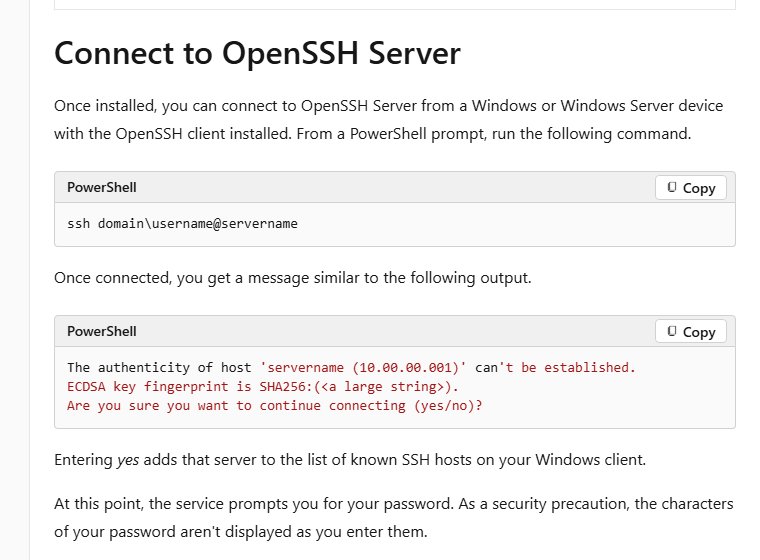
- Run
ssh [email protected], using the user name and IP address from step 5. A domain account usesssh domain\username@servername. - Type
yesat Are you sure you want to continue connecting to save the server's host key fingerprint. - Enter the Windows account password. The characters do not appear as you type.
- Check for a prompt such as
username@SERVERNAME C:\Users\username>, then runhostnameto confirm you are on the server. - Type
exitto close the session.
That prompt is Command Prompt (cmd.exe), the default SSH shell on Windows. Run powershell inside the session, or change the default shell as shown further down.
Configure public-key sign-in
Key-based sign-in replaces a guessable password with a key file that never leaves the client. It works with local and Active Directory accounts; Microsoft Entra ID accounts do not support it.
Where the public key goes on the server depends on the account type. Getting this wrong is the main cause of key sign-in failures on Windows.
| Item | Location | Notes |
|---|---|---|
| Private key (client) | C:\Users\username\.ssh\id_ecdsa |
Treat it like a password; never copy it to the server |
| Public key (client) | C:\Users\username\.ssh\id_ecdsa.pub |
Safe to share; this is the file the server needs |
| Standard user (server) | C:\Users\username\.ssh\authorized_keys |
One public key per line |
| Administrator (server) | C:\ProgramData\ssh\administrators_authorized_keys |
Used instead of the profile file for every admin account |
| Admin key file permissions | Only SYSTEM and Administrators |
Wider permissions make sshd ignore the file |
| Server config | C:\ProgramData\ssh\sshd_config |
Read when the service starts; restart sshd after edits |
7. Create an SSH key on the client device
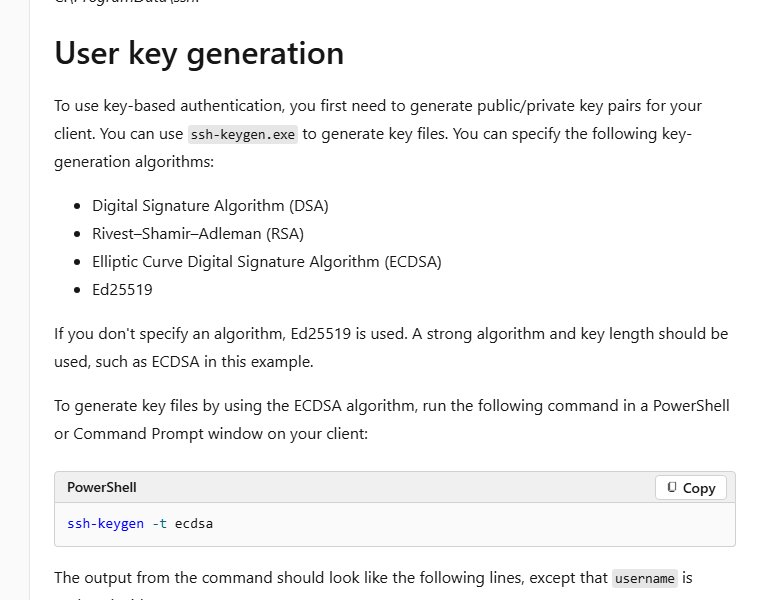
Run this on the device you connect from, not on the server. With no -t option, ssh-keygen creates an Ed25519 key; the example below uses ECDSA, matching Microsoft's documentation.
ssh-keygen -t ecdsaPress Enter to accept the default path, then type a passphrase twice. The passphrase encrypts the private key, so a stolen key file alone cannot sign in.
You should see: Two files appear in C:\Users\username\.ssh: id_ecdsa (private) and id_ecdsa.pub (public), and the key fingerprint prints on screen.
To avoid typing the passphrase on every connection, store the key in the agent from an elevated PowerShell window: run Get-Service ssh-agent | Set-Service -StartupType Automatic, then Start-Service ssh-agent, then ssh-add $env:USERPROFILE\.ssh\id_ecdsa.
8. Add the public key to the Windows account on the server
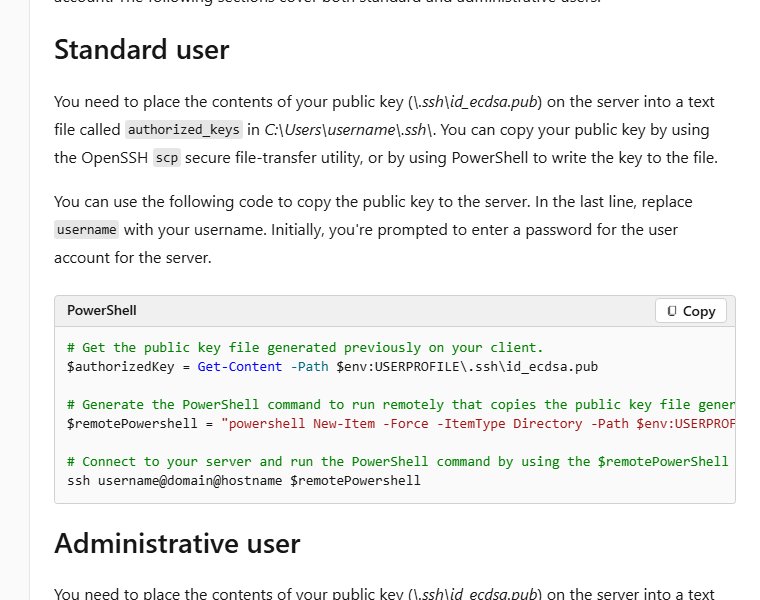
Most home PCs use an administrator account, so the admin route is the one most readers need. Run these from PowerShell on the client; the first connection still asks for the password.
- Load the public key into a variable:
$authorizedKey = Get-Content -Path $env:USERPROFILE\.ssh\id_ecdsa.pub. - For an administrator account, build the remote command:
$remotePowershell = "powershell Add-Content -Force -Path $env:ProgramData\ssh\administrators_authorized_keys -Value '$authorizedKey';icacls.exe ""$env:ProgramData\ssh\administrators_authorized_keys"" /inheritance:r /grant ""Administrators:F"" /grant ""SYSTEM:F""". - For a standard account, use this instead:
$remotePowershell = "powershell New-Item -Force -ItemType Directory -Path $env:USERPROFILE\.ssh; Add-Content -Force -Path $env:USERPROFILE\.ssh\authorized_keys -Value '$authorizedKey'". - Send it to the server:
ssh username@servername $remotePowershell, and enter the account password. - Open a new window and run
ssh username@servernameagain. It should ask for the key passphrase, or nothing if the agent holds the key, but not the Windows password.
On a non-English Windows install, the Administrators group name differs. Use its SID instead, written as *S-1-5-32-544, in the icacls grant.
9. Disable password authentication only after key access works
Turning off passwords stops brute-force guessing against the account. Do it only after step 8 signs you in with the key, or you can lock yourself out of remote access.
- On the server, open PowerShell as administrator and run
Copy-Item "C:\ProgramData\ssh\sshd_config" "C:\ProgramData\ssh\sshd_config.bak"to back up the config. - Run
notepad "C:\ProgramData\ssh\sshd_config". - Find the
PasswordAuthenticationline, remove any leading#, and set it toPasswordAuthentication no. - Make sure
PubkeyAuthentication yesis not commented out with a#and set tono, then save the file. - Run
sshd -tto test the file. No output means the syntax is valid. - Run
Restart-Service sshd. - Keep your current session open and test a new connection from the client. A password-only attempt should now fail.
Change the default SSH shell to PowerShell on Windows
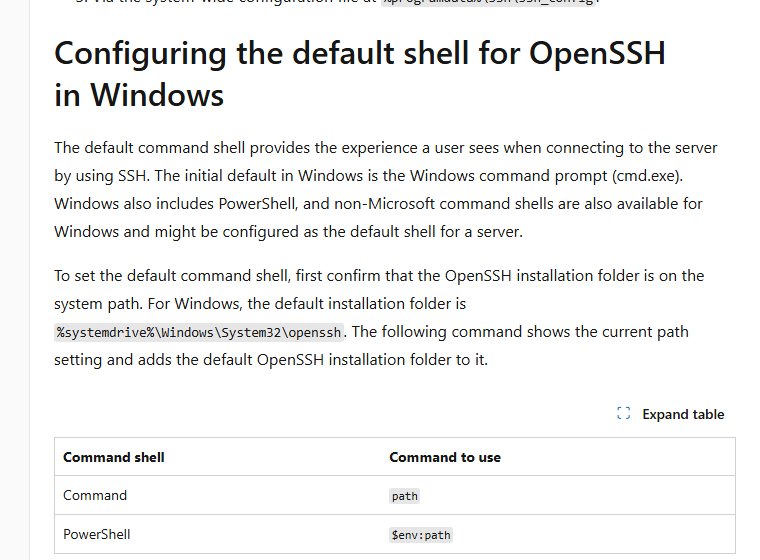
SSH sessions open in Command Prompt by default. A registry value on the server switches every new session to PowerShell; it does not affect the ssh client.
New-ItemProperty -Path "HKLM:\SOFTWARE\OpenSSH" -Name DefaultShell -Value "C:\Windows\System32\WindowsPowerShell\v1.0\powershell.exe" -PropertyType String -ForceCreates the DefaultShell string value under HKEY_LOCAL_MACHINE\SOFTWARE\OpenSSH with the full path to powershell.exe. Run it in an elevated PowerShell window on the server.
You should see: The next SSH session opens at a PS C:\Users\username> prompt instead of C:\Users\username>.
Allow only specific users to SSH into Windows
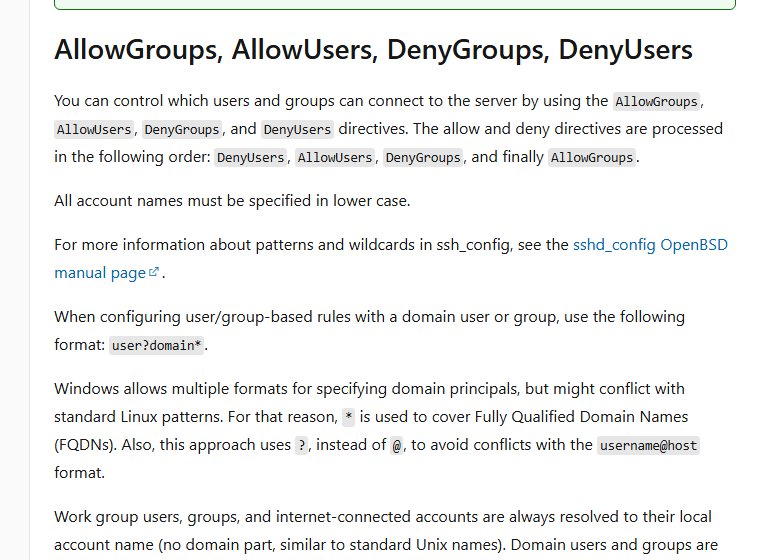
By default, any local account with a password can try to sign in. AllowUsers and AllowGroups in sshd_config limit SSH to the accounts you name.
AllowUsers localuser
AllowGroups sshusers
Add these lines to C:\ProgramData\ssh\sshd_config, replacing the names with your own. Write every account and group name in lower case. Rules are processed as DenyUsers, AllowUsers, DenyGroups, then AllowGroups.
You should see: After Restart-Service sshd, a named account still connects and any other account is refused.
Troubleshooting and rollback
Run ssh -v username@servername on the client for any failure. The verbose output shows how far the connection gets and which key was offered. Server-side events are in Event Viewer under Applications and Services Logs > OpenSSH; the Windows Event Viewer basics apply.
OpenSSH Server will not install
Windows cannot reach the feature files, usually because the PC is offline or managed by WSUS or Group Policy. Errors include 0x800F0954, 0x800F0950 and 0x8024402C.
- Run
winverand confirm the PC runs Windows 10 build 1809 or later. - Connect the PC to the internet and retry
Add-WindowsCapability -Online -Name OpenSSH.Server~~~~0.0.1.0. - On a work PC, ask the administrator to check Specify settings for optional component installation and component repair under Computer Configuration > Administrative Templates > System.
- On an offline PC, mount the Features on Demand ISO that matches your exact Windows version and run
dism /online /add-capability /capabilityname:OpenSSH.Server~~~~0.0.1.0 /source:E:\, replacingE:\with the mounted drive.
Start-Service sshd reports that the service does not exist
Only the OpenSSH Client is installed, or the server install did not finish.
- Run
Get-WindowsCapability -Online | Where-Object Name -like 'OpenSSH*'in an elevated window. - If
OpenSSH.Server~~~~0.0.1.0showsNotPresent, install it with the PowerShell method above. - Run
Start-Service sshdagain from the elevated window.
Connection is refused or immediately reset
The service is stopped, port 22 is not listening, or the firewall blocks it.
- On the server, run
Get-Service -Name sshdand start it if it is stopped. - Run
netstat -an | findstr :22and look for0.0.0.0:22withLISTENING. - Re-run the firewall check from step 4.
- Run
sshd -tto catch a brokensshd_config, check that thePortline reads 22 if it is uncommented, then runRestart-Service sshd. - To rule out a firewall profile problem, add a temporary rule with
New-NetFirewallRule -Name "SSH-Test" -DisplayName "SSH Test Rule" -Enabled True -Direction Inbound -Protocol TCP -LocalPort 22 -Action Allow -Profile Any, test, then remove it withRemove-NetFirewallRule -Name "SSH-Test".
The password is rejected
The user name format is wrong, the account type is unsupported, or password sign-in is turned off.
- Run
whoamion the server and use the part after the backslash as the user name. Microsoft accounts sign in with this local account name. - For a domain account, connect with
ssh domain\username@servername. - Use a local or Active Directory account; Microsoft Entra ID accounts cannot sign in to Windows OpenSSH.
- If you set
PasswordAuthentication noin step 9, passwords are refused by design; sign in with the key instead.
Public-key authentication returns Permission denied (publickey)
The key is in the wrong file for the account type, the admin key file has wrong permissions, or the key type is too old.
- For an administrator account, put the key in
C:\ProgramData\ssh\administrators_authorized_keys, not in the profile'sauthorized_keysfile. - Reset its permissions:
icacls.exe "C:\ProgramData\ssh\administrators_authorized_keys" /inheritance:r /grant "Administrators:F" /grant "SYSTEM:F". - If the client uses an old
ssh-rsakey, create an ECDSA or Ed25519 key instead. OpenSSH 8.8 and later disablessh-rsaby default. - Run
Restart-Service sshdand test again withssh -vto confirm which key the client offers.
Remove or fully disable OpenSSH Server
Disabling keeps the feature for later; removing uninstalls it. Run either set in an elevated PowerShell window on the server.
- To disable, run
Stop-Service sshd, thenSet-Service -Name sshd -StartupType 'Disabled'. - Close port 22 while disabled:
Disable-NetFirewallRule -Name 'OpenSSH-Server-In-TCP'. - To remove completely, run
Remove-WindowsCapability -Online -Name OpenSSH.Server~~~~0.0.1.0. - Delete the firewall rule:
Remove-NetFirewallRule -Name 'OpenSSH-Server-In-TCP'. - Restart Windows if the service was in use when you removed it.
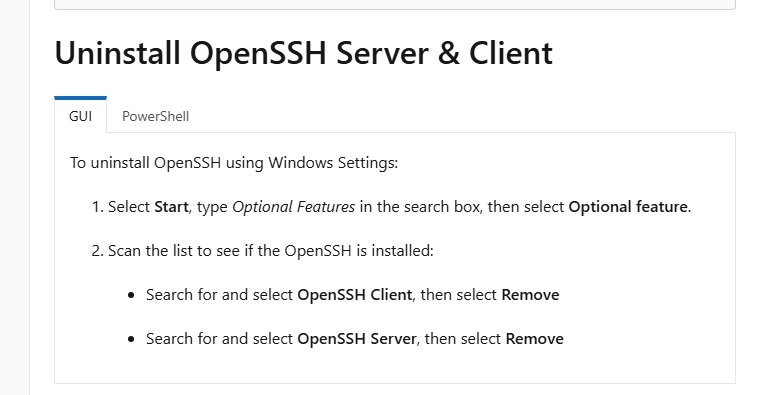
- In Settings, the same removal is Optional features > OpenSSH Server > Remove on Windows 11, or Uninstall on Windows 10.
OpenSSH Server on Windows FAQ
What port does OpenSSH Server use on Windows?
OpenSSH Server listens on TCP port 22 by default, on both IPv4 and IPv6. The install creates an inbound firewall rule named OpenSSH-Server-In-TCP for that port. The Port line in C:\ProgramData\ssh\sshd_config sets a different port.
Where is the sshd_config file on Windows?
The server configuration file is C:\ProgramData\ssh\sshd_config. If it is missing, sshd creates one with default settings when the service starts. Changes take effect only after you run Restart-Service sshd.
Where are the OpenSSH logs on Windows?
By default, OpenSSH Server logs to Event Viewer under Applications and Services Logs > OpenSSH. Setting SyslogFacility LOCAL0 in sshd_config writes file logs to C:\ProgramData\ssh\logs instead.
Do I need to restart Windows after installing OpenSSH Server?
No. Add-WindowsCapability reports RestartNeeded : False, and the service starts as soon as you run Start-Service sshd. A restart is only advised after uninstalling OpenSSH Server while the service was in use.
Can I sign in over SSH with a Microsoft account?
Yes. Internet-connected Microsoft accounts resolve to their local account name, so connect with the name whoami prints on the server and the account password. Microsoft Entra ID accounts are not supported for SSH sign-in.
Which shell does SSH open on Windows?
Command Prompt (cmd.exe) is the default shell for SSH sessions on Windows. Set the DefaultShell string value under HKEY_LOCAL_MACHINE\SOFTWARE\OpenSSH to the full path of powershell.exe to open PowerShell instead.
What key type does ssh-keygen create on Windows?
With no -t option, ssh-keygen on Windows creates an Ed25519 key. You can choose ECDSA, RSA or DSA with -t. Avoid old ssh-rsa keys, because OpenSSH 8.8 and later disable that algorithm by default.
Why can a key-based SSH session not reach network shares?
A session opened with a key has no stored Windows credentials, so it cannot authenticate to other machines as the user. Microsoft documents this as by-design behaviour. Use a password sign-in when the session needs network resources.
Is OpenSSH from GitHub the same as the Windows feature?
No. The Windows optional feature is serviced by Microsoft through Windows Update and is the recommended option. The PowerShell/openssh-portable releases on GitHub may differ in version, and you update and configure them yourself.