To clear computer cache in Windows 10, open Settings > System > Storage > Temporary files, tick the cache types you want gone and select Remove files.
This guide also covers Disk Cleanup, Storage Sense, the DNS cache, the browser cache and the same steps on Windows 11.
Step-by-step tutorial to clear computer cache Windows 10
Before you begin, save your work and close the apps you have open. The Temporary files page removes the largest system caches in one pass.
- Select Start > Settings.
- Select System, then Storage.
- Select Temporary files.
- Tick every cache type you want to clear, such as temporary files, thumbnails and temporary internet files.
- If Downloads or Recycle Bin appear in the list, leave them unticked unless you have checked their contents.
- Select Remove files and wait for Windows to finish.
The same path, Settings > System > Storage > Temporary files, works on Windows 11.
Types of computer cache in Windows 10 and the tool that clears each
Windows has no single button for every cache. Each type below lives in a different place, so match what you want gone to the right tool.
| Cache type | Clear it with | Why clear it |
|---|---|---|
| Temporary files and thumbnails | Settings > System > Storage > Temporary files | Frees the most drive space with the least risk |
| Old Windows update files and Windows.old | Disk Cleanup > Clean up system files | Reclaims gigabytes after a feature update; removes the option to go back |
| Ongoing temporary files | Storage Sense | Clears temporary files and old Recycle Bin items on a schedule |
| DNS cache | ipconfig /flushdns in Command Prompt |
Fixes sites that will not load after a DNS or hosting change |
| Browser cache | The browser's Clear browsing data option | Fixes pages that show old or broken content |
| Microsoft Store cache | Reset the Store app | Fixes Store downloads that stall or fail |
| Memory (RAM) contents | Restart the PC | Gives apps a clean start when the PC slows down |
Steps to clear all cache in Windows 11 and Windows 10
Run these in order to clear every common cache in one session. Each step is detailed in its own section below.
- Remove temporary files from Settings > System > Storage > Temporary files.
- Open Disk Cleanup, select Clean up system files and delete old update files.
- Open Command Prompt and run
ipconfig /flushdnsto clear the DNS cache. - In Microsoft Edge, open Clear browsing data and clear Cached images and files.
- Reset the Microsoft Store cache if Store downloads are failing.
- Empty the Recycle Bin.
- Select Start > Power > Restart.
If you use Chrome as well, you can clear the Chrome cache from its own settings, because each browser keeps a separate cache.
Clear cache with Disk Cleanup in Windows 10
Disk Cleanup is the classic tool and still ships with Windows 10 and Windows 11. By default it selects Downloaded Program Files, Temporary Internet Files and Thumbnails.
- Type disk cleanup in the search box on the taskbar and select Disk Cleanup from the results.
- Select the drive you want to clean, usually C:, and select OK.
- Tick the file types you want to delete in Files to delete.
- Select Clean up system files, choose the drive again and select OK to add update and system caches.
- Tick the extra items, then select OK.
- Select Delete files in the confirmation window.
Deleting Previous Windows installation(s) removes the Windows.old folder. That cannot be undone, and you lose the option to go back to the previous version of Windows.
Clear cache automatically with Storage Sense in Windows 10
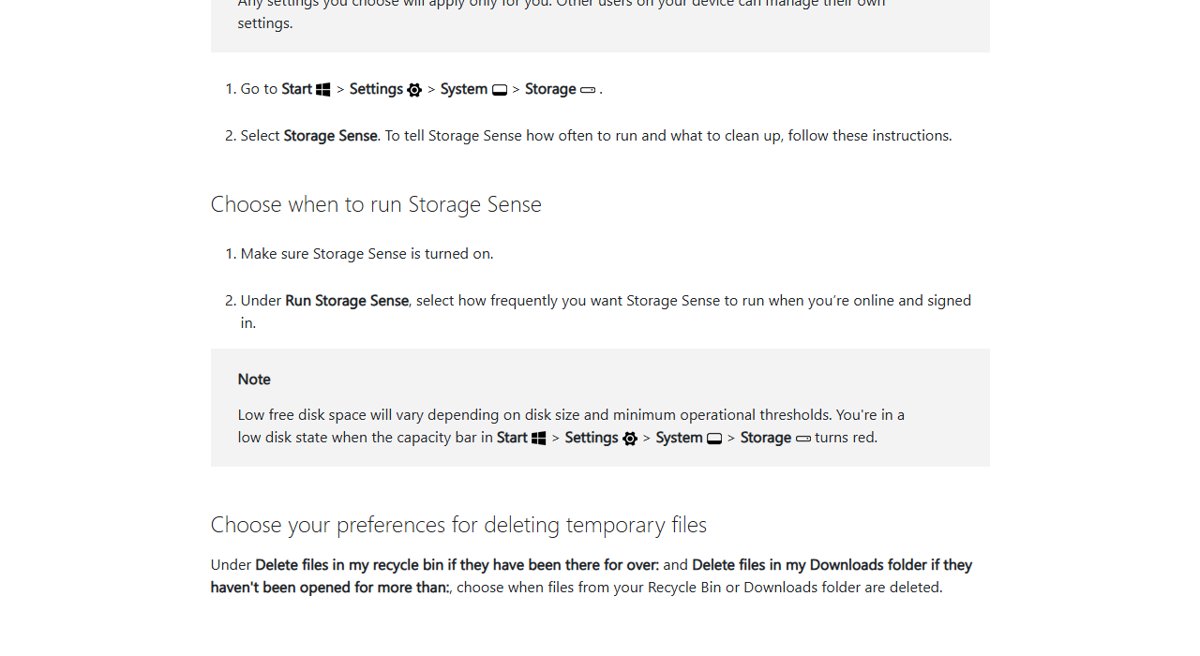
Storage Sense deletes temporary files and old Recycle Bin items for you. The path is the same on Windows 10 and Windows 11.
- Select Start > Settings > System > Storage.
- Set Storage Sense to On.
- Select Configure Storage Sense or run it now in Windows 10, or Storage Sense in Windows 11.
- Choose how often it runs under Run Storage Sense.
- Set Delete files in my recycle bin if they have been there for over: to a period you are comfortable with.
- Set Delete files in my Downloads folder if they haven't been opened for more than: or leave it at Never.
- Select Clean now in Windows 10, or Run Storage Sense now in Windows 11, to clear the cache immediately.
Clear the DNS cache in Windows 10 with ipconfig /flushdns
The DNS cache stores recent website name lookups. Clearing it forces Windows to look the names up again, which fixes sites that moved servers.
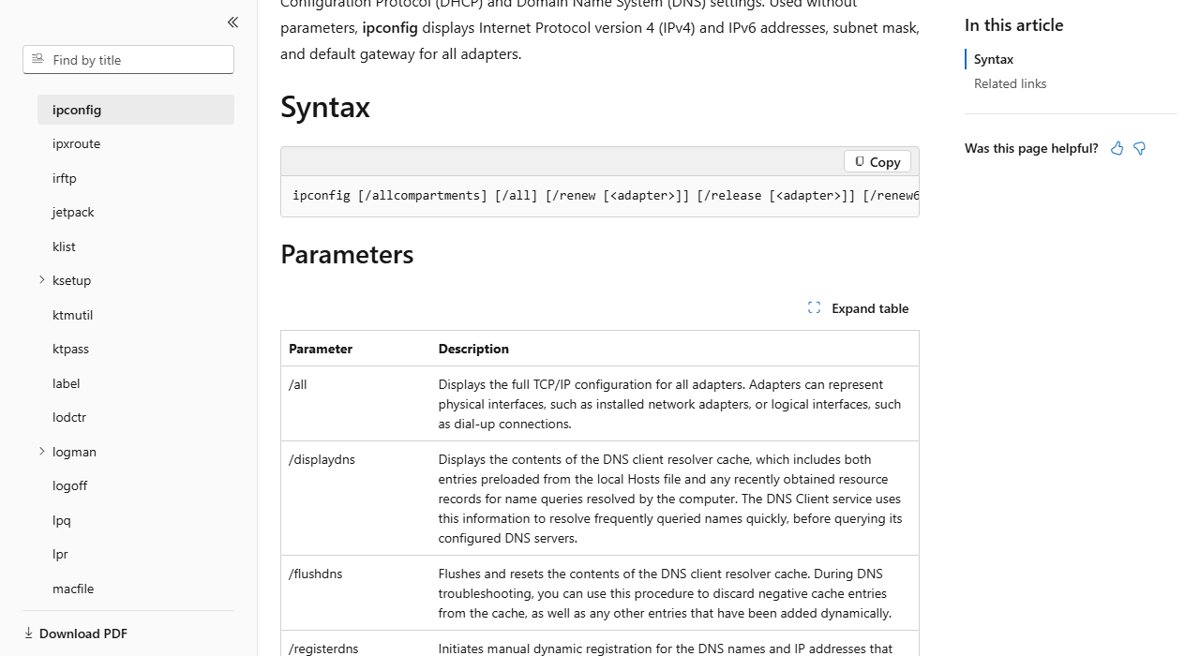
ipconfig /flushdnsFlushes and resets the contents of the DNS client resolver cache, including negative entries left from failed lookups. Open Command Prompt from the Start menu, type the command and press Enter.
You should see: Command Prompt confirms the flush with no error. Run ipconfig /displaydns afterwards to view the cache as it refills while you browse.
Clear browser cache in Microsoft Edge on Windows 10
Edge keeps copies of pages, images and other media on the drive. Tick only the cache box so cookies and saved sign-ins stay.
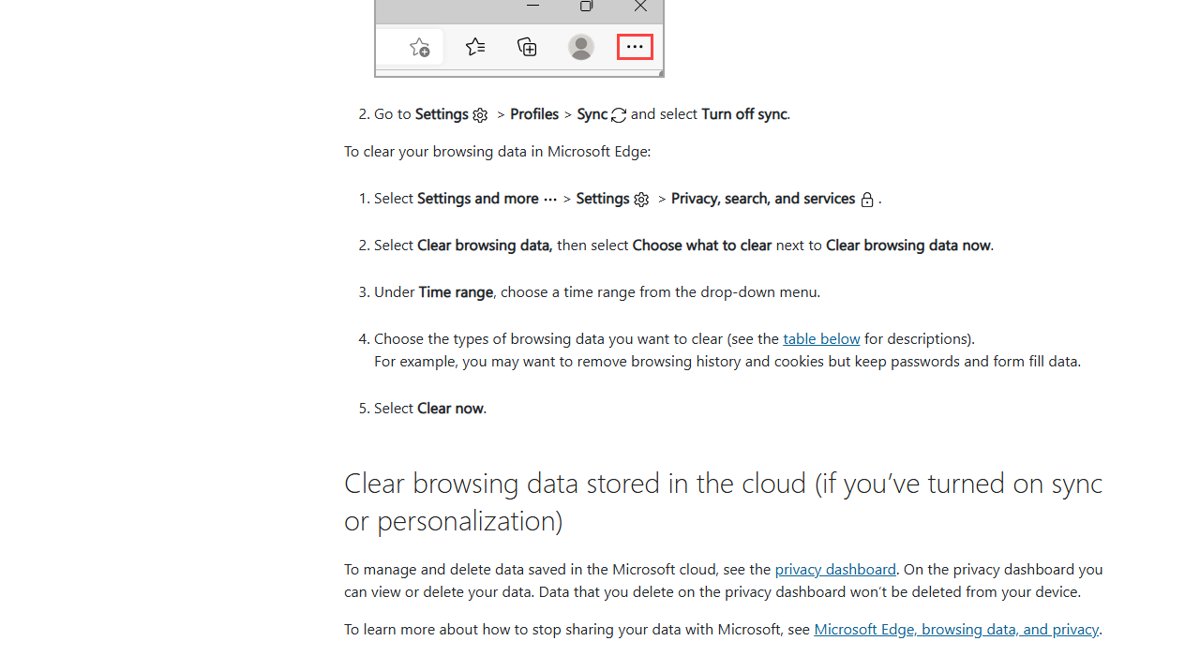
- Open Edge and select Settings and more > Settings.
- Select Privacy, search, and services.
- Select Choose what to clear next to Clear browsing data now.
- Pick a period from the Time range drop-down menu.
- Tick Cached images and files and untick anything you want to keep.
- Select Clear now.
Store app problems need a different fix: reset the Microsoft Store cache from the app's settings instead of the browser.
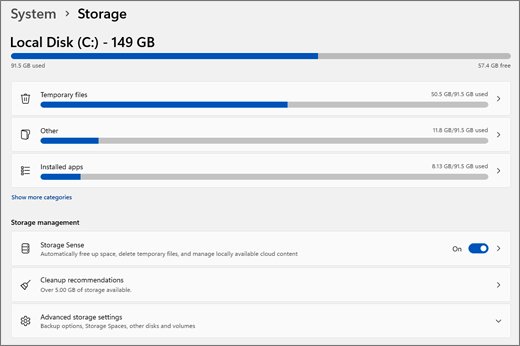
Confirm the cache is cleared in Windows 10 Storage settings
- Open Settings > System > Storage.
- Note the used and free space shown for drive C:.
- Select Temporary files and confirm the total is close to zero or much smaller than before.
- Restart the PC and open the same page again; a small amount of new temporary data is normal.
To clear leftovers by hand, you can delete temporary files in Windows 10 straight from the Temp folder.
Tips for clearing computer cache Windows 10
| Tip | Why it matters |
|---|---|
| Check Downloads before you clean it | Storage Sense can delete real files you saved there |
| Empty the Recycle Bin after the cleanup | Deleted files still use space until the Recycle Bin is emptied |
| Keep Previous Windows installation(s) for a few days after a feature update | Deleting it removes the way back to the old version |
| Turn on Storage Sense | Cache never builds up to gigabytes again |
| Restart after a big cleanup | Apps that held temporary files open release them, and memory starts fresh |
| Use the built-in tools, not a third-party cleaner | Disk Cleanup and Storage Sense already remove what is safe to remove |
Memory is a separate cache from the drive. A restart clears it, and the RAM cache on Windows works differently from the files above.
Clear computer cache Windows 10 FAQ
How do I clear my computer cache in Windows 10?
Open Settings > System > Storage > Temporary files, tick the cache types and select Remove files. For older update files, run Disk Cleanup and select Clean up system files. Clear the browser and DNS caches separately.
How do I clear computer cache in Windows 11?
Select Start > Settings > System > Storage > Temporary files, tick the items to remove and select Remove files. Windows 11 also lists Cleanup recommendations on the same Storage page, and Storage Sense has a Run Storage Sense now button.
How do I clear the Windows cache all at once?
No single button clears every cache. Remove temporary files in Settings, run Disk Cleanup with Clean up system files, flush DNS with ipconfig /flushdns, clear the browser cache and restart. Together these cover the common caches.
What does clearing the cache do?
Clearing the cache deletes stored copies of data that Windows and apps can rebuild, such as thumbnails, temporary internet files and update leftovers. It frees drive space and can fix stale or corrupted data. Apps rebuild what they need on next use.
Can clearing cache delete important files?
Cache files themselves are not personal files. The risk comes from extra options on the same screens: Downloads and Recycle Bin settings in Storage Sense can remove real files. Check them before you tick them.
How often should I clear my computer cache?
Turn on Storage Sense and let it run on its schedule, and clear caches by hand only when space runs low or a site or app misbehaves. Clearing the browser cache too often only makes pages load slower.
Will clearing cache affect my installed programs?
No. Temporary files, thumbnails and the DNS cache are not part of installed programs, which keep working. Clearing browser cookies signs you out of websites, so untick cookies if you only want the cache gone.
Is it safe to use third-party tools for clearing cache?
Windows already includes Disk Cleanup, Temporary files and Storage Sense, which remove only what is safe to remove. Third-party cleaners add no needed function and some change system settings, so the built-in tools are the better choice.