To create a survey in MS Forms, sign in at forms.office.com, select New Form, add your questions with Add new, then select Collect responses to send the link.
This guide walks through every step from a blank form to a finished survey, including sections, branching, themes, response settings, sharing, reading results in Excel and co-authoring.
The fastest way to create a survey in Microsoft Forms
These six steps produce a working survey you can send in a few minutes. Forms saves your work automatically as you build it.
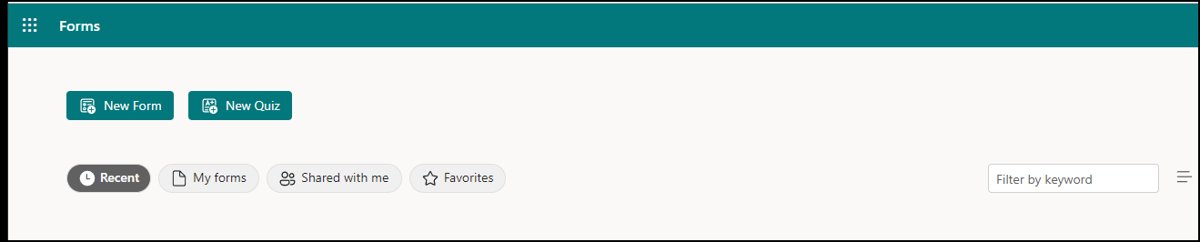
- Go to forms.office.com and sign in with your work, school or personal Microsoft account.
- Select New Form.
- Type a title and, if you want, a short description.
- Select Add new, pick a question type such as Choice or Text, and type the question. Repeat for each question.
- Select Preview, answer the questions and select Submit to test the survey.
- Select Collect responses, choose who can respond, then select Copy link and paste the link wherever your audience will see it.
What You Need Before You Start
Microsoft Forms runs in a web browser, so there is nothing to install. What you can do with it depends on the account you sign in with.
| Requirement | Details |
|---|---|
| An account | A Microsoft 365 work or school account, or a personal Microsoft account (Hotmail, Live or Outlook.com) |
| A browser | Forms opens at forms.office.com; respondents can answer in almost any web browser or on a mobile device |
| Work or school account for internal-only surveys | Only people in my organization can respond and Specific people in my organization can respond are available only to Office 365 Education and Microsoft 365 Apps for business users |
| Work or school account for co-authoring | Share to collaborate is available only to Office 365 Education and Microsoft 365 Apps for business customers |
| Work or school account for short links | The Shorten URL option is not available with a personal Microsoft account |
| Your questions, drafted | Write the questions first, especially if you plan to add branching; Microsoft recommends creating all questions before you add branching |
Step 1: Open Microsoft Forms
Pick the entry point you already use. All three land in the same Forms portal with the same list of your forms.
- Open a browser and go to forms.office.com.
- Sign in with your Microsoft 365 school credentials, Microsoft 365 work credentials, or a personal Microsoft account.
- Alternatively, sign in at Office.com, look for the Microsoft 365 app icons on the left, and select Forms.
- In Microsoft Teams, you can instead add Forms as a tab in a channel; that route is covered in [Using Microsoft Forms with Other Microsoft 365 Apps](#using-microsoft-forms-with-other-microsoft-365-apps).
Step 2: Create a New Survey Form
Forms uses New Form for surveys and polls and New Quiz for anything with correct answers and scoring. A survey is a form, so choose New Form.
- On the Forms portal, select New Form.
- Select the default title and type a name for your survey. Titles can have up to 90 characters.
- Add a description that tells respondents what the survey is for and how long it takes. Descriptions can have up to 1,000 characters.
- To format text, highlight it and choose Bold (Ctrl+B, or Cmd+B on a Mac), Italic (Ctrl+I), Underline (Ctrl+U), font color, font size, numbering or bullets.
- Leave the page open and carry on; Forms saves the form automatically while you create it.
To start from a template instead, go to forms.office.com, select My forms and pick a template. The template option does not appear if you open Forms from Office.com.
Step 3: Add Your First Question
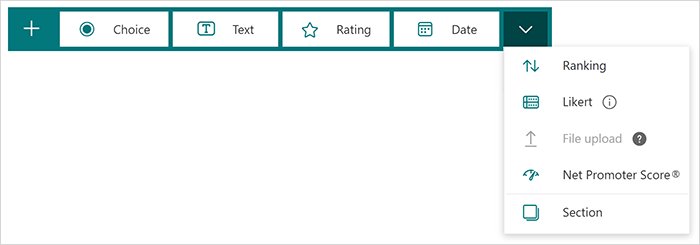
Every question starts from the same button. The first four types show directly; the rest sit under More question types.
- Select Add new below the title.
- Choose Choice, Text, Rating or Date, or select More question types to get Ranking, Likert, File upload or Net Promoter Score.
- Type the question in the question box.
- For a Choice question, type each answer option in its own box; for Rating, Likert or Ranking, fill in the items and scale the question asks for.
- Select Add new again for the next question.
Use this table to match what you want to learn with the question type that captures it cleanly.
Which question type to use for each survey question
| Question type | Where to find it | Use it when you want |
|---|---|---|
| Choice | Add new | Respondents to pick from a fixed list of answers you write |
| Text | Add new | Open-ended comments in the respondent's own words |
| Rating | Add new | A single score for one thing, such as overall satisfaction |
| Date | Add new | A specific date, such as when a visit or purchase happened |
| Ranking | More question types | Respondents to put several options in order of preference |
| Likert | More question types | Several statements rated on the same agreement or frequency scale in one grid |
| Net Promoter Score | More question types | The standard how-likely-are-you-to-recommend-us score |
| File upload | More question types | Respondents to attach a document or image |
| Section | Add new list | Not a question: a page break with its own title that groups the questions after it |
Step 4: Configure Each Question
Each question has its own options at the bottom of the question card and under its More settings for question menu. Set them as you go so you do not have to revisit every card later.
- Select the question to open it for editing.
- On a Choice question, select Add option for each extra answer; to cover answers you did not list, add an option such as "Other" or "None of the above".
- Turn on Multiple answers if respondents may pick more than one option.
- Turn on Required for any question every respondent must answer.
- Open More settings for question for Shuffle options (randomizes answer order), Drop-down (shows options as a list), Subtitle (adds an instruction line under the question) and Add branching.
- Select the trash can next to an answer to remove it, the Copy question icon to duplicate the question, or the Up and Down arrows to change its order.
Deleting a question is permanent: Forms deletes the question together with every response already collected for it. Delete questions before you send the survey, not after.
Step 5: Organize the Survey with Sections
Sections split a long survey into separate pages, each with its own title. They also let you branch whole groups of questions instead of one question at a time.
- Open the survey and select + Add new.
- Scroll to the bottom of the form and select Add new question, then select Section.
- Type a section title and a subtitle that explains what the next group of questions covers.
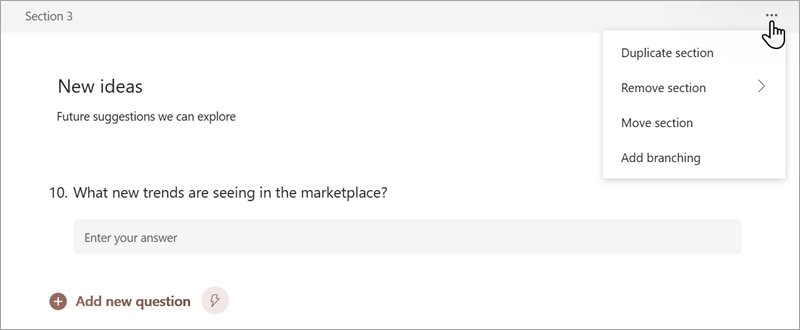
- To duplicate, remove or move a section, select More settings for section in its upper-right corner.
- Choose Duplicate section, Remove section (either Just section or Section and questions), or Move section, then use Move up and Move down to reorder it.
Adding sections disables the Shuffle questions setting. It also unlocks Show progress bar, which only works on forms with multiple sections or pages.
Step 6: Add Branching Logic
Branching shows each respondent only the questions that apply to them. A respondent who answers No to "Did you contact support?" can skip straight past the support questions.
- Finish writing all your questions first.
- On the question that decides the path, select More settings for question, then Add branching. For a section, select More settings for section > Add branching instead.
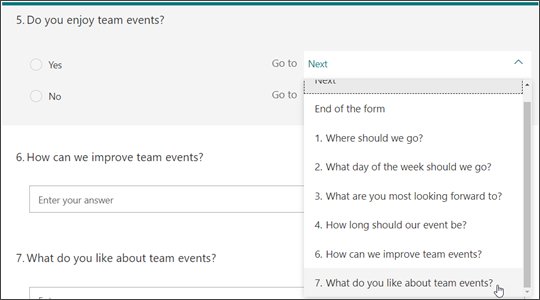
- On the Branching options page, open the drop-down list next to each answer.
- Choose the later question or section that answer should jump to.
- To make a question the last one someone sees, choose End of the form in its drop-down list.
- To start over and remove all branching, select More options, then Reset.
Branch only forward. Question 4 can branch to questions 5, 6, 7 or the end of the form. Pointing it back at question 2 sends respondents straight to the Submit button and skips everything in between.
Step 7: Customize the Survey Design
Themes change the background, frame color and button color. They do not change your questions or settings.
- Open the survey and select Style.
- Pick a theme from the gallery in the right pane, or scroll down for more colors and background images.
- To use your own background, select Customized, then Upload image, and choose Image Search, OneDrive or Upload.
- To set a brand color, select Customized, then Customize color, and type the six-digit hex value without the # sign.
- To remove your own image later, select Style, select Edit on the image thumbnail, then Delete.
A color block from the gallery always keeps the default wavy-lines design. For a plain solid background, save a solid color block as a .png file and upload it as the background image.
Step 8: Adjust Survey Settings
Open the survey and select Settings to see these options. Decide them before you send the link, because they control who can answer and how often.
| Setting | What it does | Set it when |
|---|---|---|
| Anyone can respond | Anyone inside or outside your organization can answer without signing in | The survey goes to customers or the public |
| Only people in my organization can respond | Respondents must sign in with a work or school account in your organization | The survey is internal |
| Specific people in my organization can respond | Only the people or groups you list can answer: up to 100 names, of which up to 20 can be groups | Only one team or project group should answer |
| Record name | Records who responded (internal options only) | You need to follow up with named respondents; leave it off for anonymous feedback |
| One response per person | Stops the same person answering twice (internal options only) | Votes or feedback that must not be double-counted |
| Accept responses | Clearing it closes the survey; you can write the message people see instead | The survey is finished |
| Start date and End date | Opens and closes the survey at an exact date and hour | Feedback has a deadline |
| Shuffle questions | Shows questions in a random order, either All questions or all except those you lock with Lock questions | You want to reduce order bias; unavailable once the survey has sections |
| Show progress bar | Shows respondents how far through they are | The survey has several sections |
| Customize thank you message | Replaces the default completion message | You want to tell people what happens next |
| Allow receipt of responses after submission | Lets respondents save or print a PDF of their answers from the thank-you page | People need a copy of what they submitted |
| Get email notification of each response | Emails you every time someone submits | Low-volume surveys you want to watch closely |
Step 9: Preview and Test the Survey
Preview shows the survey exactly as respondents will see it. A test submission is the only reliable way to check branching and required questions.
- Select Preview at the top of the form, then Computer or Mobile to see each layout.
- Answer every question, taking each branch path at least once.
- Confirm every question you marked Required shows as required.
- Select Submit to send a test response.
- Select Back to return to editing and fix anything that looked wrong.
- Open View responses and confirm your test entry appears, then delete test responses before you send the real link.
To clear test answers, open View responses, select More options for responses and choose to delete all responses.
Step 10: Share the Survey
All sharing options live on one screen. Choose the audience first, then the delivery method.
- Open the survey and select Collect responses.
- Under Send and collect responses, choose Anyone can respond, Only people in my organization can respond, or Specific people in my organization can respond.
- To share a plain link, select Copy link. Check Shorten URL first if you want a shorter link (work or school accounts only).
- To send an invitation, select the Outlook or Teams invitation icon, enter a person, Teams group or channel, check Outlook, Teams or both, and edit the message.
- For printed material or slides, select the QR code icon, then Download, and place the .png image where people can scan it.
- To put the survey inside a webpage or Sway, select the Embed icon, then Copy, and paste the code.
An invitation reaches up to 500 individual recipients, and a Teams group can have up to 200 members. Anyone who receives the link can forward it, so use one of the organization-only options when the audience must be restricted.
Step 11: View Survey Responses
Results update in real time as people submit. Forms shows a summary for each question, and Excel gives you one row per response.
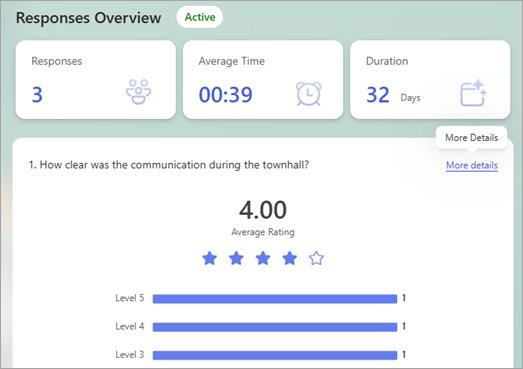
- Open the survey and select View responses to see the Responses Overview: number of responses and average completion time.
- Select More Details under a question to see every answer to it; select a column header to sort.
- Select Check individual results and use the left and right arrows to step through each respondent.
- Select Open results in Excel to create a workbook in OneDrive for work or school that stays connected to the form and picks up new responses.
- To share results without giving edit access, select More options for responses > Share a summary link > Copy.
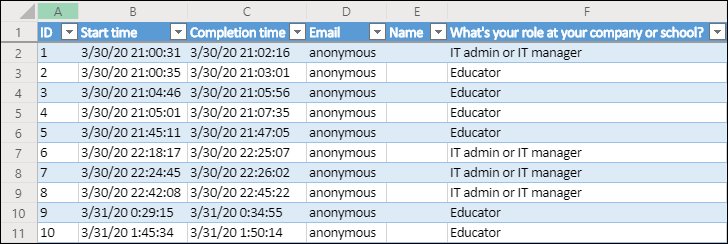
Download a copy gives you an offline workbook with no connection to the form. In either workbook the first five columns hold the respondent ID, start and completion times, name and email; names and emails stay blank for anonymous responses.
Step 12: Collaborate with Others
Co-authors can add questions, analyze responses and share the survey. You stay the owner and the form stays in your Forms portal. This needs a work or school account.
- Open the survey and select More form settings > Collaborate or Duplicate. If that option is not there yet, select Share.
- Under Add collaborators, select Share the link to collaborate and view result.
- Choose who can edit: Users with an Office 365 work or school account can view and edit, People in my organization can view and edit, or Specific people in my organization can view and edit.
- Select Copy and send the link to your co-authors by email, Teams or a notebook.
- To stop sharing, return to the same screen, select Delete next to the link, then Remove link.
You can add up to 100 co-authors, and a group counts as one. Co-authors see both questions and response data. A removed collaborate link cannot be reactivated, though you can create a new one.
Step 13: Copy or Reuse a Survey
To reuse a survey yourself, sign in to Forms, select My Forms, select More options on the survey's tile, then Copy. The copy appears first in the list with the same name, carrying the questions, format and layout but no responses.
To let someone else reuse your survey, share it as a template with the steps below.
- Open the survey and select Collaborate or Duplicate. If you do not see it, select Share.
- Under Share as a template, select Get a link to duplicate.
- Select Copy and send the link.
- The recipient opens the link and duplicates the survey into their own Forms portal, where they can edit it freely.
- To stop further copies, return to the same screen, select the trash can next to the link, then Remove link.
Only the content is duplicated; no response data carries over. If the template crosses between a personal account and a work or school account, the copy's who can respond setting resets.
Example: Simple Customer Feedback Survey Structure
This eight-question layout covers satisfaction, detail and follow-up while staying under three minutes for most respondents. Build it with the steps above.
| # | Question | Type | Settings |
|---|---|---|---|
| Section 1 | About your visit | Section | Subtitle: "Takes about 2 minutes" |
| 1 | How satisfied were you with your overall experience? | Rating | Required |
| 2 | How likely are you to recommend us to a friend or colleague? | Net Promoter Score | Required |
| 3 | Rate the following: speed of service, staff friendliness, value for money | Likert | Required |
| 4 | Did you contact customer support? | Choice (Yes / No) | Branch: No skips to Section 3 |
| Section 2 | Support | Section | Only reached by respondents who answered Yes |
| 5 | How well did support resolve your issue? | Rating | Optional |
| Section 3 | Final thoughts | Section | Progress bar now shows 3 of 3 |
| 6 | What one thing should we improve? | Text | Optional |
| 7 | Which of these would you like us to add first? | Ranking | Optional |
| 8 | May we contact you about your answers? | Choice (Yes / No) | Optional; ask for an email only in a follow-up Text question |
Tips for Writing Better Survey Questions
| Tip | Weak version | Better version |
|---|---|---|
| Ask about one thing per question | How fast and friendly was our service? | Split into two Rating questions, or one Likert grid with two rows |
| Keep scales consistent | A 5-point scale on one question and a 10-point scale on the next | The same scale for every Rating question in the survey |
| Avoid leading wording | How much did you enjoy our new menu? | How would you rate our new menu? |
| Give every respondent an answer | A Choice list that misses common answers | Add an "Other" or "Not applicable" option to Choice questions |
| Make only essential questions required | Every question marked Required | Require the core questions and leave comment boxes optional |
| Say how long it takes | No description | A description such as "8 questions, about 2 minutes" |
| Use Text questions sparingly | Five open comment boxes | One or two Text questions at the end |
Common Mistakes to Avoid
| Mistake | What happens | Do this instead |
|---|---|---|
| Deleting a question after responses arrive | The question and all responses collected for it are permanently deleted | Finalize questions before sending; add a new question rather than rewriting a live one |
| Branching back to an earlier question | Respondents jump straight to Submit and skip the rest of the survey | Branch only to later questions, sections or End of the form |
| Relying on Shuffle questions in a sectioned survey | Shuffle is disabled once the survey has sections | Choose either sections or shuffling |
| Sending a Anyone can respond link to a restricted audience | Anyone the email is forwarded to can answer | Use Only people in my organization or Specific people |
| Sharing a summary link carelessly | Anyone who has the link can view the response summary, even after you narrow sharing | Delete the old summary link via More options for responses > Share a summary link > Remove link |
| Using Download a copy for ongoing analysis | The offline workbook never updates with new responses | Use Open results in Excel for a live connection |
| Leaving test responses in the results | Test answers skew the averages | Delete all responses after testing and before sending |
Using Microsoft Forms with Other Microsoft 365 Apps
Forms plugs into the apps your respondents already use. Match your situation to the route that puts the survey in front of them.
| Your situation | Use this | How |
|---|---|---|
| Your team works in a Teams channel | A Forms tab in Teams | Channel > Add a tab > Forms > Create a shared form that your team can edit, or Add an existing form to collect responses, show results or collaborate |
| You need a quick one-question vote in a chat or meeting | The Teams Poll app | Create a poll from the chat or channel instead of a full survey |
| You want a daily summary posted to a channel | The Forms connector in Teams | Channel More options > Connectors > Configure next to Forms, then pick the form |
| Respondents live in their inbox | Outlook invitation | Collect responses > invitation icon > check Outlook |
| You want to analyze or chart results | Excel | View responses > Open results in Excel for a live workbook |
| The survey belongs on an intranet page | SharePoint | Add the Microsoft Forms web part to the page; it can also show results on the page |
| The survey belongs inside a webpage or Sway | Embed code | Collect responses > Embed > Copy |
| You want AI help drafting or chasing responses | Copilot in Forms | Use Copilot to draft the invitation or send Smart Reminders to people who have not responded |
Fix common problems when creating a survey in Forms
Only people in my organization, Specific people or Shorten URL is missing
These options exist only for work or school accounts, not personal Microsoft accounts.
- Sign out of Forms.
- Sign back in at forms.office.com with your Office 365 Education or Microsoft 365 business account.
- Recreate the survey there, or ask the owner of the personal account to share it as a template and duplicate it.
Collaborate or Duplicate does not appear
Microsoft is rolling out this entry point gradually, and Share to collaborate needs a work or school account.
- Confirm you are signed in with a work or school account.
- Select Share instead of More form settings.
- Continue with Share the link to collaborate and view result.
Shuffle questions is unavailable
Shuffling is disabled on any form that has sections or multiple pages.
- Decide whether sections or shuffling matter more.
- To shuffle, open each section's More settings for section and choose Remove section > Just section.
- Open Settings and turn on Shuffle questions.
Respondents jump to the end of the form
A branch points to an earlier question, which sends respondents straight to Submit.
- Open More settings for question > Add branching.
- Check every drop-down list and change any backward branch to a later question or End of the form.
- If the logic is tangled, select More options > Reset and rebuild the branches.
The Excel workbook stopped updating with new responses
The workbook came from Download a copy, or its live data connection to the form was disconnected.
- Open View responses in Forms.
- If Open in Excel still appears, open the workbook and follow its instructions to set up a new data connection.
- Otherwise select Open results in Excel to create a new connected workbook.
Frequently Asked Questions
How do I create a survey in Microsoft Forms?
Go to forms.office.com, sign in and select New Form. Give it a title, select Add new to add each question, then select Preview to test it. When it works, select Collect responses, choose who can respond and copy the link.
Can I create a survey in Teams?
Yes. In a Teams channel, select Add a tab, choose Forms, then select Create a shared form that your team can edit. The form opens inside the tab, and everyone in the team can edit it. For a single quick question, the Teams Poll app is faster.
Can I create a survey in Outlook?
Yes, by building it in Microsoft Forms and sending it through Outlook. In Forms, select Collect responses, choose the invitation icon, enter the recipients and check Outlook. Recipients get an email invitation with a link to the survey.
How do I create a survey in SharePoint?
Build the survey in Microsoft Forms, then add the Microsoft Forms web part to your SharePoint page and point it at the form. The web part can collect responses on the page or show a summary of results.
How do I create a survey in Word?
Build the survey in Microsoft Forms rather than in the document. Then select Collect responses, select Copy link, and paste the link into your Word document so readers can open the survey from it.
How do I create a survey for work?
Sign in to Forms with your work account and select New Form. Under Collect responses, choose Only people in my organization can respond, so colleagues must sign in. Turn Record name on for follow-up, or leave it off for anonymous feedback.
How do I create a good survey?
Ask one thing per question, keep rating scales consistent and require only the questions you truly need. Use sections and branching so people see only relevant questions, tell respondents how long it takes, and test every path in Preview before sending.