Press Win + R, type dxdiag and press Enter to open the DirectX Diagnostic Tool on Windows 11 or Windows 10.
This guide covers every way to launch it, what the System, Display, Sound and Input tabs tell you, how to save a report for support, and how to fix the DirectX problems it reveals.
How to Run dxdiag in Windows 11 or Windows 10
The DirectX Diagnostic Tool is built into Windows 11 and Windows 10. There is nothing to install, and the same steps work on both versions.
- Press Win + R to open the Run dialog.
- Type
dxdiagin the Open box. - Select OK or press Enter.
- Select Yes if Windows asks whether to check that your drivers are digitally signed. Microsoft recommends Yes on the first run.
- Wait for the DirectX Diagnostic Tool window to finish collecting details, then read the System tab.
Microsoft notes that the driver signature prompt can appear the first time you use the tool. On later runs, the window opens without it.
How to Open dxdiag from Run, Search, and Command Prompt
Every route below opens the same DirectX Diagnostic Tool window. Pick the one that matches what is already open on your screen.
| Your situation | Do this | Why it fits |
|---|---|---|
| Keyboard works normally | Press Win + R, type dxdiag, press Enter |
Fastest route, no menus |
| You prefer the mouse | Type dxdiag in the Search box on the taskbar, then select dxdiag in the results | Microsoft's own documented route on Windows 11 and 10 |
| Search is slow or broken | Right-click Start, select Run, enter dxdiag.exe, select OK |
Skips Windows Search entirely |
| A Command Prompt, PowerShell or Terminal window is already open | Type dxdiag and press Enter |
No need to leave the console |
| A support agent is guiding you remotely | Use the Run dialog route | Same keystrokes on every Windows 10 and 11 PC |
Using dxdiag from the Command Line
Microsoft's own troubleshooting articles launch the tool by running dxdiag at a command prompt. It works the same in Command Prompt, PowerShell and Windows Terminal.
dxdiagStarts the DirectX Diagnostic Tool (dxdiag.exe), which ships with Windows. No administrator window is needed for Microsoft's documented steps.
You should see: The DirectX Diagnostic Tool window opens, with the System tab showing DirectX Version under System Information.
To keep the results as a file, use Save All Information in the window, covered below. That is the format Microsoft and Intel support ask for.
What dxdiag Is and When to Use It
dxdiag collects information about your devices so you can troubleshoot DirectX sound and video problems. It reads and reports; it does not change drivers or settings. What dxdiag does, in practice, is answer one question per tab.
| When you need to know | Where dxdiag shows it | Typical reason |
|---|---|---|
| Which DirectX version Windows reports | System tab, System Information section, DirectX Version | A game lists a DirectX requirement |
| Which graphics driver is really in use | Display tab, Device section, Name | Low resolution, stutter, or a game refusing to start |
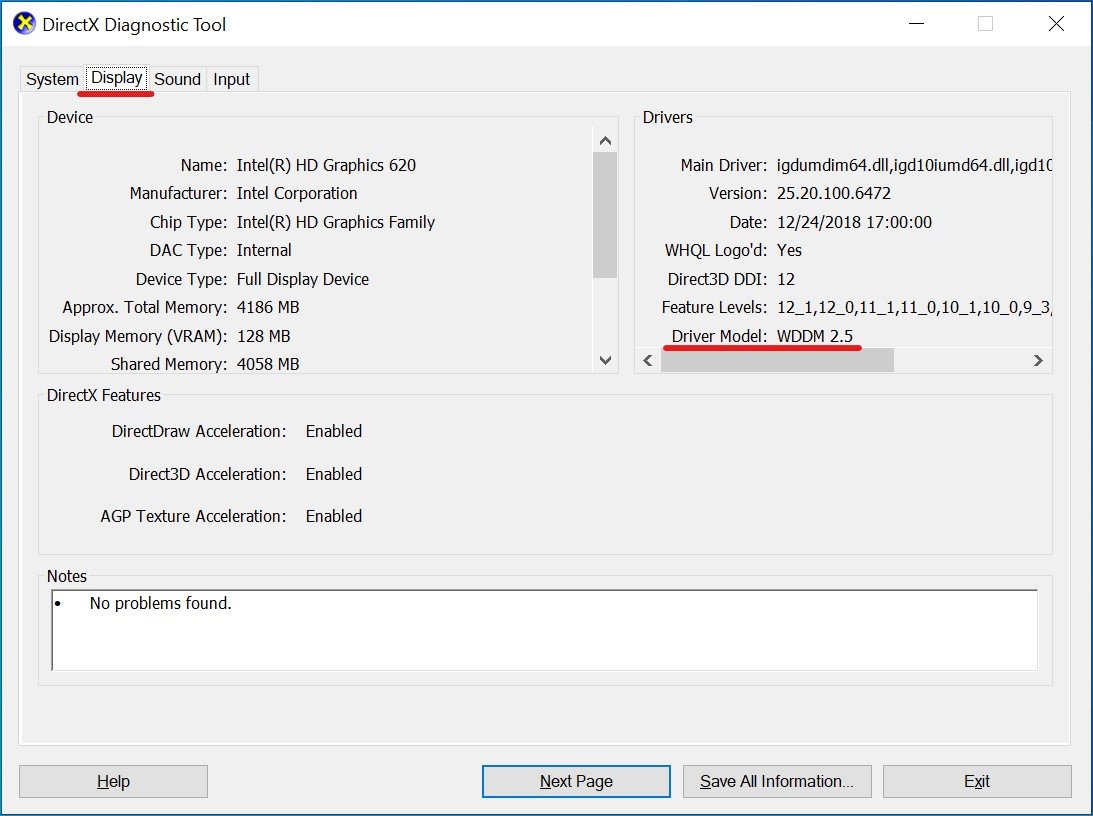
| Which display driver model is installed | Display tab, Drivers section, Driver Model | Software needs a WDDM 2.x driver; Windows 11 requires a WDDM 2.0 driver |
| How much video memory the GPU reports | Display tab | Checking a game's graphics memory requirement |
| Which audio device and driver DirectX sees | Sound tab | No sound or crackling in games and videos |
| Which input devices Windows detects | Input tab | A controller or joystick is not recognized |
| Everything above in one file | Save All Information | Intel, Microsoft or a game's support team asked for a report |
How to Read the System, Display, Sound, and Input Tabs
Select each tab along the top of the window in turn. Match the field you are looking at to its row and act on the last column.
| Tab | Field to read | What it means | Act when |
|---|---|---|---|
| System | DirectX Version under System Information | The DirectX runtime Windows reports. On Windows 10 and 11 it arrives through Windows Update | It is lower than a game's stated requirement |
| Display | Name in the Device section | The adapter driver in use. Microsoft Basic Display Adapter means a generic driver, not your GPU maker's | It shows Microsoft Basic Display Adapter, or the wrong GPU |
| Display | Driver Model in the Drivers section | The WDDM version of your display driver | It shows WDDM 1.x, or lower than your software requires |
| Display | Video memory figures | Graphics memory the adapter reports to DirectX | A game lists a graphics memory requirement |
| Sound | The listed audio device and its driver | The playback device DirectX uses for game and video sound | The wrong device appears, or games have no sound |
| Input | The list of detected devices | The keyboards, mice and controllers DirectX can see | Your controller is missing from the list |
Understanding the System tab first saves time: if the DirectX version is already current, the problem is almost always a driver on the Display or Sound tab.
How to Save a dxdiag Report
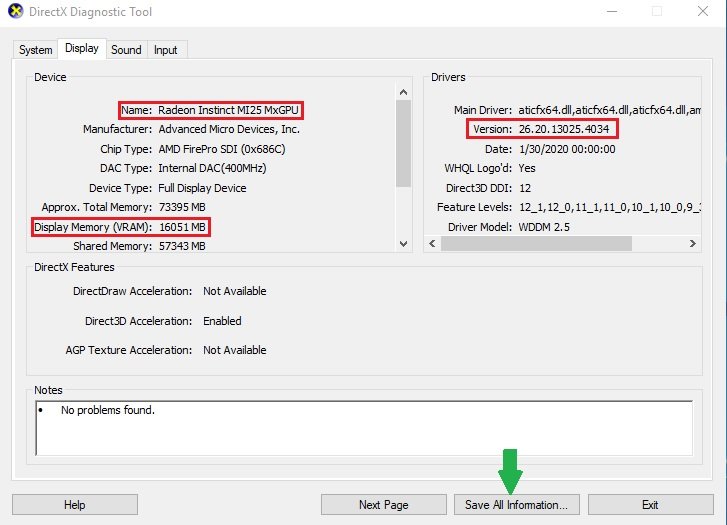
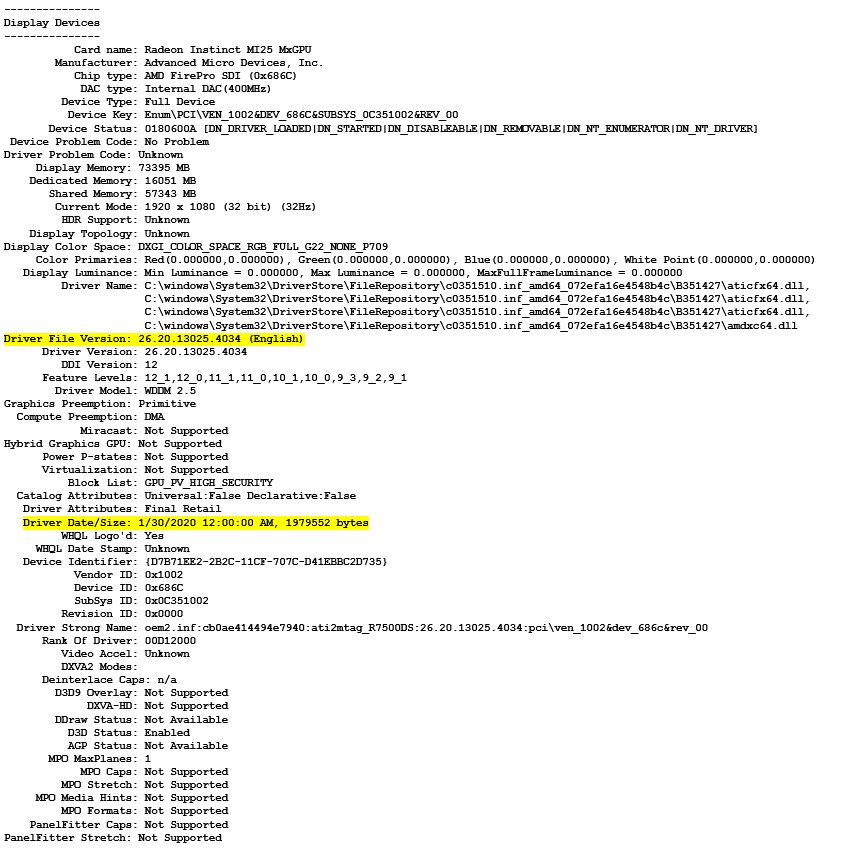
Microsoft and Intel support ask for this file because it holds every tab in one place.
- Open dxdiag with Win + R, type
dxdiag, then press Enter. - Select Yes if you are asked to check whether your drivers are digitally signed.
- Wait until the tool finishes loading, then select Save All Information… at the bottom of the window.
- In the Save As window, choose Desktop or another folder you can find easily.
- Keep the file type as a text file (.txt) and select Save.
- Attach that .txt file to your support request.
The report describes your PC's hardware and Windows setup. Send it to the support team that asked for it, and do not post it on a public page.
How to check that dxdiag now shows a healthy result
Run this check after you install a driver or Windows update in response to a dxdiag finding. Close and reopen the tool first, because it only reads devices when it starts.
- Restart the PC, then press Win + R, type
dxdiagand press Enter. - On the System tab, confirm DirectX Version meets the game's requirement.
- On the Display tab, confirm Name shows your GPU maker's adapter, not Microsoft Basic Display Adapter.
- On the same tab, confirm Driver Model shows WDDM 2.x or later.
- On the Sound and Input tabs, confirm the device you were fixing is now listed.
- Select Save All Information… again if support needs an updated report.
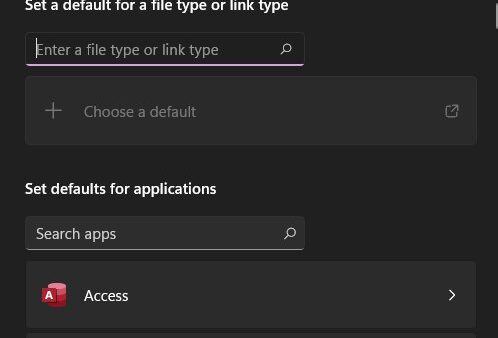
If the saved .txt file opens in the wrong app, reset the Open With settings so text files open in Notepad again.
Fix DirectX Problems Using dxdiag Results
Each group below starts with a common dxdiag finding and what it means, then the fix. These cover graphics, audio and driver issues, which are what dxdiag reports on.
Display tab Name shows "Microsoft Basic Display Adapter"
Windows is using its generic built-in driver because your GPU maker's driver is missing.
- Open Settings > Windows Update on Windows 11, or Settings > Update & Security > Windows Update on Windows 10.
- Select Check for updates and install everything offered, including driver updates.
- Restart the PC.
- If the name still has not changed, download the driver from your graphics card maker's own website and install it.
- Reopen dxdiag and check the Name field again.
DirectX Version on the System tab is lower than a game requires
DirectX on Windows 10 and 11 is part of Windows and only updates through Windows Update.
- Install all pending Windows updates and restart.
- Follow the guide to updating DirectX in Windows 10/11 for older-game runtimes and DirectX 12 checks.
- Reopen dxdiag and read DirectX Version on the System tab again.
Driver Model on the Display tab shows WDDM 1.x
An old or generic display driver is installed, and software that needs WDDM 2.x will not use the GPU fully.
- Install pending Windows updates and restart.
- Install the current driver for your GPU from its maker's website.
- Restart, then check Driver Model on the Display tab again.
dxdiag shows only Intel graphics or the wrong graphics card
The dedicated GPU's driver is missing, or Windows assigns the game to the integrated GPU.
- Right-click Start and select Device Manager.
- Expand Display adapters and check that both GPUs are listed.
- Install the dedicated GPU's driver from its maker's website if it is missing or shows a warning.
- Open Settings > System > Display > Graphics and set the game to High performance. The Display settings guide lists quick ways to reach that page.
- Restart the game and check whether it now uses the dedicated card.
Sound tab lists the wrong device, or games and videos have no sound
The wrong output device is the default, or the audio driver needs updating.
- Open Settings > System > Sound and choose your speakers or headphones under Output.
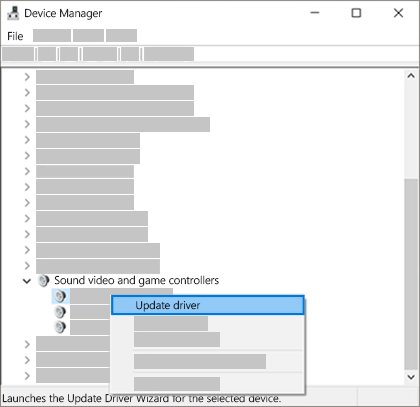
- Right-click Start, select Device Manager, and expand Sound, video and game controllers.
- Right-click your audio device, select Update driver, then Search automatically for drivers.
- Run the audio troubleshooter in Get Help if sound is still missing.
- Reopen dxdiag and check the Sound tab.
Common dxdiag Questions and Fixes
These problems are with dxdiag itself rather than with the devices it reports on.
dxdiag takes a long time to open
The tool queries every display, sound and input device before it shows results.
- Wait for the tool to finish loading before selecting any tab or button.
- Close other programs that are using the GPU, such as games or video editors, and reopen dxdiag.
- Restart the PC if the window stays blank, then run
dxdiagfrom the Run dialog.
dxdiag does not appear in Windows Search
Windows Search is not returning results, not a missing tool. dxdiag is part of Windows.
- Right-click Start and select Run.
- Enter
dxdiag.exeand select OK. - If that also fails, open Command Prompt and type
dxdiag.
dxdiag reports no problems, but a game still crashes
dxdiag checks DirectX devices and drivers. It does not test the game's own files, settings or mods.
- Confirm the DirectX Version and Display driver meet the game's published requirements.
- Install all Windows updates and your GPU maker's latest driver.
- Use the game launcher's repair or verify option to fix damaged game files.
- Select Save All Information… and send the report to the game's support team.
A website offers a dxdiag download
dxdiag is already installed with Windows 10 and Windows 11, so a separate download is never needed.
- Close the download page without running anything from it.
- Press Win + R, type
dxdiagand press Enter to use the built-in copy. - Get DirectX changes from Windows Update, not from third-party sites.
What dxdiag Cannot Fix
Treat dxdiag as a diagnostic report, not a repair tool: it shows which driver, DirectX version or device is wrong, and the fix always happens elsewhere. dxdiag only reads and displays information. Drivers come from Windows Update or the hardware maker, DirectX comes from Windows Update, and game faults need the game's own repair option or support team.
Quick troubleshooting checklist: run dxdiag, read DirectX Version, check the Display Name and Driver Model, check the Sound and Input devices, fix what is wrong, then run dxdiag again to confirm.
Frequently Asked Questions
How do I open dxdiag?
Press Win + R, type dxdiag and press Enter. You can also type dxdiag in the taskbar Search box and select it from the results. Select Yes if Windows asks to check whether your drivers are digitally signed.
How do I run dxdiag in Windows 10?
In Windows 10, type dxdiag in the Search box on the taskbar and select dxdiag, or press Win + R, type dxdiag and press Enter. In the DirectX Diagnostic Tool, select the System tab to see DirectX Version under System Information.
How do I run dxdiag on Windows 11?
On Windows 11, press Win + R, type dxdiag and press Enter, or right-click Start, choose Run and enter dxdiag.exe. The tool is built into Windows 11 and needs no download or extra setup.
How do I get a dxdiag file?
Open dxdiag, wait for it to finish loading, and select Save All Information. In the Save As window, choose Desktop, keep the text file type and select Save. The result is a .txt file you can attach to a support request.
How do I use dxdiag?
Open it, then read one tab at a time. The System tab shows the DirectX version, the Display tab shows the graphics driver name and driver model, and the Sound and Input tabs show audio and input devices. Save All Information exports everything to a text file.
What is the dxdiag run command?
The command is dxdiag. Type it in the Run dialog (Win + R), in Command Prompt, or in PowerShell and press Enter. Windows opens the DirectX Diagnostic Tool, and the command works the same on Windows 10 and Windows 11.
Do I need to run dxdiag as administrator?
No. Microsoft's steps open dxdiag from the Run dialog or Search with no administrator step. Run it normally, answer Yes to the driver signature check on first use, and save the report the same way.
Do I need to download dxdiag for Windows 10?
No. dxdiag ships with Windows 10 and Windows 11, so a download is never needed. Avoid sites offering a dxdiag download, and open the built-in copy by pressing Win + R, typing dxdiag and pressing Enter.

![5 Methods to Open Old Sound Settings in Windows 11 [2024]](https://techdows.com/wp-content/uploads/2026/09/Sound-dialog-with-the-Playback-tab-open-and-Properties-button-highlighted-500x338.jpg)