To use breakout rooms in Zoom, turn on Breakout room – Meetings in the Zoom web portal, click Breakout Rooms in the meeting controls, choose how many rooms and how to assign people, click Create, then click Open All Rooms.
This guide covers every step on the host side, the options worth setting first, pre-assigning rooms when you schedule, what participants see, and fixes for the problems hosts hit most often.
The fastest way to start breakout rooms in a Zoom meeting
These steps work in the Zoom desktop app for Windows, macOS and Linux, and in the Zoom web client, once breakout rooms are turned on for your account.
- Start an instant or scheduled meeting as the host.
- Click Breakout Rooms in the meeting controls.
- Select the number of rooms you want to create.
- Choose Assign automatically to let Zoom split participants evenly.
- Click Create. The rooms are created but do not start yet.
- Click Open All Rooms to move everyone into their rooms.
If the Breakout Rooms button is missing, the feature is switched off. Turn it on with the steps in the enable section below.
What Are Zoom Breakout Rooms?
Breakout rooms split one Zoom meeting into smaller sessions. Each room is isolated from the main session for audio and video, and the host can move between rooms at any time.
| Fact | Detail |
|---|---|
| Maximum rooms | Up to 100 breakout rooms per meeting |
| Pre-assigned participants | Up to 1,000; the top capacities need the Large Meeting add-on, otherwise your meeting capacity is the limit |
| Who can create and manage them | The host and co-hosts, from the desktop app or web client |
| Who can join them | Desktop, mobile and web app users, phone dial-in, H.323/SIP devices and Zoom Rooms |
| Features inside a room | The same audio, video and screen share abilities allowed in the main session |
| Webinars | Webinars can use breakout rooms too, with a separate webinar setting |
Before You Start: Breakout Room Requirements
Check these before the meeting, because a missing requirement usually shows up as a missing button or a room that will not fill.
| Requirement | What Zoom needs |
|---|---|
| Setting | Breakout room – Meetings turned on in the web portal |
| Host app | Zoom desktop app for Windows, macOS or Linux, or the Zoom web client, at Zoom's global minimum version or higher |
| Mobile hosts | The Android and iOS apps can join breakout rooms but cannot create or manage them |
| Pre-assigning | The pre-assign option turned on, and end-to-end encryption turned off for that meeting |
| Saving assignments | A recurring meeting with a fixed recurrence pattern; no-fixed-time meetings are not supported |
| Broadcasting your voice | Zoom desktop or mobile app version 5.12.0 or higher for host, co-hosts and participants |
| Changing rooms after they open | Enabled for your account by Zoom, then turned on in your breakout room settings |
If your app is below the minimum version, follow how to update Zoom on a Windows or Mac computer before the meeting starts.
How to Enable Breakout Rooms in Zoom
Breakout rooms are switched on from the Zoom web portal, not from inside the meeting app. Do this once and it applies to every meeting you host.
- Sign in to the Zoom web portal.
- In the navigation menu, click Settings.
- Click the Meeting tab.
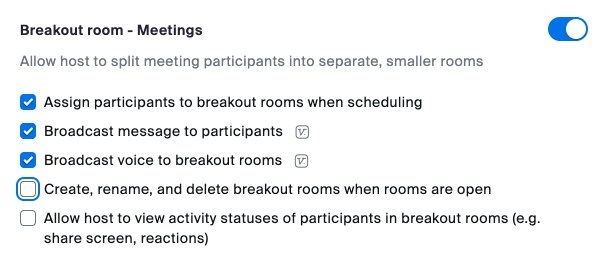
- Under In Meeting (Advanced), click the Breakout room – Meetings toggle to turn it on.
- If a verification dialog appears, click Enable.
- Select the sub-options you want, such as Assign participants to breakout rooms when scheduling and Broadcast message to participants, then click Save.
On a work or school account, a grayed-out toggle means the setting is locked at the group or account level. Ask your Zoom admin, who can turn it on under Account Management > Account Settings or User Management > Groups, on the same Meeting tab.
How to Create Breakout Rooms During a Zoom Meeting
- Start an instant or scheduled meeting.
- Click Breakout Rooms in the meeting controls.
- Select the number of rooms you want to create.
- Pick an assignment method: Assign automatically, Assign manually, Let participants choose room or Load pre-assigned rooms.
- If you picked automatic assignment and want co-hosts placed too, check Include co-host(s) to breakout rooms. It is off by default.
- Click Create.
Zoom creates the rooms but does not open them. That gap is where you assign people, rename rooms and set options before anyone moves.
How to Assign Participants to Breakout Rooms
The assignment method is the one real choice in this process. Match your situation to a row, then use the steps under the table for manual assignment.
| Your situation | Choose this | What happens |
|---|---|---|
| Groups do not matter, you want speed | Assign automatically | Zoom splits participants evenly across the rooms |
| You need specific people together | Assign manually | You pick who goes in each room with the Assign button |
| Participants should pick a topic room | Let participants choose room | Desktop and mobile app users choose and switch rooms themselves |
| You planned groups when scheduling | Load pre-assigned rooms | Zoom loads your pre-assignments or a saved set of assignments |
To assign manually, click Assign next to a room and select the participants for it. Repeat for each room. Once a room has people, the count replaces the Assign button.
Anyone left unassigned stays in the main meeting when the rooms open. If a host and a co-host both assign people, only the first set submitted with Open All Rooms is kept.
How to Rename, Add, Delete, and Recreate Rooms
Hover over a room or a participant in the Breakout Rooms window to see these controls. They all work before the rooms open.
| To do this | Click | Notes |
|---|---|---|
| Rename a room | Rename, type the name, then Yes | Useful for topic-based rooms that participants choose themselves |
| Add a room | Add a Room | Adds one more empty breakout room |
| Delete a room | Delete Room | After opening, only a room with no one in it can be deleted |
| Move one person | Move to, then pick a room | Works on a single participant |
| Swap two people | Exchange, then pick a participant in another room | Both participants trade rooms |
| Start the layout over | Recreate > Recreate all Rooms | Deletes the current rooms so you can create new ones |
| Go back to your pre-assigned layout | Recreate > Recover to pre-assigned rooms | Only available when the meeting uses pre-assigned rooms |
Renaming, adding or deleting rooms after they open requires Create, rename, and delete breakout rooms when rooms are open in your web portal settings.
Important Breakout Room Options to Set Before Opening Rooms
After creating the rooms, click Options on Windows or the gear icon on macOS. Check the options you want before you click Open All Rooms.
| Option | What it does when checked |
|---|---|
| Allow participants to choose room | Participants can pick and enter rooms on their own once the rooms open |
| Allow participants to return to the main session at any time | Participants can go back to the main session from their meeting controls; unchecked, they wait for you to close the rooms |
| Automatically move all assigned participants into breakout rooms | Moves everyone straight in; unchecked, each person must click Join |
| Automatically move all selected participants in breakout rooms to main meeting | Returns people as soon as rooms close, skipping the 60-second wrap-up |
| Auto close breakout rooms after () minutes | Ends every room after the time you set |
| Notify me when the time is up | Alerts the host and co-hosts when the time runs out |
| Set Countdown timer | Shows participants how long they have before returning to the main room |
To apply these to every meeting, check Set default breakout room behaviors in the web portal and click Edit Options. That setting needs Zoom version 6.0.10 or later.
How to Open Breakout Rooms
- Create the rooms and assign participants.
- Check your settings under Options (Windows) or the gear icon (macOS).
- Click Open All Rooms.
- Assigned participants get a prompt and move to their room once they confirm it.
- Stay in the main meeting, or click Join next to a room to enter it.
The host, or the co-host who launched the rooms, stays in the main meeting until joining a room manually.
How to Manage Breakout Rooms While They Are Open
Once rooms are open, the Breakout Rooms window splits into two tabs: one for rooms and their members, one for all participants. A search box appears when there are 7 or more participants.
- Click Breakout Rooms in the meeting controls to open the window.
- Look for (not joined) next to names to spot people who have not entered their room yet.
- Assign latecomers listed under Unassigned by hovering over them and clicking Assign To.
- Move someone to a different room by hovering over the name and clicking Move To.
- Click Join next to a room to drop in, then Leave to go back to the main meeting.
- When a participant clicks Ask for Help, click Join Breakout Room in the prompt to go to that room.
To reuse this layout in a recurring meeting, close the rooms first, click the icon button in the Breakout Rooms window, choose Save Breakout Rooms, name the set and click Save. Each user can keep up to 10 saved sets.
How to Broadcast Messages to All Breakout Rooms
Broadcasting must be turned on first with Broadcast message to participants or Broadcast voice to breakout rooms in your web portal settings.
- In the meeting controls, click Breakout Rooms.
- Click Broadcast, then select Broadcast Message.
- Type your message and click the send icon. It appears in every room for about 10 seconds.
- To speak to every room instead, click Broadcast, select Broadcast Voice, then click the broadcast voice icon.
- Click the stop icon to end the voice broadcast.
Keep text broadcasts short, since the message disappears after roughly 10 seconds. Voice broadcast needs version 5.12.0 or higher for everyone.
How to Close Breakout Rooms
- Click Breakout Rooms in the meeting controls.
- Click Close All Rooms.
- A 60-second countdown appears for the host, co-hosts and participants.
- Participants choose to return to the main room at once, or they are moved when the countdown ends.
To skip the countdown, check Automatically move all selected participants in breakout rooms to main meeting in Options. To close rooms on a timer, use Auto close breakout rooms after () minutes.
How to Pre-Assign Breakout Rooms Before a Meeting
Pre-assigning works only when Assign participants to breakout rooms when scheduling is checked in your settings and end-to-end encryption is off for the meeting.
- Sign in to the Zoom web portal and click Meetings.
- Click Schedule a Meeting.
- In the Options section, select the Breakout Room pre-assign checkbox, then click Create Rooms.
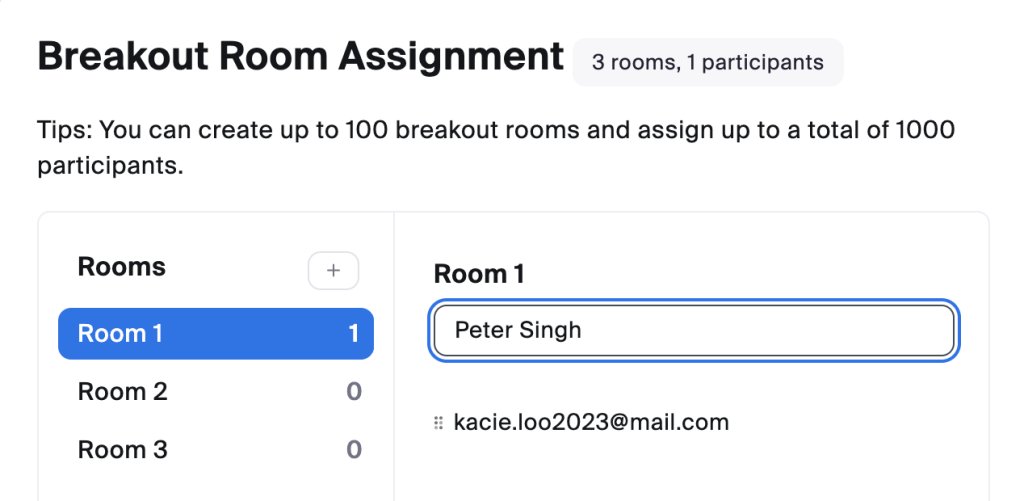
- In the Breakout Room Assignment window, click the plus button next to Rooms to add rooms.
- Hover over a room name and click the pencil button to rename it.
- In the Add participants box, search by name or email, or type an external user's email, and press Enter.
- Click Save, then finish scheduling the meeting.
- In the meeting, click Breakout Rooms, then Open All Rooms.
For large groups or people outside your account, click Import from CSV instead and fill in the Pre-assign Room Name and Email Address columns. Each meeting holds one set of pre-assignments, and a recurring series uses the same set for every occurrence.
To change them later, open the meeting under Meetings, click View detail in the Breakout Room section, edit and click Save.
How Co-Hosts Can Help with Breakout Rooms
Co-hosts can run almost every breakout room task, which lets one person teach while another handles the rooms.
| Task | Host | Co-host |
|---|---|---|
| Assign, start and end breakout rooms | Yes | Yes |
| Move between breakout rooms | Yes | Yes |
| Broadcast a message to all rooms | Yes | Yes |
| Receive Ask for Help requests | Yes | No |
| View participants' activity statuses | Yes | Yes |
Agree beforehand who assigns people. If both do it, Zoom keeps only the first set of assignments submitted when Open All Rooms is clicked.
What Participants See in Breakout Rooms
Participants get an invitation when the host opens the rooms. Inside a room they have full meeting controls, with audio and video separate from the main session.
- Click Join on the invitation, or click Later and use Breakout Rooms in the meeting controls, then Join Breakout Room.
- If the host allows self-selection, click Breakout Rooms, hover over the number next to a room, click Join and confirm with Join.
- Click Ask for Help, then Invite Host, to bring the host into your room.
- Click Leave Breakout Room and choose whether to leave the room or the entire meeting.
- When the host closes the rooms, choose to return to the main room now or after 60 seconds.
If activity statuses are on, participants see a notice before joining that the host can view their audio, video and sharing status. Choosing Leave room there removes them from the breakout room.
Screen Sharing, Chat, Whiteboards, and Recording in Breakout Rooms
Breakout rooms carry over the sharing rules of the main session, but recording works differently and catches many hosts out.
| Feature | How it works in breakout rooms |
|---|---|
| Screen sharing by participants | Allowed as in the main session |
| Host sharing to every room | Click Share Screen, enable Share to breakout rooms, choose the content and click Share; add Share Sound for audio |
| Existing shares in rooms | Interrupted by the host's share; annotation or whiteboarding in the room is saved first |
| Messages from the host | Sent with Broadcast Message and shown in every room for about 10 seconds |
| Captions | Automated and translated captions are available to support discussion |
| Cloud recording | Records the main meeting only, never any breakout room, wherever the host is |
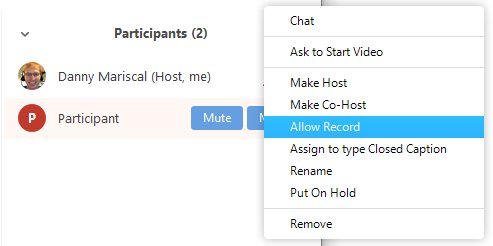
| Local recording | Works per room, only for participants the host allows to record locally before rooms open |
A participant with permission clicks Record in the meeting controls to start a computer recording of their own room. Several participants can have permission at once.
Best Practices for Running Effective Breakout Rooms
Each practice below prevents a specific failure described in Zoom's own documentation.
| Practice | Why it matters |
|---|---|
| Set options before clicking Open All Rooms | Timers, return rules and auto-move apply when the rooms launch |
| Turn on Auto close breakout rooms after () minutes with Set Countdown timer | Participants see how long they have and groups end together |
| Grant local recording before rooms open | Cloud recording will not capture any breakout room |
| Ask pre-assigned people to sign in before joining | Pre-assignment only applies to the Zoom account matching the email used |
| Name rooms by topic when participants choose | Self-selecting participants see the room names in their list |
| Make one person responsible for assignments | Only the first submitted set of host or co-host assignments is kept |
| Save layouts in recurring classes | Reloading a saved set skips manual assignment each session |
How to check breakout rooms are working
- Click Breakout Rooms and open the rooms tab.
- Confirm each room lists its participants and nobody shows (not joined).
- Check the Unassigned category is empty, or holds only people meant to stay in the main session.
- If activity statuses are on, confirm the audio, video and sharing icons show people are active.
- Click Join on one room to confirm participants can hear and see each other.
Troubleshooting Common Zoom Breakout Room Problems
The Breakout Rooms button does not appear
Breakout rooms are off for your account, or you joined from an app that cannot manage them.
- Sign in to the Zoom web portal and click Settings > Meeting.
- Turn on Breakout room – Meetings under In Meeting (Advanced) and click Save.
- Host from the desktop app or web client, not the mobile app.
- Rejoin the meeting so the setting applies.
The Breakout room toggle is grayed out
An admin locked the setting at the group or account level.
- Contact your Zoom admin.
- Ask them to turn on Breakout room – Meetings under Account Management > Account Settings or for your group.
A participant did not land in their pre-assigned room
They joined signed out, signed in to another account, or joined after the rooms started.
- Ask the participant to sign in with the email you pre-assigned.
- Click Close All Rooms.
- Click Recreate, then Recover to pre-assigned rooms.
- Click Open All Rooms again.
Participants cannot choose their own room
Self-selection is off, or they joined from the web app or by phone.
- Check Allow participants to choose room under Options.
- Move web and phone participants yourself with Move To or Assign To.
You cannot rename, add or delete rooms after opening them
Adjusting open rooms is not enabled, or the room still has people in it.
- In web portal settings, check Create, rename, and delete breakout rooms when rooms are open and click Save.
- To delete an open room, move its participants out first.
The recording has no breakout room content
Cloud recording captures the main session only.
- Before opening rooms, allow a participant in each room to record locally.
- Ask them to click Record once they are inside the room.
Quick Checklist for Using Breakout Rooms in Zoom
| When | Check |
|---|---|
| Before the meeting | Breakout room – Meetings is on, with broadcast and pre-assign options checked if needed |
| Before the meeting | Your Zoom desktop app meets the global minimum version |
| Before the meeting | Rooms are pre-assigned if you already know the groups |
| In the meeting | Click Breakout Rooms, pick the room count and assignment method, click Create |
| Before opening | Set Options: timer, countdown, return rule, auto-move |
| While open | Watch for (not joined) and Unassigned, answer Ask for Help, use Broadcast |
| At the end | Click Close All Rooms and save the layout if the meeting recurs |
Frequently Asked Questions
What are breakout rooms in Zoom?
Breakout rooms are separate sessions split off from a Zoom meeting, up to 100 per meeting. Participants meet in smaller groups with audio and video isolated from the main session, and the host or co-host can move between rooms at any time.
How do you use breakout rooms in Zoom as a host?
Click Breakout Rooms in the meeting controls, choose the number of rooms and an assignment method, and click Create. Set any timers under Options, then click Open All Rooms. Click Close All Rooms to bring everyone back.
How do you set up breakout rooms before a Zoom meeting?
Schedule the meeting in the Zoom web portal, select the Breakout Room pre-assign checkbox in Options, and click Create Rooms or Import from CSV. Add rooms and participants, then click Save. In the meeting, click Breakout Rooms and Open All Rooms.
How do you join a breakout room in Zoom?
Click Join when the host's invitation appears. If you chose Later, click Breakout Rooms in your meeting controls and then Join Breakout Room. When the host lets participants choose, pick a room from the list and click Join.
How do you open breakout rooms once they are created?
Click Open All Rooms in the Breakout Rooms window. Assigned participants are moved after they confirm the prompt, unless you checked the option to move them automatically. The host stays in the main meeting until joining a room.
Can you make breakout rooms from the Zoom mobile app?
No. The Android and iOS apps can join and take part in breakout rooms, but only the desktop app for Windows, macOS or Linux and the web client can create and manage them.
How many breakout rooms can you create in Zoom?
You can create up to 100 breakout rooms and pre-assign up to 1,000 participants. Those maximums need the Large Meeting add-on; without it, your meeting capacity sets the participant limit.
Can you use breakout rooms in Zoom webinars?
Yes. Webinars support breakout rooms, but they use a separate webinar breakout room setting rather than the Breakout room – Meetings toggle, so turn that one on for webinars.